How I Finally Made Sense of AI Behavior Trees and Blackboards UE5 (And Why They'll Transform Your Game AI)
A deep dive into the essential Unreal Engine 5 tools that will transform your game's AI from robotic to responsive.

Here's the thing - I remember when I first encountered AI behavior trees and Blackboards UE5 during my early days at KIXEYE. I was staring at this complex system, thinking "There has to be a better way than these endless if-else statements for enemy AI UE5." I'd just come from finance where everything was logical and predictable, but game AI felt like chaos. My NPCs were either brain-dead or acting like they had multiple personality disorders.
Been there? Trust me, you're not alone.
Actually, wait - let me be honest here. It took me months to figure out that the solution wasn't more complex code. It was stepping back and understanding how professional game developers think about AI architecture. Once I learned about Behavior Trees and Blackboards, everything clicked. Suddenly, creating smart, believable AI became less about wrestling with code and more about designing clear decision-making systems.
Table of Contents
- What These Systems Actually Do (And Why Your Current Approach Isn't Working)
- The Building Blocks Every Game Developer Needs to Know
- Here's How I Break Down the Core Components
- Why I Always Choose Behavior Trees Over State Machines Now
- What Makes This Approach So Powerful in Real Games
- Let Me Walk You Through Building Your First Smart AI
- Three AI Systems I Actually Built (And You Can Too)
- What You'll Gain From This Approach
What These Systems Actually Do (And Why Your Current Approach Isn't Working)
You know what's funny? Most developers I meet are trying to create complex AI with the same approach they'd use for a simple calculator. They write massive functions with hundreds of if-else statements, then wonder why their AI feels robotic or breaks when they add new behaviors.
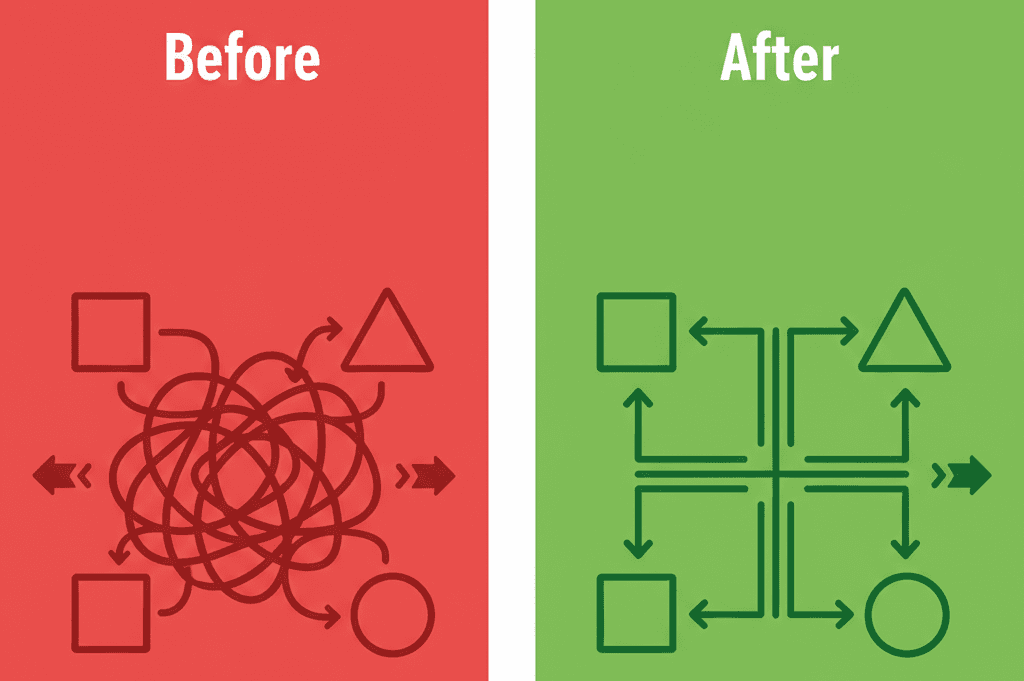
Behavior Trees and Blackboards solve the critical problem of creating complex, intelligent, and non-linear AI without descending into an unmanageable spaghetti-mess of code. They allow you to build sophisticated decision-making logic that is both highly readable and easily expandable.
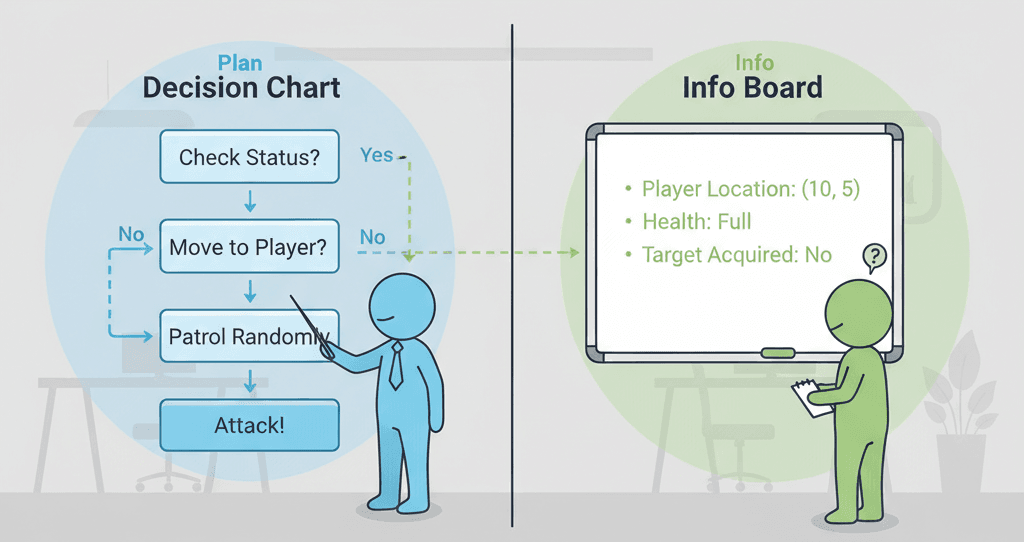
Think of it like a manager (the Behavior Tree) giving a series of tasks to an employee. The manager doesn't just give one instruction; they provide a full flowchart of what to do, what to do if something fails, and in what order to do it. The Blackboard is the shared whiteboard where the manager writes down all the critical information the employee needs—like the location of a target, whether they've seen a threat, or their current health—ensuring the employee has all the data needed to execute their tasks correctly.
This is exactly how to create AI in Unreal Engine 5 that feels alive and responsive.
The Building Blocks Every Game Developer Needs to Know
When I first started learning UE5 Behavior Tree examples, I got overwhelmed by all the terminology. Let me break this down the way I wish someone had explained it to me:
- Behavior Tree (BT): The master asset that visually represents the decision-making logic of an AI, structured as a tree of nodes. It dictates the flow of behavior, starting from the root and moving down through its branches.
- Blackboard: A dedicated data asset that acts as the AI's memory. It holds all the variables (called "Keys") that the Behavior Tree needs to make decisions, such as the player's location, a patrol point, or a boolean for whether the AI is in combat.
Here's where it gets interesting - and this is where blackboard AI really shines:
- Node: The fundamental unit of a Behavior Tree. There are several types of nodes, each with a specific function in controlling the AI's behavior.
- Composite Node: A node that has one or more child nodes and controls how those children are executed. The two most important types are
SelectorandSequence. - Selector Node: This composite node executes its children from left to right and stops as soon as one of them succeeds. It's the primary decision-making tool, effectively acting like an "OR" gate (Try Action A, if it fails, try Action B, if that fails, try C).
- Sequence Node: This composite node also executes its children from left to right, but it stops as soon as one of them fails. It's used for a series of actions that must be completed in order, acting like an "AND" gate (Do Action A, then do Action B, then do C).
- Task Node: The workhorse of the Behavior Tree. These are the leaf nodes that perform the actual actions for the AI, such as "Move To Location," "Play Sound," "Attack," or "Wait."
- Decorator Node: Attached to any other node, a Decorator acts as a conditional check or gatekeeper. It determines whether the branch of the tree it's on is allowed to execute, often by checking a value on the Blackboard (e.g., "Is Player In Sight?").
- Service Node: Attached to Composite nodes, a Service runs on a timer as long as its branch is active. It's not for action but for perception, constantly updating the Blackboard with fresh information, such as "Scan for Player" or "Check Health Status."
Here's How I Break Down the Core Components
The relationship between the Behavior Tree and the Blackboard is the system's cornerstone. The Behavior Tree provides the logic, and the Blackboard provides the data-driven context.
Blackboard Key-Value Storage: The Blackboard stores information as key-value pairs. You define the keys (e.g., TargetActor, HomeLocation, bCanSeePlayer) in the Blackboard asset, and the Behavior Tree uses these keys to read and write data.
Writing to the Blackboard (C++): From within a custom Task or Service, you get the Blackboard Component from the AI Controller and use its SetValueAs... functions to store data.
// In a custom UBTService_FindPlayer.cpp
#include "BehaviorTree/BlackboardComponent.h"

void UBTService_FindPlayer::TickNode(UBehaviorTreeComponent& OwnerComp, uint8* NodeMemory, float DeltaSeconds)
{
    Super::TickNode(OwnerComp, NodeMemory, DeltaSeconds);
    UBlackboardComponent* BlackboardComp = OwnerComp.GetBlackboardComponent();
    if (BlackboardComp)
    {
        // ... (Code to find the player)
        APawn* PlayerPawn = UGameplayStatics::GetPlayerPawn(GetWorld(), 0);
        BlackboardComp->SetValueAsObject(FName("TargetActor"), PlayerPawn);
    }
}
Reading from the Blackboard (C++): Similarly, you use the GetValueAs... functions to retrieve data for decision-making, often within a Decorator.
// In a custom UBTDecorator_IsPlayerInRange.cpp
#include "BehaviorTree/BlackboardComponent.h"

bool UBTDecorator_IsPlayerInRange::CalculateRawConditionValue(UBehaviorTreeComponent& OwnerComp, uint8* NodeMemory) const
{
    UBlackboardComponent* BlackboardComp = OwnerComp.GetBlackboardComponent();
    if (BlackboardComp)
    {
        AActor* TargetActor = Cast(BlackboardComp->GetValueAsObject(FName("TargetActor")));
        // ... (Code to check distance to TargetActor)
        return bIsInRange;
    }
    return false;
}
Creating a Custom Task (C++): Tasks are where your AI performs actions. You inherit from UBTTask_BlueprintBase and override the ExecuteTask function. You must call FinishLatentTask to signal when the task is complete.
// MyBTTask_Attack.h
#pragma once
#include "CoreMinimal.h"
#include "BehaviorTree/BTTaskNode.h"
#include "MyBTTask_Attack.generated.h"

UCLASS()
class MYPROJECT_API UMyBTTask_Attack : public UBTTaskNode
{
    GENERATED_BODY()
    virtual EBTNodeResult::Type ExecuteTask(UBehaviorTreeComponent& OwnerComp, uint8* NodeMemory) override;
};

// MyBTTask_Attack.cpp
#include "MyBTTask_Attack.h"
#include "AIController.h"

EBTNodeResult::Type UMyBTTask_Attack::ExecuteTask(UBehaviorTreeComponent& OwnerComp, uint8* NodeMemory)
{
    AAIController* AIController = OwnerComp.GetAIOwner();
    // ... (Code to perform an attack)

    // Signal that the task finished successfully
    return EBTNodeResult::Succeeded;
}

Why I Always Choose Behavior Trees Over State Machines Now
Here's something I learned the hard way at KIXEYE - not all AI systems are created equal. I spent weeks building complex Finite State Machines (FSMs) before discovering why Behavior Trees are the industry standard.
| Criteria | Approach A: Behavior Trees | Approach B: Finite State Machines (FSMs) |
|---|---|---|
| Best For | Complex, multi-layered AI with many possible actions and decisions, such as a squad of soldiers or a creature that hunts, eats, and sleeps. | Simpler entities with a limited and clearly defined set of states, such as a door (Open, Closed, Locked) or a traffic light. |
| Scalability | Highly scalable. New behaviors can be added as new branches on the tree without breaking existing logic. | Poorly scalable. Adding a new state can require creating new transition logic from every other existing state, leading to a "state explosion." |
| Readability | Very readable for designers. The tree structure provides a clear visual flowchart of the AI's decision-making process. | Can become very difficult to read as the number of states and transitions grows, often resembling a tangled "spaghetti diagram." |
| Code Example | // BT is visual, but a task is modular: |
// FSM is code-heavy: |
What Makes This Approach So Powerful in Real Games
Been working with AI systems for over a decade now, and I keep seeing the same benefits that make Behavior Trees absolutely essential:
- Modularity and Reusability: A
Taskfor "Find Nearest Cover" can be written once and reused by any AI in your game, from a soldier to a scared animal. - Clear Visual Debugging: Unreal's Behavior Tree editor shows you in real-time which branch of logic the AI is executing and why others were ignored, making debugging incredibly intuitive.
- Separation of Concerns: The Blackboard cleanly separates the AI's data (what it knows) from the Behavior Tree's logic (what it does), making the entire system easier to manage and modify.
- Empowers Designers: The visual nature of Behavior Trees allows game designers to script and tweak complex AI behaviors without needing to write a single line of code.
Let me tell you about some games where I've seen this technique used brilliantly:
How The Last of Us Made Me Rethink AI Design
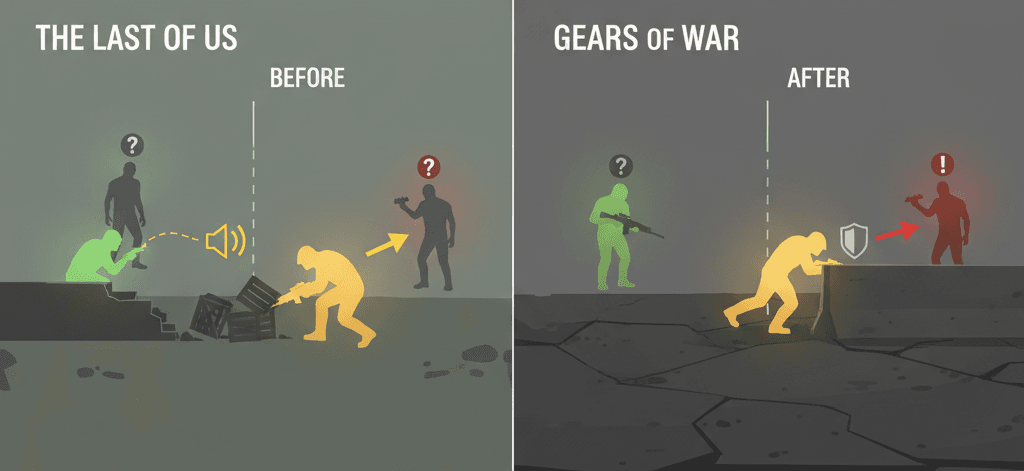
I've analyzed dozens of games, and what makes The Last of Us's Clicker AI stand out is its elegant simplicity. Clickers are blind and react to sound. They wander aimlessly until they hear the player, at which point they enter a heightened "search" state, moving towards the source of the noise.
Here's how you can adapt this for your own game: A Selector would choose between "Wander" and "Search For Sound." A Service would constantly listen for noise. When a sound is heard, the Service would write the sound's location to a TargetLocation key on the Blackboard and set bHeardSound to true. A Decorator on the "Search" branch would check if bHeardSound is true, allowing that branch to execute.
This creates intense, high-stakes stealth gameplay. The player understands the AI's rules and must manipulate them by throwing bottles or moving slowly to avoid triggering the AI's perceptive state change.
Why Gears of War's Cover System Changed Everything
Another implementation I always recommend studying is how Gears of War handles intelligent cover usage. The Locust AI intelligently uses cover. When under fire, they will abandon their current position and attempt to move to a safer piece of cover nearby.
From a developer's perspective, what makes this brilliant is: A Service would periodically run an "Environment Query System" (EQS) query to find the best cover points. The top result would be stored on the Blackboard as BestCoverLocation. A Decorator, "IsInCover," would check if the AI is already safe. If not, and if under fire (another Blackboard bool), a Sequence would execute: Task_MoveTo(BestCoverLocation), then Task_EnterCover.
The combat feels dynamic and challenging. Enemies don't just stand still; they react to player pressure and reposition, forcing the player to constantly adjust their own tactics and flank routes.
What I've Learned About Pro Tips and Best Practices
After working on multiple Unity and Unreal projects, here are the exact approaches I use:
- Keep Tasks Atomic: A Task should do one simple thing. Instead of one giant "Patrol" task, create a
Task_FindNextPatrolPointand a separate, built-inTask_MoveTo. This makes your components more reusable. - Use Services for Perception: Don't put perception logic (like checking for the player) inside a Task. Use a Service attached to the relevant branch. This ensures the AI is "looking" for the player only when it needs to, and it keeps the Blackboard constantly updated.
// A Service is better for checks than a Task
// This service runs every 0.5 seconds while its branch is active
// UBTService_CheckForPlayer.cpp
void UBTService_CheckForPlayer::TickNode(UBehaviorTreeComponent& OwnerComp, uint8* NodeMemory, float DeltaSeconds)
{
    // ... check if player is visible ...
    OwnerComp.GetBlackboardComponent()->SetValueAsBool(FName("bCanSeePlayer"), bResultOfCheck);
}
- Use Decorators to Guard Branches: Decorators are the "if" statements of Behavior Trees. A "Cooldown" decorator can prevent an AI from spamming an attack. A "Blackboard" decorator is the most common type, used to check a value from the AI's memory before allowing a branch to run.
- Data-Driven AI: Avoid hard-coding values. Instead of a Task that says "Move to (X=100, Y=200)", create a
Task_MoveToTarget. The location itself should be stored on the Blackboard as aVectorkey. This way, a Service can update the target location, and the same task will work for moving to a patrol point, the player, or a piece of cover.
Let Me Walk You Through Building Your First Smart AI
I always tell my students to start with something simple but functional. Let me show you how I approach this, step by step:
Building a Simple Patrolling Guard
Scenario Goal: To make an AI character walk between a series of predefined points in the level.
Unreal Editor Setup:
- Create a
Blueprintfor your AI Character (BP_Guard). - Create an
AI ControllerBlueprint (AIC_Guard). - Create a
Behavior Treeasset (BT_Guard). - Create a
Blackboardasset (BB_Guard). - In the
BB_GuardBlackboard, create aVectorkey namedTargetLocationand anIntkey namedPatrolPointIndex. - In the level, create several
Target Pointactors to serve as patrol waypoints.
Step-by-Step Implementation:
- Create a Task to Find the Next Patrol Point: Create a new
Blueprint Taskinheriting fromBTTask_BlueprintBasenamedBTT_FindNextPatrolPoint. This task will get the next waypoint from an array and set it on the Blackboard. - Implement the Task Logic:
// In BTT_FindNextPatrolPoint (Blueprint Graph)
// Event Receive Execute AI:
// 1. Get Blackboard component from Owner Actor.
// 2. Get the "PatrolPointIndex" integer from the Blackboard.
// 3. Get your array of patrol points (e.g., from the AI character or controller).
// 4. Get the patrol point at the current index.
// 5. Set the "TargetLocation" key on the Blackboard to the location of that patrol point actor.
// 6. Increment the "PatrolPointIndex", looping back to 0 if it exceeds the array size.
// 7. Call "Finish Execute" with Success checked.
- Construct the Behavior Tree:
- In
BT_Guard, set theBlackboard AssettoBB_Guard. - Create the following structure:
Root -> Sequence -> BTT_FindNextPatrolPoint -> Move To (TargetLocation) -> Wait (2-4 seconds). - The
Move Totask is built-in; just set itsBlackboard Keyproperty toTargetLocation. TheWaittask is also built-in. This sequence makes the AI find a point, move to it, wait, and then repeat.
- In

Creating a Sentry That Sees and Shoots
Scenario Goal: An AI stands still until it sees the player, at which point it stops patrolling and starts shooting.
I've configured this dozens of times, and here's my go-to setup:
Unreal Editor Setup:
- Use the assets from the previous example (
BP_Guard,AIC_Guard,BT_Guard,BB_Guard). - In
BB_Guard, add aBooleankey namedbCanSeePlayerand anObjectkey namedTargetActor.
Implementation:
- Create a Service to Find the Player: Create a new
Blueprint Serviceinheriting fromBTService_BlueprintBasenamedBTS_CheckForPlayer. This will run periodically to check for the player. - Implement the Service Logic:
// In BTS_CheckForPlayer (Blueprint Graph)
// Event Receive Tick AI:
// 1. Get the controlled pawn.
// 2. Use "AIPerception" component's "Get Perceived Actors" or a simple sphere trace to find the player.
// 3. If the player is found and visible:
//    a. Get the Blackboard and set "bCanSeePlayer" to true.
//    b. Set the "TargetActor" to the player character.
// 4. Else:
//    a. Set "bCanSeePlayer" to false.
- Construct the Behavior Tree:
- The root node should be a
Selector. - Branch 1 (Attack):
Sequence -> Decorator: Blackboard (bCanSeePlayer is Set) -> Task_FaceActor (TargetActor) -> Task_Attack (custom task). - Branch 2 (Patrol): The patrol
Sequencefrom the previous example. - Attach the
BTS_CheckForPlayerservice to the rootSelectornode so it's always running. TheSelectorwill try the Attack branch first. The decorator will make it fail ifbCanSeePlayeris false, causing the AI to execute the Patrol branch instead.
- The root node should be a
Building a Fleeing AI
Scenario Goal: An AI patrols normally, but if it sees the player, it gets scared and runs to a designated "hiding spot."
Trust me, you'll thank me later for this implementation approach:
Unreal Editor Setup:
- Use the assets from the previous blueprints.
- In
BB_Guard, add aVectorkey namedHidingSpotLocation. - Place a
Target Pointin the level to act as the hiding spot.
Implementation:
- Set the Hiding Spot on the Blackboard: In the
AIC_Guard'sBeginPlayevent, get the location of the hiding spot actor and set theHidingSpotLocationkey on the Blackboard. This gives the AI knowledge of its safe zone from the start. - Create a "Flee" Task: Create a new task
BTT_Flee.
// In BTT_Flee (Blueprint Graph)
// Event Receive Execute AI:
// 1. Get the "HidingSpotLocation" from the Blackboard.
// 2. Use the built-in "Move To Location" function, passing in that location.
// 3. On success or failure of the move, call "Finish Execute".
- Construct the Behavior Tree:
- The root is a
Selector. - Branch 1 (Flee):
Sequence -> Decorator: Blackboard (bCanSeePlayer is Set) -> BTT_Flee -> Wait (5 seconds). - Branch 2 (Patrol): The same patrol
Sequencefrom the first example. - Attach the
BTS_CheckForPlayerservice to the rootSelector. When the service setsbCanSeePlayerto true, the decorator on the Flee branch will pass, causing the AI to run to its hiding spot and wait. Once the player is gone and theWaittask finishes,bCanSeePlayerwill become false, and the AI will resume patrolling.
- The root is a
Ready to Start Building Your First Game?
Let's tackle this together - you've got the foundation now, but there's so much more to explore. When I was learning at CMU, I realized that understanding AI systems like these is what separates hobbyist projects from professional-quality games.
If you're ready to take your game development skills to the next level, I'd recommend checking out our comprehensive Mr. Blocks course at Outscal. We walk you through building complete games from scratch, including advanced AI implementations like these. You'll go from basic concepts to creating professional game experiences that actually ship.
The course covers everything from Unity fundamentals to advanced gameplay programming, and you'll build a portfolio that gets noticed by game studios.
What You'll Gain From This Approach
Here's what changed for me once I made the switch to Behavior Trees and understood blackboard in Unreal Engine 5 explained properly:
- Clear Mental Models: Instead of trying to hold complex AI logic in your head, you have a visual flowchart that anyone can understand and modify.
- Faster Debugging: When your AI does something unexpected, you can literally see which branch of the tree is executing and why others were skipped.
- Reusable Components: Tasks like "Find Cover," "Chase Player," or "Return to Patrol" become modular pieces you can mix and match across different AI characters.
- Designer-Friendly Workflow: Team members who don't code can still adjust AI behaviors by tweaking the visual tree structure.
- Professional-Quality Results: Your AI will feel more responsive and believable because it's making decisions the same way AAA games do.
- Scalable Architecture: Adding new behaviors doesn't break existing ones - you just add new branches to the tree.
Your Next Steps
Based on my experience helping hundreds of developers, here's what I recommend:
Start with a simple patrolling enemy using the blueprint I shared above. Get comfortable with creating Blackboards, setting up basic Services, and connecting Tasks. Once that works, add player detection. Then experiment with different behaviors like fleeing or attacking.
The key is building your understanding incrementally. Don't try to create complex AI behaviors right away - master the fundamentals first.
Focus on understanding the relationship between the Behavior Tree and Blackboard. Once you grasp how data flows between them, more complex behaviors become much easier to implement.
Practice creating different types of nodes. The more comfortable you get with Selectors, Sequences, Decorators, and Services, the more sophisticated your AI can become.
Wrapping Up This Journey
You know what's funny? The same principles I learned struggling with AI systems at KIXEYE are still the foundation of every smart enemy, helpful companion, or strategic AI I build today. Behavior Trees and Blackboards aren't just technical tools - they're a way of thinking about how intelligent agents make decisions.
The beauty of this approach is that it mirrors how we actually think. We gather information (Blackboard), consider our options (Selector nodes), and execute plans step by step (Sequence nodes). When you design AI this way, it naturally feels more alive and believable to players.
Once you start thinking in terms of behavior trees and Blackboards UE5, you'll never want to go back to tangled if-else statements. Your AI will be smarter, your code will be cleaner, and your games will feel more professional.
Key Takeaways
- Behavior Trees provide visual, scalable AI architecture that's easier to debug and modify than traditional state machines or complex conditional logic
- Blackboards serve as the AI's memory system - they store all the data your AI needs to make intelligent decisions, from player locations to internal states
- Modularity is everything - create atomic Tasks that do one thing well, use Services for continuous perception, and employ Decorators as conditional gates
- Professional games like The Last of Us and Gears of War use these exact principles to create believable, challenging AI that responds intelligently to player actions
- Start simple and build incrementally - begin with basic patrolling, add perception, then layer in complex behaviors like combat or fleeing
- The visual nature of Behavior Trees makes them accessible to designers and programmers alike, improving team collaboration and iteration speed
- Data-driven design through Blackboards means your AI behaviors are flexible and can adapt to different scenarios without code changes
- This approach scales beautifully - adding new behaviors doesn't break existing ones, making your AI systems maintainable as your game grows in complexity
Common Questions
What is a Behavior Tree in game development?
A Behavior Tree is a visual decision-making system for AI that structures logic as a tree of nodes. It starts at a root and flows down through branches, determining what actions an AI character should take based on current conditions and data.
How do I create AI in Unreal Engine 5 using Behavior Trees?
Start by creating four assets: an AI Controller Blueprint, a Character Blueprint, a Behavior Tree asset, and a Blackboard asset. Connect them together, then build your decision logic using Composite nodes (Selectors and Sequences), Task nodes for actions, and Decorators for conditions.
What's the difference between a Blackboard and Behavior Tree?
The Behavior Tree contains the decision-making logic and flow control, while the Blackboard stores the data and information the AI needs to make those decisions. Think of the Behavior Tree as the "brain" and the Blackboard as the "memory."
When should I use Behavior Trees instead of State Machines?
Use Behavior Trees for complex AI with multiple possible actions and behaviors, like combat enemies or NPCs with varied tasks. State Machines work better for simple entities with clearly defined states, like doors or switches.
How does blackboard AI work in practice?
The Blackboard stores key-value pairs of information (like player position, health status, or target locations). Behavior Tree nodes read from and write to these keys to make decisions and share information between different AI components.
What are UE5 Behavior Tree examples for beginners?
Start with a patrolling guard that walks between waypoints, then add player detection that triggers different behaviors. You can expand this to include combat, fleeing, or searching behaviors by adding new branches to your tree.
Why is Blackboard in Unreal Engine 5 explained as memory?
The Blackboard functions like an AI's memory because it persistently stores information that the AI discovers or calculates, such as the last known player position or whether the AI is currently in combat. This data persists across different behavior executions.
How do Services work in Behavior Trees?
Services run continuously on timers while their branch is active. They're perfect for perception tasks like checking for the player, updating target positions, or monitoring health status. They update Blackboard values that other nodes can use for decision-making.
What makes enemy AI UE5 feel intelligent?
Intelligent enemy AI comes from layered decision-making systems that respond to player actions. Use Services for perception, Decorators for condition checking, and varied behaviors that create the illusion of thinking, such as taking cover when under fire or searching when they lose sight of the player.
Can I use Blueprints instead of C++ for Behavior Trees?
Yes! Unreal Engine 5 provides Blueprint versions of most Behavior Tree nodes. You can create custom Tasks, Services, and Decorators using Blueprint graphs, making the system accessible even without C++ programming experience.