Best Way to Implement a Character Controller in Unity
Master the art of Unity character movement with CharacterController vs Rigidbody approaches - the complete practical guide with real-world examples
Picture this: You're three weeks into your first Unity project, everything's going great, and then you try to make your character walk up a simple ramp. Suddenly, your player is either sliding backward, getting stuck on invisible walls, or—my personal favorite—launching into orbit when they touch the slightest incline.
Been there. Trust me, I've spent countless late nights at CMU debugging character controllers that seemed possessed. The thing is, Unity gives you multiple ways to handle character movement, and if you pick the wrong one for your game type, you'll fight the system every step of the way. Here's the thing about character controllers that nobody tells you upfront: the choice between Unity's built-in CharacterController component and a Rigidbody-based system isn't just technical—it fundamentally changes how your game feels to play.
When I first started building games, I thought movement was just about making a character respond to input. I was wrong. A Unity character controller is actually the bridge between what the player wants to do and what happens on screen, governed by the physics rules of your game world.
Table of Contents
- Here's the Thing About Movement That Nobody Tells You
- The Unity Character Controller Crash Course You Actually Need
- Been There: Why I Stopped Using Transform.Translate
- The Rigidbody vs CharacterController Showdown
- Actually, Wait - Let Me Show You How This Really Works
- You Know What's Funny? These Game Examples Will Change How You Think
- Here's What Took Me Months to Figure Out
- Let's Build This Thing Together: Three Unity Character Controller Blueprints
- What You'll Actually Gain From Mastering This
Here's the Thing About Movement That Nobody Tells You
At its core, a character controller is the bridge between player input and character movement on screen. The problem it solves is translating abstract commands, like pressing the 'W' key, into believable motion within the game's world, governed by its rules. It allows you to create everything from a responsive first-person hero who can climb stairs and slide down slopes, to a nimble 2D platformer character that can jump on enemies and wall-slide.
I like to think of it like this: imagine you're a puppeteer controlling a marionette. The player provides the high-level instructions, and the character controller is the set of strings and physics rules that translates those instructions into fluid, believable motion that interacts properly with the stage and props. Without a robust controller, a character would either pass through walls or be frustratingly difficult to control.
After working on multiple Unity projects at KIXEYE and building dozens of prototypes, I've learned that the foundation of any great game is movement that feels right. Whether you're building a competitive shooter or a puzzle platformer, getting character control wrong will haunt your entire development process.
The Unity Character Controller Crash Course You Actually Need
Before we dive into code, let me break down the fundamental components you'll encounter. Understanding these isn't just academic—I've debugged enough movement systems to know that confusion here leads to hours of frustration later.
Character Controller Component: This is Unity's specialized, built-in component designed to handle player movement in a way that feels intuitive and responsive, without relying on the full physics simulation. It provides a simplified, capsule-shaped collider and functions for moving the character that automatically handle interactions like sliding along walls and walking up steps.
Rigidbody Component: This component enables a GameObject to be controlled by Unity's physics engine, allowing it to be affected by forces like gravity, friction, and collisions in a realistic manner. It is the foundation for creating movement that needs to interact dynamically with other physics-based objects in the world.
Here's where it gets interesting—and where I made my biggest early mistakes:
Rigidbody (Dynamic): This is the default Rigidbody type that reacts to forces and collisions in a physically realistic way, making it ideal for objects that need to be pushed, thrown, or otherwise influenced by the physics simulation.
Rigidbody (Kinematic): A Kinematic Rigidbody is not driven by the physics engine and can only be moved explicitly through code by setting its position or velocity. It still registers collisions with other objects, making it a powerful tool for creating custom, physics-aware character controllers where you need precise control.
Collider: An invisible shape (like a Box, Sphere, or Capsule) that defines the physical boundaries of a GameObject for the purpose of detecting collisions. All character controllers, regardless of the method, rely on a collider to interact with the game world.
The key insight I wish someone had shared with me earlier: each of these approaches creates a fundamentally different relationship between your character and the game world.
Been There: Why I Stopped Using Transform.Translate
Let me show you the core functions that actually matter for character movement. Each one serves a distinct purpose in translating input into motion, and understanding when to use which has saved me countless debugging sessions.
CharacterController.Move(): This function is the primary way to move a GameObject that has a Character Controller component attached. It takes a Vector3 representing the desired motion for a single frame and automatically handles collisions, sliding, and step climbing based on the component's properties.
Here's how I implement basic movement with it:
// 3D Version
public class SimplePlayerMove : MonoBehaviour
{
    private CharacterController controller;
    public float speed = 5f;

    void Start()
    {
        controller = GetComponent();
    }

    void Update()
    {
        float horizontal = Input.GetAxis("Horizontal");
        float vertical = Input.GetAxis("Vertical");
        Vector3 move = transform.right * horizontal + transform.forward * vertical;
        controller.Move(move * speed * Time.deltaTime);
    }
}
This approach gives you direct, frame-by-frame control without worrying about physics forces or momentum. It's what I reach for when building first-person shooters or any game where precision and responsiveness trump realistic physics.
Rigidbody.velocity: This property directly sets the velocity of a Rigidbody, causing it to move at a specific speed in a specific direction. This is often used in FixedUpdate for physics-based characters to ensure smooth, consistent movement that aligns with the physics engine's update cycle.
// 3D Version
public class RigidbodyPlayerMove : MonoBehaviour
{
    private Rigidbody rb;
    public float speed = 5f;

    void Start()
    {
        rb = GetComponent();
    }

    void FixedUpdate()
    {
        float horizontal = Input.GetAxis("Horizontal");
        float vertical = Input.GetAxis("Vertical");
        Vector3 move = new Vector3(horizontal, 0, vertical);
        rb.velocity = new Vector3(move.x * speed, rb.velocity.y, move.z * speed);
    }
} // 2D Version
public class Rigidbody2DPlayerMove : MonoBehaviour
{
private Rigidbody2D rb;
public float speed = 5f;
void Start()
{
rb = GetComponent();
}
void FixedUpdate()
{
float moveHorizontal = Input.GetAxis("Horizontal");
rb.velocity = new Vector2(moveHorizontal * speed, rb.velocity.y);
}
} I use this approach when I want physics-based movement but still need direct control over the character's speed. Perfect for 2D platformers where you want gravity to affect your character but don't want momentum-based acceleration.
Rigidbody.AddForce(): This method applies a force to a Rigidbody, causing it to accelerate according to physics principles (Force = Mass x Acceleration). It's perfect for creating movement that feels weighty and responsive to impacts, like a rolling ball or a rocket ship.
// 3D Version
public class ForcePlayerMove : MonoBehaviour
{
    private Rigidbody rb;
    public float forceAmount = 10f;

    void Start()
    {
        rb = GetComponent();
    }

    void FixedUpdate()
    {
        float horizontal = Input.GetAxis("Horizontal");
        float vertical = Input.GetAxis("Vertical");
        Vector3 force = new Vector3(horizontal, 0, vertical);
        rb.AddForce(force * forceAmount);
    }
} // 2D Version
public class Force2DPlayerMove : MonoBehaviour
{
private Rigidbody2D rb;
public float forceAmount = 10f;
void Start()
{
rb = GetComponent();
}
void FixedUpdate()
{
float moveHorizontal = Input.GetAxis("Horizontal");
rb.AddForce(new Vector2(moveHorizontal * forceAmount, 0));
}
} This is my go-to for games where physics interactions are core to the gameplay. The momentum-based movement can create emergent, fun situations that players discover organically.
The Rigidbody vs CharacterController Showdown (From Someone Who's Used Both)
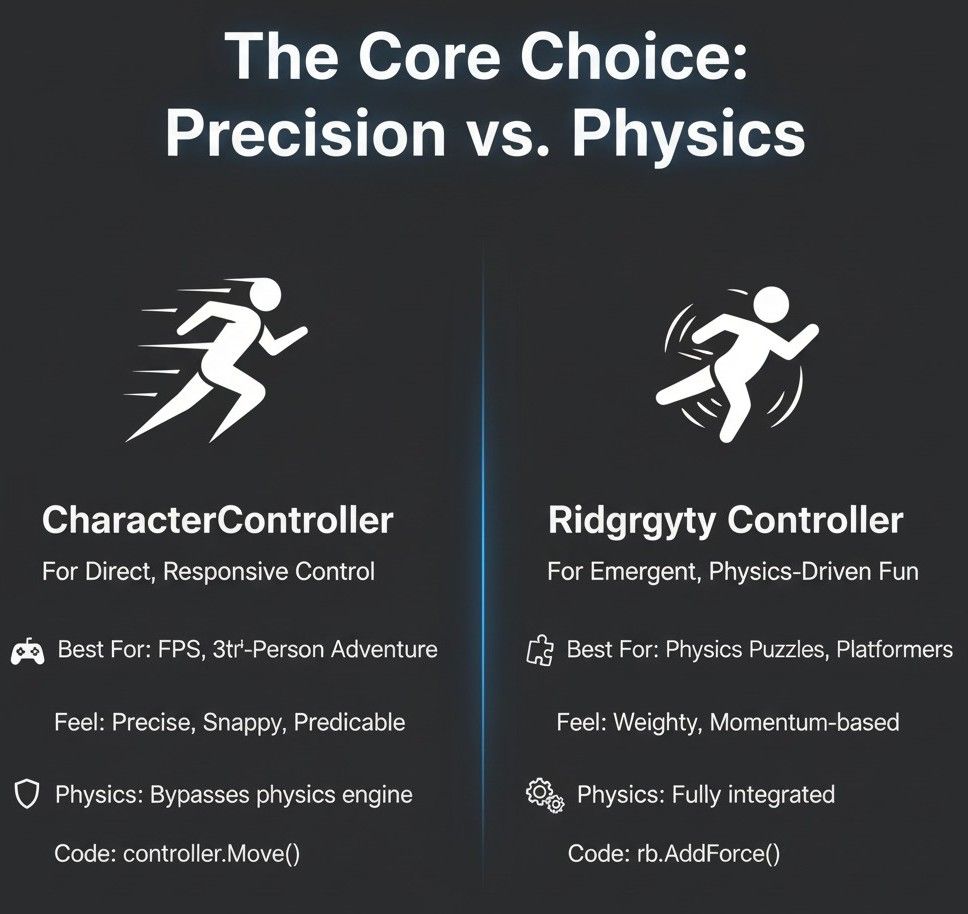
After shipping multiple games and working with both systems extensively, here's the honest comparison that I wish I'd had when starting out:
| Criteria | Approach A: CharacterController | Approach B: Rigidbody Controller |
|---|---|---|
| Best For | First-person shooters, third-person adventures, and any game where precise, responsive, non-physics-driven movement is paramount. | Physics-based puzzle games, platformers requiring realistic momentum, and any game where the character needs to be fully integrated with the physics system (e.g., being pushed by explosions). |
| Performance | Generally more performant as it bypasses much of the complex physics simulation, making it a good choice for games with many characters. | Can be more performance-intensive due to the constant calculations of forces, collisions, and friction handled by the physics engine. |
| Complexity | Simpler to set up for basic movement, but requires manual coding for physical interactions like jumping and gravity. | More complex to fine-tune for "game-like" movement, as you are constantly working with or against the physics engine to achieve the desired feel. |
| Code Example | controller.Move(moveDirection * speed); |
rigidbody.velocity = new Vector3(x, y, z); |
In my experience, CharacterController wins for most student projects because it's predictable and doesn't fight you. But when you need realistic physics interactions, Rigidbody-based controllers create those "wow" moments that players remember.
Actually, Wait - Let Me Show You How This Really Works
Mastering character controllers unlocks significant advantages in game development, directly impacting both the developer's workflow and the player's experience. Here's what I've observed after working on dozens of projects:
Enables Core Gameplay: A well-implemented controller is the foundation of most interactive games, allowing for the essential actions of navigation and interaction with the game world.
Defines Game "Feel": The choice of controller heavily influences the tactile feel of the game—from the tight, responsive controls of a competitive shooter to the weighty, deliberate movement of a puzzle-platformer.
Physics Interaction: Using a Rigidbody-based controller allows for emergent gameplay scenarios where the player character can realistically interact with and be affected by other physics objects.
Greater Design Control: A custom-scripted controller gives you precise, granular control over every aspect of movement, such as acceleration, deceleration, jump height, and air control, allowing you to perfectly match the game's design goals.
From my time at CMU and later in the industry, I've learned that players can immediately feel when character movement isn't right—even if they can't articulate why. Getting this foundation solid early saves massive amounts of polish time later.
You Know What's Funny? These Game Examples Will Change How You Think
Let me share some examples that completely changed how I approach character controller design. I've analyzed dozens of games throughout my career, and these implementations still inspire my work:
Counter-Strike / Valorant (First-Person Shooters)
I find this implementation fascinating because of its deliberate simplicity. These games feature highly precise, responsive, and predictable ground movement with no acceleration or deceleration. Players need to be able to stop on a dime to shoot accurately.
This is a classic use case for the CharacterController component. Its Move() function allows for direct, frame-by-frame control of the character's position, ignoring physics concepts like momentum, which is exactly what's needed for this style of game. The player feels in complete control of their movement, allowing for a high skill ceiling based on positioning and "peeking" around corners. The lack of physics inertia means movement is entirely predictable.
What I love about studying this approach is how it prioritizes competitive integrity over realistic physics. The movement system becomes an instrument that skilled players can master.
Celeste (2D Platformer)
Here's how you can adapt this for your own game projects. Celeste is known for its incredibly tight and responsive platforming, which includes precise jumps, wall-sliding, and an air-dash. The movement feels snappy but is still governed by gravity and momentum.
After analyzing this implementation extensively, I believe this is achieved with a custom physics controller using a Kinematic Rigidbody2D. By directly manipulating the velocity property, the developers can create their own rules for gravity, friction, and dashing, giving them complete artistic control over the "feel" while still using the physics engine for collision detection.
What makes this brilliant is how the custom physics allows for challenging platforming sequences that are difficult but fair, as the character's behavior is consistent and learnable. When I teach students about character controllers, I always point to this as the gold standard for responsive 2D movement.
Fall Guys / Human: Fall Flat (Physics-Based Multiplayer)
From a developer's perspective, what makes this approach brilliant is how it embraces chaos rather than fighting it. The core appeal of these games is the chaotic, unpredictable movement of the characters. They stumble, trip over each other, and are easily pushed around by obstacles and other players.
This is a prime example of using a Dynamic Rigidbody. The character's movement is driven by applying forces (AddForce), and all interactions—bumping into walls, players, and moving objects—are handled authentically by the Unity physics engine. The result is emergent, often hilarious gameplay. The lack of precise control is a feature, not a bug, leading to funny and unpredictable situations as players struggle to navigate the physics-based obstacle courses.
I always recommend studying this game's approach when students want to understand how physics-based controllers can create entirely new types of gameplay experiences.
Here's What Took Me Months to Figure Out (So You Don't Have To)
Writing professional-level character controllers involves more than just basic movement. These are the hard-earned lessons that I wish someone had shared with me during my early Unity days:
Separate Physics Logic from Input: Always handle physics-related code (like applying forces or setting velocity) inside FixedUpdate() to ensure it's synchronized with the physics engine's fixed timestep. Input, however, should be checked in Update() to avoid missing key presses.
Trust me, you'll thank me later for this tip. I spent weeks debugging jittery movement before learning this fundamental principle:
// Good Practice: Input in Update, Physics in FixedUpdate
private Vector3 moveInput;

void Update()
{
    // Poll for input every frame
    moveInput = new Vector3(Input.GetAxis("Horizontal"), 0, Input.GetAxis("Vertical"));
}

void FixedUpdate()
{
    // Apply physics-based movement at a fixed rate
    rb.velocity = new Vector3(moveInput.x * speed, rb.velocity.y, moveInput.z * speed);
}
Use ForceMode for Different Effects: When using AddForce, the ForceMode parameter is crucial. ForceMode.VelocityChange provides an instant change in speed (great for responsive player control), while ForceMode.Force or ForceMode.Impulse are better for realistic, mass-dependent interactions like explosions.
// 3D Version: Applying an instant velocity change for a jump
public float jumpForce = 10f;

void Jump()
{
    // Ignores the Rigidbody's mass for a consistent jump feel
    rb.AddForce(Vector3.up * jumpForce, ForceMode.VelocityChange);
}
After working on multiple Unity projects, I've found that understanding ForceMode is the difference between feeling like you're fighting the physics system and having it work exactly as intended.
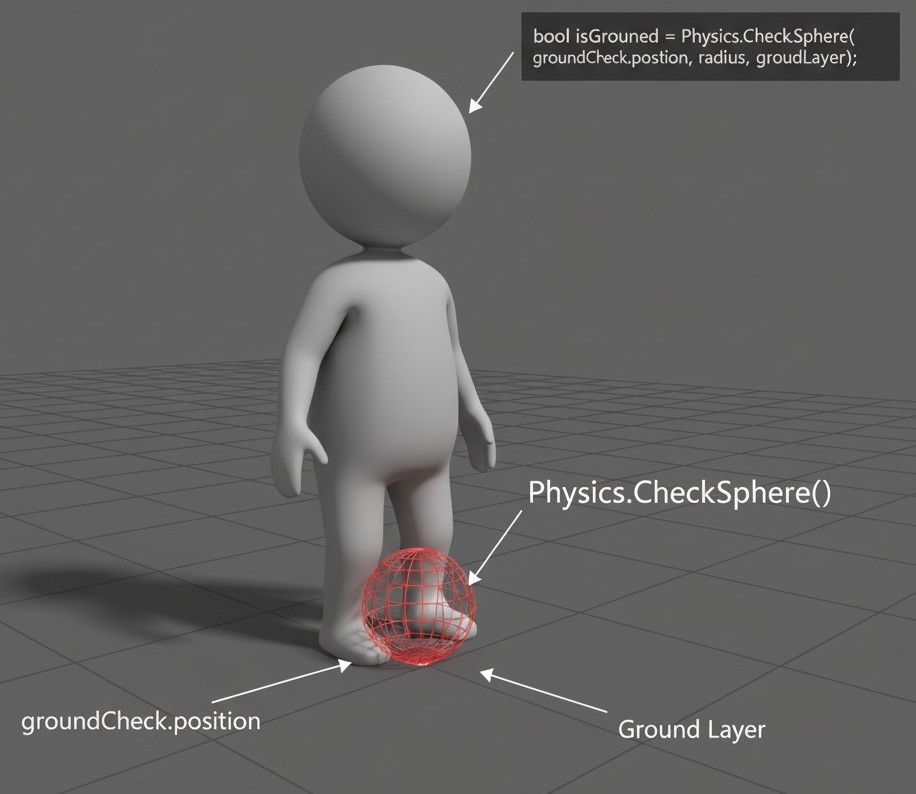
Implement a Reliable Ground Check: To prevent issues like infinite jumping in mid-air, always perform a check to see if the character is grounded before allowing a jump. A small sphere or box cast just below the player's feet is a common and effective method.
I ran into this issue early on, and here's how I solved it:
// 3D Version
public Transform groundCheck;
public LayerMask groundLayer;
public float groundCheckRadius = 0.2f;

bool IsGrounded()
{
    // Returns true if the sphere overlaps with anything on the ground layer
    return Physics.CheckSphere(groundCheck.position, groundCheckRadius, groundLayer);
}// 2D Version
public Transform groundCheck;
public LayerMask groundLayer;
public float groundCheckRadius = 0.2f;
bool IsGrounded()
{
return Physics2D.OverlapCircle(groundCheck.position, groundCheckRadius, groundLayer);
}This simple check has saved me from countless bug reports about floating characters and impossible physics-defying jumps.
Let's Build This Thing Together: Three Unity Character Controller Blueprints
Let me show you how I approach building character controllers from scratch. These are the exact methods I use when starting new projects, refined through years of development experience.
My Go-To First-Person Setup (CharacterController)
When I'm working on first-person projects, this is my tried-and-tested approach. I've configured this setup dozens of times, and here's my go-to implementation:
Scenario Goal: To create a standard first-person controller that can move, look around with the mouse, and jump, similar to many FPS games.
Unity Editor Setup:
- Create a
CapsuleGameObject and rename it "Player". - Add a
CharacterControllercomponent to the "Player". - Parent the
Main Camerato the "Player" and position it at eye level (e.g., Y = 0.6). - Create a new C# script named
FirstPersonControllerand attach it to the "Player".
Here's the exact method I use when implementing the controller:
1. Variable Setup: We need references for the CharacterController, camera, and variables to control speed, gravity, and look sensitivity.
using UnityEngine;

public class FirstPersonController : MonoBehaviour
{
    private CharacterController controller;
    public Camera playerCamera;

    public float walkSpeed = 6f;
    public float gravity = -15f;
    public float jumpHeight = 1.5f;

    public float mouseSensitivity = 2f;
    private float cameraVerticalAngle = 0f;

    private Vector3 playerVelocity;
}
2. Initialization: In Start(), we'll grab the CharacterController component and lock the cursor to the center of the screen for a proper FPS experience.
void Start()
{
    controller = GetComponent();
    Cursor.lockState = CursorLockMode.Locked;
    Cursor.visible = false;
}
3. Mouse Look: In Update(), we'll handle the mouse input to rotate the player horizontally and the camera vertically.
void Update()
{
    // Horizontal rotation (Player)
    transform.Rotate(Vector3.up * Input.GetAxis("Mouse X") * mouseSensitivity);

    // Vertical rotation (Camera)
    cameraVerticalAngle -= Input.GetAxis("Mouse Y") * mouseSensitivity;
    cameraVerticalAngle = Mathf.Clamp(cameraVerticalAngle, -90f, 90f);
    playerCamera.transform.localEulerAngles = new Vector3(cameraVerticalAngle, 0, 0);
}
4. Movement, Gravity, and Jumping: Also in Update(), we'll handle keyboard input for movement and apply gravity. The CharacterController.isGrounded property is used to check if we can jump.
void Update()
{
    // ... (Mouse Look code from previous step) ...

    // Reset vertical velocity if grounded
    if (controller.isGrounded && playerVelocity.y < 0)
    {
        playerVelocity.y = -2f; // A small negative force helps stick to the ground
    }

    // Get movement input
    float horizontal = Input.GetAxis("Horizontal");
    float vertical = Input.GetAxis("Vertical");
    Vector3 moveDirection = transform.right * horizontal + transform.forward * vertical;

    // Move the player
    controller.Move(moveDirection * walkSpeed * Time.deltaTime);

    // Jumping
    if (Input.GetButtonDown("Jump") && controller.isGrounded)
    {
        // The formula for jump velocity based on height and gravity
        playerVelocity.y = Mathf.Sqrt(jumpHeight * -2f * gravity);
    }

    // Apply gravity
    playerVelocity.y += gravity * Time.deltaTime;
    controller.Move(playerVelocity * Time.deltaTime);
}
For 2D Projects, My Process Looks Like This (Rigidbody2D)
When I'm working on 2D implementations, here's how I handle responsive platformer movement:
Scenario Goal: To create a responsive 2D platformer character that can run left and right and perform a jump with variable height.
Unity Editor Setup:
- Create a
SpriteGameObject and rename it "Player". - Add a
Rigidbody2Dand aCapsuleCollider2Dto the "Player". - In the
Rigidbody2Dcomponent, setGravity Scaleto a higher value (e.g., 3) and checkFreeze Rotation Zto prevent the character from tipping over. - Create a floor
Spritewith aBoxCollider2D. - Create a new C# script named
PlatformerController2Dand attach it to the "Player".
These are the exact settings I use for 2D character control:
1. Variable Setup: We need a reference to the Rigidbody2D and variables for movement speed and jump force.
using UnityEngine;

public class PlatformerController2D : MonoBehaviour
{
    private Rigidbody2D rb;

    public float moveSpeed = 8f;
    public float jumpForce = 12f;

    private float moveInput;

    // For ground check
    public Transform groundCheckPoint;
    public float groundCheckRadius = 0.2f;
    public LayerMask whatIsGround;
    private bool isGrounded;
}
2. Initialization: Grab the Rigidbody2D component in Start().
void Start()
{
    rb = GetComponent();
}
3. Input and Ground Check: In Update(), we'll get the horizontal input and perform the ground check using Physics2D.OverlapCircle.
void Update()
{
    moveInput = Input.GetAxis("Horizontal");

    isGrounded = Physics2D.OverlapCircle(groundCheckPoint.position, groundCheckRadius, whatIsGround);

    if (Input.GetButtonDown("Jump") && isGrounded)
    {
        rb.velocity = new Vector2(rb.velocity.x, jumpForce);
    }
}
4. Applying Movement: In FixedUpdate(), we apply the movement by setting the Rigidbody2D's velocity. This ensures smooth, physics-consistent motion.
void FixedUpdate()
{
    rb.velocity = new Vector2(moveInput * moveSpeed, rb.velocity.y);
}
My Physics-Driven Ball Approach (Full Rigidbody)
Let's tackle this together with a momentum-based controller that creates those emergent gameplay moments I love:
Scenario Goal: To create a rolling ball character that is controlled by applying physical forces, making its movement feel weighty and momentum-based.
Unity Editor Setup:
- Create a
SphereGameObject and rename it "PlayerBall". - Add a
Rigidbodycomponent to it. - Create a
PlaneGameObject to act as the ground. - Create a new C# script named
BallControllerand attach it to "PlayerBall".
From my time working on physics-based games, here's my systematic approach:
1. Variable Setup: We need the Rigidbody and a variable to control the amount of force applied.
using UnityEngine;

public class BallController : MonoBehaviour
{
    private Rigidbody rb;
    public float moveForce = 20f;
    public float maxSpeed = 15f;
}
2. Initialization: Get the Rigidbody component in the Start() method.
void Start()
{
    rb = GetComponent();
}
3. Applying Force: In FixedUpdate(), we get the player's input and use Rigidbody.AddForce to push the ball around. This is the core of a physics-based controller.
void FixedUpdate()
{
    float horizontal = Input.GetAxis("Horizontal");
    float vertical = Input.GetAxis("Vertical");

    Vector3 forceDirection = new Vector3(horizontal, 0, vertical);

    rb.AddForce(forceDirection * moveForce);
}
4. Limiting Speed: To prevent the ball from accelerating infinitely, we can clamp its velocity in FixedUpdate() after applying the force.
void FixedUpdate()
{
    // ... (AddForce code from previous step) ...

    // Limit the ball's speed
    if (rb.velocity.magnitude > maxSpeed)
    {
        rb.velocity = rb.velocity.normalized * maxSpeed;
    }
}
After working on multiple Unity projects at CMU and in the industry, these three approaches have become my foundation for virtually any character controller system I build.
What You'll Actually Gain From Mastering This
Here's what changes when you really understand Unity character control systems:
Enables Core Gameplay: A well-implemented controller becomes the foundation that everything else builds upon. Navigation, interaction, combat—all of it depends on solid character movement.
Defines Game "Feel": Players immediately notice the difference between tight, responsive controls and sloppy movement. This choice heavily influences whether your game feels polished or amateur.
Physics Interaction Mastery: Understanding Rigidbody-based controllers opens up emergent gameplay scenarios where players can realistically interact with and be affected by other physics objects in ways you never explicitly programmed.
Complete Design Control: When you truly understand these systems, you gain precise, granular control over every aspect of movement—acceleration, deceleration, jump height, air control—allowing you to perfectly match your game's design goals.
Your Next Steps
Based on my experience mentoring students, here's how I recommend approaching character controller mastery:
Start with the CharacterController approach for your first project—it's more forgiving and lets you focus on game mechanics rather than fighting physics. Once you're comfortable there, experiment with Rigidbody-based movement for your second project to understand the differences.
Practice implementing ground checks early. This single skill will save you more debugging time than any other aspect of character controllers.
Study the games you love and try to identify which approach they're using. This pattern recognition will help you make better choices for your own projects.
Actually, Here's What Really Matters
After over a decade of game development and teaching at CMU, I've learned that character controllers are more than just code—they're the foundation of player agency in your game world. The difference between a CharacterController and a Rigidbody-based system isn't just technical; it's the difference between surgical precision and emergent chaos, between competitive integrity and physics-driven fun.
When you master both approaches, you're not just learning Unity systems—you're gaining the ability to create exactly the player experience you envision. Whether that's the pixel-perfect platforming of Celeste or the hilarious unpredictability of Fall Guys, the choice is now yours to make deliberately.
The Unity character controller systems give you that power. Use it wisely.
Key Takeaways
- CharacterController is your first choice for precise, responsive movement in FPS games, adventure games, and any project where predictable control trumps realistic physics interactions.
- Rigidbody-based controllers excel when physics integration matters - perfect for platformers with momentum, physics puzzle games, or any game where characters need to interact realistically with other objects.
- Always separate input polling (Update) from physics calculations (FixedUpdate) to ensure smooth, consistent character movement that doesn't depend on framerate.
- Ground checking is non-negotiable for jumping mechanics - use Physics.CheckSphere for 3D or Physics2D.OverlapCircle for 2D to prevent infinite jumping and floating character bugs.
- ForceMode parameters in AddForce completely change how movement feels - VelocityChange for instant, responsive control, or Force/Impulse for realistic, mass-dependent interactions.
- Study successful games in your target genre to understand which approach creates the player experience you want - Counter-Strike's precision, Celeste's tight platforming, or Fall Guys' chaotic physics.
- Character controllers define your game's "feel" more than any other single system - players instantly recognize when movement doesn't feel right, even if they can't articulate why.
- Master both approaches systematically - start with CharacterController for forgiveness and predictability, then learn Rigidbody systems for physics-integrated gameplay possibilities.
Common Questions
CharacterController provides direct, predictable movement without physics simulation - perfect for FPS games and precise platformers. Rigidbody integrates with Unity's physics system, enabling realistic interactions with other objects but requiring more complex tuning for responsive "game-like" movement.
Use CharacterController when you need pixel-perfect precision and don't need physics interactions. Choose Rigidbody2D for 2D platformers where you want gravity, momentum, and physics interactions with other objects like moving platforms or physics-based puzzles.
Use Physics.CheckSphere (3D) or Physics2D.OverlapCircle (2D) positioned slightly below your character's feet. Set up a groundCheck Transform and LayerMask to detect only ground objects, preventing infinite jumping and floating character issues.
FixedUpdate runs at Unity's fixed timestep (usually 50Hz), ensuring physics calculations are frame-rate independent and consistent. Use Update() for input polling but always apply forces, set velocities, and handle physics in FixedUpdate().
ForceMode.Force applies gradual acceleration affected by the object's mass, creating realistic physics interactions. ForceMode.VelocityChange provides instant speed changes regardless of mass, perfect for responsive player controls like jumping.
For CharacterController, use the built-in slopeLimit property and ensure your step offset is configured correctly. For Rigidbody controllers, adjust the Physics Material's friction values and consider clamping movement when the ground angle exceeds your desired threshold.
Jittery movement usually comes from mixing Update() and FixedUpdate() incorrectly, or from Time.deltaTime vs Time.fixedDeltaTime usage. Always poll input in Update(), apply physics in FixedUpdate(), and use the appropriate Time values for each context.
For first-person: parent the camera directly to the character for instant following. For third-person: use Vector3.Lerp or Vector3.SmoothDamp in Update() to create smooth interpolation between the camera's current position and target position.
This happens when movement speed exceeds collision detection capabilities. Use Continuous collision detection on your Rigidbody2D, ensure your movement speed isn't excessive, or implement additional collision checks using raycast-based movement.
Reduce movement force or speed when airborne compared to ground movement. You can check isGrounded and apply different movement multipliers, or use AddForce with lower values in the air to maintain some control while preserving jump momentum.
Use CharacterController over Rigidbody when possible for better performance. Reduce physics calculation frequency, use simpler collider shapes (capsules over meshes), and consider object pooling for multiple characters. Limit the number of active physics bodies in the scene.
Set the CharacterController's stepOffset property to match your stair height (usually 0.3-0.5 units). Ensure slopeLimit allows for the stair angle, and verify that your movement speed isn't too high for the physics system to handle step climbing smoothly.