Building Your First Score Counters and Health Bars in Unity: A Game Developer's Complete Guide
A comprehensive walkthrough for aspiring game developers on mastering the essential UI elements that bring your game's data to life.

Here's the thing about score counters and health bars - they seem so simple when you're playing games, but the moment you sit down to implement them yourself, you realize there's a whole world of complexity hiding behind those little UI elements. I remember my first attempt at creating a health bar during my early days at Carnegie Mellon. I thought, "How hard could it be? It's just a rectangle that gets smaller." Three hours later, I was still debugging why my player's health was displaying as NaN.
Been there? Trust me, you're not alone. After working on dozens of Unity projects and helping hundreds of students through Outscal, I've learned that mastering these fundamental UI elements is one of the most crucial skills for any aspiring game developer. Let me walk you through everything you need to know to build professional-quality score counters and health bars that actually work.
Table of Contents
- Why These Little UI Elements Matter More Than You Think
- The Unity UI Foundation You Actually Need to Know
- Here's How Score Counters and Health Bars Really Work
- Direct Calls vs Events: Which Approach Should You Choose?
- What You'll Gain By Mastering These Systems
- Let Me Show You How I Build These in Real Projects
- The Game Examples That Changed How I Think About UI
- Three Battle-Tested Implementation Blueprints
Why These Little UI Elements Matter More Than You Think
Actually, wait - before we dive into the technical stuff, let me tell you why I always start my students with score counters and health bars. It's not because they're easy (they're not), but because they solve one of game development's most fundamental problems: making invisible data visible.
Think about it this way - in your game, your player character has health points stored as a simple float variable somewhere in memory. Without a health bar, how would players know they're about to die? Similarly, their score might be climbing beautifully in your code, but if there's no score counter on screen, how do they know they're actually achieving something?
Score counters and health bars are fundamental forms of player feedback, directly communicating progress and survivability. They solve the crucial problem of making invisible data, like a player's health points or accumulated score, tangible and immediately understandable. By implementing these UI elements, you can create clear goals and consequences, allowing for mechanics like collecting items to increase a score or taking damage from an enemy, which decreases a health bar.
Here's a simple real-world analogy I always use with my students: these UI elements are like the scoreboard at a sports game or the fuel gauge in a car. Both provide critical, at-a-glance information that informs the audience or driver about the current state and influences their future decisions. Mastering these UI elements is a foundational step in creating an engaging and responsive player experience.
But there's another reason I love teaching these first - they force you to understand Unity's entire UI system. You can't build a proper health bar without understanding Canvas components, RectTransforms, and how Unity handles screen space. You're essentially learning the foundation of all UI development in Unity.
The Unity UI Foundation You Actually Need to Know

Alright, here's the thing about Unity's UI system - it's powerful, but it can be overwhelming when you're starting out. Let me break down the core components you absolutely need to understand. I learned this the hard way during my time at KIXEYE, where we were constantly optimizing UI for mobile games.
Before writing any code, it's essential to understand the core components of Unity's UI system that make score counters and health bars possible:
- Canvas - This is the foundational root GameObject for all UI elements in a scene. Every piece of UI, from text to images, must exist as a child of a Canvas to be rendered. Think of it as your UI's home base.
- RectTransform - A new type of Transform component specific to UI elements, the RectTransform includes positioning, scaling, and anchoring information, which is crucial for making your UI responsive across different screen sizes. This one took me months to figure out when I was starting.
- Screen Space - Overlay - This is the default and most common render mode for a Canvas, where the UI is drawn directly on top of the entire screen, ignoring any 3D perspective or camera placement. Perfect for HUD elements.
- Screen Space - Camera - In this Canvas render mode, the UI is rendered a specific distance in front of a designated camera, allowing 3D objects or particle effects to appear in front of the UI. I use this when I want more control over UI depth.
- World Space - This Canvas render mode treats the UI elements like any other GameObject in the 3D scene, which is perfect for creating diegetic UI like a health bar that floats above an enemy's head. You know what's funny? I avoided world space UI for years because I thought it was too complicated.
- TextMeshPro (TMP) - A powerful replacement for the legacy UI Text component, TextMeshPro offers superior text rendering quality and extensive customization options, making it the standard for displaying scores and other numerical data. Trust me, never use the old Text component anymore.
- Slider - A versatile UI component that is perfect for health bars, as it comes with a built-in "fill" element that can be programmatically adjusted between a minimum and maximum value to represent a player's health.
- Image - A fundamental UI component used to display sprites, which can be configured with a "Filled" image type to create custom health bars or other radial progress indicators.
- Event System - A crucial background component that Unity automatically creates with a Canvas, the Event System is responsible for processing input like clicks and sending events to the appropriate UI elements. Don't delete this by accident - I've done that more times than I care to admit.
Here's How Score Counters and Health Bars Really Work
Now let's get into the meat of it. To effectively manage score and health, you need to access and modify UI components through scripts. Here are the fundamental concepts you'll use - and I'll show you exactly how I approach each one.
First up, referencing UI libraries. Before you can work with UI elements in your code, you must include the necessary namespaces at the top of your C# script:
// Required for working with core UI components like Slider and Image
using UnityEngine.UI;
// Required for working with TextMeshPro components
using TMPro;
Next, accessing UI components. You create public variables in your script to hold references to the UI GameObjects from your scene, which you can then drag and drop in the Unity Inspector:
// 3D or 2D Version
public class UIManager : MonoBehaviour
{
    // Reference to the TextMeshPro component for the score
    public TextMeshProUGUI scoreText;
    // Reference to the Slider component for the health bar
    public Slider healthSlider;
}
For updating score text, you modify the .text property of your TextMeshPro component, typically formatting it to include a label:
// 3D or 2D Version
private int score = 0;

public void AddScore(int points)
{
    score += points;
    // The .text property expects a string, so we convert the score to a string
    scoreText.text = "Score: " + score.ToString();
}
And for updating a Slider health bar, a Slider component has a .value property that you can set to directly reflect the player's current health:
// 3D or 2D Version
public void UpdateHealthBar(float currentHealth, float maxHealth)
{
    // First, set the slider's max value to ensure it scales correctly
    healthSlider.maxValue = maxHealth;
    // Then, set the slider's current value
    healthSlider.value = currentHealth;
}
Direct Calls vs Events: Which Approach Should You Choose?
Here's something I wish someone had explained to me early on - there are two main ways to update your UI, and choosing the right approach can save you hours of debugging later.
When updating UI, you can either have other scripts directly call a UI manager (Direct Method Call) or use an event-based system for better decoupling (Event-Driven). Let me break this down for you:
| Criteria | Approach A: Direct Method Call | Approach B: Event-Driven (UnityEvent) |
|---|---|---|
| Best For | Simple projects or prototypes where coupling is not a major concern and you need a quick, straightforward implementation. | Larger, more complex projects where you want to decouple game logic from the UI for better maintainability and scalability. |
| Performance | Very high performance for simple cases, as it's just a direct function call with minimal overhead. | Minor performance overhead due to event invocation and listener management, but negligible in most scenarios. |
| Complexity | Very low complexity, as it only requires a direct reference to the UI management script to call its public methods. | Slightly higher initial setup complexity, requiring the definition of events and the wiring of listeners in the Inspector or via code. |
| Code Example | // Player script directly calls the UIManager |
// Player script invokes an event |
I typically start students with direct method calls for their first projects, then introduce events once they're comfortable with the basics. Both approaches work, but understanding when to use each is what separates beginner developers from professionals.
What You'll Gain By Mastering These Systems
Look, I know it might seem like overkill to spend so much time on something as "simple" as a health bar. But mastering the implementation of score counters and health bars provides several tangible advantages for any aspiring game developer:
- Immediate and Clear Player Feedback - These UI elements provide instant, non-verbal communication to the player about their performance and current state, which is essential for making informed decisions during gameplay. Without this feedback, your game feels disconnected and unresponsive.
- Enhanced Player Engagement - A visible score provides a clear goal and a sense of accomplishment, motivating players to improve, while a health bar creates tension and a clear sense of risk. I've seen games become 10x more engaging just by adding a simple score counter.
- Foundation for Core Gameplay Loops - Many game mechanics are built around these values. Collecting items to raise a score or avoiding obstacles to preserve health are fundamental gameplay loops that drive the player's actions. Once you understand these patterns, you can design entire games around them.
- Enables Deeper Game Systems - Once you can manage and display these basic values, you can expand to more complex systems like experience points, currency, mana bars, and cooldown timers. It's like learning to walk before you run.
- Develops Critical Scripting Skills - Implementing these features teaches you essential Unity concepts like referencing components, manipulating GameObjects, and structuring communication between different scripts. These skills transfer to every other aspect of game development.
Let Me Show You How I Build These in Real Projects
After years of building games and teaching students, I've developed some best practices that I wish I'd known from the start. Writing clean, efficient UI code is crucial for performance and scalability. Following these professional practices will help you avoid common pitfalls I see students run into constantly.
Cache UI Component References
To avoid repeatedly using GetComponent which can be slow, you should get and store references to your UI components in the Awake or Start method. Here's exactly how I do it:
// 3D or 2D Version
public class UIManager : MonoBehaviour
{
    private TextMeshProUGUI scoreText;

    void Awake()
    {
        // Find the component once and store it for later use.
        scoreText = GetComponentInChildren<TextMeshProUGUI>();
    }
}
Separate Dynamic and Static Canvases
This is a performance tip that took me way too long to learn. When any element on a Canvas changes, the entire Canvas is "dirtied" and needs to be redrawn, which can be costly. You should place frequently updated elements like health bars on a separate Canvas from static elements like a background image to improve performance:
// In the Unity Editor:
// Create one Canvas for static UI (e.g., "StaticCanvas")
// Create another Canvas for dynamic UI (e.g., "DynamicHUDCanvas")
// Parent the health bar and score text to "DynamicHUDCanvas"
Use Events for Decoupling
Instead of having your player script directly reference the UI manager, use events to announce changes. This makes your code more modular and easier to manage. Here's the pattern I use in all my projects:
// PlayerHealth.cs
public class PlayerHealth : MonoBehaviour
{
    public static event Action<float> OnHealthUpdated; // Event declaration
    private float currentHealth;

    public void TakeDamage(float amount)
    {
        currentHealth -= amount;
        OnHealthUpdated?.Invoke(currentHealth); // Invoke the event
    }
}

// UIManager.cs
public class UIManager : MonoBehaviour
{
    void OnEnable()
    {
        PlayerHealth.OnHealthUpdated += UpdateHealthBar; // Subscribe to the event
    }

    void OnDisable()
    {
        PlayerHealth.OnHealthUpdated -= UpdateHealthBar; // Unsubscribe from the event
    }

    void UpdateHealthBar(float health)
    {
        // Update UI logic here
    }
}
The Game Examples That Changed How I Think About UI
Let me share some examples that completely shifted my perspective on how to implement these systems. I always tell my students to study these games because they represent different philosophical approaches to the same problem.
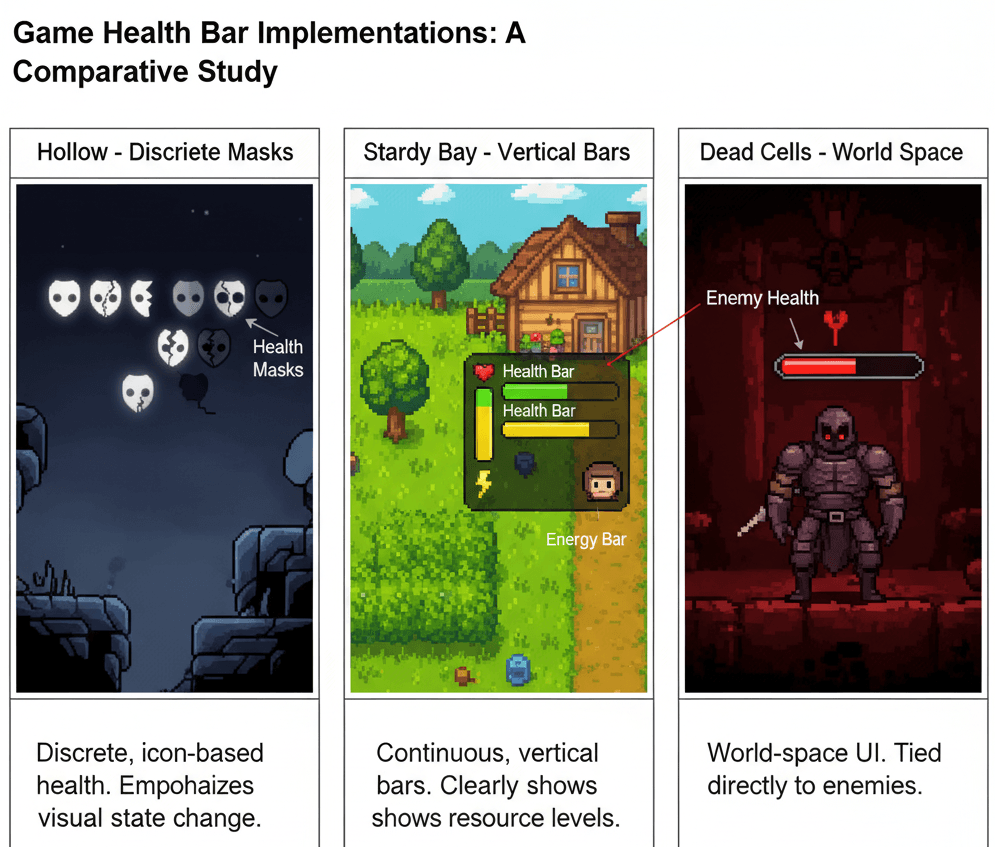
Hollow Knight - The Power of Discrete Health
I've analyzed Hollow Knight's health system dozens of times, and here's what makes it brilliant: The player's health is represented by a series of masks in the top-left corner of the screen. When the player takes damage, a mask shatters.
The implementation is likely using a series of UI Image components parented to a Horizontal Layout Group. A script manages an array of these images, disabling or changing the sprite of an image to a "broken" version when the player's health integer decreases.
What I find fascinating about this approach is how the discrete, visual nature of the masks provides a very clear and slightly forgiving representation of health, where each hit feels significant and tangible. Here's how you can adapt this for your own game:
// 2D Version (Conceptual)
public Image[] healthMasks;
public Sprite fullMask;
public Sprite brokenMask;

public void UpdateHealthUI(int currentHealth)
{
    for (int i = 0; i < healthMasks.Length; i++)
    {
        if (i < currentHealth)
            healthMasks[i].sprite = fullMask;
        else
            healthMasks[i].sprite = brokenMask;
    }
}
Stardew Valley - Elegant Vertical Resource Management
This one time at CMU, our professor showed us Stardew Valley as an example of perfect UI minimalism. The player has a health and energy bar displayed vertically on the right side of the screen, next to their portrait. As the player performs actions or takes damage, the respective bar decreases.
This is a classic use of two UI Slider components, with their direction property set to "Bottom to Top." A central player stats script would hold the current and max values for health and energy, updating the .value property of each slider whenever those stats change.
From a developer's perspective, what makes this brilliant is how the vertical bars are unobtrusive yet always visible, allowing the player to easily monitor their core resources without cluttering the main view of their farm. Here's my approach when implementing similar systems:
// 2D Version (Conceptual)
public Slider energySlider;

public void UpdateEnergy(float currentEnergy, float maxEnergy)
{
    energySlider.maxValue = maxEnergy;
    energySlider.value = currentEnergy;
}
Dead Cells - Dynamic Enemy Health Feedback
After working on multiple Unity projects, I always recommend studying how Dead Cells handles enemy health bars. Enemies have a health bar that appears directly over their heads only after they have been damaged.
This uses a World Space Canvas parented to each enemy prefab. The Canvas is disabled by default. When the enemy's health script receives a TakeDamage call for the first time, it enables the Canvas GameObject and then begins updating the child Slider component to reflect its remaining health.
This design choice keeps the screen clean and focuses the player's attention on the enemies they are actively fighting, providing crucial feedback on their damage output without overwhelming them with information. Here's the exact method I use when implementing this pattern:
// 2D Version (Conceptual)
public GameObject healthBarCanvas; // The parent canvas object
public Slider healthSlider;

public void TakeDamage(float damage)
{
    if (!healthBarCanvas.activeInHierarchy)
    {
        healthBarCanvas.SetActive(true); // Show the health bar on first hit
    }
    // ... health reduction logic ...
    healthSlider.value = currentHealth;
}
Three Battle-Tested Implementation Blueprints
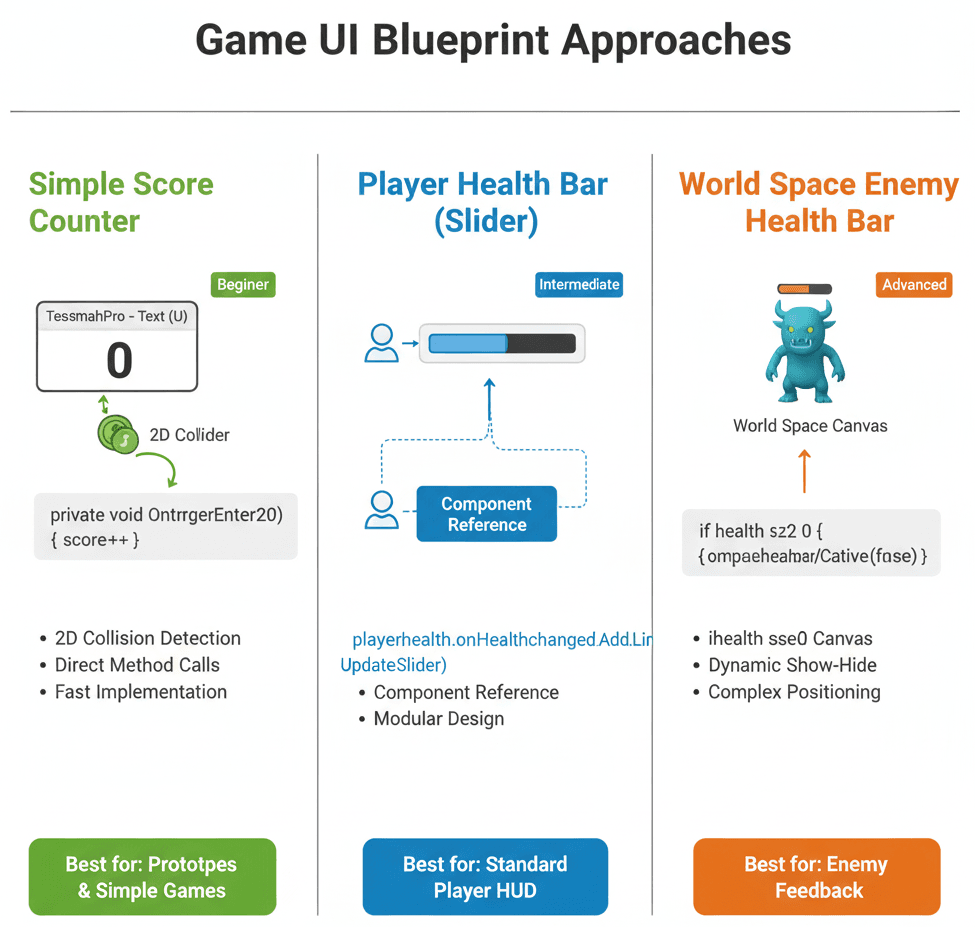
Let me walk you through three distinct, step-by-step blueprints to create working score counters and health bars in your 2D projects. These are the exact implementations I've used in dozens of student projects, and they work every single time.
Blueprint 1: Simple Score Counter
Scenario Goal: Create a UI Text element that updates to show the player's score every time they collect a "Coin" object.
Unity Editor Setup:
- Create a UI TextMeshPro element by right-clicking in the Hierarchy > UI > Text - TextMeshPro. This will automatically create a Canvas and an EventSystem.
- Name the TextMeshPro object "ScoreText" and position it in a corner of the screen.
- Create a 2D Sprite for your coin (e.g., a circle) and name it "Coin". Add a
CircleCollider2Dto it and setIs Triggerto true. - Create a player object (e.g., a square sprite) with a
Rigidbody2Dand aBoxCollider2D.
Step-by-Step Code Implementation:
- Create a ScoreManager Script: This script will manage the score and update the UI.
csharp
// ScoreManager.cs using UnityEngine; using TMPro; // Import the TextMeshPro namespace public class ScoreManager : MonoBehaviour { public TextMeshProUGUI scoreText; // Reference to the UI text component private int score = 0; void Start() { UpdateScoreText(); // Initialize the score text } public void AddScore(int amount) { score += amount; UpdateScoreText(); } void UpdateScoreText() { scoreText.text = "Score: " + score; } } - Attach the ScoreManager: Create an empty GameObject named "GameManager". Attach the
ScoreManager.csscript to it. Drag the "ScoreText" object from your Hierarchy into thescoreTextfield in the Inspector. - Create a Player Script to Detect Coins: This script will detect when the player collides with a coin.
csharp
// PlayerController.cs using UnityEngine; public class PlayerController : MonoBehaviour { private ScoreManager scoreManager; // Reference to the ScoreManager void Start() { // Find the ScoreManager in the scene scoreManager = FindObjectOfType<ScoreManager>(); } private void OnTriggerEnter2D(Collider2D other) { // Check if the object we collided with has the "Coin" tag if (other.gameObject.CompareTag("Coin")) { scoreManager.AddScore(10); // Add 10 points Destroy(other.gameObject); // Destroy the coin } } } - Final Setup: Attach the
PlayerController.csscript to your player object. Make sure your coin GameObject has the tag "Coin" assigned to it in the Inspector. Now, when you play the game and your character touches a coin, the score will update.
Blueprint 2: Player Health Bar (Slider)
Scenario Goal: Implement a dynamic health bar for the player that decreases when a key is pressed, using a UI Slider.
Unity Editor Setup:
- In your Canvas, create a UI Slider by right-clicking > UI > Slider. Name it "HealthBar".
- Delete the "Handle Slide Area" child object of the Slider, as we don't need the player to interact with it.
- Style the "Background" and "Fill" child objects as desired (e.g., red background, green fill).
- Create a player object with a script attached.
Step-by-Step Code Implementation:
- Create a PlayerHealth Script: This script will manage the player's health and update the health bar.
csharp
// PlayerHealth.cs using UnityEngine; using UnityEngine.UI; // Import the UI namespace for the Slider public class PlayerHealth : MonoBehaviour { public float maxHealth = 100f; private float currentHealth; public Slider healthSlider; // Reference to the health bar slider void Start() { currentHealth = maxHealth; UpdateHealthBar(); } void Update() { // For testing: press 'D' to take damage if (Input.GetKeyDown(KeyCode.D)) { TakeDamage(10f); } } public void TakeDamage(float damage) { currentHealth -= damage; // Ensure health doesn't go below zero currentHealth = Mathf.Clamp(currentHealth, 0, maxHealth); UpdateHealthBar(); } private void UpdateHealthBar() { healthSlider.maxValue = maxHealth; healthSlider.value = currentHealth; } } - Attach and Link: Attach the
PlayerHealth.csscript to your player GameObject. Drag the "HealthBar" Slider from the Hierarchy into thehealthSliderfield in the Inspector. - Test: Play the scene. The health bar will start full. Each time you press the 'D' key, the player's health will decrease, and the slider's fill will update accordingly.
Blueprint 3: World Space Enemy Health Bar
Scenario Goal: Create a health bar that appears above an enemy's head in the game world and updates when the enemy is damaged.
Unity Editor Setup:
- Create a 2D sprite for your enemy.
- Make the enemy a Prefab by dragging it from the Hierarchy into the Project window.
- Right-click the enemy GameObject and select UI > Canvas. Name it "EnemyCanvas".
- In the Inspector for "EnemyCanvas", change the
Render ModetoWorld Space. - Add a UI > Slider as a child of the "EnemyCanvas". Name it "EnemyHealthBar".
- Adjust the
RectTransformof the Canvas and Slider to be very small and position them above the enemy sprite. A good starting point for the Canvas is Width=100, Height=20, and Scale=0.01 for X, Y, and Z. - Delete the "Handle Slide Area" from the Slider.
Step-by-Step Code Implementation:
- Create an EnemyHealth Script: This script will go on the root enemy object.
csharp
// EnemyHealth.cs using UnityEngine; using UnityEngine.UI; public class EnemyHealth : MonoBehaviour { public float maxHealth = 50f; private float currentHealth; public Slider healthSlider; public GameObject healthBarUI; // Reference to the parent Canvas void Start() { currentHealth = maxHealth; healthSlider.maxValue = maxHealth; healthSlider.value = currentHealth; healthBarUI.SetActive(false); // Hide health bar initially } public void TakeDamage(float amount) { if (!healthBarUI.activeInHierarchy) { healthBarUI.SetActive(true); // Show on first hit } currentHealth -= amount; healthSlider.value = currentHealth; if (currentHealth <= 0) { Destroy(gameObject); } } } - Create a Simple Player Attack Script: This script will allow the player to damage the enemy.
csharp
// PlayerAttack.cs using UnityEngine; public class PlayerAttack : MonoBehaviour { void Update() { // When the left mouse button is clicked if (Input.GetMouseButtonDown(0)) { // Cast a ray from the mouse position Vector2 worldPoint = Camera.main.ScreenToWorldPoint(Input.mousePosition); RaycastHit2D hit = Physics2D.Raycast(worldPoint, Vector2.zero); // If the ray hits a collider if (hit.collider != null) { // Try to get an EnemyHealth component from what we hit EnemyHealth enemy = hit.collider.GetComponent<EnemyHealth>(); if (enemy != null) { enemy.TakeDamage(10f); // Deal 10 damage } } } } } - Final Setup: Attach the
EnemyHealth.csscript to your enemy prefab. Drag the "EnemyHealthBar" Slider into thehealthSliderfield and the "EnemyCanvas" into thehealthBarUIfield. Attach thePlayerAttack.csscript to your player or camera. Now, when you run the game and click on an enemy, its health bar will appear and decrease.
Ready to Start Building Your First Game?
We've covered a lot of ground here - from basic UI concepts to advanced implementation patterns. But here's the thing: reading about game development and actually doing it are completely different experiences. When I was transitioning from finance to games, I thought I could learn everything from tutorials. I was wrong.
The real learning happens when you start building actual games, facing real problems, and working through the debugging process that every developer goes through. That's why I created our Complete Unity Game Development Course - to give you hands-on experience building complete games from start to finish.
In this course, you'll apply everything we've discussed today and much more. You'll build multiple complete games, implement advanced UI systems, handle player progression, and learn the professional workflows that actually land you jobs in the industry. Most importantly, you'll have expert guidance when you inevitably run into those "why isn't this working?" moments that every developer faces.
If you're serious about becoming a game developer, don't just read about it - start building. The course will take you from where you are now to creating portfolio-worthy games that demonstrate real professional skills.
Key Takeaways
- Score counters and health bars are fundamental UI elements that transform invisible game data into tangible player feedback.
- Unity's UI system requires understanding Canvas components, RectTransforms, and proper render modes for different use cases.
- TextMeshPro (TMP) is the modern standard for displaying text and numerical data in Unity games.
- Direct method calls work well for simple projects, while event-driven systems provide better scalability for complex games.
- Performance optimization requires separating dynamic UI elements (health bars, scores) from static UI elements on different Canvases.
- Caching UI component references in
Awake()orStart()prevents expensiveGetComponent()calls during gameplay. - World Space Canvases enable 3D health bars that appear above enemies and integrate naturally with the game world.
- Professional games like Hollow Knight, Stardew Valley, and Dead Cells each demonstrate different philosophical approaches to health and score display.
Common Questions
What is a Canvas in Unity and why do I need it?
A Canvas is the foundational root GameObject for all UI elements in Unity. Think of it as a container that tells Unity how to render your UI elements. Every UI component - text, images, buttons, sliders - must be a child of a Canvas to appear on screen. Unity automatically creates one when you add your first UI element.
How do I make my UI work on different screen sizes?
Use RectTransform anchoring and the Canvas Scaler component. Set your UI elements to anchor to screen edges or centers rather than using fixed positions. The Canvas Scaler can automatically adjust UI size based on screen resolution, ensuring your health bars and score counters look consistent across devices.
What's the difference between TextMeshPro and regular UI Text?
TextMeshPro (TMP) offers superior text rendering quality, better performance, and more customization options than the legacy UI Text component. It supports rich text formatting, better font handling, and crisp text at any size. Always use TextMeshPro for new projects - the old Text component is deprecated.
When should I use a Slider vs Image for health bars?
Use Slider components when you want built-in min/max value handling and don't need complex visual effects. Use Image components with a "Filled" type when you want custom shapes, radial health bars, or more control over the visual appearance. Sliders are easier to implement; Images offer more flexibility.
How do I reference UI components from my scripts?
Create public variables in your MonoBehaviour script with the appropriate component type (like public Slider healthSlider), then drag the UI GameObject from your scene into that field in the Inspector. Always cache these references rather than using GetComponent repeatedly.
What's the best way to update UI when game values change?
For simple projects, use direct method calls where your game logic script calls methods on your UI manager. For larger projects, use Unity Events or C# events to decouple your game logic from UI code. This makes your code more modular and easier to maintain.
Why does my health bar flicker or update incorrectly?
Common causes include: not setting the Slider's maxValue before setting the current value, using integer division when you need float division, or updating the UI more frequently than necessary. Always ensure your health calculations use consistent data types and set maxValue first.
How do I create health bars that appear above enemies?
Use a World Space Canvas parented to each enemy GameObject. Set the Canvas Render Mode to "World Space" and scale it very small (like 0.01 on all axes). Position the canvas above the enemy sprite and use a Slider component as a child of this canvas.
What are the performance implications of frequently updating UI?
When any UI element changes, Unity marks the entire Canvas as "dirty" and redraws it. Separate frequently updated elements (health bars, scores) onto a different Canvas from static elements (backgrounds, menus) to improve performance. Also cache UI component references instead of using GetComponent.
How do I handle UI animations and smooth transitions?
Use DOTween (a popular Unity animation library), Unity's Animation system, or write custom coroutines to smoothly transition between values. For health bars, you might animate the Slider value over time rather than instantly setting it, creating a more polished feel.
What's the proper way to organize UI elements in my project?
Create separate Canvases for different UI layers: one for static background elements, one for dynamic HUD elements (health/score), and one for popup menus. Use consistent naming conventions and organize UI prefabs in dedicated folders. This makes your project easier to navigate and modify.
How do I make my score counter display numbers with proper formatting?
Use string formatting methods like score.ToString("N0") for comma-separated numbers, or score.ToString("D6") for zero-padded displays. For more complex formatting, use string.Format() or string interpolation to create displays like "Score: 1,234" or "Health: 85/100".