The Game Developer's Complete Guide to Character Control in Unreal Engine 5
From fundamental concepts to hands-on C++ implementation, learn to create responsive, professional-grade character movement that feels second nature to players.
Here's the thing about character control in Unreal Engine 5 - it's the difference between a game that feels like you're fighting the controls and one where movement becomes second nature. I remember my first attempts at implementing character control back when I was transitioning from finance to game development. I spent weeks trying to reinvent the wheel, writing custom physics systems when Unreal Engine already had everything I needed built right in.
The truth is, character control in Unreal engine 5 isn't just about making your character move from point A to point B. It's about creating that magical connection between the player's intentions and what happens on screen. When done right, it's invisible - players don't think about the controls, they just play. When done wrong, well, you'll know because your playtesters will tell you the game "feels clunky."
Today, I'm going to walk you through everything I wish someone had taught me about character movement in unreal engine 5, from the fundamental concepts to hands-on implementation that you can use in your projects right away.
What Makes Character Control Actually Work
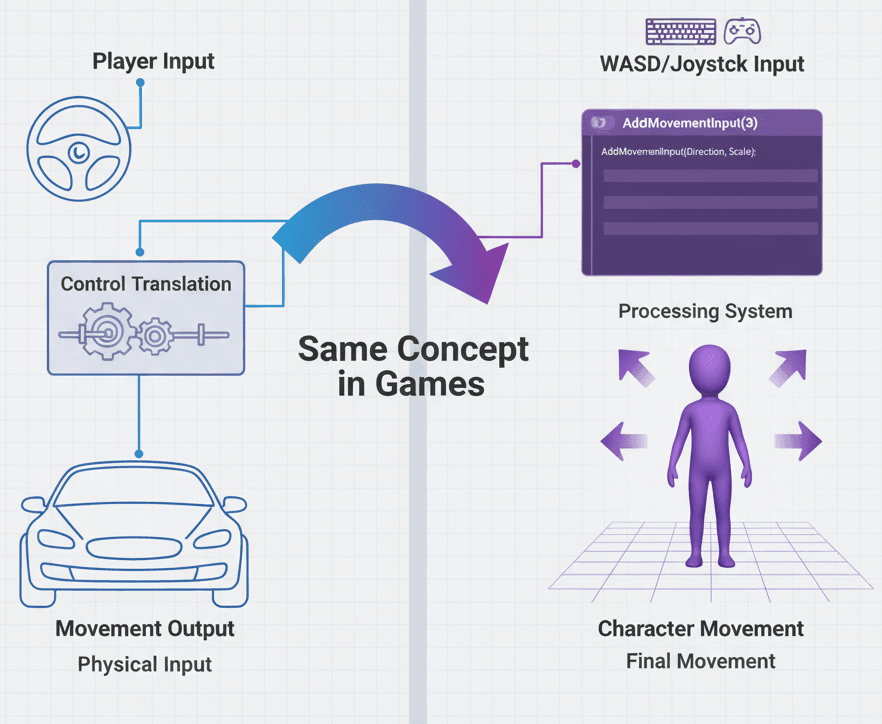
Let me start with something that took me months to fully understand: character movement is basically the engine and transmission for your digital character. Just like a car takes your steering wheel and pedal inputs and converts them into complex mechanical actions that make the vehicle move, character control systems take player input - whether that's pressing 'W' or tilting a joystick - and translate that into believable motion within your game world.
This system is what allows you to create everything from a soldier sprinting across a battlefield to a superhero soaring through the sky. It's the foundational layer that breathes life into a player's avatar, enabling them to explore and interact with your game world in meaningful ways.
The core problem character control solves is surprisingly complex when you dig into it. You're not just moving a model around - you're handling physics, collision detection, network synchronization for multiplayer, animation blending, and making it all feel responsive across different frame rates and hardware configurations.
The Building Blocks Every Game Developer Should Know
Been there - staring at Unreal Engine's character system wondering what all these components actually do. Let me break down the essential terminology that every game developer needs to understand:
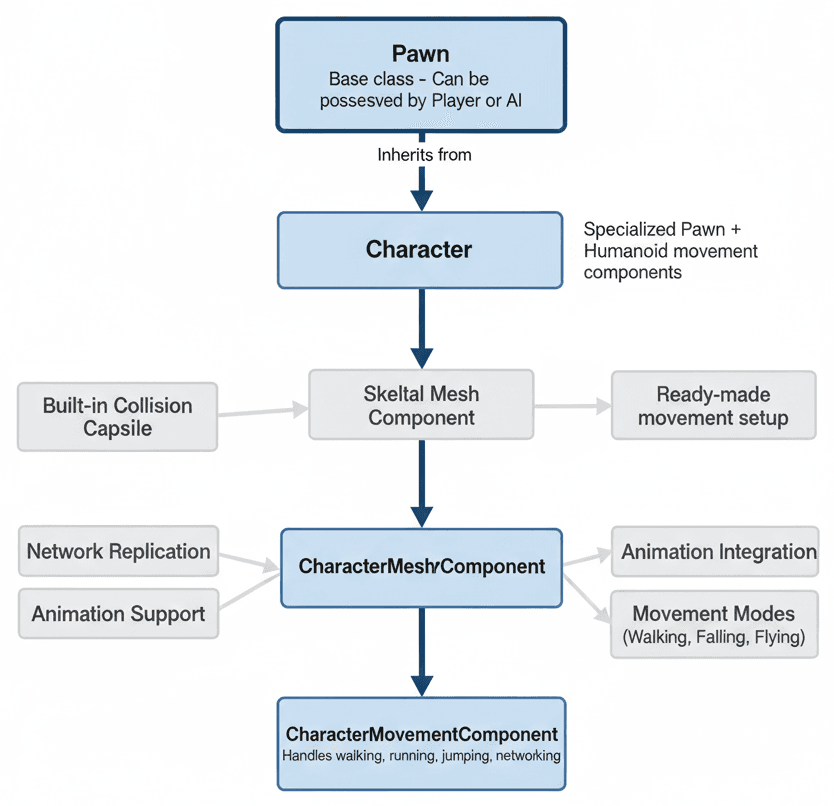
- Pawn is your base class for all actors in Unreal Engine that can be controlled by a player or by AI. Think of it as the fundamental object that can be "possessed." It's like the chassis of your character - necessary, but pretty bare bones on its own.
- Character is where things get interesting. This is a specialized type of Pawn that comes with a ready-made set of components specifically designed for humanoid movement. It includes the essential CharacterMovementComponent that handles walking, running, and jumping right out of the box.
- CharacterMovementComponent - this is your powerhouse. I can't stress enough how much development time this component saves you. It handles all the complex logic for how a Character moves, including walking, falling, swimming, and even network replication for multiplayer games. When I first discovered this component, it literally cut months off my development timeline.
- Input Action is part of Unreal Engine 5's new Enhanced Input system. It represents a specific player action like "Jump" or "Move," completely independent of any specific key or controller button. This abstraction is brilliant because it means you can easily remap controls later.
- Input Mapping Context connects your Input Actions to actual physical inputs - keyboard keys, controller buttons, mouse movement. The best part? You can dynamically enable or disable these contexts, which is perfect for things like switching between different control schemes or handling UI overlays.
- Movement Mode defines the physics and rules currently being applied to your character. The most common ones you'll work with are
MOVE_Walking,MOVE_Falling, andMOVE_Flying. The CharacterMovementComponent automatically handles transitions between these modes based on what's happening to your character.
Why CharacterMovementComponent Will Save You Months of Development
Actually, wait - let me tell you why this matters so much. When I was starting out, I thought I needed to build everything from scratch. Big mistake. Here's what the CharacterMovementComponent gives you for free:
- Enables Core Gameplay: It provides that fundamental interaction layer between the player and your game world. Without smooth character control, even the best game design falls flat.
- Faster Development Workflow: The built-in CharacterMovementComponent saves you countless hours by providing a robust, networked solution out of the box. I've seen too many developers spend months implementing basic character physics that Unreal Engine already handles perfectly.
- Improved Player Experience: Smooth, responsive, and predictable movement makes your game feel polished and professional. Players might not consciously notice great character control, but they'll definitely notice when it's bad.
- Scalable for Multiplayer: Here's something that bit me early on - the component is designed from the ground up with network replication in mind. If there's any chance your game might need multiplayer later, you'll thank yourself for using this system.
The Two Paths: Built-in vs Custom (And When to Choose Each)
You know what's funny? I spent so much time trying to figure out which approach to use that I could have built three different character controllers in the same timeframe. Here's the comparison that would have saved me weeks of analysis paralysis:
| Criteria | Approach A: CharacterMovementComponent | Approach B: Custom Physics (SetActorLocation) |
|---|---|---|
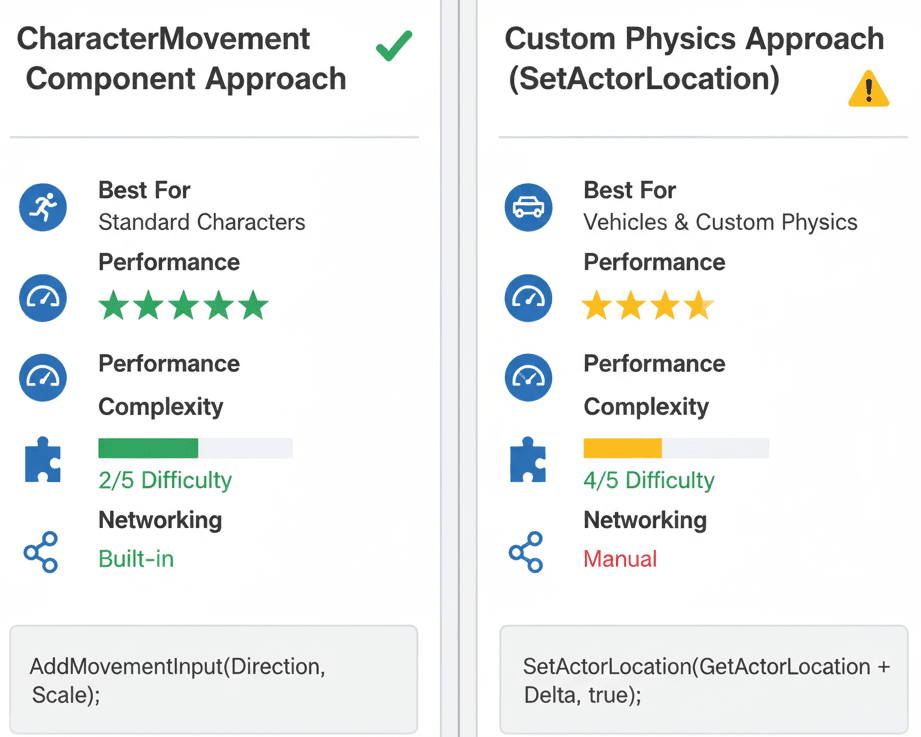
| Best For | Standard humanoid characters (walking, running, jumping). | Vehicles, physics-based objects, or highly custom movement. |
| Performance | Highly optimized and efficient for networking. | Can be less performant and requires manual network replication. |
| Complexity | Low. Most features are built-in and configurable. | High. Requires manual implementation of gravity, collision, etc. |
| Code Example | AddMovementInput(Direction, Scale); |
SetActorLocation(GetActorLocation() + Delta, true); |
Usually, this choice is easier than you think. For any bipedal character - whether it's a first-person shooter protagonist or a third-person adventure hero - go with CharacterMovementComponent. I only recommend the custom approach when you're building something truly unique like vehicles or characters with completely non-standard physics.
Real Games That Got Character Control Right
Let me share some examples that I always point my students toward when they're studying character control implementation:
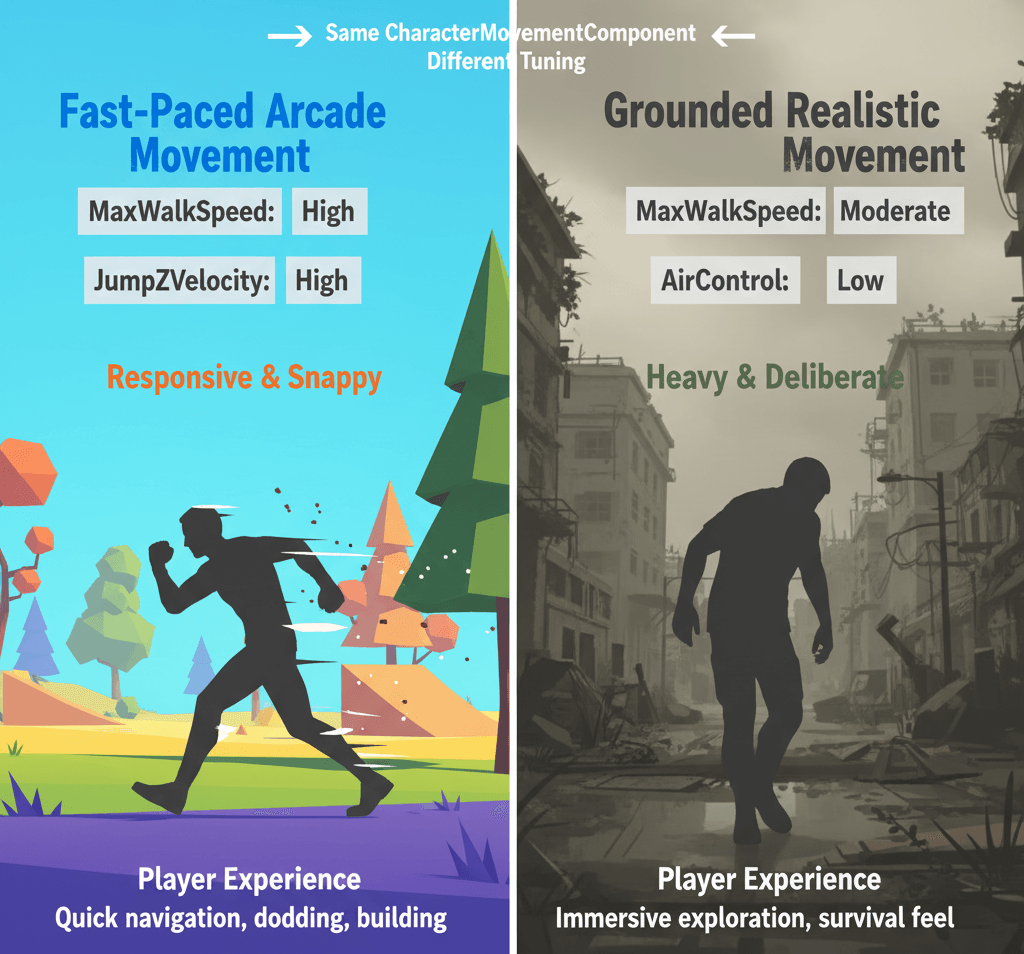
The Fast-Paced Feel of Fortnite
The running, sprinting, and jumping mechanics in Fortnite are a masterclass in responsive character control. This is a classic example of a finely-tuned CharacterMovementComponent, with variables like MaxWalkSpeed, JumpZVelocity, and AirControl adjusted for that responsive, arcade-like feel that keeps players engaged. The result? Players can quickly navigate the environment, build structures, and dodge enemy fire with fluid and predictable movement that never gets in the way of the gameplay.
The Grounded Realism of The Last of Us
Joel's movement feels completely different - heavy, deliberate, and context-aware. From a developer's perspective, what makes this brilliant is how they used the CharacterMovementComponent but likely with custom movement modes and extensive animation blending to create a sense of weight and realism. The movement system reinforces the game's survival-horror tone, making the character feel more like a real person navigating a dangerous world rather than a video game avatar.
After analyzing dozens of games, what stands out is how the best character control systems disappear into the background. Players don't fight the controls - they become an extension of their intentions.
Building Your First WASD Controller From Scratch
Alright, let's get our hands dirty. I'm going to walk you through creating a basic third-person character that responds to WASD keys - the exact same way I approach this in my own projects. We'll use the Enhanced Input system because, trust me, it's worth learning the new way rather than getting stuck with the old input system.
Here's my step-by-step process that I've refined over dozens of projects:
Setting Up Your Project Foundation
First, create a new C++ class based on Character. This gives you access to the CharacterMovementComponent and all the networking features built into Unreal Engine.
Next, you'll need two Input Action assets:
IA_MovewithAxis2D (Vector2D)Value Type for WASD movementIA_LookwithAxis2D (Vector2D)Value Type for mouse look
Then create an Input Mapping Context asset. Map your W, S, A, D keys to the IA_Move action and mouse XY movement to the IA_Look action.
The Core Character Class Implementation
Here's the exact header file I use as my starting template - I've configured this setup dozens of times, and these are my go-to includes and structure:
#pragma once

#include "CoreMinimal.h"
#include "GameFramework/Character.h"
#include "MyCharacter.generated.h"

class UInputMappingContext;
class UInputAction;
struct FInputActionValue;

UCLASS()
class AMyCharacter : public ACharacter
{
    GENERATED_BODY()

public:
    AMyCharacter();

protected:
    virtual void BeginPlay() override;

    UPROPERTY(EditAnywhere, BlueprintReadOnly, Category = Input)
    UInputMappingContext* DefaultMappingContext;

    UPROPERTY(EditAnywhere, BlueprintReadOnly, Category = Input)
    UInputAction* MoveAction;

    UPROPERTY(EditAnywhere, BlueprintReadOnly, Category = Input)
    UInputAction* LookAction;

    void Move(const FInputActionValue& Value);
    void Look(const FInputActionValue& Value);

public:
    virtual void SetupPlayerInputComponent(class UInputComponent* PlayerInputComponent) override;
};
Now for the implementation - this is where the magic happens. Let me show you the exact method I use when setting up character control:
#include "MyCharacter.h"
#include "EnhancedInputComponent.h"
#include "EnhancedInputSubsystems.h"
#include "GameFramework/SpringArmComponent.h"
#include "Camera/CameraComponent.h"
AMyCharacter::AMyCharacter()
{
// ... (Constructor setup for camera boom and camera)
}
void AMyCharacter::BeginPlay()
{
Super::BeginPlay();
if (APlayerController* PlayerController = Cast(Controller))
{
if (UEnhancedInputLocalPlayerSubsystem* Subsystem = ULocalPlayer::GetSubsystem(PlayerController->GetLocalPlayer()))
{
Subsystem->AddMappingContext(DefaultMappingContext, 0);
}
}
}
void AMyCharacter::SetupPlayerInputComponent(UInputComponent* PlayerInputComponent)
{
if (UEnhancedInputComponent* EnhancedInputComponent = CastChecked(PlayerInputComponent))
{
EnhancedInputComponent->BindAction(MoveAction, ETriggerEvent::Triggered, this, &AMyCharacter::Move);
EnhancedInputComponent->BindAction(LookAction, ETriggerEvent::Triggered, this, &AMyCharacter::Look);
}
}
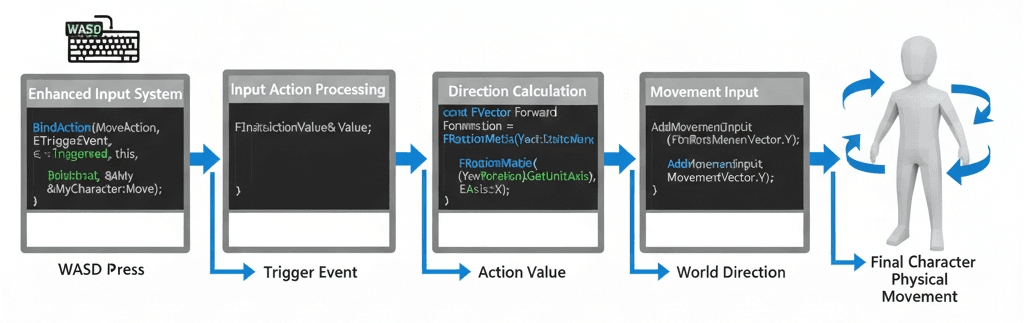
void AMyCharacter::Move(const FInputActionValue& Value)
{
FVector2D MovementVector = Value.Get();
if (Controller != nullptr)
{
const FRotator Rotation = Controller->GetControlRotation();
const FRotator YawRotation(0, Rotation.Yaw, 0);
const FVector ForwardDirection = FRotationMatrix(YawRotation).GetUnitAxis(EAxis::X);
const FVector RightDirection = FRotationMatrix(YawRotation).GetUnitAxis(EAxis::Y);
AddMovementInput(ForwardDirection, MovementVector.Y);
AddMovementInput(RightDirection, MovementVector.X);
}
}
void AMyCharacter::Look(const FInputActionValue& Value)
{
FVector2D LookAxisVector = Value.Get();
if (Controller != nullptr)
{
AddControllerYawInput(LookAxisVector.X);
AddControllerPitchInput(LookAxisVector.Y);
}
} Understanding the Key Functions
The AddMovementInput function is the core of character locomotion - I can't emphasize this enough. It takes a world direction and a scale value to push the character in that direction. The beauty of this system is that it handles all the complex physics, collision detection, and networking for you.
When you bind input actions, you're connecting a function to an Input Action's trigger event. This happens in the SetupPlayerInputComponent method, and it's typically where I handle all my character's input bindings:
// Bind the "Move" action
if (MoveAction)
{
    EnhancedInputComponent->BindAction(MoveAction, ETriggerEvent::Triggered, this, &AMyCharacter::Move);
}
The movement calculation itself handles camera-relative movement:
// Move the character forward
void AMyCharacter::Move(const FInputActionValue& Value)
{
    FVector2D MovementVector = Value.Get();
    if (Controller != nullptr)
    {
        const FRotator Rotation = Controller->GetControlRotation();
        const FRotator YawRotation(0, Rotation.Yaw, 0);
        const FVector ForwardDirection = FRotationMatrix(YawRotation).GetUnitAxis(EAxis::X);
        AddMovementInput(ForwardDirection, MovementVector.Y);
    }
}
This ensures that pressing W always moves the character forward relative to the camera, not forward in world space - a detail that makes character control feel intuitive.
You can find complete documentation about characters in Unreal Engine at the official docs and detailed information about CharacterMovementComponent methods at the Python API reference. The third person template documentation provides additional implementation examples.
The Pro Tips That Separate Amateur From Professional
Here's what I wish someone had told me when I was starting out - the small details that make the difference between a character controller that works and one that feels professional:
- Always Use Enhanced Input: I learned this the hard way. Unreal Engine 5's Enhanced Input system provides cleaner, more flexible input handling. Don't get stuck using the old input system - trust me on this one.
- Favor CharacterMovementComponent: For any bipedal character, use the built-in component instead of trying to reinvent the wheel. It handles networking, prediction, and smoothing automatically - features that would take months to implement properly on your own.
- Frame Rate Independent Movement: This one bit me early in my career. Always use the
DeltaTimevalue in your Tick function for any custom movement logic. Here's the pattern I always use:
// Example of frame rate independent movement
FVector NewLocation = GetActorLocation() + (MovementDirection * Speed * DeltaTime);
SetActorLocation(NewLocation);- Test on Multiple Frame Rates: I always test character movement at both 60 FPS and 30 FPS during development. Movement that feels great at high frame rates can feel sluggish or unpredictable at lower ones.
- Consider Character Movement Settings Early: Don't wait until the end of development to tune movement parameters like
MaxWalkSpeed,JumpZVelocity, andAirControl. These settings dramatically impact how your game feels, and players controller in unreal engine 5 systems are highly sensitive to these values.
What we've covered today is just the foundation of character control in Unreal Engine 5. You now understand how to make a character control in unreal engine 5, from the basic concepts to hands-on implementation. But character movement is just one piece of creating engaging gameplay experiences.
If you're ready to take your game development skills to the next level and learn how to build complete game experiences from concept to completion, I highly recommend checking out our comprehensive course: Build Your First Game with Unity and C#. This course takes you through the entire process of creating professional-quality games, covering everything from character control to game mechanics, UI systems, and publishing your finished game.
Key Takeaways
- CharacterMovementComponent is your best friend - it handles complex physics, networking, and collision detection automatically, saving months of development time.
- Enhanced Input system provides cleaner input handling - always use Input Actions and Input Mapping Contexts instead of the old input system for better flexibility.
- AddMovementInput is the core function for character locomotion - it takes a world direction and scale value to create smooth, physics-based character movement.
- Movement modes automatically handle different character states - MOVE_Walking, MOVE_Falling, and MOVE_Flying transitions are handled seamlessly by the built-in component.
- Frame rate independent movement requires DeltaTime - always multiply movement calculations by DeltaTime to ensure consistent behavior across different hardware.
- Real-world game examples show the power of proper tuning - games like Fortnite and The Last of Us demonstrate how the same underlying system can create completely different player experiences.
- Character movement setting values dramatically impact game feel - parameters like MaxWalkSpeed, JumpZVelocity, and AirControl should be tuned early and tested frequently.
- Network replication comes built-in - the CharacterMovementComponent handles multiplayer synchronization automatically, making it ideal for both single-player and multiplayer projects.
Common Questions
What is the difference between Pawn and Character in Unreal Engine 5?
Pawn is the base class for any actor that can be controlled by a player or AI. Character is a specialized type of Pawn that comes with built-in components for humanoid movement, including the CharacterMovementComponent, collision capsule, and skeletal mesh components.
How do I set up basic WASD movement for my character?
Create Input Action assets for movement and looking, set up an Input Mapping Context to bind them to WASD keys and mouse, then implement Move and Look functions in your Character class that call AddMovementInput and AddControllerYawInput/AddControllerPitchInput respectively.
When should I use CharacterMovementComponent versus custom physics?
Use CharacterMovementComponent for standard bipedal characters (walking, running, jumping). Only use custom physics for vehicles, physics-based objects, or highly specialized movement that can't be achieved with the built-in component.
What are Input Actions and why should I use them?
Input Actions are part of Unreal Engine 5's Enhanced Input system. They represent player actions like "Jump" or "Move" independent of specific keys, making it easier to remap controls and handle different input devices without changing your core game logic.
How do I make my character movement feel responsive?
Focus on tuning parameters like MaxWalkSpeed, JumpZVelocity, and AirControl in the CharacterMovementComponent. Also ensure your movement calculations use DeltaTime for frame rate independence and test across different performance scenarios.
Why does my character movement feel different at various frame rates?
This usually happens when movement calculations don't account for frame time. Always multiply movement vectors by DeltaTime to ensure consistent movement speed regardless of frame rate variations.
What is AddMovementInput and how does it work?
AddMovementInput is the primary function for character locomotion. It takes a world direction vector and a scale value, then applies movement in that direction while handling all the underlying physics, collision detection, and networking automatically.
How do I handle camera-relative movement?
Get the controller's control rotation, extract only the yaw component, then use FRotationMatrix to get the forward and right direction vectors. Apply these directions to AddMovementInput so that pressing W always moves forward relative to where the camera is looking.
Can I modify CharacterMovementComponent for custom movement types?
Yes, CharacterMovementComponent is highly configurable and supports custom movement modes. You can adjust built-in parameters or extend the component with custom movement modes for specialized behaviors like climbing or swimming.
What are Movement Modes and how do they work?
Movement Modes define the current physics and rules applied to your character, such as MOVE_Walking, MOVE_Falling, or MOVE_Flying. The CharacterMovementComponent automatically transitions between these modes based on the character's current state and environment.