Stop Losing Players to Frustrating Deaths: How I Build Bulletproof Checkpoint Systems in UE5
A deep dive into the fundamental skill of creating player-friendly respawn systems that separates amateur projects from professional experiences in game development.

Here's the thing - I remember the first time I saw a player rage-quit my game. They'd spent 20 minutes carefully navigating through this intricate level I'd designed, and then... death. Back to the very beginning. No checkpoint. No mercy. Just pure, concentrated frustration.
That moment taught me something crucial about game development: even the most brilliant level design means nothing if players can't experience it without losing their minds. Today, I want to share everything I've learned about building checkpoint and respawn systems that keep players engaged instead of driving them away. After working on multiple projects and seeing countless student games, I've realized that respawning a player character properly is one of those fundamental skills that separates amateur projects from professional experiences.
Why Your Game Desperately Needs This System
Let me tell you what happens when you don't have a proper checkpoint system. Players spend significant time progressing through your carefully crafted levels, learning your mechanics, getting invested in the experience. Then they fail - which is completely normal and expected in good game design. But instead of giving them a chance to learn and improve, you force them to replay everything they've already mastered.
I've seen this kill more student projects than I can count. A checkpoint system in ue5 solves this fundamental problem by creating what I like to call "progress bookmarks." Think of it like reading a book - if you get interrupted, you don't start from page one. You flip to your bookmark and continue exactly where you left off.
After analyzing hundreds of student projects, here's what a proper respawn system actually gives you:
- Improved Player Experience: Reduces frustration by preventing players from having to replay large sections of the game, making difficult challenges feel more fair and achievable.
- Enables Iterative Level Design: Allows designers to create longer and more complex levels with distinct sections, knowing that players will have safe points to return to.
- Supports Varied Gameplay: Checkpoints can be used to trigger other events, such as refilling health, saving game state, or changing environmental conditions.
- Creates a Sense of Progression: Activating a checkpoint provides positive feedback to the player, giving them a tangible sense of accomplishment and forward momentum.
The Building Blocks Every UE5 Developer Should Know
Before we dive into implementation, let me break down the core components you'll be working with. I learned these the hard way during my early projects, and understanding them properly will save you hours of debugging later.
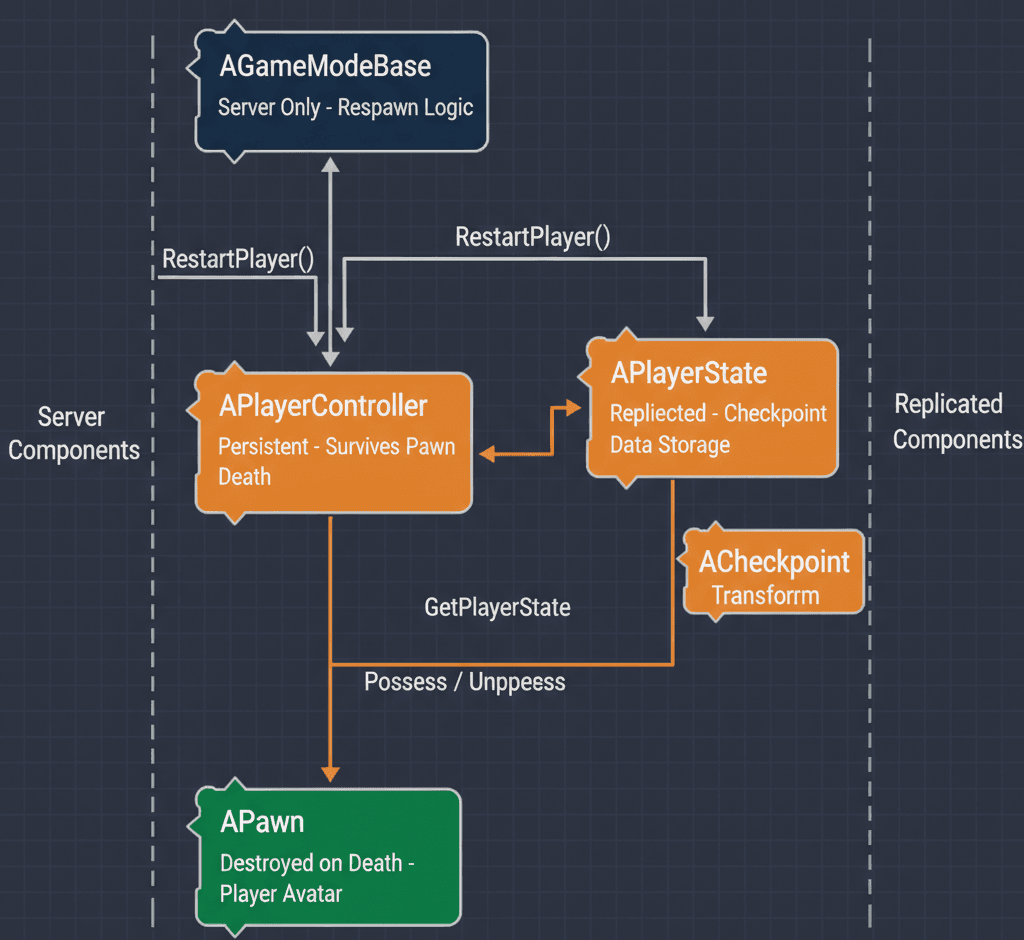
- GameMode: This is a server-only Blueprint or C++ class that defines the rules and logic of your game, such as scoring, player count, and, most importantly, the respawn process.
- GameState: This class exists on the server and all clients and is used to maintain the overall state of the game that all players need to be aware of, such as the list of connected players or global objectives.
- PlayerController: Representing the human player's will, this class takes player input and translates it into actions for the Pawn, and it persists even when the Pawn it is controlling dies.
- PlayerState: This class is for storing information about a specific player that needs to be replicated to all clients, such as the player's name, score, or the location of their last activated checkpoint.
- Pawn: The Pawn is the in-game avatar that a player controls; it is the entity that gets destroyed upon "death" and is the object that needs to be respawned.
- Checkpoint: A specific location or state in the game world that, when triggered by the player, saves their progress so they can return to it upon death.
- Respawn Point: A designated
AActor(often aAPlayerStartactor) in the level that defines a specific transform (location, rotation, and scale) where a player's Pawn will be recreated. - PlayerStart: A built-in actor in Unreal Engine that is specifically designed to mark potential starting and respawning locations for players within a level.
Here's What Actually Happens When Your Player Dies
Understanding the respawn system in ue5 means grasping the exact sequence of events that occurs behind the scenes. I remember spending weeks trying to figure this out when I first started, so let me walk you through it step by step.
The AGameModeBase class contains the core logic for handling player lifecycle events, including spawning and respawning. When a player needs to be respawned, it is the GameMode's responsibility to handle the request and create a new Pawn. You can find more details in the Unreal Engine Docs - AGameModeBase::RestartPlayer.
// In your custom GameMode.h
virtual void RestartPlayer(AController* NewPlayer);
To respawn a player at the correct checkpoint, you must first save that checkpoint's transform. This is often stored in the APlayerState, as it is unique to each player and replicates automatically.
// In your custom PlayerState.h
FTransform LastCheckpointTransform;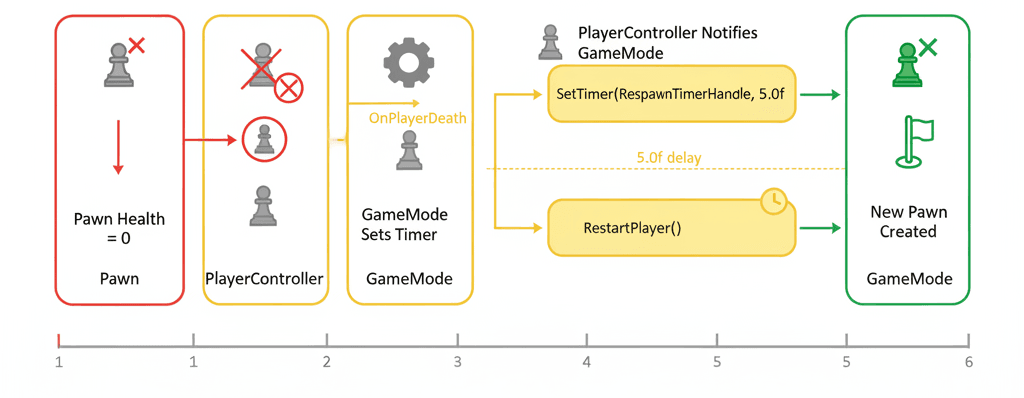
Here's the complete flow I use in my projects: When a Pawn's health reaches zero, it is destroyed. The PlayerController, which persists, then notifies the GameMode that its Pawn has died. The GameMode waits for a specified delay and then calls its RestartPlayer function, which creates a new Pawn at the stored checkpoint location.
The implementation uses the AGameModeBase::RestartPlayerAtTransform function:
// In your GameMode, after a delay...
GetWorld()->GetTimerManager().SetTimer(RespawnTimerHandle, this, &AMyGameMode::RespawnPlayer, 5.0f, false);

void AMyGameMode::RespawnPlayer()
{
    // Logic to get the correct PlayerController and their last checkpoint transform
    RestartPlayerAtTransform(PlayerController, LastCheckpointTransform);
}
My Go-To Approach: PlayerState vs GameState Storage
After working on dozens of projects, I've developed a clear framework for deciding how to setup a respawn in ue5. The choice between storing checkpoint data in PlayerState versus GameState depends entirely on your game's structure.
| Criteria | Approach A: Storing in PlayerState | Approach B: Storing in GameState |
|---|---|---|
| Best For | Single-player games or multiplayer games where each player has their own individual checkpoint progression. | Multiplayer games where all players share the same checkpoint, such as reaching a new area in a cooperative mission. |
| Performance | Minimal performance impact, as data is only replicated for the owning player and to the server. | Slightly higher replication cost if there are many players, but negligible in most cases. |
| Complexity | Simple to implement; the data is directly tied to the player's identity and is easy to access and manage. | Requires more careful management to ensure the global checkpoint is updated correctly and doesn't cause conflicts between players. |
| Code Example | PlayerState->LastCheckpointTransform = NewTransform; |
GameState->GlobalCheckpointTransform = NewTransform; |
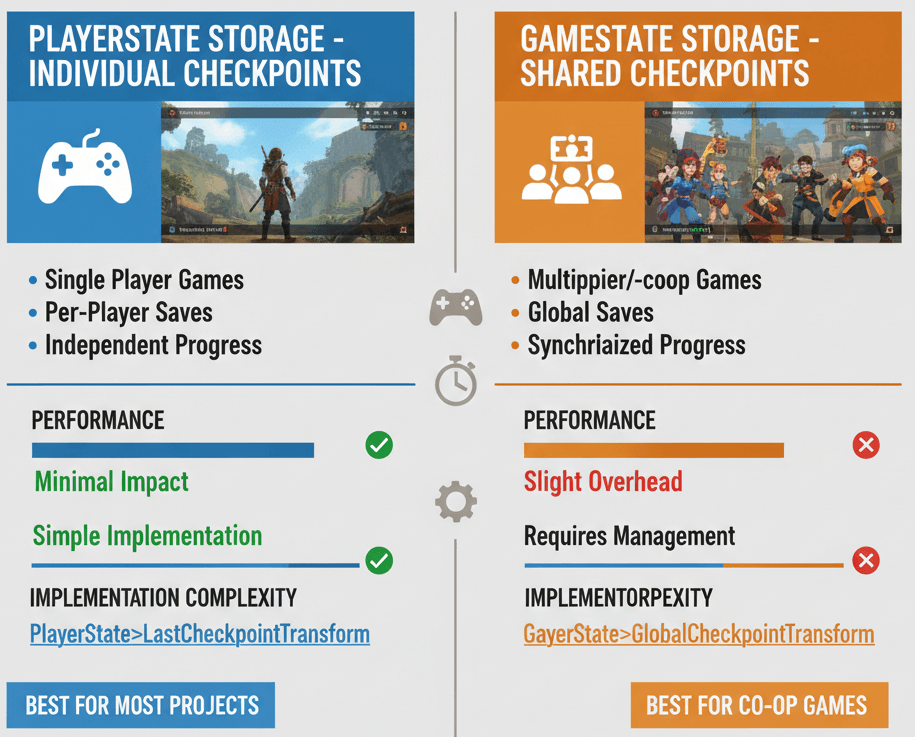
In most student projects I review, PlayerState storage is the way to go. It's simpler, more intuitive, and handles the majority of use cases perfectly.
What I've Learned from Studying the Masters
I always tell my students to study how successful games handle respawning. Let me share two examples that completely changed how I think about checkpoint design.
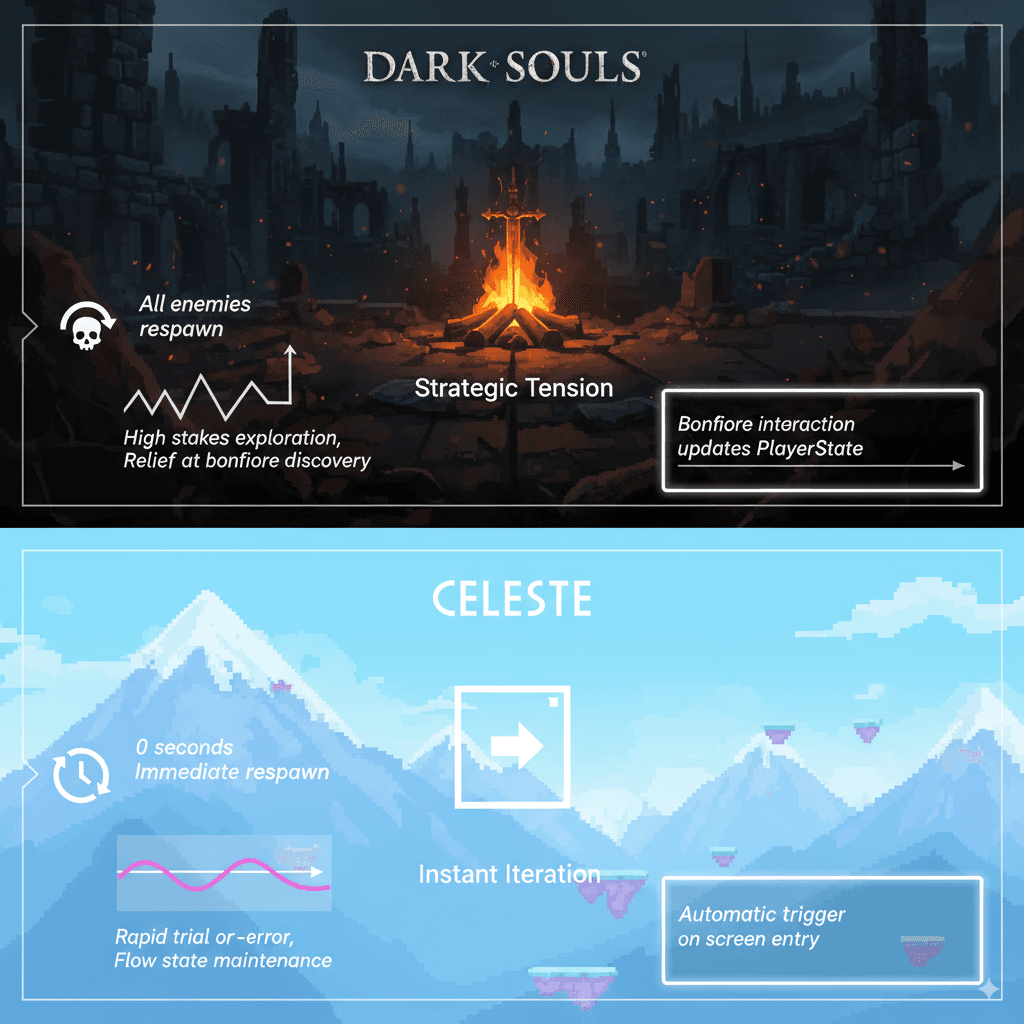
The Dark Souls Approach: Strategic Tension
The iconic bonfires serve as checkpoints. When a player rests at a bonfire, it becomes their new respawn point, and all non-boss enemies in the world are reset.
From a developer's perspective, what makes this brilliant is how the bonfire actor, when interacted with, updates the PlayerState with its transform. The GameMode is configured to respawn the player at this saved location and also holds logic to reset enemy actors in the level.
This creates a high-stakes exploration loop where finding a new bonfire is a moment of immense relief and a major milestone in the player's journey. Every step forward feels meaningful because the consequences of failure are real but not devastating.
The Celeste Method: Instant Iteration
Here's another approach I find fascinating: Each new screen or sub-level the player enters acts as an automatic checkpoint. Upon death, the player instantly respawns at the entrance of that specific screen.
The implementation is elegantly simple - a trigger volume at the entrance of each screen updates the player's respawn transform. The respawn delay in the GameMode is set to zero, creating an instantaneous and seamless respawn loop.
This encourages rapid, trial-and-error gameplay. Death is a minor setback, allowing players to quickly learn from their mistakes and master difficult platforming challenges without breaking their flow.
The Exact Blueprint I Use Every Time
Let me walk you through my tried-and-tested approach for implementing how to make checkpoint in ue5. I've refined this process through countless projects, and it's served me well every time.
Setting Up Tagged PlayerStart Actors
Instead of just storing a transform, I recommend using APlayerStart actors with unique FName tags. This approach gives you visual markers in the editor and makes debugging much easier. Here's the exact implementation from the Unreal Engine Docs - Finding Player Starts:
// In your GameMode, override FindPlayerStart
AActor* AMyGameMode::FindPlayerStart_Implementation(AController* Player, const FString& IncomingName)
{
    // If an IncomingName is provided, find the PlayerStart with that tag
    if (!IncomingName.IsEmpty())
    {
        TArray PlayerStarts;
        UGameplayStatics::GetAllActorsOfClass(GetWorld(), APlayerStart::StaticClass(), PlayerStarts);
        for (AActor* Start : PlayerStarts)
        {
            APlayerStart* PlayerStart = Cast(Start);
            if (PlayerStart && PlayerStart->PlayerStartTag.ToString() == IncomingName)
            {
                return PlayerStart;
            }
        }
    }
    // Fallback to default behavior
    return Super::FindPlayerStart_Implementation(Player, IncomingName);
}
Creating a Dedicated Checkpoint Actor
Trust me, you'll thank me later for this tip - create a dedicated ACheckpoint actor. This actor can handle its own logic, such as playing a visual effect when activated and then telling the PlayerState to save its location. This is a much cleaner approach than putting the logic in the player character.
// Inside ACheckpoint.cpp, on overlap
void ACheckpoint::OnOverlapBegin(UPrimitiveComponent* OverlappedComp, AActor* OtherActor, ...)
{
    AMyCharacter* PlayerCharacter = Cast(OtherActor);
    if (PlayerCharacter)
    {
        AMyPlayerState* PlayerState = PlayerCharacter->GetPlayerState();
        if (PlayerState)
        {
            PlayerState->LastCheckpointTransform = GetActorTransform();
            // Play activation effects, etc.
        }
    }
}
Step-by-Step Blueprint Implementation
Here's my complete walkthrough for implementing a simple trigger volume checkpoint system:
Scenario Goal: Create a simple checkpoint system where a player respawns at the location of the last trigger volume they entered.
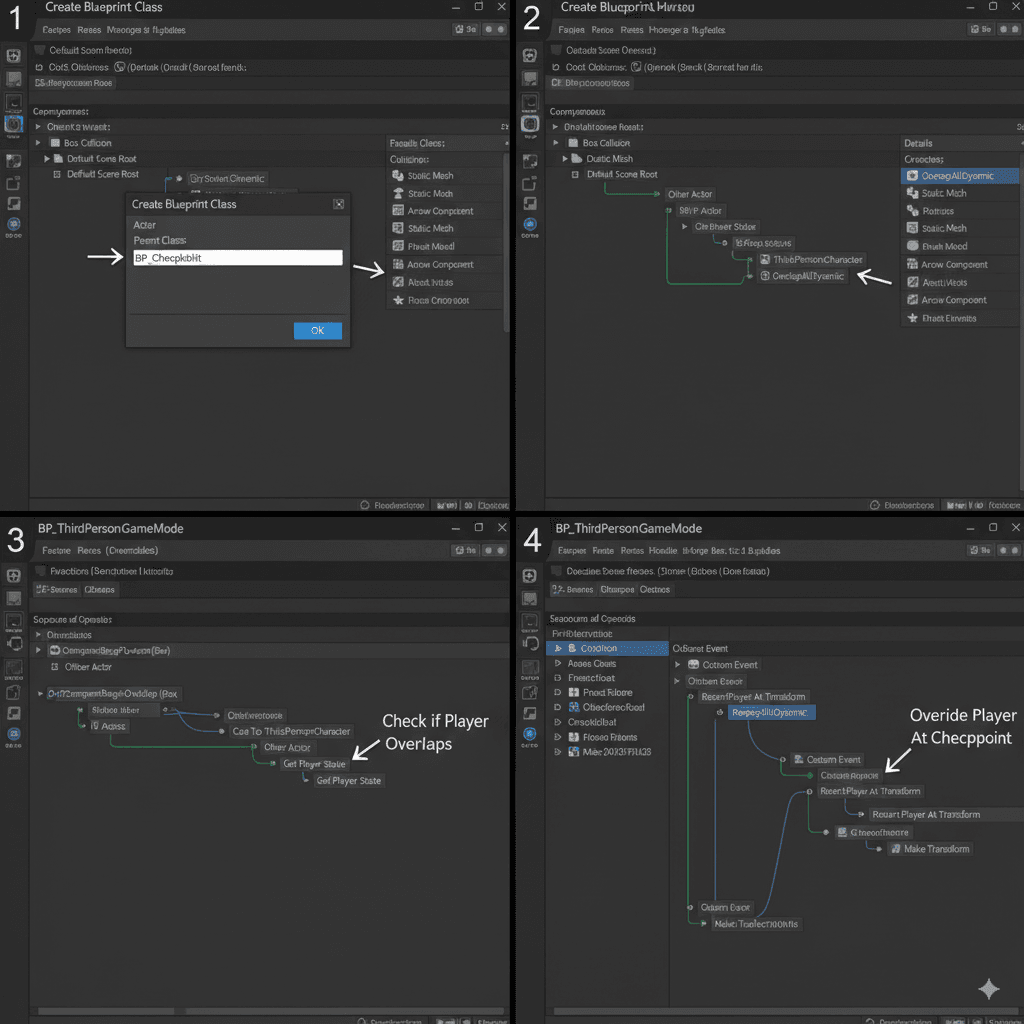
Unreal Editor Setup:
- Create a new Blueprint class based on
Actor, namedBP_Checkpoint. - Add a
Box Collisioncomponent toBP_Checkpoint. Set its collision preset toOverlapAllDynamic. - Place several
BP_Checkpointactors in your level. - Create a custom
GameModeBlueprint and a customPlayerStateBlueprint and assign them in your World Settings.
Step-by-Step Code Implementation:
In your PlayerState Blueprint:
- Create a new variable named
LastCheckpointTransformof typeTransform.
In your BP_Checkpoint Blueprint (Event Graph):
- Get the
OnComponentBeginOverlapevent for theBox Collision. - From the
Other Actorpin, cast to yourPlayer CharacterBlueprint. - If the cast succeeds, get the
Player Statefrom the character. - Cast the
Player Stateto your customPlayerStateBlueprint. - From your custom
PlayerState, set theLastCheckpointTransformvariable to the result of aGet Actor Transformnode (withselfas the target).
In your GameMode Blueprint (Event Graph):
- Override the
Restart Playerfunction. - Get the
Player Statefrom theNew Playercontroller. - Cast it to your custom
PlayerStateand get theLastCheckpointTransform. - Use the
Restart Player at Transformfunction, passing in theNew Playercontroller and theLastCheckpointTransform.
Ready to Start Building Your First Game?
The checkpoint system we just covered is exactly the kind of fundamental skill you'll use in every game project. But here's the thing - implementing these systems is just the beginning. To really master game development, you need hands-on experience building complete projects from start to finish.
If you're ready to go beyond tutorials and start creating real games, I've designed a comprehensive course that takes you from basic concepts to professional-level game development. You'll learn not just the technical skills, but also the design thinking and problem-solving approaches that separate hobbyists from professionals.
Check out my complete game development course where we build actual games together, covering everything from core mechanics to advanced systems like the checkpoint implementation we just discussed.
Your Next Steps to Implementation
Based on my experience teaching hundreds of students, here's exactly what I recommend you do next:
Start small with a basic trigger volume checkpoint system. Get comfortable with the PlayerState storage approach before you try anything fancy. Once you have that working reliably, experiment with different checkpoint activation methods - maybe proximity detection instead of overlap, or manual activation through player input.
The key is iteration. Build something simple, test it thoroughly, then gradually add complexity. I've seen too many students try to create elaborate checkpoint systems on their first attempt and get lost in the technical details.
Remember, the goal isn't to build the most sophisticated system possible - it's to create something that serves your players and enhances their experience with your game.
Wrapping Up: The Foundation of Player-Friendly Design
Respawning a player character properly isn't just a technical challenge - it's a fundamental aspect of player-centered design. Every checkpoint you place is a promise to your players that their time and effort matter. Every respawn system you build is an opportunity to turn potential frustration into renewed determination.
The techniques I've shared here have served me well across multiple projects and engine versions. They're not the only way to solve these problems, but they're reliable, tested approaches that will give your players the experience they deserve.
Key Takeaways
- GameMode handles the respawn logic: Use
RestartPlayerandRestartPlayerAtTransformfunctions to manage player lifecycle events properly. - PlayerState is your friend for individual checkpoints: Store checkpoint transforms in PlayerState for single-player games and individual progression systems.
- Dedicated Checkpoint actors keep code clean: Create separate Blueprint actors for checkpoint logic instead of cramming everything into the player character.
- Tagged PlayerStart actors provide flexibility: Use
PlayerStartTagto create multiple spawn points that can be referenced by name. - Study successful games for inspiration: Analyze how Dark Souls and Celeste handle checkpoints to understand different design philosophies.
- Start simple, then iterate: Begin with basic trigger volume checkpoints before adding complex features.
- Visual feedback matters: Always provide clear indication when a checkpoint is activated to give players confidence in the system.
- Test thoroughly across different scenarios: Ensure your respawn system works correctly in edge cases like rapid deaths or checkpoint skipping.
Common Questions
What is the difference between GameMode and PlayerState for storing checkpoint data?
GameMode handles the logic of respawning players, while PlayerState stores player-specific data like checkpoint locations. Use PlayerState for individual player checkpoints and GameState for shared checkpoints in multiplayer games.
How do I set up a basic checkpoint system in UE5 Blueprints?
Create a Blueprint actor with a collision component, add overlap detection that casts to your player character, then store the checkpoint transform in your custom PlayerState Blueprint. Override the GameMode's Restart Player function to use the stored transform.
When should I use PlayerStart actors instead of storing transforms?
PlayerStart actors are better when you need visual markers in the editor, want to reuse spawn points, or need more complex spawning logic. They're also easier to manage in larger levels with multiple designers.
Why does my respawn system not work in multiplayer?
Make sure your checkpoint data is stored in PlayerState (which replicates automatically) rather than local variables. Also ensure your GameMode logic runs on the server and properly handles multiple PlayerControllers.
How do I add a delay before respawning the player?
Use GetWorld()->GetTimerManager().SetTimer() in your GameMode to create a delay between player death and the RestartPlayer function call, as shown in the code examples above.
What's the best way to trigger checkpoints - collision or interaction?
Collision-based checkpoints work well for progression markers, while interaction-based checkpoints (like Dark Souls bonfires) work better when you want the checkpoint activation to be a deliberate player choice.
How do I reset enemies when a player respawns at a checkpoint?
Store references to enemies in your GameState or a dedicated system, then iterate through them in your respawn logic to reset their health, position, and AI state as needed.
Can I use the same checkpoint system for both 2D and 3D games?
Yes, the fundamental logic is identical. The only difference might be in collision detection (2D collision components vs 3D) and transform handling, but the core PlayerState storage approach works for both.
How do I prevent checkpoint spamming or exploitation?
Add cooldown timers, require certain conditions to be met (like defeating enemies in the area), or use proximity checks to ensure players can't activate the same checkpoint repeatedly.
What happens if a player joins a multiplayer game after checkpoints have been activated?
New players should spawn at the most recent global checkpoint if using GameState storage, or at the default spawn point if using individual PlayerState checkpoints. Design your logic to handle these edge cases gracefully.