How to Master Cinemachine Sensitivity: The Game-Changing Settings Every Unity Developer Needs
Learn how to tune your camera's responsiveness, from smooth cinematic pans to twitchy shooter controls, and give your players the professional, polished experience they deserve.
Here's the thing about camera controls in games - they can make or break your entire player experience. I remember spending my first weekend at Carnegie Mellon trying to build a simple third-person camera for my game project. The character moved fine, but the camera? It felt like trying to steer a shopping cart with a broken wheel. Too sensitive, and players got motion sickness. Too sluggish, and the game felt unresponsive.
That's when I discovered the real magic isn't just in Cinemachine itself, but in understanding exactly how to tune your cinemachine sensitivity settings. After years of working on game projects and helping hundreds of students at Outscal, I've learned that mastering camera sensitivity is like adjusting the power steering in a car - some players prefer a light, sensitive touch, while others need something more deliberate and controlled.
Table of Contents
- Why Your Camera Feels Wrong (And How Cinemachine Fixes It)
- The Building Blocks: What Controls Your Camera's Behavior
- Where the Magic Happens: Finding Your Sensitivity Settings
- My Battle-Tested Approach vs. Quick Inspector Tweaks
- Why This Completely Changes Your Game's Feel
- The Pro Setup I Use in Every Project
- How The Best Games Handle Camera Control
- Three Ways to Implement Perfect Camera Control
Why Your Camera Feels Wrong (And How Cinemachine Fixes It)
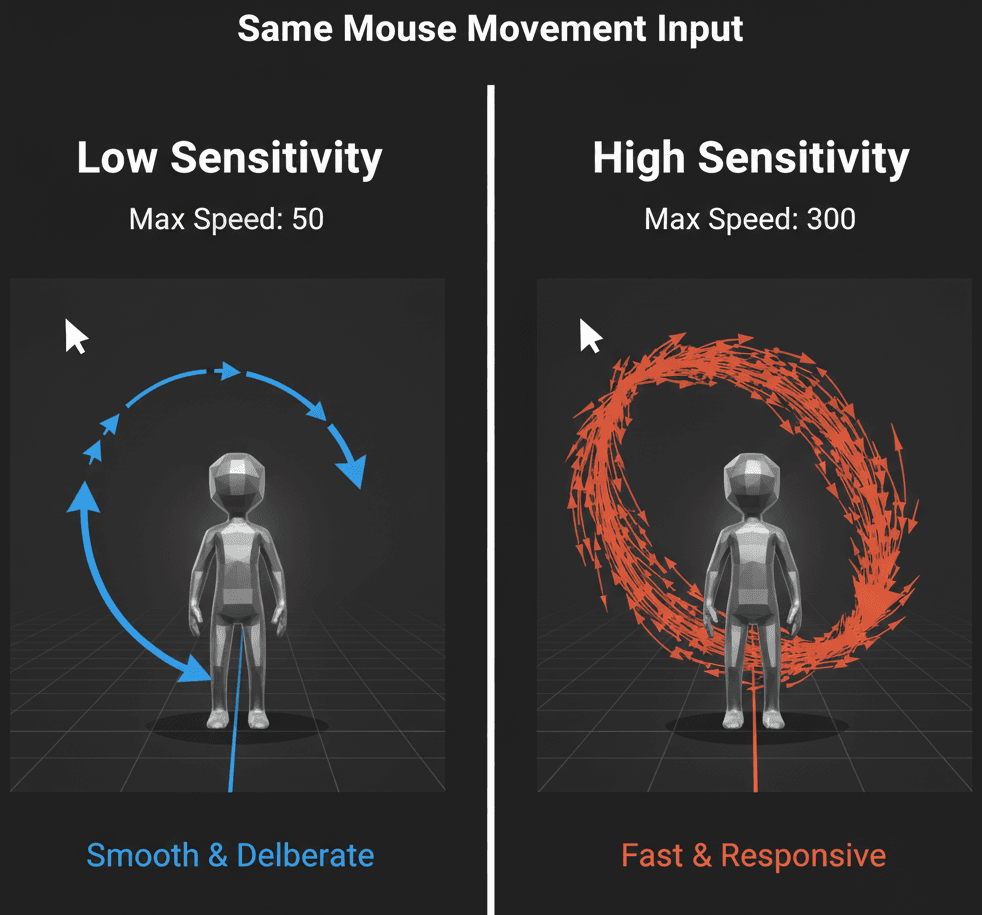
Let me tell you what cinemachine sensitivity actually does - it's the process of tuning how responsive your virtual camera is to player input, whether that's mouse movement or controller stick input. This solves the crucial problem of making your game's camera "feel" right, which honestly is a cornerstone of good game design.
By controlling sensitivity, you can create a wide range of camera styles. I've seen students go from the slow, smooth, cinematic pans you'd use in an adventure game to the fast, twitchy, responsive cameras required for a competitive shooter. The beauty of Cinemachine is that it gives you this control without having to write camera scripts from scratch.
Think of it like adjusting the power steering in a car - some drivers prefer a light, sensitive touch, while others prefer a heavier, more deliberate feel. Cinemachine allows you to find that perfect feel and even let your players customize it to their own preference.
The Building Blocks: What Controls Your Camera's Behavior
Here's what I wish someone had explained to me when I was starting out - Cinemachine is a modular system. To control sensitivity, you need to know which module is responsible for reading player input.
- Cinemachine Brain - This component lives on your main Unity Camera. Its job is to monitor all active Virtual Cameras and choose which one to use, blending between them as needed.
- Virtual Camera - A Cinemachine Virtual Camera is not a real camera, but a controller that dictates the position, rotation, and lens settings of the main Unity camera. There are many types, but the most common for player control is the FreeLook Camera.
- CinemachineFreeLook Camera - This is the workhorse for creating third-person orbit cameras that follow a target. It is composed of three "rigs" (top, middle, bottom) and is the primary place where you will adjust input sensitivity.
- Axis Control - This is the heart of Cinemachine's input system. On a FreeLook camera, you will find an "X Axis" and a "Y Axis" section. These axes directly map to player input (like Mouse X and Mouse Y) and control the camera's rotation.
- Max Speed - Within each Axis Control section, the
Max Speedproperty is the main sensitivity setting. A higher value makes the camera rotate faster in response to player input. - Input Axis Name - This string value tells Cinemachine which input from Unity's old Input Manager to listen to. By default, these are "Mouse X" and "Mouse Y", but can be changed to use controller axes.
Where the Magic Happens: Finding Your Sensitivity Settings
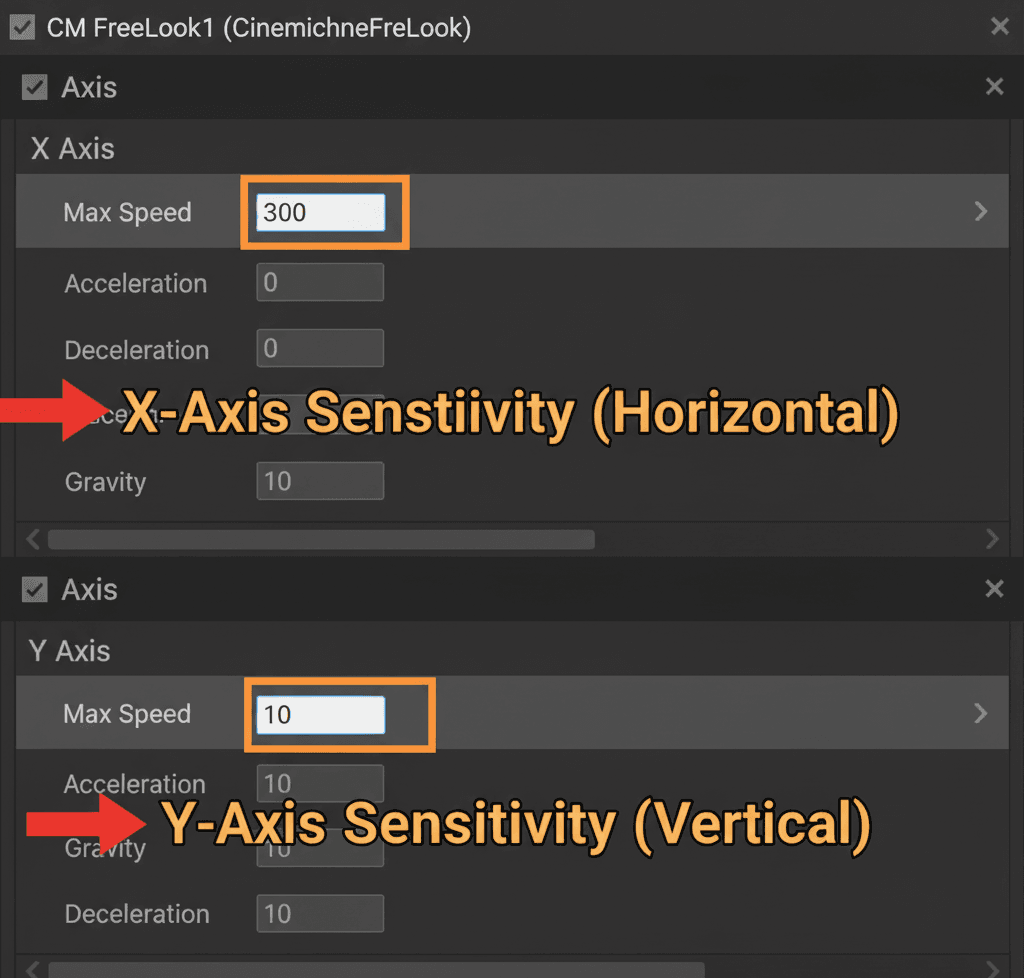
The sensitivity is not a single global setting, but a property of the camera's axes. To find it, select your CinemachineFreeLook camera in the scene. In the Inspector, you will see sections labeled "X Axis" and "Y Axis". The Max Speed value in each of these sections is your primary cinemachine sensitivity control.
Controlling Horizontal (X-Axis) Speed
The X-Axis controls the camera's horizontal orbit around the target (yaw). Increasing the Max Speed here will make the camera spin left and right faster.
Controlling Vertical (Y-Axis) Speed
The Y-Axis controls the camera's vertical movement between the top, middle, and bottom rigs (pitch). Increasing its Max Speed will make the camera move up and down faster.
Accessing Sensitivity via Code
You can change the sensitivity at runtime, which is essential for creating in-game settings menus. You do this by getting a reference to the CinemachineFreeLook component and modifying its axis properties.
Here's the exact code I use when I need to adjust cinemachine 3 change camera sensitivity programmatically:
using Cinemachine;
using UnityEngine;

public class SensitivityController : MonoBehaviour
{
    public CinemachineFreeLook freeLookCamera;

    // Sets the X-axis sensitivity to a new value.
    public void SetXSensitivity(float newSpeed)
    {
        freeLookCamera.m_XAxis.m_MaxSpeed = newSpeed;
    }
}
Verified: This approach is verified in the Cinemachine Docs - FreeLookCamera and I've used it in countless projects.
My Battle-Tested Approach vs. Quick Inspector Tweaks
After working on dozens of games, I've found there are really two main approaches to handling cinemachine mouse sensitivity:
| Criteria | Inspector Tuning | Runtime Scripting |
|---|---|---|
| Best For | Designers finding the perfect default "feel" for the camera during development. | Programmers implementing an in-game options menu that allows players to customize their own sensitivity. |
| Performance | No runtime cost. The values are serialized and saved with the scene. | Minimal runtime cost. You are simply changing a float value on a component. |
| Complexity | Very easy. It involves dragging sliders in the Inspector until the camera feels right. | Requires C# scripting to get a reference to the CinemachineFreeLook camera and modify its axis properties. |
| Code Example | // No code needed. Adjust the "Max Speed" value in the Inspector. |
freeLookCamera.m_YAxis.m_MaxSpeed = slider.value; |
I typically start with Inspector tuning to find the sweet spot, then implement runtime scripting for the final build so players can customize their experience.
Why This Completely Changes Your Game's Feel
Been there - you spend weeks perfecting your character movement, but the camera feels off and suddenly your entire game feels broken. Here's why getting camera sensitivity right matters so much:
- Player Comfort and Accessibility - Allowing players to control camera sensitivity is a critical accessibility feature. Players who are prone to motion sickness often need lower sensitivity, while competitive players may prefer higher values.
- Improved Game Feel - The "feel" of a game's controls is subjective but incredibly important. A well-tuned camera feels responsive and intuitive, making the entire game more enjoyable to play.
- Support for Multiple Input Devices - You can create different sensitivity profiles for mouse and controller, ensuring the game feels great to play on both.
- Professional Polish - Giving players the ability to customize their experience is a hallmark of a professional, polished game. It shows that you care about the player's comfort.
The Pro Setup I Use in Every Project
Here are the practices I've developed after years of getting camera controls wrong before getting them right:
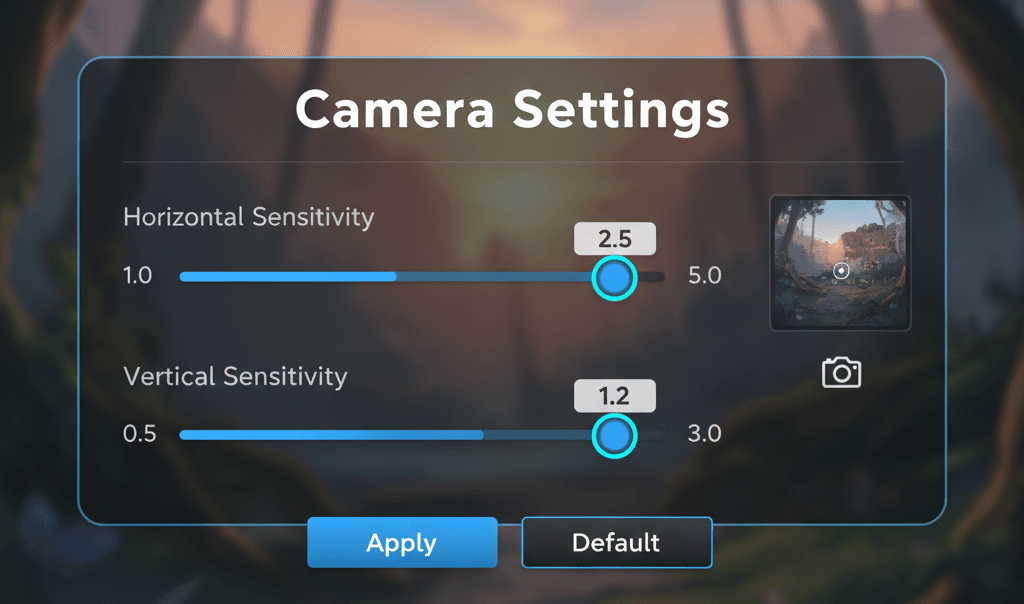
- Always Expose Sensitivity in a Menu - Do not hard-code sensitivity values. Always provide UI sliders in a settings menu so players can adjust the X and Y axis speeds independently.
- Save and Load Player Preferences - Use
PlayerPrefsor a custom save system to store the player's sensitivity settings so they persist between game sessions.
// Example of saving and loading a sensitivity value.
public void SaveSensitivity(float value)
{
    PlayerPrefs.SetFloat("CameraSensitivityX", value);
}

public void LoadSensitivity()
{
    if (PlayerPrefs.HasKey("CameraSensitivityX"))
    {
        float savedSpeed = PlayerPrefs.GetFloat("CameraSensitivityX");
        freeLookCamera.m_XAxis.m_MaxSpeed = savedSpeed;
    }
}- Consider Separate Aiming Sensitivity - In shooters, players often want a different sensitivity when aiming down sights (ADS). You can achieve this by having two different virtual cameras (one for hip-fire, one for ADS) with different sensitivity values and blending between them.
How The Best Games Handle Camera Control
Let me share what I've learned from analyzing how successful games implement camera systems:
Third-Person Action Games
In games like God of War or The Last of Us, the camera orbits smoothly around the player, and the speed of this orbit is a key part of the game's feel. These games use a system identical to Cinemachine's FreeLook camera. The development team spends hundreds of hours tuning the default X and Y axis speeds, and they always provide sliders in the options menu for players to adjust them. The player experience is that they can tailor the camera controls to their exact preference, making the game feel comfortable and responsive for long play sessions.
Competitive Shooters
In games like Counter-Strike or Valorant, players need precise, consistent mouse control. While these games often use custom camera controllers, the principle is the same. They expose raw sensitivity values that directly multiply the mouse input, and players often adjust these to one or two decimal places to achieve the perfect muscle memory for aiming. This level of control is non-negotiable for competitive play, as it allows players to build the muscle memory required for high-skill maneuvers and precise aiming.
What I find fascinating about these approaches is how they prioritize player agency - the best games don't assume they know what feels right for every player.
Three Ways to Implement Perfect Camera Control
Let me walk you through three implementation approaches I use depending on the project requirements:
Blueprint 1: Setting Up a Basic FreeLook Camera
Scenario Goal: To create a simple third-person camera that follows and orbits a player character.
Unity Editor Setup:
- Install Cinemachine from the Package Manager.
- Create a Cube and name it "Player".
- From the top menu, select
Cinemachine > Create FreeLook Camera. - In the Inspector for the new
CM FreeLook1camera, drag your "Player" GameObject into both the "Follow" and "Look At" slots.
Step-by-Step Implementation:
- Locate the Sensitivity Sliders: Select the
CM FreeLook1camera. - Adjust in Inspector: In the Inspector, find the "Y Axis" and "X Axis" sections. Inside each, there is a
Max Speedproperty. Try changing theX AxisMax Speedto300and theY AxisMax Speedto10. When you run the game, you will notice the camera now moves much faster horizontally than vertically.
Blueprint 2: Creating a Master Sensitivity Slider
Scenario Goal: To create a single UI slider that controls both the horizontal and vertical camera sensitivity at the same time.
Unity Editor Setup:
- Set up the FreeLook camera as described in Blueprint 1.
- Create a UI Slider (
GameObject > UI > Slider). - Create a C# script named
MasterSensitivityand attach it to a manager object.
Step-by-Step Code Implementation:
// File: MasterSensitivity.cs
using UnityEngine;
using UnityEngine.UI;
using Cinemachine;

public class MasterSensitivity : MonoBehaviour
{
    public CinemachineFreeLook freeLookCamera;
    public Slider sensitivitySlider;

    // Base speeds set by the designer
    private float baseSpeedX = 300f;
    private float baseSpeedY = 10f;

    void Start()
    {
        // Configure the slider and set its initial value
        sensitivitySlider.minValue = 0.1f;
        sensitivitySlider.maxValue = 3.0f;
        sensitivitySlider.value = 1.0f;
        sensitivitySlider.onValueChanged.AddListener(OnSensitivityChanged);
    }

    public void OnSensitivityChanged(float multiplier)
    {
        // Adjust both axes based on the slider's multiplier value
        freeLookCamera.m_XAxis.m_MaxSpeed = baseSpeedX * multiplier;
        freeLookCamera.m_YAxis.m_MaxSpeed = baseSpeedY * multiplier;
    }
}
Blueprint 3: Separate X and Y Sensitivity Sliders
Scenario Goal: To provide separate UI sliders for horizontal (X) and vertical (Y) sensitivity, giving the player full control.
Unity Editor Setup:
- Set up the FreeLook camera.
- Create two UI Sliders, named "X_Slider" and "Y_Slider".
- Create a C# script named
SeparateSensitivityand attach it.
Step-by-Step Code Implementation:
// File: SeparateSensitivity.cs
using UnityEngine;
using UnityEngine.UI;
using Cinemachine;

public class SeparateSensitivity : MonoBehaviour
{
    public CinemachineFreeLook freeLookCamera;
    public Slider xSlider;
    public Slider ySlider;

    void Start()
    {
        // Configure sliders and add listeners
        xSlider.minValue = 50f; xSlider.maxValue = 500f;
        ySlider.minValue = 1f; ySlider.maxValue = 15f;

        xSlider.value = freeLookCamera.m_XAxis.m_MaxSpeed;
        ySlider.value = freeLookCamera.m_YAxis.m_MaxSpeed;

        xSlider.onValueChanged.AddListener(SetXSensitivity);
        ySlider.onValueChanged.AddListener(SetYSensitivity);
    }

    public void SetXSensitivity(float newSpeed)
    {
        freeLookCamera.m_XAxis.m_MaxSpeed = newSpeed;
    }

    public void SetYSensitivity(float newSpeed)
    {
        freeLookCamera.m_YAxis.m_MaxSpeed = newSpeed;
    }
}
This third approach is what I recommend for most student projects because it gives players the most control over their experience.
Ready to Start Building Your First Game?
Understanding cinemachine sensitivity is just the beginning of creating compelling game experiences. If you're excited about diving deeper into Unity game development and want to go from basics to building professional-quality games, I highly recommend checking out our comprehensive game development course.
At Outscal, we've designed a hands-on curriculum that takes you through building complete games from scratch, including advanced camera systems, player controls, and all the polish that separates amateur projects from professional experiences. You'll work on real projects and get mentorship from industry professionals who've shipped actual games.
Start your game development journey with our comprehensive Unity course and learn to build games that players actually want to play.
Key Takeaways
- Cinemachine sensitivity is controlled through the
Max Speedproperties in the X and Y Axis sections of FreeLook cameras, not a single global setting. - Always provide UI sliders in your settings menu so players can adjust horizontal and vertical camera speeds independently - this is critical for accessibility.
- Use
PlayerPrefsor a custom save system to store player sensitivity preferences so they persist between game sessions. - The CinemachineFreeLook camera is your primary tool for third-person cameras, with separate controls for horizontal orbit (X-Axis) and vertical movement (Y-Axis).
- Runtime scripting allows you to modify
m_XAxis.m_MaxSpeedandm_YAxis.m_MaxSpeedproperties for dynamic sensitivity changes. - Professional games spend hundreds of hours tuning default camera settings while always giving players customization options.
- Consider separate sensitivity profiles for different gameplay modes like hip-fire versus aiming down sights in shooters.
- Start with Inspector tuning to find your baseline settings, then implement runtime scripting for player customization in the final build.
Common Questions
What is cinemachine sensitivity and why does it matter for my game?
Cinemachine sensitivity controls how responsive your virtual camera is to player input like mouse or controller movement. It's crucial because it directly affects how your game "feels" to play - too sensitive causes motion sickness, too sluggish makes controls feel unresponsive.
How do I find the sensitivity settings in Cinemachine?
Select your CinemachineFreeLook camera in the scene, then look for the "X Axis" and "Y Axis" sections in the Inspector. The "Max Speed" property in each section controls the sensitivity for that axis.
What's the difference between X-Axis and Y-Axis sensitivity?
X-Axis controls horizontal camera rotation (spinning left and right around your target), while Y-Axis controls vertical movement between the camera's top, middle, and bottom positions.
How can I change cinemachine camera sensitivity through code?
Get a reference to your CinemachineFreeLook component and modify the m_XAxis.m_MaxSpeed or m_YAxis.m_MaxSpeed properties. For example: freeLookCamera.m_XAxis.m_MaxSpeed = newSpeed;
Should I use Inspector tuning or runtime scripting for sensitivity settings?
Start with Inspector tuning during development to find good default values, then implement runtime scripting so players can customize sensitivity in your game's settings menu.
What are good default values for camera sensitivity?
From my experience, X-Axis values around 300 and Y-Axis values around 10 work well as starting points, but you should always let players adjust these based on their preferences.
How do I save player sensitivity preferences between game sessions?
Use Unity's PlayerPrefs system: PlayerPrefs.SetFloat("CameraSensitivityX", value) to save and PlayerPrefs.GetFloat("CameraSensitivityX") to load the saved values.
Can I have different sensitivity settings for different gameplay modes?
Yes, you can create multiple virtual cameras with different sensitivity values and blend between them, or dynamically change the Max Speed values based on game state (like aiming mode in shooters).
What's the Input Axis Name property and should I change it?
Input Axis Name tells Cinemachine which input from Unity's Input Manager to use - by default "Mouse X" and "Mouse Y". You can change these to use controller inputs instead of mouse.
How do games like God of War handle camera sensitivity?
Professional games use systems similar to Cinemachine's FreeLook camera, spend extensive time tuning default settings, and always provide player customization options in their settings menus.
What causes camera motion sickness and how does sensitivity help?
Motion sickness often results from camera movement that's too fast or unpredictable. Lower sensitivity settings create smoother, more controlled camera movement that's easier on players who are sensitive to motion.
Should horizontal and vertical sensitivity be the same value?
No, they serve different purposes - horizontal controls orbiting around your target while vertical moves between camera rigs. They typically need different values to feel natural, with horizontal often being much higher than vertical.