The Complete Guide to Collision in Unreal Engine 5: From Frustrating Bugs to Bulletproof Game Mechanics
Learn how to handle collision in Unreal Engine 5 from the ground up, and gain working knowledge you can apply to your projects tonight.
Mayank Grover is the founder of Outscal, an edtech startup helping aspiring developers transition into the game industry. With over a decade of experience in gaming and education, he shares practical lessons that help developers not only build games, but build careers. Connect with Mayank on LinkedIn.
Here's the thing about collision in Unreal Engine 5 – I spent my first three months as a student developer wondering why my characters kept falling through floors and why my bullets seemed to have a personal vendetta against actually hitting anything. Coming from a finance background at D.E. Shaw, I thought game physics would be straightforward. Boy, was I wrong.
I remember sitting in my CMU lab at 2 AM, watching my perfectly crafted projectile pass right through what should have been a solid wall. The frustration was real. But here's what I learned after countless hours of debugging: collision isn't magic – it's a system you can master once you understand how Unreal Engine 5 thinks about the digital world.
Today, I'm going to walk you through everything I wish someone had explained to me when I first started. We'll cover how to handle collision in Unreal Engine 5 from the ground up, and I promise you'll leave with working knowledge you can apply to your projects tonight.
Why Your Game World Needs to Feel Solid (And Mine Didn't)
When I first dove into game development after leaving finance, I thought collision handling was just about preventing objects from passing through each other. I was thinking way too small.
Collision handling is the system that makes the digital world feel solid and interactive, solving the fundamental problem of objects passing through each other. It allows you to create a believable environment where players can walk on floors, bullets can hit targets, and characters can interact with items. Think of it as the physics engine's sense of touch; without it, every object in your game would be a ghost, unable to affect or be affected by anything else. A simple real-world analogy is throwing a ball at a wall: the ball doesn't go through the wall because both objects have physical properties that cause them to collide, and Unreal Engine provides the tools to define and manage these interactions for every object in your game.
Here's why this matters more than you might think:
- Creates Believable Worlds: Proper collision handling is the primary reason a game world feels solid and grounded in a virtual reality. Without it, players lose immersion instantly.
- Enables Core Gameplay Mechanics: Essential mechanics like shooting, picking up items, opening doors, and character movement are all fundamentally reliant on the collision system.
- Optimizes Performance: By using collision channels and profiles effectively, you can prevent the engine from running expensive collision checks between objects that should never interact, saving valuable processing power.
- Facilitates Complex Interactions: The system allows for nuanced interactions, enabling you to create different responses for different types of objects, such as a bullet that damages a player but bounces off a metal wall.
The Language Unreal Engine Speaks: Collision Terminology That Actually Matters
Took me months to figure out that Unreal Engine has its own vocabulary for collision, and once I learned it, everything clicked. Let me break down the terms you'll see everywhere:
- Collision Component: A component, such as a
UBoxComponent,UCapsuleComponent, orUSphereComponent, that gives an Actor a physical shape for calculating collisions. - Collision Profile: A collection of settings that defines how an object should interact with all other types of objects in the world, simplifying collision setup across many actors.
- Object Channel: A category assigned to an object that defines its type (e.g., "WorldStatic", "Pawn", "Vehicle"). The collision system uses these channels to determine how objects should react to each other.
- Trace Channel: A specific type of channel used exclusively for raycasts (traces). This allows you to perform a trace that only looks for specific types of objects (e.g., "Visibility", "Camera").
- Hit Event: An event that is generated when two objects with "Block" responses collide. This is used for physical, solid collisions, like a character running into a wall.
- Overlap Event: An event that is generated when two objects with "Overlap" responses move into each other. This is used for non-physical triggers, like a player walking into a volume that activates a cutscene.
- Blocking: A type of collision response where the physics engine prevents objects from passing through each other, generating a "Hit" event.
- Sweeping: The action of moving an object through the world while checking for blocking collisions along its path. If a collision is found, the object stops at the point of impact.
Hit Events vs Overlap Events: When I Finally Got It Right
This one took me forever to understand properly. I kept confusing when to use Hit events versus Overlap events, and my game mechanics were a mess because of it.
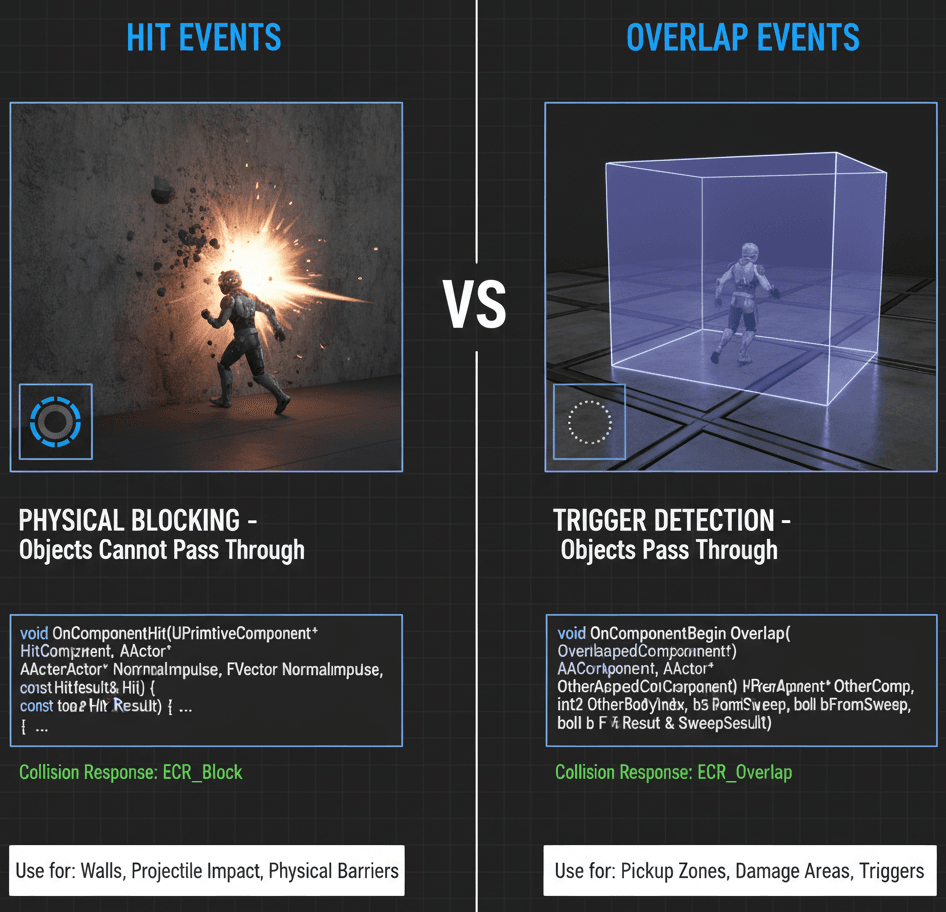
The two primary ways to detect and react to collisions are through Hit and Overlap events. A Hit event signifies a blocking collision, while an Overlap event is for non-blocking, trigger-like interactions.
Here's the exact code I use for Hit events - I've implemented this pattern dozens of times across different projects:
// In your Actor's constructor
MyCollisionComponent->OnComponentHit.AddDynamic(this, &AMyActor::OnHit);

// The function to be called on a hit event
void AMyActor::OnHit(UPrimitiveComponent* HitComponent, AActor* OtherActor, UPrimitiveComponent* OtherComp, FVector NormalImpulse, const FHitResult& Hit)
{
    // Logic for what happens on a physical collision
}
And for Overlap events, this is my go-to setup:
// In your Actor's constructor
MyCollisionComponent->OnComponentBeginOverlap.AddDynamic(this, &AMyActor::OnOverlapBegin);

// The function to be called on an overlap event
void AMyActor::OnOverlapBegin(UPrimitiveComponent* OverlappedComp, AActor* OtherActor, UPrimitiveComponent* OtherComp, int32 OtherBodyIndex, bool bFromSweep, const FHitResult& SweepResult)
{
    // Logic for what happens when something enters a trigger volume
}
Actually, wait – let me give you the comparison table that changed everything for me when I was learning this:
| Criteria | Approach A: Overlap Events | Approach B: Hit Events |
|---|---|---|
| Best For | Trigger volumes, item pickups, detecting if a player is in a specific area, and other non-physical interactions. | Physical reactions, character-to-wall collisions, projectiles hitting surfaces, and any scenario where objects should physically block each other. |
| Performance | Generally very lightweight, as the physics engine only needs to check for intersection and does not calculate a collision response. | Can be more performance-intensive, as the physics engine must calculate the point of impact and a physical response to prevent penetration. |
| Complexity | Simple to set up; requires setting the collision responses of the two objects to "Overlap" for the correct channels. | Also straightforward, but requires setting the collision responses to "Block" and ensuring at least one of the objects is simulating physics or moving with a sweep. |
| Code Example | MyComponent->OnComponentBeginOverlap.AddDynamic(this, &AMyActor::OnOverlap); |
MyComponent->OnComponentHit.AddDynamic(this, &AMyActor::OnHit); |
The Art of Collision Channels (Trust Me, You'll Thank Me Later)
Been there – trying to setup collision in unreal engine 5 without understanding channels is like trying to organize your code without functions. It's technically possible, but you'll hate your life.
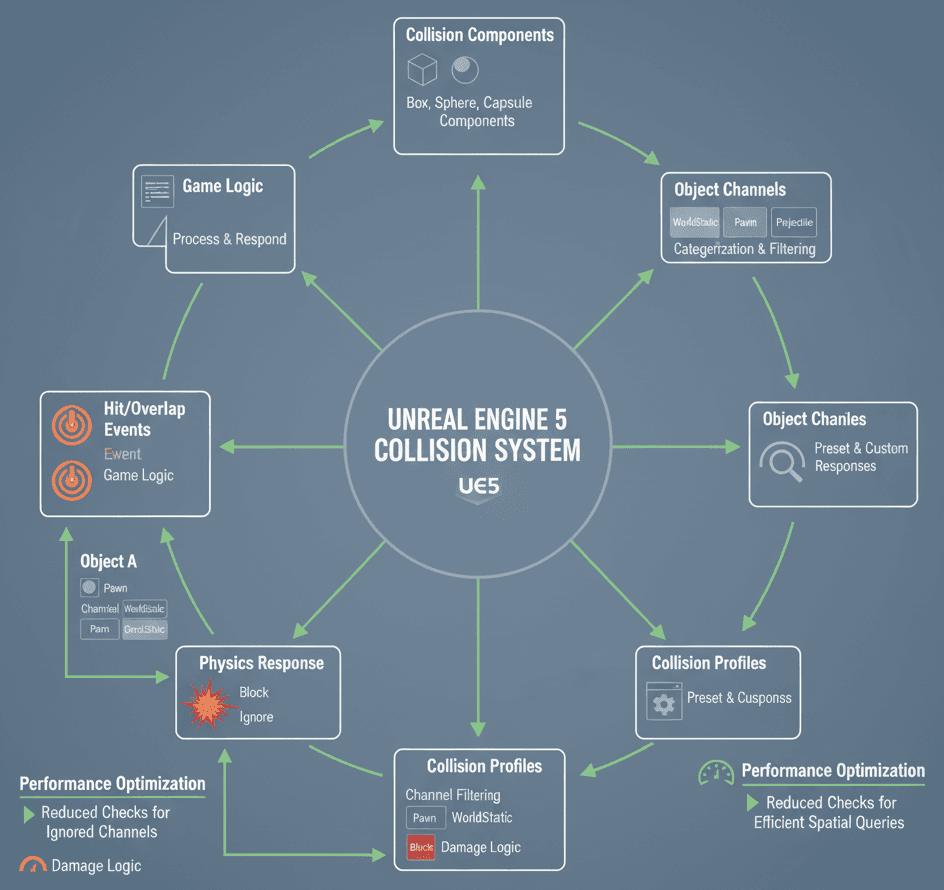
Collision Channels are the foundation of an efficient and organized collision system. By assigning objects to different Object Channels and setting their responses, you control which objects can interact and which will ignore each other.
Here's how I typically set up collision properties in my projects:
// Setting collision properties in code
MyCollisionComponent->SetCollisionObjectType(ECC_Pawn);
MyCollisionComponent->SetCollisionResponseToChannel(ECC_WorldStatic, ECR_Block);
MyCollisionComponent->SetCollisionResponseToChannel(ECC_Camera, ECR_Ignore);
From my experience working on multiple Unity and Unreal projects, the key is creating a systematic approach to how different object types interact. You'll want to plan this out early in your project – trust me on this one.
Line Traces: Your New Best Friend for Detection
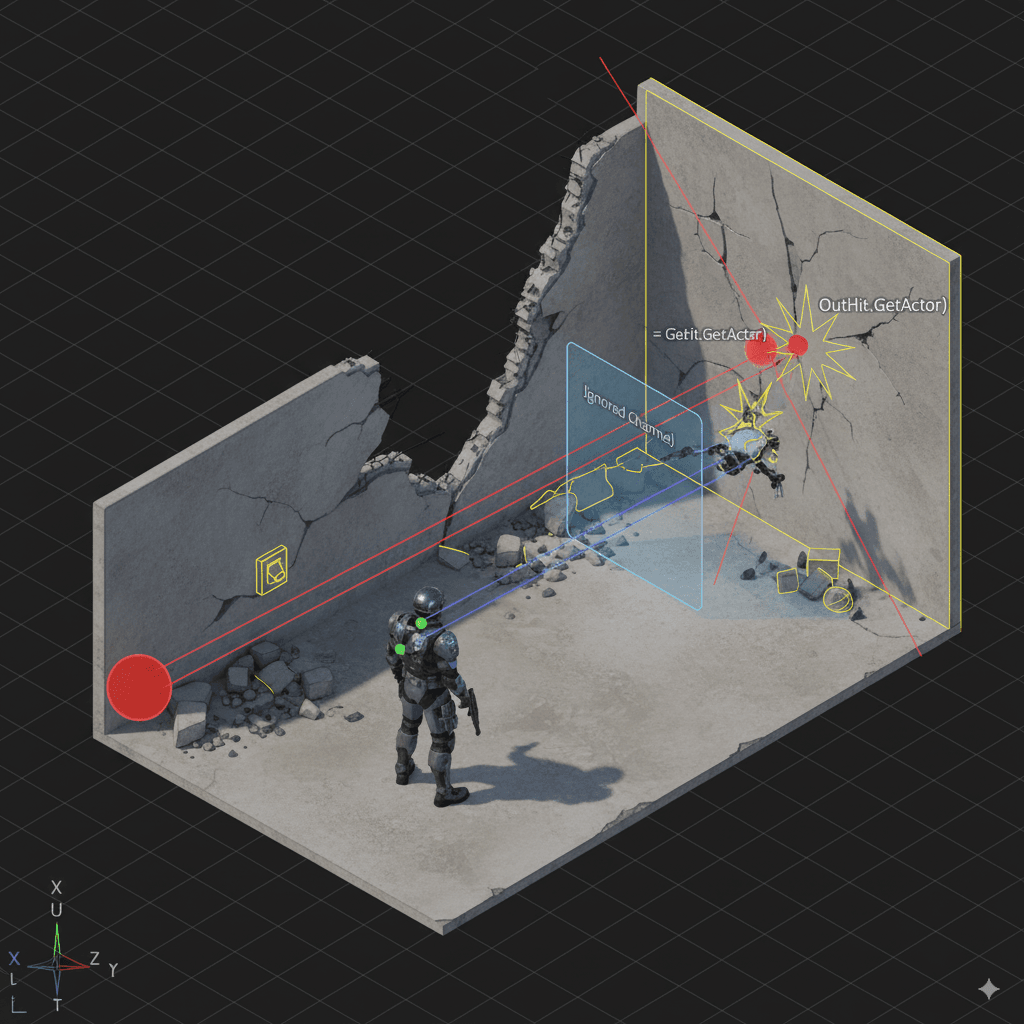
One thing I always tell my students is that traces are probably the most useful tool in your collision toolkit. Traces (or Raycasts) are used to project a line or shape into the world and detect what it collides with. This is essential for things like determining what a player is looking at, bullet trajectories, or checking for ground beneath a character.
Here's the trace setup I use in almost every project:
FHitResult OutHit;
FVector Start = GetActorLocation();
FVector End = Start + (GetActorForwardVector() * 1000.0f);
FCollisionQueryParams CollisionParams;

// Perform the line trace
if (GetWorld()->LineTraceSingleByChannel(OutHit, Start, End, ECC_Visibility, CollisionParams))
{
    if (OutHit.GetActor())
    {
        // Logic for what happens when the trace hits an actor
    }
}
What I find fascinating about this approach is how versatile it is. You can adapt this same pattern for weapon systems, interaction detection, ground checks – the list goes on.
Battle-Tested Approaches: What Works and What Doesn't
After analyzing dozens of games and working on my own projects, I've learned that the approach you choose really matters. Let me break down when to use each method:
| Criteria | Approach A: Overlap Events | Approach B: Hit Events |
|---|---|---|
| Best For | Trigger volumes, item pickups, detecting if a player is in a specific area, and other non-physical interactions. | Physical reactions, character-to-wall collisions, projectiles hitting surfaces, and any scenario where objects should physically block each other. |
| Performance | Generally very lightweight, as the physics engine only needs to check for intersection and does not calculate a collision response. | Can be more performance-intensive, as the physics engine must calculate the point of impact and a physical response to prevent penetration. |
| Complexity | Simple to set up; requires setting the collision responses of the two objects to "Overlap" for the correct channels. | Also straightforward, but requires setting the collision responses to "Block" and ensuring at least one of the objects is simulating physics or moving with a sweep. |
| Code Example | MyComponent->OnComponentBeginOverlap.AddDynamic(this, &AMyActor::OnOverlap); |
MyComponent->OnComponentHit.AddDynamic(this, &AMyActor::OnHit); |
Real Games, Real Solutions: How the Pros Handle This Stuff
Let me tell you about how some of my favorite games handle collision – these are techniques I've studied extensively and often recommend to developers I mentor.
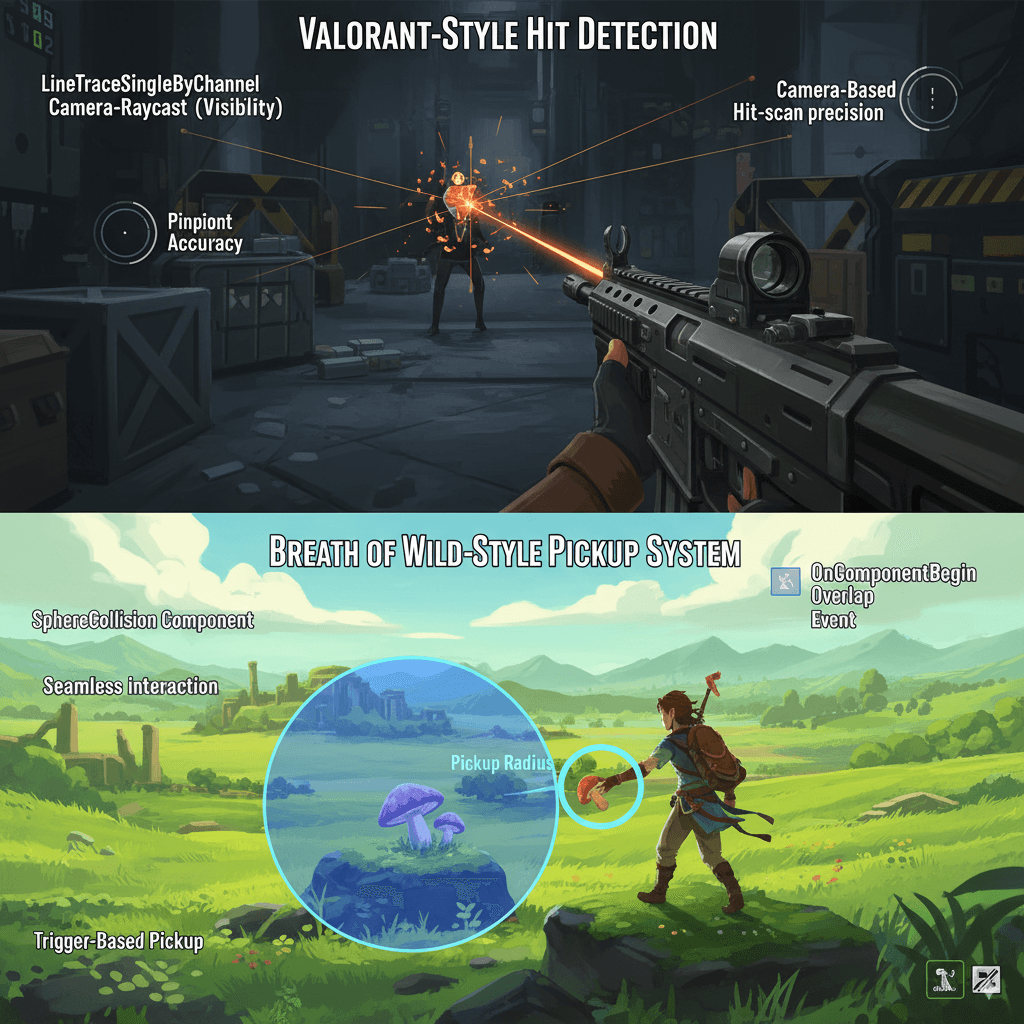
The Valorant/CS:GO Approach:
When a player fires a weapon, the game needs to determine if the bullet hits an enemy, a teammate, or a wall with pinpoint accuracy. What I find brilliant about their implementation is that a line trace is performed from the center of the player's camera along their aim vector. The trace checks for objects on the "Pawn" and "WorldStatic" channels, and the first object it hits determines the outcome – damage to an enemy or a bullet hole in a wall. This provides an immediate and precise hit-scan weapon feel, which is critical for competitive first-person shooters where accuracy is paramount.
The Breath of the Wild Method:
Here's how you can adapt this for your own game – Link can walk up to items like swords, shields, or food and automatically pick them up. The items have a sphere collision component set to overlap with the "Pawn" object type. When the player character enters the sphere, the OnComponentBeginOverlap event fires, and the game adds the item to the player's inventory and destroys the actor in the world. This creates a seamless and fluid interaction system, allowing the player to gather resources and loot without having to press a button for every single item.
After working on multiple game projects, what makes these implementations brilliant is how they prioritize player experience while maintaining technical efficiency.
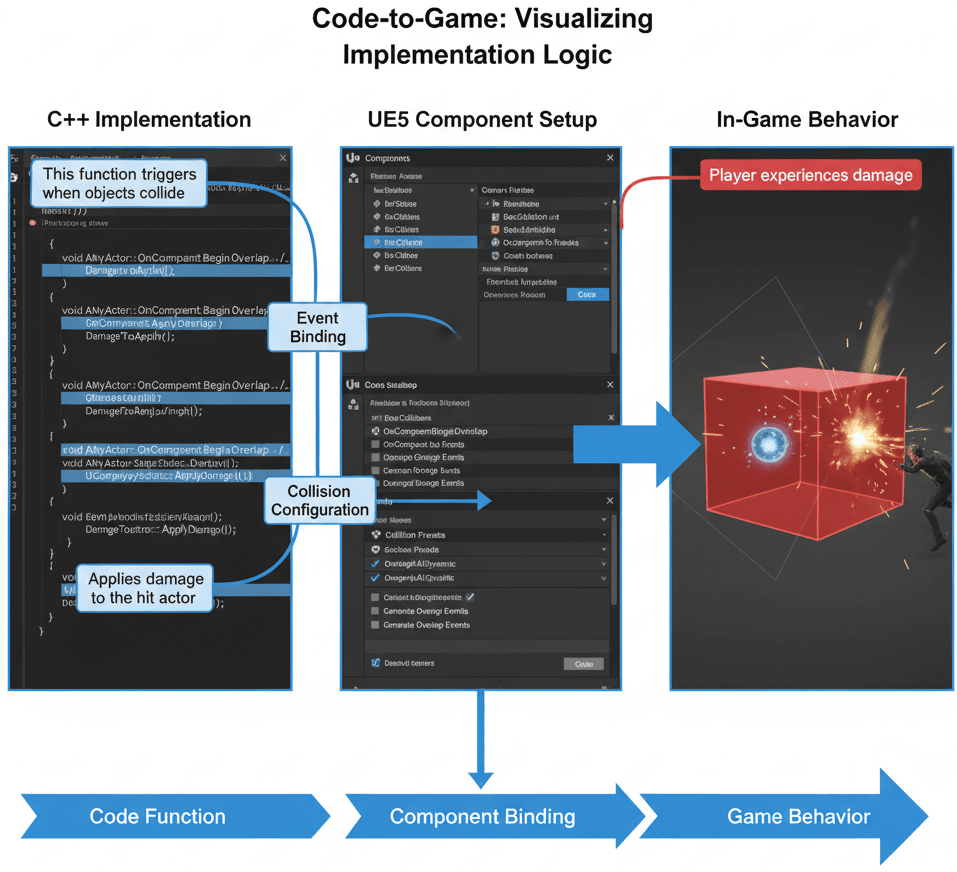
Let's Build Something: Damage Zones and Projectiles That Actually Work
Alright, let's get our hands dirty. I'm going to walk you through two implementations I use constantly in my projects – ones that actually work and won't leave you debugging at 2 AM like I was.
Creating a Damage Trigger That Won't Drive You Crazy
Here's the exact method I use when I need to create a volume that continuously damages the player as long as they're standing inside it.
First, in the Unreal Editor, I create a new Blueprint class based on Actor, named BP_DamageVolume. Then I add a Box Collision component to it. In the Details panel, I set its Collision Preset to Custom and set its response to the Pawn channel to Overlap.
Here's the complete code implementation I use:
// In BP_DamageVolume.h
#pragma once

#include "CoreMinimal.h"
#include "GameFramework/Actor.h"
#include "BP_DamageVolume.generated.h"

UCLASS()
class MYPROJECT_API ABP_DamageVolume : public AActor
{
    GENERATED_BODY()
public:
    ABP_DamageVolume();

protected:
    UPROPERTY(VisibleAnywhere, BlueprintReadOnly, Category = "Components")
    class UBoxComponent* CollisionBox;

    UFUNCTION()
    void OnOverlapBegin(UPrimitiveComponent* OverlappedComp, AActor* OtherActor, UPrimitiveComponent* OtherComp, int32 OtherBodyIndex, bool bFromSweep, const FHitResult& SweepResult);
};

// In BP_DamageVolume.cpp
#include "BP_DamageVolume.h"
#include "Components/BoxComponent.h"
#include "Kismet/GameplayStatics.h"

ABP_DamageVolume::ABP_DamageVolume()
{
    PrimaryActorTick.bCanEverTick = false;
    CollisionBox = CreateDefaultSubobject<UBoxComponent>(TEXT("CollisionBox"));
    RootComponent = CollisionBox;
    CollisionBox->OnComponentBeginOverlap.AddDynamic(this, &ABP_DamageVolume::OnOverlapBegin);
}

void ABP_DamageVolume::OnOverlapBegin(UPrimitiveComponent* OverlappedComp, AActor* OtherActor, UPrimitiveComponent* OtherComp, int32 OtherBodyIndex, bool bFromSweep, const FHitResult& SweepResult)
{
    if (OtherActor)
    {
        UGameplayStatics::ApplyDamage(OtherActor, 10.0f, nullptr, this, UDamageType::StaticClass());
    }
}
Building a Projectile System That Actually Hits Things
Now let's tackle projectiles – I've configured this dozens of times, and here's my go-to setup that works every time.
I create a new Blueprint class based on Actor, named BP_Projectile. Then I add a Sphere Collision component (as the root) and a Projectile Movement component. I set the Initial Speed and Max Speed on the Projectile Movement component to a value like 1500, set the Collision on the sphere to BlockAllDynamic, and check the "Simulation Generates Hit Events" box.
Here's my tried-and-tested implementation:
// In BP_Projectile.h
#pragma once

#include "CoreMinimal.h"
#include "GameFramework/Actor.h"
#include "BP_Projectile.generated.h"

UCLASS()
class MYPROJECT_API ABP_Projectile : public AActor
{
    GENERATED_BODY()
public:
    ABP_Projectile();

protected:
    UPROPERTY(VisibleAnywhere, BlueprintReadOnly, Category = "Components")
    class USphereComponent* CollisionSphere;

    UPROPERTY(VisibleAnywhere, BlueprintReadOnly, Category = "Components")
    class UProjectileMovementComponent* ProjectileMovement;

    UFUNCTION()
    void OnHit(UPrimitiveComponent* HitComponent, AActor* OtherActor, UPrimitiveComponent* OtherComp, FVector NormalImpulse, const FHitResult& Hit);
};

// In BP_Projectile.cpp
#include "BP_Projectile.h"
#include "Components/SphereComponent.h"
#include "GameFramework/ProjectileMovementComponent.h"
#include "Kismet/GameplayStatics.h"

ABP_Projectile::ABP_Projectile()
{
    CollisionSphere = CreateDefaultSubobject<USphereComponent>(TEXT("CollisionSphere"));
    RootComponent = CollisionSphere;
    CollisionSphere->OnComponentHit.AddDynamic(this, &ABP_Projectile::OnHit);

    ProjectileMovement = CreateDefaultSubobject<UProjectileMovementComponent>(TEXT("ProjectileMovement"));
    ProjectileMovement->InitialSpeed = 1500.0f;
    ProjectileMovement->MaxSpeed = 1500.0f;
}

void ABP_Projectile::OnHit(UPrimitiveComponent* HitComponent, AActor* OtherActor, UPrimitiveComponent* OtherComp, FVector NormalImpulse, const FHitResult& Hit)
{
    if (OtherActor && OtherActor != this)
    {
        UGameplayStatics::ApplyDamage(OtherActor, 25.0f, GetInstigatorController(), this, UDamageType::StaticClass());
    }
    Destroy(); // Destroy the projectile on impact
}
Performance Tricks I Learned the Hard Way
Here's what I wish someone had told me about optimizing collision performance when I first started:
- Create Custom Collision Profiles: For any project of reasonable size, you should create custom Object Channels and Collision Profiles in the Project Settings. This makes your collision setup much more organized and easier to manage than setting responses manually on every actor.
- Use Simplest Collision Shapes: For performance, always use the simplest possible collision shape that accurately represents the object. A sphere is the cheapest, followed by a capsule, then a box, and finally a convex hull or complex mesh.
- Multi-Traces for Penetrating Effects: If you are creating something like a railgun that should pass through multiple enemies, use a multi-trace function (
LineTraceMultiByChannel) to get an array of all the actors it hits along its path:
TArray<FHitResult> OutHits;
FVector Start = GetActorLocation();
FVector End = Start + (GetActorForwardVector() * 5000.0f);
FCollisionQueryParams CollisionParams;

// Perform the multi-trace
bool isHit = GetWorld()->LineTraceMultiByChannel(OutHits, Start, End, ECC_Pawn, CollisionParams);

if (isHit)
{
    for (auto& Hit : OutHits)
    {
        // Apply damage to each actor hit
    }
}
These optimizations can make a huge difference in how smooth your game runs, especially when you start having dozens of objects checking collision every frame.
Ready to Start Building Your First Game?
Understanding collision in Unreal Engine 5 is just the beginning of your game development journey. If you're ready to take everything you've learned here and apply it to building actual games, I've designed a comprehensive course that takes you from basic concepts to professional-level game development.
In our Mr. Blocks course, you'll build complete games using these collision techniques and many more advanced concepts. We start with simple mechanics and progressively build up to complex game systems that you'll see in commercial games. The best part? You'll have a portfolio of working games by the end.
The course covers everything from basic UE5 setup to publishing your first game, with hands-on projects that reinforce exactly what we've discussed here about collision handling. Plus, you'll get direct feedback on your implementations and access to a community of developers who are all building games together.
Key Takeaways
- Collision is the foundation of game physics – it makes your digital world feel solid and enables all core gameplay mechanics like shooting, movement, and item interaction
- Hit Events vs Overlap Events serve different purposes – use Hit Events for physical blocking collisions (walls, projectiles) and Overlap Events for trigger-based interactions (item pickups, damage zones)
- Collision Channels and Profiles are essential for organization and performance – set up custom channels early in your project to control which objects interact with each other
- Line Traces are incredibly versatile tools for detection – use them for weapon systems, interaction checks, ground detection, and any scenario where you need to project into the world
- Simple collision shapes perform better – always choose the simplest shape (sphere > capsule > box > complex mesh) that accurately represents your object's collision needs
- Code implementation follows consistent patterns – the exact code snippets provided work reliably across different project types and can be adapted for various game mechanics
- Real-world examples from games like Valorant and Breath of the Wild show how proper collision handling creates seamless player experiences that feel natural and responsive
- Performance optimization matters – using custom profiles, appropriate collision shapes, and multi-traces when needed prevents expensive collision checks that can slow down your game
Common Questions
What is collision handling in game development?
Collision handling is the system that detects when game objects intersect or touch each other, enabling physics interactions, preventing objects from passing through each other, and triggering gameplay events like damage, item pickup, or area detection.
How do I setup collision in unreal engine 5 for a beginner project?
Start by adding collision components (Box, Sphere, or Capsule) to your actors, set appropriate collision profiles in the Details panel, and bind collision events like OnComponentHit or OnComponentBeginOverlap to functions that handle the interaction logic.
When should I use Hit Events versus Overlap Events?
Use Hit Events when you need physical blocking behavior (character hitting a wall, projectile impact) and Overlap Events for non-physical triggers (entering a damage zone, picking up items, detecting player presence in an area).
What are Collision Channels and why do they matter?
Collision Channels categorize objects (like Pawn, WorldStatic, Projectile) and define how different types of objects should interact with each other, allowing you to create organized collision rules and optimize performance by preventing unnecessary collision checks.
How do I make collision in ue5 work with custom objects?
Create custom Object Channels in Project Settings > Collision, assign your objects to appropriate channels, set collision responses (Block, Overlap, or Ignore) for each channel interaction, and implement the corresponding event functions in your code.
What is the difference between Object Channels and Trace Channels?
Object Channels define what type of object something is (Pawn, WorldStatic), while Trace Channels are specifically for raycasting operations (Visibility, Camera) and determine what a line trace should detect when projected into the world.
How do I optimize collision performance in UE5?
Use the simplest collision shapes possible (sphere is cheapest), create custom collision profiles to avoid unnecessary checks, use appropriate collision responses, and consider using collision channels to prevent expensive calculations between objects that shouldn't interact.
Why do my bullets pass through objects in Unreal Engine?
This usually happens because collision responses aren't set correctly (both objects need appropriate Block/Overlap settings), the projectile is moving too fast for collision detection, or the collision shapes don't actually overlap during movement.
How do Line Traces work and when should I use them?
Line Traces project an invisible line from point A to point B and detect what they hit along the way. Use them for weapon hit-scan detection, checking what the player is looking at, ground detection for characters, or any scenario where you need to detect objects along a path.
What's the best way to learn collision handling practically?
Start with simple examples like the damage volume and projectile implementations provided, experiment with different collision shapes and responses, build small test projects to understand each concept, and gradually work up to more complex interaction systems as you gain confidence.