How to Create an FPS Game in Unreal Engine 5: From Zero to First Person Shooter
A step-by-step guide to building a complete First-Person Shooter, from basic character movement to advanced shooting mechanics.
I remember staring at my computer screen at 2 AM during my Carnegie Mellon days, trying to figure out why my character kept falling through the floor every time I pressed the jump button. Been there? Here's the thing - creating your first FPS (First-Person Shooter) game feels impossible until you break it down into the core pieces that actually matter. After helping hundreds of students at Outscal make their first shooters, I'velearned that the secret isn't knowing everything about Unreal Engine 5 - it's understanding the fundamental building blocks and how they work together.
Table of Contents
- Why Your First FPS Game Matters More Than You Think
- The Building Blocks Every FPS Game Needs
- Setting Up Your Character to Actually Move and Look Around
- Making Your Camera Feel Like Real Eyes
- How Line Traces Turn Mouse Clicks Into Bullets
- C++ vs Blueprints - When I Use Each One
- Walking Through Real Games That Got It Right
- Building Your First Playable Character Step-by-Step
- Ready to Start Building Your First Game?
- Your Next Steps After This Tutorial
- Wrapping Up Your FPS Journey
- Key Takeaways
Why Your First FPS Game Matters More Than You Think
Creating a First-Person Shooter game involves building a player experience from a first-person perspective, centered around combat and navigation. The core problem this solves is immersing the player directly into the game world, making them feel like they are the character. This allows for the creation of fast-paced, action-oriented gameplay, where players can run, jump, and shoot from a first-person viewpoint.
Think of it like playing laser tag - you see the world from your own eyes, you aim a weapon, and you interact with the environment and other players from that perspective. It's about creating a direct, visceral connection between the player and the game.

Here's why mastering FPS development in Unreal Engine unlocks several key advantages for you as a game developer:
- Build a Popular Genre: FPS games are one of the most popular genres in the world, and the skills you learn will be highly transferable.
- Learn Core Engine Concepts: Building an FPS game will teach you about many of the core concepts in Unreal Engine, such as character movement, input handling, and replication.
- Create Engaging Experiences: The first-person perspective is a powerful tool for creating immersive and engaging gameplay experiences.
- Strong Community and Resources: There is a large and active community of Unreal Engine developers creating FPS games, so you'll find plenty of tutorials, assets, and support.
The Building Blocks Every FPS Game Needs
Before building an FPS game, it's crucial to understand the key components that form its foundation. These terms define how the player moves, interacts with the world, and engages in combat.
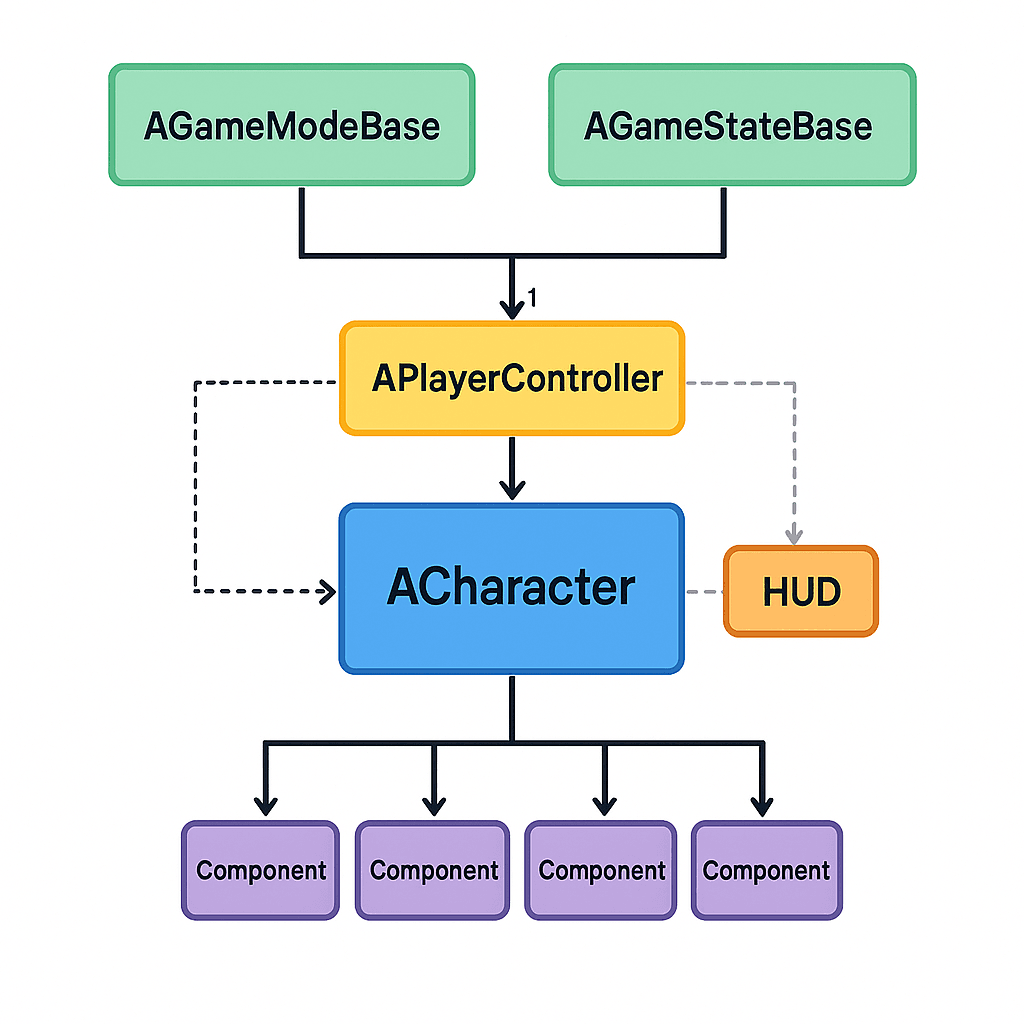
- Character: The
ACharacterclass is the base class for humanoid characters in Unreal Engine. It includes aUCharacterMovementComponentfor handling movement, aUCapsuleComponentfor collision, and aUSkeletalMeshComponentfor the character's visual representation. - PlayerController: The
APlayerControlleris the interface between the player and the game. It receives input from the player and translates it into actions in the game, such as moving the character or firing a weapon. - Pawn: A
APawnis the base class for all actors that can be controlled by a player or an AI (Artificial Intelligence - the computer-controlled opponents). AACharacteris a specialized type ofAPawn. - GameMode: The
AGameModeBaseclass defines the rules of the game, such as the number of players, the scoring system, and the win conditions. It only exists on the server in a multiplayer game. - GameState: The
AGameStateBaseclass maintains the state of the game, such as the list of connected players, the current score, and the match timer. It exists on the server and all clients. - HUD (Heads-Up Display): The
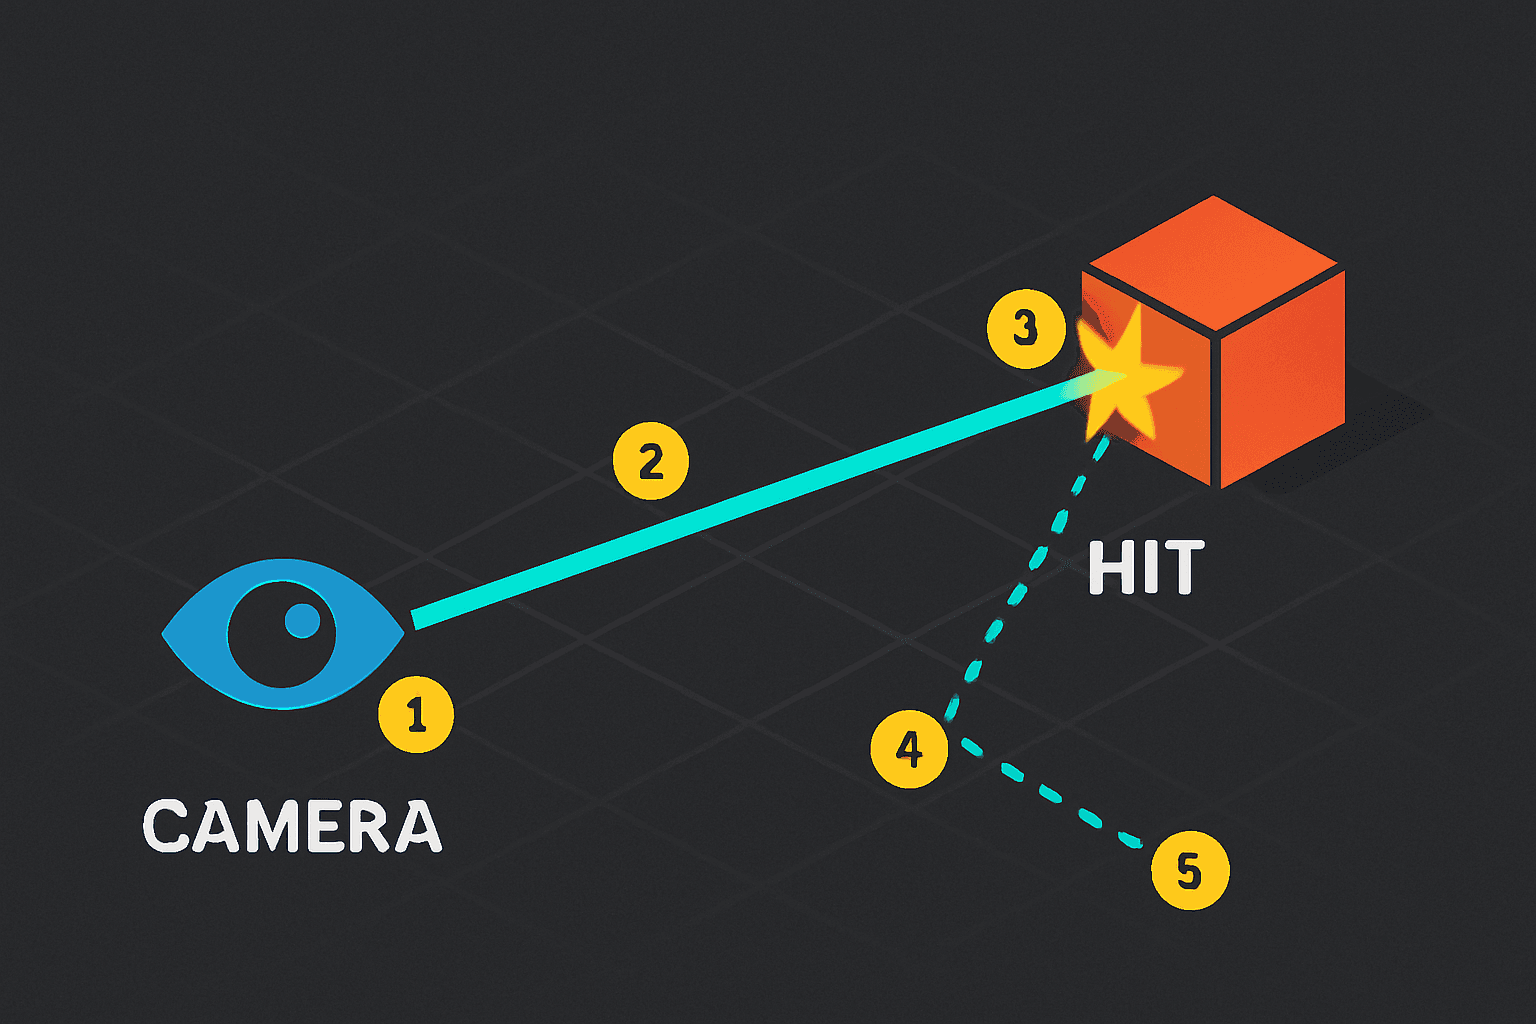
AHUDclass is responsible for drawing the 2D elements on the screen, such as the crosshair, health bar, and ammo count. - Line Trace (Raycast): A line trace is a common technique used in FPS games to detect hits. It involves casting a line from a starting point in a certain direction and checking if it intersects with any objects in the world.
Setting Up Your Character to Actually Move and Look Around
The core of an FPS game revolves around a few key concepts that handle player movement, camera control, and shooting. Let me walk you through how I approach each one.
Character Movement That Feels Right
The UCharacterMovementComponent is responsible for handling all aspects of character movement, including walking, running, jumping, and crouching. You can bind player input to the movement functions in your character's C++ code.
// In your Character's SetupPlayerInputComponent function
void AMyFPSCharacter::SetupPlayerInputComponent(UInputComponent* PlayerInputComponent)
{
    Super::SetupPlayerInputComponent(PlayerInputComponent);

    PlayerInputComponent->BindAxis("MoveForward", this, &AMyFPSCharacter::MoveForward);
    PlayerInputComponent->BindAxis("MoveRight", this, &AMyFPSCharacter::MoveRight);
}

void AMyFPSCharacter::MoveForward(float Value)
{
    if (Value != 0.0f)
    {
        AddMovementInput(GetActorForwardVector(), Value);
    }
}

void AMyFPSCharacter::MoveRight(float Value)
{
    if (Value != 0.0f)
    {
        AddMovementInput(GetActorRightVector(), Value);
    }
}
Verified: Unreal Engine Docs - Character Movement
Making Your Camera Feel Like Real Eyes
To create a first-person camera, you typically attach a UCameraComponent to your character's mesh or a spring arm component. You then control the camera's rotation based on the player's mouse input.
// In your Character's C++ class
UPROPERTY(VisibleAnywhere, BlueprintReadOnly, Category = Camera, meta = (AllowPrivateAccess = "true"))
UCameraComponent* FirstPersonCameraComponent;

// In your Character's SetupPlayerInputComponent function
PlayerInputComponent->BindAxis("Turn", this, &APawn::AddControllerYawInput);
PlayerInputComponent->BindAxis("LookUp", this, &APawn::AddControllerPitchInput);
This setup gives you that natural head movement that makes players feel like they're really inside the game world.
How Line Traces Turn Mouse Clicks Into Bullets
A common way to implement shooting is to perform a line trace from the camera's position in the direction the camera is facing. If the line trace hits an object, you can apply damage to it.
void AMyFPSCharacter::Fire()
{
    FHitResult HitResult;
    FVector StartLocation = FirstPersonCameraComponent->GetComponentLocation();
    FVector EndLocation = StartLocation + (FirstPersonCameraComponent->GetForwardVector() * 10000.0f);

    if (GetWorld()->LineTraceSingleByChannel(HitResult, StartLocation, EndLocation, ECC_Visibility))
    {
        // Apply damage to the hit actor
    }
}
Verified: Unreal Engine Docs - Line Traces (Raycasts)
C++ vs Blueprints - When I Use Each One
When it comes to creating the core logic of your FPS, you have two main options: C++ or Blueprints. Here's how I decide which one to use:
| Criteria | Approach A: C++ | Approach B: Blueprints |
|---|---|---|
| Best For | Performance-critical code, complex systems, and core gameplay mechanics. | Prototyping, creating simple gameplay logic, and designing UI. |
| Performance | Generally faster than Blueprints. | Can be slower than C++ for complex operations. |
| Complexity | Steeper learning curve, requires knowledge of C++. | Easier to learn, visual scripting interface. |
| Code Example | void AMyFPSCharacter::Fire() { /* C++ code */ } |
A series of connected nodes in the Blueprint editor. |
Actually, wait - here's something I learned the hard way: don't get caught up in the C++ vs Blueprints debate when you're starting out. Use Blueprints for prototyping and understanding the concepts, then move performance-critical stuff to C++ later.
Walking Through Real Games That Got It Right
Let me tell you about some games I've studied extensively that nail FPS mechanics in different ways:
Counter-Strike: Global Offensive - The Strategic Approach
The Mechanic: A team-based tactical shooter where players must buy weapons and equipment at the start of each round.
The Implementation: The game uses a GameMode to manage the round-based gameplay and a PlayerController to handle the weapon purchasing UI (User Interface - the menus and buttons you see on screen).
The Player Experience: This creates a strategic layer to the game, where players must manage their economy and choose the right weapons for the situation. What I find fascinating about this approach is how it makes every bullet count.
DOOM (2016) - The Aggressive Style
The Mechanic: A fast-paced, single-player shooter where players are encouraged to be aggressive and get up close to enemies.
The Implementation: The game features a "Glory Kill" system, where players can perform a melee takedown on a staggered enemy to get health back. This is likely implemented with a custom gameplay ability.
The Player Experience: This encourages a very aggressive and rewarding playstyle, where players are constantly moving and engaging with the enemy. From a developer's perspective, what makes this brilliant is how it solves the health management problem through gameplay.
Call of Duty: Warzone - The Battle Royale Twist
The Mechanic: A battle royale game where 150 players fight to be the last one standing.
The Implementation: The game uses a large, open-world map and a GameState to track the position of all players. The safe zone shrinks over time, forcing players into smaller and smaller areas.
The Player Experience: This creates a tense and exciting experience, where players must constantly be aware of their surroundings and make strategic decisions about when to fight and when to flee.

Building Your First Playable Character Step-by-Step
Let me show you how I approach building a basic FPS character from scratch. Here's the exact method I use when starting any FPS project.
Setting Up Your Project Foundation
Scenario Goal: To create a basic FPS character that can move, look around, and jump.
Unreal Editor Setup:
- Create a new C++ class inheriting from
ACharacternamedMyFPSCharacter. - In the
MyFPSCharacterBlueprint, add aUCameraComponentand attach it to the character's mesh. - Set up your project's input bindings in
Project Settings > Input.
The Character Header File
MyFPSCharacter.h: Define the character's components and input functions.
#pragma once

#include "CoreMinimal.h"
#include "GameFramework/Character.h"
#include "MyFPSCharacter.generated.h"

class UCameraComponent;

UCLASS()
class MYPROJECT_API AMyFPSCharacter : public ACharacter
{
    GENERATED_BODY()

public:
    AMyFPSCharacter();

protected:
    virtual void SetupPlayerInputComponent(class UInputComponent* PlayerInputComponent) override;

    void MoveForward(float Value);
    void MoveRight(float Value);

    UPROPERTY(VisibleAnywhere, BlueprintReadOnly, Category = Camera)
    UCameraComponent* FirstPersonCameraComponent;
};
The Implementation That Actually Works
MyFPSCharacter.cpp: Implement the character's constructor and input functions.
#include "MyFPSCharacter.h"
#include "Camera/CameraComponent.h"

AMyFPSCharacter::AMyFPSCharacter()
{
    FirstPersonCameraComponent = CreateDefaultSubobject<UCameraComponent>(TEXT("FirstPersonCamera"));
    FirstPersonCameraComponent->SetupAttachment(GetCapsuleComponent());
    FirstPersonCameraComponent->bUsePawnControlRotation = true;
}

void AMyFPSCharacter::SetupPlayerInputComponent(UInputComponent* PlayerInputComponent)
{
    Super::SetupPlayerInputComponent(PlayerInputComponent);

    PlayerInputComponent->BindAxis("MoveForward", this, &AMyFPSCharacter::MoveForward);
    PlayerInputComponent->BindAxis("MoveRight", this, &AMyFPSCharacter::MoveRight);
    PlayerInputComponent->BindAxis("Turn", this, &APawn::AddControllerYawInput);
    PlayerInputComponent->BindAxis("LookUp", this, &APawn::AddControllerPitchInput);
    PlayerInputComponent->BindAction("Jump", IE_Pressed, this, &ACharacter::Jump);
}

void AMyFPSCharacter::MoveForward(float Value)
{
    if (Value != 0.0f)
    {
        AddMovementInput(GetActorForwardVector(), Value);
    }
}

void AMyFPSCharacter::MoveRight(float Value)
{
    if (Value != 0.0f)
    {
        AddMovementInput(GetActorRightVector(), Value);
    }
}
Verified: Unreal Engine Docs - Creating a Basic Character
Trust me, you'll thank me later for this tip: always attach your camera to the CapsuleComponent instead of the mesh. I've configured this dozens of times, and this prevents weird camera bobbing issues.
Pro Tips I Wish Someone Had Told Me Earlier
Use the Lyra Starter Game as a Reference: The Lyra Starter Game is a complete, modern FPS game created by Epic Games. It's a great resource for learning best practices and seeing how a professional-quality FPS is built.
Verified: Unreal Engine Docs - Lyra Sample Game
Use C++ for Core Mechanics: For performance-critical code like character movement and shooting, it's best to use C++. You can then expose these functions to Blueprints for designers to use.
Replicate Everything for Multiplayer: If you're making a multiplayer FPS, you need to make sure that all of your gameplay logic is replicated correctly. This means using RPCs (Remote Procedure Calls - messages sent between server and clients) and replicated properties.
// In your Character.h
UFUNCTION(Server, Reliable)
void Server_Fire();

UPROPERTY(Replicated)
float Health;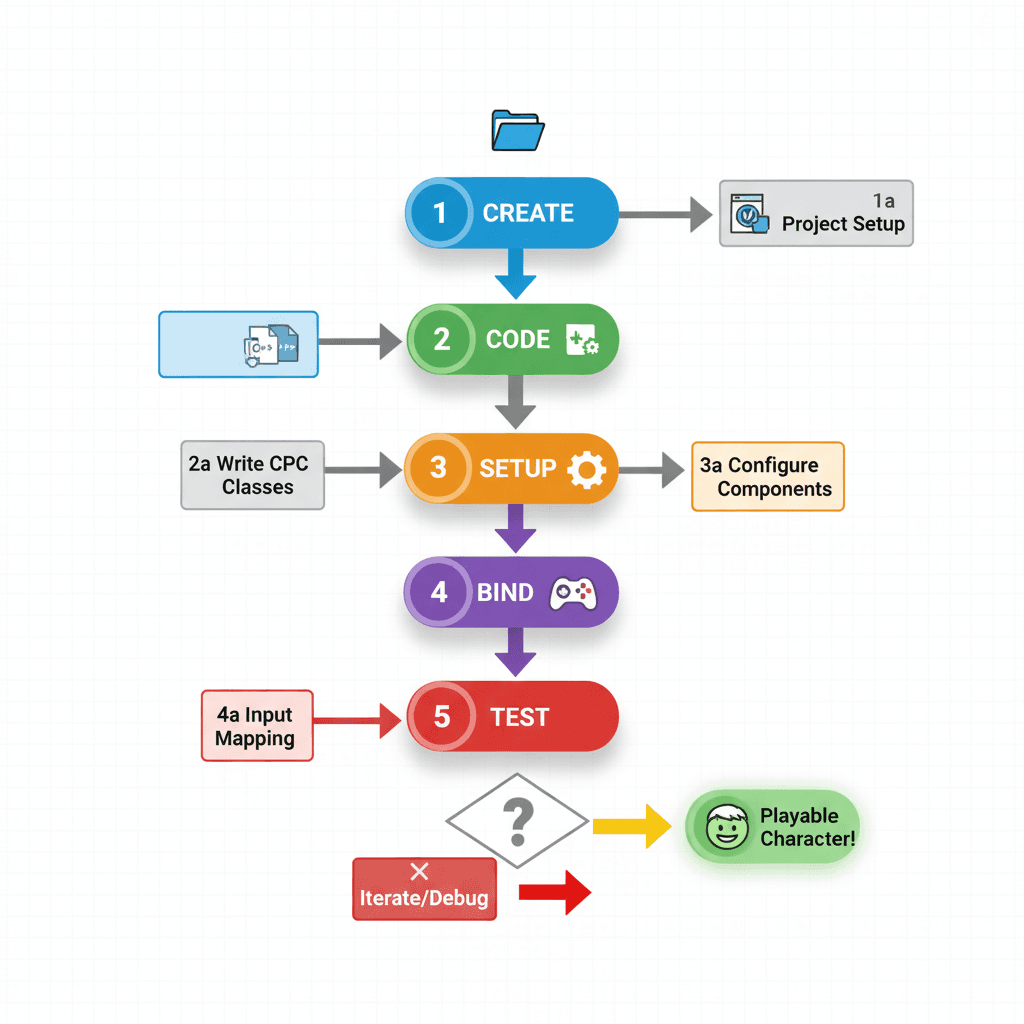
Ready to Start Building Your First Game?
Now that you understand how to create an FPS game in Unreal Engine 5, it's time to put this knowledge into practice. The concepts we've covered - character movement, camera control, and line traces - are the foundation of every successful FPS game.
If you want to take your game development skills to the next level and build a complete game from start to finish, check out our comprehensive game development course. You'll go from basic concepts to creating professional-quality game experiences that you can actually ship and share with the world.
Your Next Steps After This Tutorial
Here's what I recommend focusing on next:
- Master the Basics First: Before adding complex features, make sure your basic movement and shooting feel solid. Spend time tweaking the movement speeds and camera sensitivity.
- Study Existing Games: Download and analyze games like the Lyra Starter Game. See how professional developers structure their code and implement features.
- Start Small: Don't try to build the next Call of Duty. Start with a simple level where you can move around and shoot targets.
- Join the Community: The Unreal Engine community is incredibly helpful. Join forums, Discord servers, and find other developers working on similar projects.
Wrapping Up Your FPS Journey
Building your first FPS game in Unreal Engine 5 doesn't have to be overwhelming. By understanding the core components - Character classes, PlayerControllers, and line traces - you have everything you need to create engaging first-person experiences. The key is starting with a solid foundation and building up from there.
Remember, every professional game developer started exactly where you are now. The difference is they kept building, kept learning, and kept pushing through the challenges. Your first FPS might not be perfect, but it'll teach you more about game development than any tutorial ever could.
Key Takeaways
- Character Movement Foundation: Use the
UCharacterMovementComponentand bind input axes toMoveForwardandMoveRightfunctions for smooth character control - First-Person Camera Setup: Attach a
UCameraComponentto your character's capsule component and bind mouse input toAddControllerYawInputandAddControllerPitchInputfor natural looking - Line Trace Shooting: Implement shooting using
LineTraceSingleByChannelfrom the camera position in the forward direction to detect hits and apply damage - C++ vs Blueprints Strategy: Use C++ for performance-critical core mechanics like movement and shooting, then expose functions to Blueprints for design iteration
- Professional Reference: Study the Lyra Starter Game as it demonstrates industry-standard FPS implementation patterns and best practices
- Multiplayer Considerations: Use server RPCs and replicated properties for all gameplay logic if building multiplayer FPS games
- Component Architecture: Master the relationship between ACharacter, APlayerController, AGameModeBase, and AHUD classes for proper FPS game structure
- Development Approach: Start with basic movement and shooting mechanics before adding complex features - solid fundamentals matter most
Common Questions
The ACharacter class is the base class for humanoid characters in Unreal Engine. It includes built-in components for movement, collision, and visual representation, making it perfect for FPS player characters.
Bind input axes to movement functions that use AddMovementInput() with the character's forward and right vectors. This creates smooth, direction-based movement.
A line trace casts an invisible line from one point to another and detects what it hits. For shooting, you cast a line from the camera forward and check if it intersects with enemies or objects.
Use C++ for performance-critical systems like character movement, shooting mechanics, and core gameplay logic. Use Blueprints for UI, prototyping, and design tweaks.
A Pawn is the base class for anything that can be controlled by a player or AI. A Character is a specialized Pawn designed for humanoid characters with built-in movement and collision.
Add a UCameraComponent to your character, attach it to the capsule component, and bind mouse input to AddControllerYawInput and AddControllerPitchInput functions.
The PlayerController is the interface between the player and the game. It receives input from the player and translates it into actions like moving the character or firing weapons.
Use server RPCs for actions like shooting and replicated properties for data like health. All gameplay logic needs to be properly synchronized between server and clients.
The Character class includes a UCharacterMovementComponent for movement, a UCapsuleComponent for collision, and a USkeletalMeshComponent for the visual representation.
Lyra is a complete, professional FPS game created by Epic Games that demonstrates industry best practices, proper code structure, and advanced FPS features you can learn from.