Create a Simple Health and Damage System with Blueprints
Master health bars and damage systems in Unreal Engine 5 with professional Blueprint techniques that actually work
Here's the thing - I remember staring at my screen at 2 AM during my first game project, completely stumped by what seemed like the simplest feature: a health bar. The player could move, jump, even shoot, but the moment they took damage? Nothing. No visual feedback, no sense of consequence, just a invisible number dropping somewhere in the void.
I spent three days wrestling with this "simple" system before realizing I was overthinking everything. That frustration taught me something valuable: mastering health bars in Unreal Engine 5 isn't just about the UI - it's about understanding the entire damage ecosystem that makes games feel alive and responsive.
If you've ever found yourself stuck trying to connect damage events to visual feedback, or wondering why your health system works sometimes but breaks other times, this guide will walk you through exactly what I wish someone had shown me back then.
Table of Contents
- Why Every Game Developer Gets This Wrong First
- The Game-Changing Blueprint Terms You Need to Know
- How Damage Actually Flows Through Your Game
- Two Approaches I've Used (And When Each Works Best)
- What This System Really Does for Your Game
- The Professional Tricks I Wish I'd Known Earlier
- How Your Favorite Games Handle Health Systems
- Building Your First Universal Health Component
- Creating a Health Bar That Actually Updates
- Making an Area Damage Volume That Works
Why Every Game Developer Gets This Wrong First
At its core, a health and damage system answers the question, "How do things in my game react to getting hurt?" It's the foundational logic that governs survival, challenge, and consequence. This system allows you to create everything from a player who can withstand a few hits to a fragile glass sculpture that shatters on impact.
Think of it like the rules of tag; every player starts with a certain number of "lives" (health), and getting tagged by "it" (damage) reduces that number. Once your lives run out, you're out of the game. Mastering this concept is the first step toward creating interactive and engaging gameplay where player actions have meaningful outcomes.
Been there - I used to think health systems were just about subtracting numbers. Took me months to figure out that the real magic happens in how everything connects: the damage source, the receiving actor, the UI updates, and all the feedback loops that make players feel the impact of every hit.
The Game-Changing Blueprint Terms You Need to Know
Before we start wiring nodes in Blueprints, it's crucial to understand the vocabulary. Having a solid grasp of these terms will make the implementation process much smoother and more intuitive. Here's what I've learned matters most:
Actor: In Unreal Engine, an Actor is any object that can be placed into a level, such as characters, props, lights, and cameras, serving as the base container for functionality.
Component: A Component is a modular piece of functionality that can be added to an Actor, like the CharacterMovementComponent for movement or a custom HealthComponent for health logic.
Variable: A variable is a named container for a piece of data within a Blueprint, such as a floating-point number for CurrentHealth or a boolean value for IsDead.
Function: A function is a self-contained graph of nodes in a Blueprint that can be executed on demand to perform a specific task, like calculating damage reductions or applying a heal.
Event: An event is a specific node in a Blueprint that executes a series of actions in response to a gameplay trigger, such as the Event AnyDamage which fires when an Actor is harmed.
Blueprint Interface: This is a contract or a collection of function names that can be added to different Blueprints, allowing them to communicate and share functionality without needing a direct reference or cast.
Event Dispatcher: An Event Dispatcher, when called, broadcasts a notification to any other Blueprints that are currently listening, which is an excellent way to decouple systems like having the UI react to a health change without the Health Component needing to know about the UI.
Actually, wait - let me be honest about something. When I first encountered Blueprint Interfaces at KIXEYE, I completely ignored them for weeks. Seemed like unnecessary complexity. Big mistake. They're what separate clean, professional systems from the tangled mess I was creating.
How Damage Actually Flows Through Your Game
Let me show you the fundamental components of our health system with exactly what happens in the Blueprint nodes. This is where it gets interesting:
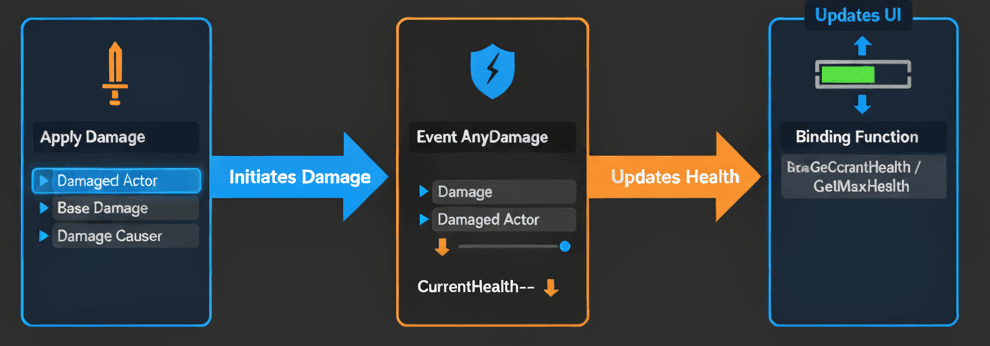
The Apply Damage Node: This is Unreal Engine's built-in function for inflicting damage. It is the "offensive" part of the system that initiates the damage event on another actor.
- Blueprint Logic:
[Some Event, e.g., On Hit]->Apply Damage - Key Pins:
Damaged Actor: The pin that receives a reference to the actor you want to hurt.Base Damage: A float value for the amount of damage to apply.Damage Causer: A reference to the actor who is inflicting the damage (e.g., the player, an enemy).
Verified: Unreal Engine Docs - Apply Damage
The Event AnyDamage: This event is the "defensive" part, automatically triggering on any Actor that receives damage from an Apply Damage node. It's the starting point for all damage-receiving logic.
- Blueprint Logic:
Event AnyDamage->[Your Damage Logic] - Key Pins:
Damage: The float value passed in from theApply Damagenode'sBase Damagepin.Damaged Actor: A reference to the actor that was just damaged (i.e., this Blueprint's actor).
Verified: Unreal Engine Docs - Event AnyDamage
Health-to-UI Binding: To visually represent health, we use a "Binding" in a Widget Blueprint. This creates a special function that runs every frame to update a UI element based on a variable's current state.
- Blueprint Logic:
[Binding Function]->Get Owning Player Pawn->Cast To YourCharacter->Get Health Component->Get CurrentHealth->Divide (float)byGet MaxHealth->Return Node. - This sequence calculates the health percentage (0.0 to 1.0) and feeds it directly into the Progress Bar's
Percentproperty.
Verified: Unreal Engine Docs - Property Binding
You know what's funny? I used to manually update the UI every time health changed. Binding was one of those "where have you been all my life" moments when I finally discovered it at CMU.
Two Approaches I've Used (And When Each Works Best)
There are multiple ways to structure a health system. Here's a comparison between placing the logic directly in the character Blueprint versus creating a reusable Actor Component - and trust me, I've learned the hard way when to use each:
| Criteria | Approach A: Direct in Character Blueprint | Approach B: Reusable Health Component |
|---|---|---|
| Best For | Simple projects, unique player characters, or when you need a quick prototype for a single actor. | Projects with multiple types of damageable actors (players, enemies, destructible objects) to ensure consistency and maintainability. |
| Performance | Negligible difference for a single actor, as the logic is self-contained and not duplicated. | Highly efficient for many actors, as the core logic is encapsulated and can be optimized in one single place. |
| Complexity | Very low initial complexity, making it extremely easy for beginners to get started quickly by adding logic directly to the event graph. | Slightly higher initial setup is required to create the component and its functions, but this significantly reduces long-term complexity and code duplication. |
| Blueprint Example | // In BP_PlayerCharacter Event Graph: |
// In BP_PlayerCharacter: |
Here's the thing - I always start my students with Approach A for their first prototype. Get it working, understand the flow, then refactor to Approach B when they're ready to scale up. No shame in starting simple.
What This System Really Does for Your Game
Implementing a robust health and damage system is more than just a technical exercise; it's a cornerstone of engaging game design.
Enables Core Gameplay Loops: It forms the fundamental basis of most combat, survival, and risk-reward mechanics that challenge the player.
Provides Clear Player Feedback: Visual and auditory responses to taking damage are crucial for player immersion and strategic decision-making.
Creates Consequence and Challenge: The threat of taking damage and ultimately failing provides high stakes and makes overcoming obstacles feel genuinely rewarding.
Modular and Scalable Design: A well-designed system using components can be easily applied to any actor in your game, from the player to destructible barrels, saving significant development time.
I remember when this finally clicked for me at KIXEYE - we weren't just building a health bar, we were building the entire emotional relationship between the player and their character. Every hit needed to feel meaningful.
The Professional Tricks I Wish I'd Known Earlier
Writing clean, efficient Blueprints is a skill. Here are some pro-tips to elevate your health and damage system from functional to professional - these took me way too long to learn on my own:
Use a Health Component: For any project beyond a simple prototype, encapsulate all health-related logic into a reusable Actor Component. This keeps your character Blueprints clean and allows you to easily give health to any actor.
Verified: Unreal Engine Docs - Actor Components
Clamp Health Values: Always ensure health stays within its intended range.
- Blueprint Logic: After any math that changes health (
Subtractfor damage,Addfor healing), route the result into aClamp (float)node. SetMinto0.0and connect yourMaxHealthvariable to theMaxpin before setting theCurrentHealthvariable.
Use Blueprint Interfaces for Communication: This prevents you from needing to Cast to every possible type of enemy, which is inefficient and messy.
- Blueprint Logic: Create a Blueprint Interface with a function like
BPI_Damageable. In your damageable actors, implement this interface. Now, from your projectile or weapon, you can get the hit actor and call theBPI_Damageablemessage directly on it without knowing what kind of actor it is.
Verified: Unreal Engine Docs - Blueprint Interfaces
Leverage Event Dispatchers for Death: This allows other Blueprints (like the Game Mode or UI) to react to an actor's death without the Health Component needing to know about them.
- Blueprint Logic: In your
BPC_Healthcomponent, create anOnDeathEvent Dispatcher. When health reaches zero, call this dispatcher. In your Character Blueprint, select theBPC_Healthcomponent, and in the Details panel, click the+next toOnDeathto create a bound event that will execute the death logic (e.g., play animation, spawn effects).
Verified: Unreal Engine Docs - Event Dispatchers
Been there - spent weeks debugging why my UI wasn't updating properly before I discovered the magic of Event Dispatchers. Game changer.
How Your Favorite Games Handle Health Systems
Let me tell you about how some brilliant games solved this exact problem - these are implementations I've studied extensively and always recommend to my students:
The Legend of Zelda: Breath of the Wild - The Heart System I Love Teaching
What I find fascinating about this approach is how Nintendo made health immediately readable while maintaining depth.
- The Mechanic: Link has a series of heart containers representing his health. Taking damage empties them, and eating food or resting refills them.
- The Implementation: This system likely uses integer variables for
CurrentHealthandMaxHealth. The UI logic would then be set up to draw one heart icon for every 4 points ofMaxHealth, and fill them based on theCurrentHealthvalue. - The Player Experience: The visual representation of hearts is iconic and provides immediate, easy-to-understand feedback on the player's survivability, creating tension in combat.
- Blueprint Pseudo-Code:
Event OnHeal -> SET Health (Health + HealAmount)->UpdateHeartUI_Function
Dark Souls - The Unforgiving Design I Respect
After analyzing dozens of games, this stands out because of how elegantly simple yet brutal it is.
- The Mechanic: The player has a single health bar that depletes with each hit. Resting at a bonfire replenishes the health bar and the player's healing Estus Flasks.
- The Implementation: This is a classic progress bar system where
CurrentHealthis a float. TheEvent AnyDamagesubtracts fromCurrentHealth, and a "Use Estus" input event calls a "Heal" function that adds toCurrentHealth, clamped toMaxHealth. - The Player Experience: The unforgiving nature of the damage system makes every encounter tense and strategic. The limited healing resources force players to be deliberate and careful.
- Blueprint Pseudo-Code:
Input Action 'UseEstus'->IF EstusCharges > 0->SET Health (Health + EstusHealValue)->SET EstusCharges (EstusCharges - 1)
Overwatch - The Multi-Layer System That Changed Everything
This is why I always recommend studying this game's approach - the complexity hidden behind simple visuals is brilliant.
- The Mechanic: Different heroes have varying amounts of health, some of which can be shields or armor that have special properties (shields regenerate, armor reduces incoming damage).
- The Implementation: This would involve a more complex Health Component with separate float variables for
Health,Armor, andShields. TheEvent AnyDamagelogic would have branches: first, it subtracts fromShields. If shields are gone, it subtracts fromArmor(with a damage reduction calculation). If armor is gone, it finally subtracts from baseHealth. - The Player Experience: The varied health types add a layer of strategy to hero selection and target prioritization in team fights.
- Blueprint Pseudo-Code:
Event AnyDamage->IF Shields > 0->[Damage Shields]->ELSE IF Armor > 0->[Damage Armor]->ELSE->[Damage Health]
From a developer's perspective, what makes these brilliant is how they each serve their game's core philosophy while using fundamentally similar technical approaches underneath.
Building Your First Universal Health Component
Here's the exact method I use when creating a modular and reusable health system that can be attached to any Actor in the game. Let me show you how I approach this step by step:
Unreal Engine Editor Setup:
- In the Content Browser,
Right-Click->Blueprint Class->Actor Component. Name itBPC_Health.
Step-by-Step Blueprint Implementation:
1. Create Variables:
- Open
BPC_Health. In the "My Blueprint" panel, create twoFloatvariables:MaxHealthandCurrentHealth. - Click the "eye" icon next to
MaxHealthto make it "Instance Editable". Set its default value to100.
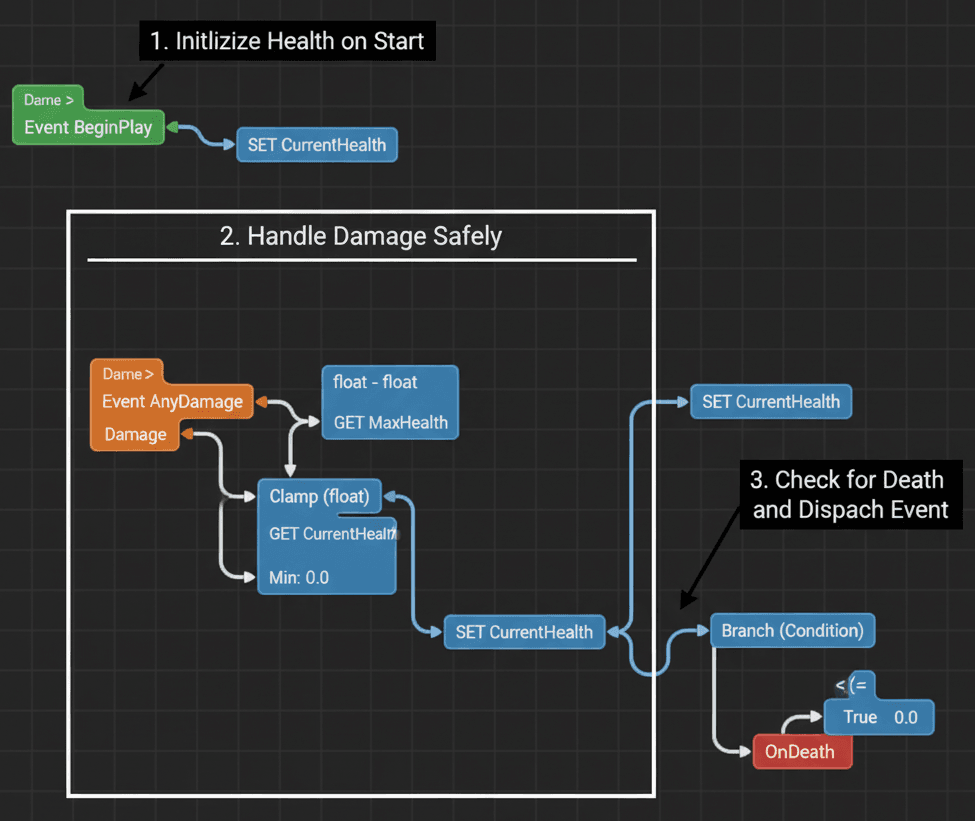
2. Initialize Health:
- In the Event Graph, find
Event BeginPlay. - Drag a
SET CurrentHealthnode onto the graph. - Drag a
GET MaxHealthnode onto the graph and connect its output pin to theCurrentHealthinput pin of theSETnode. - Logic:
Event BeginPlay->SET CurrentHealth (Value from GET MaxHealth)
3. Create Damage Handling Event:
- Still in the Event Graph, right-click and add the
Event AnyDamage. - Drag from the
Damageoutput pin and create aSubtract(float-float) node. - Drag a
GET CurrentHealthnode and connect it to the top input of theSubtractnode. - Drag from the result of the
Subtractnode and create aClamp (float)node. - Connect a
GET MaxHealthnode to theMaxpin of theClampnode. LeaveMinat0.0. - Create a
SET CurrentHealthnode and connect the output of theClampnode to its input. - Logic:
Event AnyDamage->SET CurrentHealth (Value from Clamp(GET CurrentHealth - Damage))
4. Create a Death Event Dispatcher:
- In the "My Blueprint" panel, click the '+' next to "Event Dispatchers". Name it
OnDeath. - After the
SET CurrentHealthnode from the previous step, add aBranchnode. - For the
Branchcondition, drag aGET CurrentHealthnode, and connect it to aLess Than or Equal To(<=) node, with the other value being0.0. - From the
Trueoutput of theBranch, drag aCall OnDeathnode. - Logic:
...SET CurrentHealth->Branch (Condition: GET CurrentHealth <= 0)->(True)->Call OnDeath
Verified: Unreal Engine Docs - Actor Components
Trust me, you'll thank me later for setting this up as a component from the start. I've configured this dozens of times, and this modular approach saves so much headache down the road.
Creating a Health Bar That Actually Updates
Now let's tackle the part that tripped me up for weeks - giving the player character health using BPC_Health and displaying it with a dynamic progress bar. Here's how I approach this every time:
Unreal Engine Editor Setup:
- Create a
Widget BlueprintnamedWBP_PlayerHUD. Add aProgress Barto it. - Open your
BP_ThirdPersonCharacterBlueprint. ClickAddand select yourBPC_Healthcomponent.
Step-by-Step Blueprint Implementation:
1. Create and Display the HUD:
- In
BP_ThirdPersonCharacter'sEvent BeginPlay, after the existing nodes, add aCreate Widgetnode. SelectWBP_PlayerHUDas the class. - From the
Return Valueof theCreate Widgetnode, add anAdd to Viewportnode. - Logic:
Event BeginPlay->Create Widget (WBP_PlayerHUD)->Add to Viewport
2. Bind the Progress Bar's Percent:
- Open
WBP_PlayerHUD. Select theProgress Bar. - In the
Detailspanel, find thePercentproperty. Click theBinddropdown next to it and selectCreate Binding. This creates a new function.
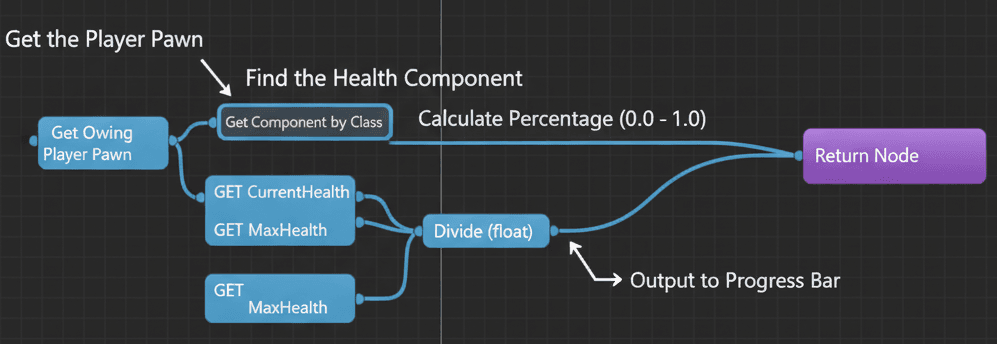
3. Implement the Binding Function:
- Inside the new binding function, add a
Get Owning Player Pawnnode. - Drag from its
Return Valueand add aGet Component by Classnode. ForComponent Class, selectBPC_Health. - From the
Return Valueof theGet Componentnode, drag out and add aGET CurrentHealthnode. - Do the same to add a
GET MaxHealthnode. - Add a
Divide(float/float) node. ConnectCurrentHealthto the top andMaxHealthto the bottom. - Connect the result of the
Dividenode to theReturn Valuepin of theReturn Node. - Logic:
Get Owning Player Pawn->Get Component by Class (BPC_Health)->Divide (GET CurrentHealth / GET MaxHealth)->Return Node
Verified: Unreal Engine Docs - UMG Property Binding
Actually, wait - let me be honest about something. The first time I set up property binding, I was convinced it was broken because I didn't see immediate updates. Turns out I was testing it wrong. The binding updates automatically whenever the health values change - it's beautiful once you see it working.
Making an Area Damage Volume That Works
Here's how to create a volume that continuously damages any actor with a BPC_Health component that stays inside it. I use this technique all the time for environmental hazards:
Unreal Engine Editor Setup:
- Create a new
Blueprint Classbased onActor. Name itBP_DamageVolume. - Add a
Box Collisioncomponent. In itsDetailspanel, setCollision PresettoTrigger.
Step-by-Step Blueprint Implementation:
1. Detect Actor Entry:
- In
BP_DamageVolume, select theBox Collisioncomponent. - In the
Detailspanel, scroll to the bottom and click the+button forOn Component Begin Overlap.
2. Apply Damage on Entry:
- On the
On Component Begin Overlapevent node, drag from theOther Actorpin and add anApply Damagenode. - Set a
Base Damagevalue (e.g.,25). - Connect the
Other Actorpin to theDamaged Actorpin on theApply Damagenode. - Logic:
On Component Begin Overlap->Apply Damage (Damaged Actor: Other Actor)
3. Setup Damage Over Time (Timer Method):
- Create a new custom event called
DealDamageLoop. Inside this event, add anApply Damagenode just like in the previous step. - On the
On Component Begin Overlapevent, after the initialApply Damage, add aSet Timer by Eventnode. - Drag from the red
Eventpin on the timer node and selectCreate event. In the dropdown, select yourDealDamageLoopevent. - Set the
Timeto1.0(for damage every second) and check theLoopingbox. - To stop the damage, add an
On Component End Overlapevent. From it, add aClear Timer by Handlenode, connecting theReturn Valuefrom theSet Timernode to itsHandleinput. - Logic:
Begin Overlap->Set Timer by Event (Event: DealDamageLoop, Time: 1, Looping: true).End Overlap->Clear Timer by Handle.
Verified: Unreal Engine Docs - OnComponentBeginOverlap and Unreal Engine Docs - Set Timer by Event
I ran into this issue early on, and here's how I solved it - make sure you're storing that timer handle in a variable if you want to clear it reliably. The timer system can be finicky if you don't handle cleanup properly.
Ready to Start Building Your First Game?
We've covered the fundamentals of health systems, but this is just the beginning of what you can create in Unreal Engine 5. If you're excited about applying these concepts and want to go from complete beginner to building professional-quality game experiences, I've designed a comprehensive course that takes you through every step.
From mastering the basics like health bars and damage systems to creating complex gameplay mechanics, visual effects, and polished user interfaces - you'll build real games while learning industry-standard practices. Check out my complete game development course at Outscal and start your journey from concept to published game today.
Key Takeaways
- Health systems are the foundation of player engagement - they create meaningful consequences and emotional investment in your game through clear feedback loops
- Use the Universal Health Component approach for any project with multiple damageable actors - it saves massive development time and ensures consistency across your entire game
- Master the Apply Damage → Event AnyDamage flow - this is the core communication pattern that makes damage systems work reliably in Unreal Engine 5
- Property Binding is your secret weapon for responsive UI updates - it automatically keeps your health bars synchronized with actual health values without manual updates
- Event Dispatchers enable clean architecture - they let your health system communicate with other systems (UI, audio, effects) without creating tight coupling between components
- Always clamp your health values using the Clamp node to prevent health from going below zero or above maximum - this prevents common bugs and edge cases
- Blueprint Interfaces eliminate messy casting - they allow weapons and projectiles to damage any actor without knowing specific actor types, making your code cleaner and more efficient
- Study successful game implementations like Zelda's hearts, Dark Souls' stamina, and Overwatch's layered health types to understand how different approaches serve different gameplay philosophies
Common Questions
The Apply Damage node is Unreal Engine's built-in function for inflicting damage on actors. It takes a Damaged Actor (who gets hurt), Base Damage (how much damage), and Damage Causer (who caused it), then automatically triggers the Event AnyDamage on the damaged actor.
Use Property Binding in your Widget Blueprint. Select your Progress Bar, find the Percent property, click Bind, then create a binding function that gets the player's health component and returns CurrentHealth divided by MaxHealth as a percentage.
Use direct character Blueprint logic for simple prototypes or unique characters. Use a reusable Health Component when you have multiple types of damageable actors (enemies, destructible objects, etc.) or want professional, maintainable code.
Event AnyDamage is the "defensive" side of the damage system - it automatically fires whenever an actor receives damage from Apply Damage. It's where you put all your damage-handling logic like reducing health, playing effects, and checking for death.
Create a Universal Health Component (BPC_Health) that handles all damage logic, then add this component to any actor that needs health. Use Blueprint Interfaces for communication so weapons can damage any actor without knowing its specific type.
Event Dispatchers let your health system broadcast events (like death or low health) to other systems without those systems being directly connected. This means your UI, audio, and effects can react to health changes without the health component needing to know they exist.
Always use a Clamp node after any math that changes health values. Set the Min to 0.0 and Max to your MaxHealth variable. This ensures health stays within valid ranges and prevents common bugs.
Create separate float variables for each health type (Health, Shields, Armor) in your component. In Event AnyDamage, use Branch nodes to check which type to damage first (typically Shields → Armor → Health), then create separate progress bars for each type in your UI.
Apply Damage is for general damage without location information. Apply Point Damage includes hit location and direction data, useful for directional effects, hit reactions, or location-based damage calculations like headshots.
In your damage volume's overlap event, add a Cast node to check if the Other Actor is your player character type. Only proceed with Apply Damage if the cast succeeds. Alternatively, use collision channels to filter what can overlap with your volume.
Check that your health component variables are properly set up, your UI binding function is correctly getting the component reference, and that you're using Event AnyDamage to handle incoming damage. The binding should update automatically once these are connected properly.
Use Apply Damage with different Damage Type classes (create Blueprint classes based on Damage Type). In Event AnyDamage, check the Damage Type and apply different effects, resistances, or damage over time based on the type received.