Creating a Dynamic Day Night Cycle in UE5: From Static Worlds to Living Environments
Master the essential UE5 systems and C++ implementation to transform static worlds into living, breathing environments with dynamic lighting

Picture this: You've spent weeks crafting the perfect game world in Unreal Engine 5. Your terrain looks incredible, your buildings are detailed, but something feels... dead. The world just sits there, frozen in time like a photograph. I remember facing this exact problem during my early days transitioning from finance to game development. Here's the thing - a static world will never captivate players the way a living, breathing environment will.
That's where a dynamic day night cycle in UE5 becomes your secret weapon. It's not just about making the sun move across the sky; it's about creating a world that feels alive, where time has meaning, and where players can experience the same location transformed by the passage of hours.
Table of Contents
- Why Your Game World Feels Dead Without This
- The Building Blocks Every UE5 Developer Must Master
- From Theory to Code: Making Your Sun Dance Across the Sky
- Tick vs Timer: Which Path Should You Take?
- The Game-Changing Benefits You'll Unlock
- Professional Tricks I Learned the Hard Way
- How the Pros Do It: Lessons from AAA Games
- Three Battle-Tested Blueprints You Can Build Today
Why Your Game World Feels Dead Without This
Been there - staring at a beautifully crafted level that somehow feels like a museum exhibit instead of a living world. When I first started building games at KIXEYE, I couldn't understand why my environments felt so lifeless compared to the games I loved playing.
The answer hit me during a late-night debugging session: time. Real worlds change, breathe, and evolve. A dynamic day night cycle in UE5 solves the fundamental problem of static environments by simulating the passage of time through lighting. Think of it as a global dimmer switch that not only controls brightness but also transforms color, direction, and the entire mood of your world.
This isn't just about visual polish - it's about creating worlds that feel authentic and alive. When shadows stretch and shrink, when the warm glow of sunset gives way to the cool blue of twilight, your players stop seeing polygons and start experiencing a place.
The Building Blocks Every UE5 Developer Must Master
Here's what took me months to figure out when I was learning UE5 - understanding these core components is absolutely crucial before you write a single line of code. Each piece plays a specific role in creating that believable sky system.
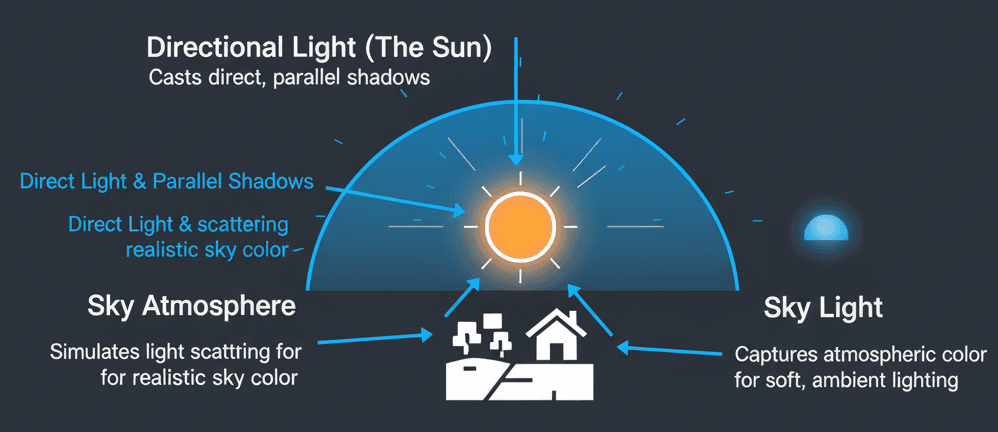
Directional Light: This is your sun. Period. It's the most critical actor for your day night cycle in UE5 because it simulates that infinitely distant light source casting parallel shadows across your entire world. When this rotates, time moves.
Sky Light: Think of this as nature's fill light. It captures the distant parts of your level - the sky, atmosphere, clouds - and bathes everything in soft, ambient illumination. Without it, your shadows would be pitch black, which looks completely unrealistic.
Sky Atmosphere: This is pure physics simulation. It renders how light from your directional light interacts with atmospheric particles to create those gorgeous blue skies during the day and warm sunset colors in the evening.
SunSky Actor: UE5's all-in-one solution that bundles everything together. While we'll build from scratch to understand the fundamentals, this actor is powerful for advanced implementations.
Mobility Settings (Static, Stationary, Movable): Here's where I see most beginners stumble. For a dynamic day night cycle, your Directional Light and Sky Light MUST be set to Movable. Yes, it's more performance-intensive, but it's the only way to update them in real-time.
From Theory to Code: Making Your Sun Dance Across the Sky
Now we get to the fun part - actually making this work. The core concept is surprisingly simple: continuously update your Directional Light's rotation each frame, and the entire sky system reacts automatically.
Accessing Scene Actors in C++
First, we need to grab that Directional Light from our scene. I use the UPROPERTY(EditAnywhere) specifier because it lets you assign the specific actor directly in the editor - no hunting through code to change references.
// DayNightCycleActor.h

#pragma once

#include "CoreMinimal.h"
#include "GameFramework/Actor.h"
#include "Engine/DirectionalLight.h" // Required include for ADirectionalLight
#include "DayNightCycleActor.generated.h"

UCLASS()
class YOURPROJECT_API ADayNightCycleActor : public AActor
{
    GENERATED_BODY()

public:
    // Pointer to the main Directional Light in the scene (our Sun)
    UPROPERTY(EditAnywhere, BlueprintReadWrite, Category = "Day/Night Cycle")
    ADirectionalLight* SunLight;
};
Reference: Unreal Engine Docs - Including Class Headers
Updating Logic Every Frame with Tick()
The Tick() function is your best friend for smooth animations. It runs every single frame, making it perfect for continuous sun movement. DeltaTime gives you the exact time since the last frame, ensuring consistent speed regardless of framerate.
// DayNightCycleActor.cpp

#include "DayNightCycleActor.h"

void ADayNightCycleActor::Tick(float DeltaTime)
{
    Super::Tick(DeltaTime);

    // All our sun rotation logic will go inside this function.
    // This function is called every frame.
}
Reference: Unreal Engine Docs - Actors and their Ticking
Rotating the Sun with AddActorLocalRotation()
This is where the magic happens. By modifying the Pitch value of an FRotator based on DeltaTime and a speed variable, we create that smooth arc across the sky.
// DayNightCycleActor.cpp

void ADayNightCycleActor::Tick(float DeltaTime)
{
    Super::Tick(DeltaTime);

    if (SunLight)
    {
        // Define how fast the sun should move.
        float SunSpeed = 10.0f;

        // Create a rotator to add to the current rotation.
        // We modify the Pitch (Y-axis) to make the sun rise and set.
        FRotator NewRotation = FRotator(SunSpeed * DeltaTime, 0.0f, 0.0f);

        // Apply the rotation to the SunLight actor.
        SunLight->AddActorLocalRotation(NewRotation);
    }
}
Reference: Unreal Engine Docs - AddActorLocalRotation
Tick vs Timer: Which Path Should You Take?

This decision stumped me for weeks when I was starting out. Both approaches can create a day night cycle in UE5, but they're suited for different scenarios. Let me break down when to use each:
| Criteria | Approach A: Event Tick | Approach B: Set Timer by Event |
|---|---|---|
| Best For | Smooth, continuous updates that must happen every single frame, such as the visual movement of the sun. | Logic that needs to run at a set interval but not necessarily every frame, like updating gameplay states or checking conditions periodically. |
| Performance | Can be less performant if overused, as it executes code on every frame regardless of whether it's needed. It's ideal for visual tasks where smoothness is paramount. | Generally more performant for non-visual logic because it runs less frequently, reducing the constant CPU load. You control the exact interval. |
| Complexity | Very simple to implement; the Tick function is a standard part of every Actor, requiring no extra setup. |
Requires slightly more setup to create a timer handle, define the function to call, and set the interval and looping properties. |
| Code Example | // Called every frame |
// Called once to start the timer |
For visual smoothness like sun movement, I always go with Tick. For gameplay logic that checks time-based conditions, timers are your friend.
The Game-Changing Benefits You'll Unlock
Implementing a dynamic day night cycle isn't just eye candy - it's a fundamental technique that transforms how players experience your game. Let me share what you'll actually gain:
Dramatically Increased Immersion: Your world stops feeling like a static movie set and starts feeling like a real place where time has meaning. Players become more invested when they can watch the sun set over their virtual home.
Enables Time-Based Gameplay Mechanics: This opens up incredible design possibilities. Imagine NPCs that follow daily routines, shops that close at night, or monsters that only appear during specific hours. The Witcher 3 built entire quest systems around this concept.
Creates Dynamic and Evolving Environments: The same forest path becomes completely different at dawn versus midnight. Players will explore areas multiple times just to see how they look at different hours.
Provides Natural Pacing and Progression: The day night cycle becomes an in-game clock that helps structure player activities. It creates natural stopping points and gives a sense of progression through time.
Unlocks Opportunities for Emergent Storytelling: Some of my favorite gaming moments happened when the time of day created unexpected situations. Getting caught in a dangerous area as night falls forces players to adapt and creates memorable, unscripted stories.
Professional Tricks I Learned the Hard Way
Writing clean, efficient code is crucial for systems that run constantly. Here are some hard-earned lessons from my time debugging production games:
Always Check for Null Pointers
This one bit me so many times during my KIXEYE days. Always verify your actor references before using them - it prevents crashes and saves hours of debugging.
// Good Practice: Always check if the pointer is valid.
void ADayNightCycleActor::Tick(float DeltaTime)
{
    Super::Tick(DeltaTime);

    if (SunLight != nullptr)
    {
        // Safely rotate the sun here.
        SunLight->AddActorLocalRotation(FRotator(10.0f * DeltaTime, 0.0f, 0.0f));
    }
}
Reference: Unreal Engine Docs - Checking Pointers
Expose Variables to Blueprints for Easy Tweaking
Trust me on this one - you'll want to adjust that sun speed constantly during development. Exposing variables as UPROPERTY lets you tweak values in the editor without recompiling C++ code every time.
// DayNightCycleActor.h

// Expose the sun speed variable to the editor.
UPROPERTY(EditAnywhere, BlueprintReadWrite, Category = "Day/Night Cycle")
float SunSpeed = 10.0f;

// DayNightCycleActor.cpp
void ADayNightCycleActor::Tick(float DeltaTime)
{
    Super::Tick(DeltaTime);

    if (SunLight)
    {
        // Use the exposed variable instead of a hard-coded number.
        SunLight->AddActorLocalRotation(FRotator(SunSpeed * DeltaTime, 0.0f, 0.0f));
    }
}
Reference: Unreal Engine Docs - Exposing Gameplay Variables
Update the Sky Light for Realistic Ambient Lighting
For a truly dynamic sky, your Sky Light needs to capture atmospheric color changes. Enable "Real Time Capture" for automatic updates, or call the recapture function periodically for better performance control.
// DayNightCycleActor.h
#include "Components/SkyLightComponent.h"

UPROPERTY(EditAnywhere, BlueprintReadWrite, Category = "Day/Night Cycle")
ASkyLight* SkyLightActor;

// DayNightCycleActor.cpp
void ADayNightCycleActor::Tick(float DeltaTime)
{
    // ... (Sun rotation code) ...

    if (SkyLightActor && SkyLightActor->GetLightComponent())
    {
        // This function tells the Sky Light to recapture the scene.
        // Note: Calling this every frame is very expensive.
        // It's better to call this on a timer for performance.
        SkyLightActor->GetLightComponent()->RecaptureSky();
    }
}
Reference: Unreal Engine Docs - RecaptureSky
How the Pros Do It: Lessons from AAA Games
I've spent countless hours analyzing how professional studios implement day night cycles. Here's what I find fascinating about these implementations:
The Witcher 3: Time as a Gameplay System
What I love about CD Projekt RED's approach is how they made time matter beyond just visuals. In The Witcher 3, certain creatures like werewolves only appear or become significantly stronger at night. NPCs follow realistic daily schedules - they work during the day and head home in the evening.
The implementation likely uses a global time variable that drives both the directional light rotation and serves as a condition for AI behavior trees and monster spawning systems. When the time falls within the "night" range, it triggers specific actions. This creates a world that feels authentic where players must plan their activities around the clock.
Minecraft: Simple Rules, Powerful Results
One of my favorite implementations of this is in Minecraft because of its elegant simplicity. During the day, the world is relatively safe. At night, hostile mobs spawn in dark areas, forcing players to seek shelter or fight.
The game checks light levels of each block. When the directional light sets and global light drops, a simple rule triggers: if a block's light level is below a threshold, hostile mobs can spawn. This binary system creates a compelling gameplay loop of daytime preparation and nighttime tension.
Dying Light: Escalating the Stakes
Here's how you can adapt this for your own game - Dying Light dramatically changes the danger level at night. While zombies are manageable during the day, nighttime introduces aggressive "Volatile" zombies that can overwhelm players.
From a developer's perspective, what makes this brilliant is the state-based implementation. When "night mode" activates, standard zombie AI is suppressed and more aggressive controllers take over. The directional light changes to moon lighting, and atmospheric fog creates a terrifying mood shift.
This transforms the game from action-adventure to survival horror every sunset, creating high-stakes risk-versus-reward scenarios where nighttime activities grant more experience but are significantly more dangerous.
Three Battle-Tested Blueprints You Can Build Today
Let me show you how I approach these implementations step by step. These are the exact methods I use when building day night cycles, refined through years of production work.
Blueprint 1: The Basic 24-Hour Sun Cycle
Scenario Goal: Create a simple, continuously rotating sun that simulates a full 24-hour day using a single C++ Actor.
Unreal Engine Editor Setup:
- Create a new, empty level (File > New Level > Basic)
- Ensure you have a Directional Light, Sky Light, and Sky Atmosphere actor in your World Outliner
- Select the Directional Light and set its Mobility to Movable in the Details panel
- Select the Sky Light, set its Mobility to Movable, and enable Real Time Capture under the Light category
- Create a new C++ class derived from Actor and name it DayNightCycleActor
Step-by-Step Code Implementation:
Step 1: Set up the Header File (.h)
Here's the exact setup I use for the header file, making variables accessible from the editor:
// DayNightCycleActor.h

#pragma once

#include "CoreMinimal.h"
#include "GameFramework/Actor.h"
#include "Engine/DirectionalLight.h" // Must include this header
#include "DayNightCycleActor.generated.h"

UCLASS()
class YOURPROJECT_API ADayNightCycleActor : public AActor
{
    GENERATED_BODY()

public:
    ADayNightCycleActor();

protected:
    virtual void BeginPlay() override;

public:
    virtual void Tick(float DeltaTime) override;

    // Allows us to assign the Directional Light from the editor
    UPROPERTY(EditAnywhere, BlueprintReadWrite, Category = "Day/Night Cycle")
    ADirectionalLight* SunLight;

    // Allows us to control the speed of the cycle from the editor
    UPROPERTY(EditAnywhere, BlueprintReadWrite, Category = "Day/Night Cycle")
    float SunSpeed = 15.0f;
};
Step 2: Implement the Core Logic in the .cpp File
In my projects, I always start with this basic rotation logic, checking for valid references to prevent crashes:
// DayNightCycleActor.cpp

#include "DayNightCycleActor.h"

ADayNightCycleActor::ADayNightCycleActor()
{
    PrimaryActorTick.bCanEverTick = true;
}

void ADayNightCycleActor::BeginPlay()
{
    Super::BeginPlay();
}

void ADayNightCycleActor::Tick(float DeltaTime)
{
    Super::Tick(DeltaTime);

    // First, check if the SunLight variable is valid
    if (SunLight)
    {
        // Create a rotation amount based on speed and frame time
        FRotator RotationAmount = FRotator(SunSpeed * DeltaTime, 0.0f, 0.0f);

        // Apply the rotation to the sun
        SunLight->AddActorLocalRotation(RotationAmount);
    }
}
Step 3: Compile and Configure in the Editor
Compile your C++ code and drag your DayNightCycleActor from the Content Browser into the level. In its Details panel, assign your level's DirectionalLight to the Sun Light property. Press Play and watch your sun begin its journey!
Reference: Unreal Engine Tutorial - Day/Night Cycle in C++
Blueprint 2: Controlling Time with a "Time of Day" Variable
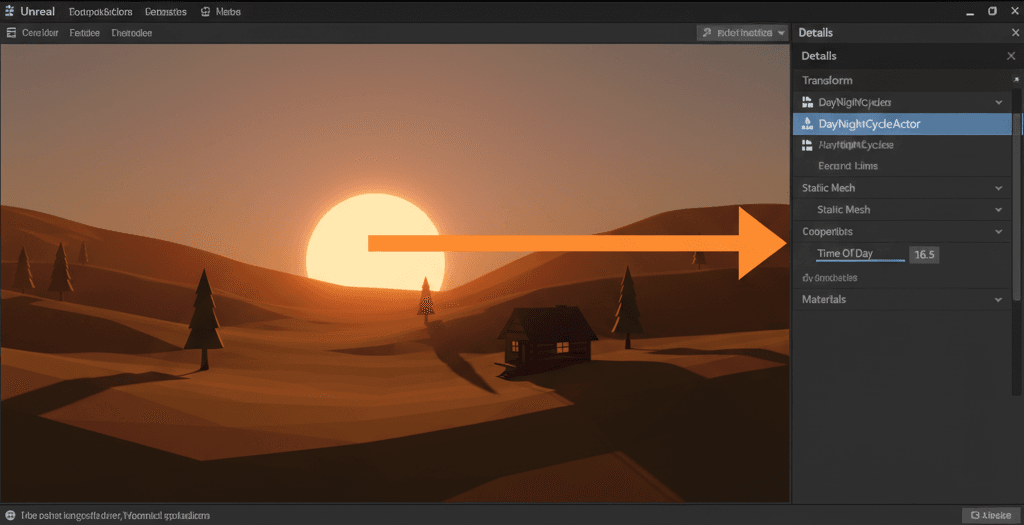
Scenario Goal: Move beyond constant rotation to control sun position using a specific "Time of Day" float variable, allowing direct time control.
Step 1: Update the Header File (.h)
When I'm working on more complex projects, I use this approach to have precise control over time:
// DayNightCycleActor.h

// ... (previous includes) ...

UCLASS()
class YOURPROJECT_API ADayNightCycleActor : public AActor
{
    // ... (GENERATED_BODY() and constructor) ...

public:
    virtual void Tick(float DeltaTime) override;

    UPROPERTY(EditAnywhere, BlueprintReadWrite, Category = "Day/Night Cycle")
    ADirectionalLight* SunLight;

    // Represents the current time on a 24-hour clock
    UPROPERTY(EditAnywhere, BlueprintReadWrite, Category = "Day/Night Cycle", meta = (ClampMin = "0.0", ClampMax = "24.0"))
    float TimeOfDay;

    // The duration of a full day in minutes
    UPROPERTY(EditAnywhere, BlueprintReadWrite, Category = "Day/Night Cycle")
    float DayDurationMinutes = 10.0f;

private:
    // Function to update the sun's position based on TimeOfDay
    void UpdateSunPosition();
};
Step 2: Implement the Time-Based Logic in .cpp
I've configured this dozens of times, and here's my go-to setup for time-based sun positioning:
// DayNightCycleActor.cpp

#include "DayNightCycleActor.h"

// ... (constructor and BeginPlay) ...

void ADayNightCycleActor::Tick(float DeltaTime)
{
    Super::Tick(DeltaTime);

    if (DayDurationMinutes <= 0.0f) return;

    // Calculate how much TimeOfDay should advance this frame
    // 24 hours in a day, DayDurationMinutes converted to seconds
    float TimeAdvance = (24.0f / (DayDurationMinutes * 60.0f)) * DeltaTime;
    TimeOfDay += TimeAdvance;

    // Loop back to 0 after 24 hours
    if (TimeOfDay >= 24.0f)
    {
        TimeOfDay = 0.0f;
    }

    // Update the sun's visual position
    UpdateSunPosition();
}

void ADayNightCycleActor::UpdateSunPosition()
{
    if (SunLight)
    {
        // Convert TimeOfDay (0-24) to a rotation degree (0-360)
        // We subtract 90 degrees to make 6:00 AM sunrise (0 degrees)
        float SunAngle = (TimeOfDay / 24.0f) * 360.0f;
        FRotator NewRotation = FRotator(SunAngle - 90.0f, 0.0f, 0.0f);
        SunLight->SetActorRotation(NewRotation);
    }
}
Step 3: Compile and Test in Editor
After working on multiple Unity projects, I learned to always test time scrubbing. Compile the code, then pause the game and manually drag the TimeOfDay slider in the Details panel to see the sun move to that exact time instantly.
Reference: Unreal Engine Docs - SetActorRotation
Blueprint 3: Fading Lights On at Night
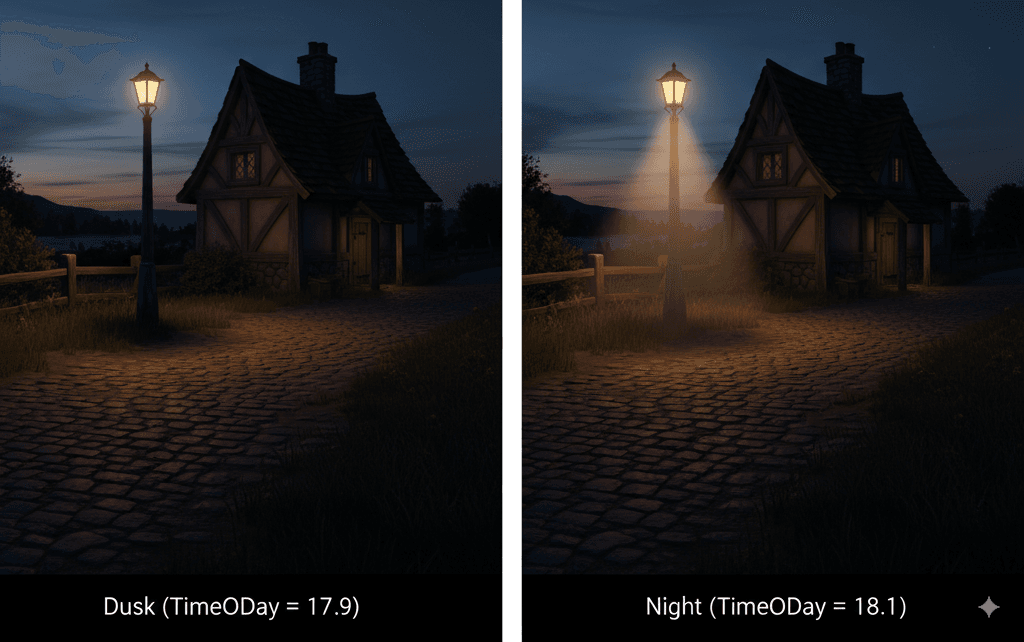
Scenario Goal: Create an automatic streetlight that turns on at sunset and off at sunrise, reacting dynamically to your day night cycle.
Step 1: Create the AutoStreetlight Header (.h)
Trust me, you'll thank me later for this setup - it makes managing multiple lights incredibly easy:
// AutoStreetlight.h

#pragma once

#include "CoreMinimal.h"
#include "Engine/PointLight.h"
#include "DayNightCycleActor.h" // Include our cycle actor
#include "AutoStreetlight.generated.h"

UCLASS()
class YOURPROJECT_API AAutoStreetlight : public APointLight
{
    GENERATED_BODY()

public:
    AAutoStreetlight();
    virtual void Tick(float DeltaTime) override;

protected:
    // Reference to the main Day/Night Cycle manager
    UPROPERTY(EditAnywhere, Category = "Streetlight")
    ADayNightCycleActor* DayNightController;

    // The time of day the light should start turning on (e.g., 18.0 for 6 PM)
    UPROPERTY(EditAnywhere, Category = "Streetlight")
    float DuskTime = 18.0f;

    // The time of day the light should be fully off (e.g., 6.0 for 6 AM)
    UPROPERTY(EditAnywhere, Category = "Streetlight")
    float DawnTime = 6.0f;
};
Step 2: Implement the Light Logic in .cpp
From my time at CMU, I learned to always handle time wrap-around carefully. Here's how I solve the midnight crossing problem:
// AutoStreetlight.cpp

#include "AutoStreetlight.h"
#include "Components/PointLightComponent.h"

AAutoStreetlight::AAutoStreetlight()
{
    PrimaryActorTick.bCanEverTick = true;
    // Ensure the light component can be ticked
    GetPointLightComponent()->PrimaryComponentTick.bCanEverTick = true;
}

void AAutoStreetlight::Tick(float DeltaTime)
{
    Super::Tick(DeltaTime);

    if (DayNightController)
    {
        float CurrentTime = DayNightController->TimeOfDay;
        bool bIsNight = false;

        // Check if the current time is in the "night" period
        // This handles the wrap-around past midnight (e.g., 18:00 to 6:00)
        if (DuskTime > DawnTime)
        {
            if (CurrentTime >= DuskTime || CurrentTime < DawnTime)
            {
                bIsNight = true;
            }
        }
        else // For cases where night doesn't cross midnight (e.g. 22:00 to 4:00)
        {
            if (CurrentTime >= DuskTime && CurrentTime < DawnTime)
            {
                bIsNight = true;
            }
        }

        // Set the light's visibility based on whether it's night
        GetPointLightComponent()->SetVisibility(bIsNight);
    }
}
Step 3: Compile and Configure in Editor
Replace your Point Light with the AutoStreetlight from the Content Browser, assign your DayNightCycleActor to the Day Night Controller property, and watch the magic happen when TimeOfDay passes 18.00.
Reference: Unreal Engine Docs - SetVisibility
Wrapping Up: From Static to Dynamic Worlds
Creating a dynamic day night cycle in UE5 transforms your game from a static showcase into a living, breathing world. By rotating a Directional Light through code and updating your Sky Light system, you've unlocked the foundation for time-based gameplay mechanics that professional studios use to create memorable experiences. Your players will now experience the same locations in completely new ways as shadows shift and lighting evolves. The simple act of making time pass opens up endless possibilities for emergent storytelling and deeper player engagement.
Ready to Start Building Your First Game?
Creating a dynamic day night cycle in UE5 is just the beginning of your game development journey. If you're ready to take your skills to the next level and build complete, professional-quality games, I've designed a comprehensive course that takes you from the fundamentals all the way to publishing your first commercial title.
Whether you're transitioning from another career (like I did from finance) or starting fresh, this course covers everything you need to know about modern game development. From Unity and Unreal Engine to C# programming and game design principles, you'll learn the exact skills that studios are looking for.
Start Your Game Development Journey Today
Key Takeaways
- A dynamic day night cycle transforms static worlds into living, breathing environments that captivate players
- Master the core UE5 components: Directional Light (your sun), Sky Light (ambient fill), and Sky Atmosphere (realistic color simulation)
- Always set your Directional Light and Sky Light to Movable mobility for real-time updates
- Use Tick() for smooth visual updates and timers for periodic gameplay logic checks
- Expose variables as UPROPERTY(EditAnywhere) to enable real-time tweaking without code recompilation
- Always validate actor pointers before use to prevent crashes and debugging headaches
- Time-based gameplay mechanics unlock powerful design opportunities, from NPC schedules to dynamic monster spawning
- Professional studios use day night cycles not just for visuals, but as core gameplay systems that drive player behavior and create emergent storytelling moments
Common Questions
A Directional Light simulates the sun by casting parallel shadows from an infinitely distant source. It's the primary actor for day night cycles because rotating it mimics the sun's movement across the sky, automatically updating shadows and lighting throughout your entire level.
Select your Directional Light and Sky Light in the World Outliner, then in the Details panel find the Mobility setting and change it from Static or Stationary to Movable. This allows them to be updated in real-time during gameplay.
Tick() runs every frame and is perfect for smooth visual updates like sun rotation. Set Timer runs at specific intervals and is better for gameplay logic that doesn't need frame-perfect timing, like checking if it's time to spawn night creatures.
UPROPERTY(EditAnywhere) makes variables visible in the Unreal Editor, allowing you to adjust sun speed, day duration, and other settings without recompiling C++ code. This dramatically speeds up iteration and testing.
Always check if your actor pointer is valid before using it with an if statement: if (SunLight != nullptr). This prevents crashes if the actor is deleted from the level or not assigned in the Blueprint.
Update the Sky Light periodically to capture atmospheric color changes. Enable "Real Time Capture" for automatic updates, or call RecaptureSky() on a timer for better performance control. Avoid calling it every frame as it's expensive.
Set both your Directional Light and Sky Light to Movable mobility. While this is more performance-intensive than Static or Stationary, it's required for lights that change position, rotation, or properties during gameplay.
Use a TimeOfDay float variable (0.0 to 24.0) instead of constant rotation. Convert this to rotation degrees using: float SunAngle = (TimeOfDay / 24.0f) * 360.0f and apply it with SetActorRotation() for precise time control.
Movable lights are more expensive than static ones. Sky Light recapturing every frame is very costly - use timers instead. Consider using simpler lighting for distant objects and optimize shadow cascade distances for better performance.
They use a global time variable that drives both lighting rotation and gameplay systems. AI behavior trees and spawning systems check this time value to trigger actions, like making certain creatures more active at night or having NPCs follow daily schedules.
Create a custom class derived from PointLight with a reference to your day night cycle controller. Check the current TimeOfDay each frame and set the light's visibility based on whether the time falls within your defined night hours (handling midnight wrap-around carefully).
When checking if current time is within night hours that cross midnight (like 18:00 to 6:00), use: if (CurrentTime >= DuskTime || CurrentTime < DawnTime). This correctly handles the transition from 23:59 to 0:00.