How Nanite Work in Unreal Engine 5: The Game-Changer That Made My AAA Dreams Actually Possible
Discover the revolutionary virtualized geometry system that eliminates manual LODs and allows for film-quality assets directly in your games.
Here's the thing - when I first heard about how Nanite work in Unreal Engine 5, I thought it was just another marketing gimmick. I mean, come on, rendering millions of polygons in real-time without performance hits? After years of manually creating LODs (Level of Detail) and optimizing every single triangle in my meshes, this sounded too good to be true.
But then I actually got my hands on it during my Carnegie Mellon days, and honestly? It changed everything I thought I knew about game development. No more spending weeks creating multiple versions of the same asset. No more praying that my high-poly models wouldn't crash someone's GPU. Just pure, film-quality detail running smoothly in real-time.
If you're a student developer wondering whether this technology is worth learning, trust me - it absolutely is. Let me walk you through exactly how this revolutionary system works and why it's going to transform the way you build games.
Table of Contents
- Wait, What Exactly Is This Nanite Thing?
- The Building Blocks That Make the Magic Happen
- Why Traditional LODs Were Driving Me Crazy (And How Nanite Fixes Everything)
- Let's Get Our Hands Dirty - Setting Up Your First Nanite Mesh
- The Real-World Magic I've Seen in Action
- Your Step-by-Step Blueprint for Nanite Mastery
- What This Actually Means for Your Game Projects
- Time to Level Up Your Skills
- The Bottom Line on Nanite
Wait, What Exactly Is This Nanite Thing?
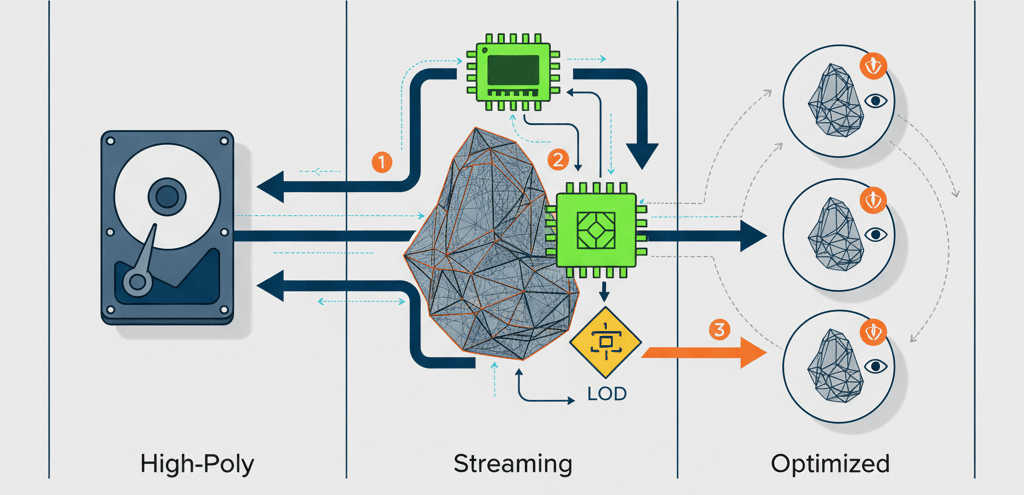
Nanite is basically like having a super-smart assistant that automatically handles all the boring optimization work you used to do manually. Think of it as a virtualized geometry system - and before you ask, virtualized geometry means the full high-polygon mesh is stored on disk and only the visible and necessary parts are streamed into memory and rendered in real-time.
Here's a simple way I explain it to my students: imagine you have a massive 4K photo on your phone. When you're zoomed out looking at your photo gallery, your phone shows you a tiny thumbnail. But when you pinch to zoom in, it seamlessly loads more detail exactly where you're looking. Nanite does this same thing, but for 3D models in your game, and it happens automatically with extreme efficiency.
The coolest part? You can now use film-quality, high-polygon assets directly in your games without the traditional performance costs. No more creating five different versions of the same rock model for different distances. Nanite handles all of that behind the scenes.
The Building Blocks That Make the Magic Happen
When I first started digging into how Nanite work in Unreal Engine 5, I realized there are some key terms you absolutely need to understand:
- Nanite Mesh - This is a static mesh that has been processed by the Nanite system, allowing it to be rendered with unprecedented detail and performance. It's literally the same high-poly mesh your 3D artist created, but supercharged.
- Cluster - Think of this as a group of triangles within a Nanite mesh that can be rendered or culled as a single unit. These form the basic building blocks of Nanite's rendering system. Instead of dealing with millions of individual triangles, Nanite organizes them into these smart clusters.
- Software Rasterization - Here's where it gets really technical. Nanite uses a custom software rasterizer to process the massive number of triangles, which is actually more efficient than traditional hardware rasterization for this specific task. I know, counterintuitive, right?
The LOD (Level of Detail) system you're probably familiar with gets completely automated and perfected through this process. No more manual work, no more guesswork.
Why Traditional LODs Were Driving Me Crazy (And How Nanite Fixes Everything)
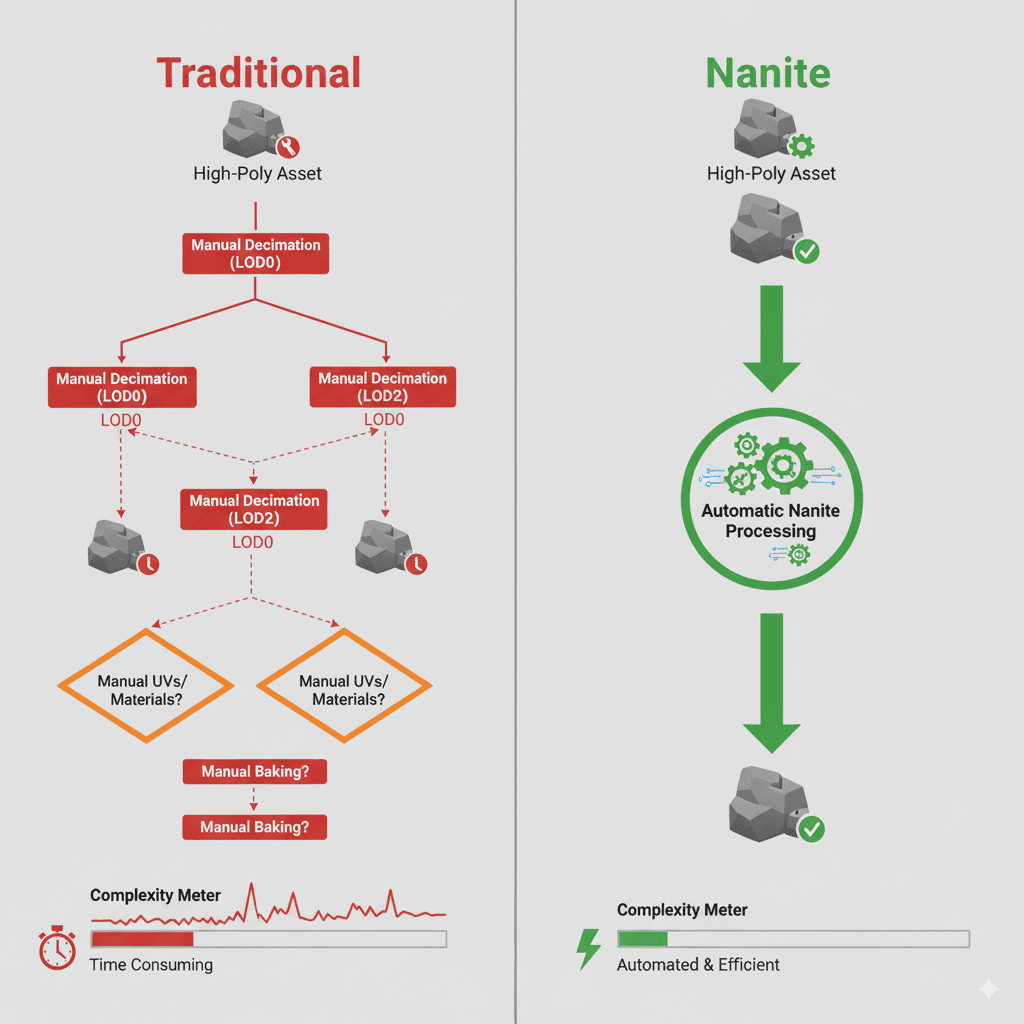
Let me tell you about the pain I used to go through before Nanite. Picture this: you've got this gorgeous, detailed 3D model from your artist - maybe a building with intricate architectural details, weathering, and beautiful textures. Then reality hits, and you realize you need to create four or five different versions of that same model for different viewing distances.
Close-up version? Keep all the detail. Medium distance? Remove some geometry. Far away? Basic shape only. And don't even get me started on the draw calls - each object hitting your GPU separately, killing performance.
Here's exactly how these approaches compare in the real world:
| Criteria | Traditional LODs | Nanite |
|---|---|---|
| Best For | Older hardware, or meshes that require complex materials or vertex animations not supported by Nanite. | High-detail static meshes, especially for environments and props. |
| Performance | Performance is dependent on the quality of the LODs and the number of draw calls. | Extremely high performance, with a constant and low number of draw calls, regardless of scene complexity. |
| Complexity | Requires manual creation of LODs, which is time-consuming and requires artistic skill. | Automatic and easy to use, with a single checkbox to enable. |
| Code Example | // No direct code, LODs are set up in the mesh editor. |
// No direct code, Nanite is enabled in the mesh editor. |
The difference in my workflow was night and day. What used to take me weeks now takes minutes.
Let's Get Our Hands Dirty - Setting Up Your First Nanite Mesh
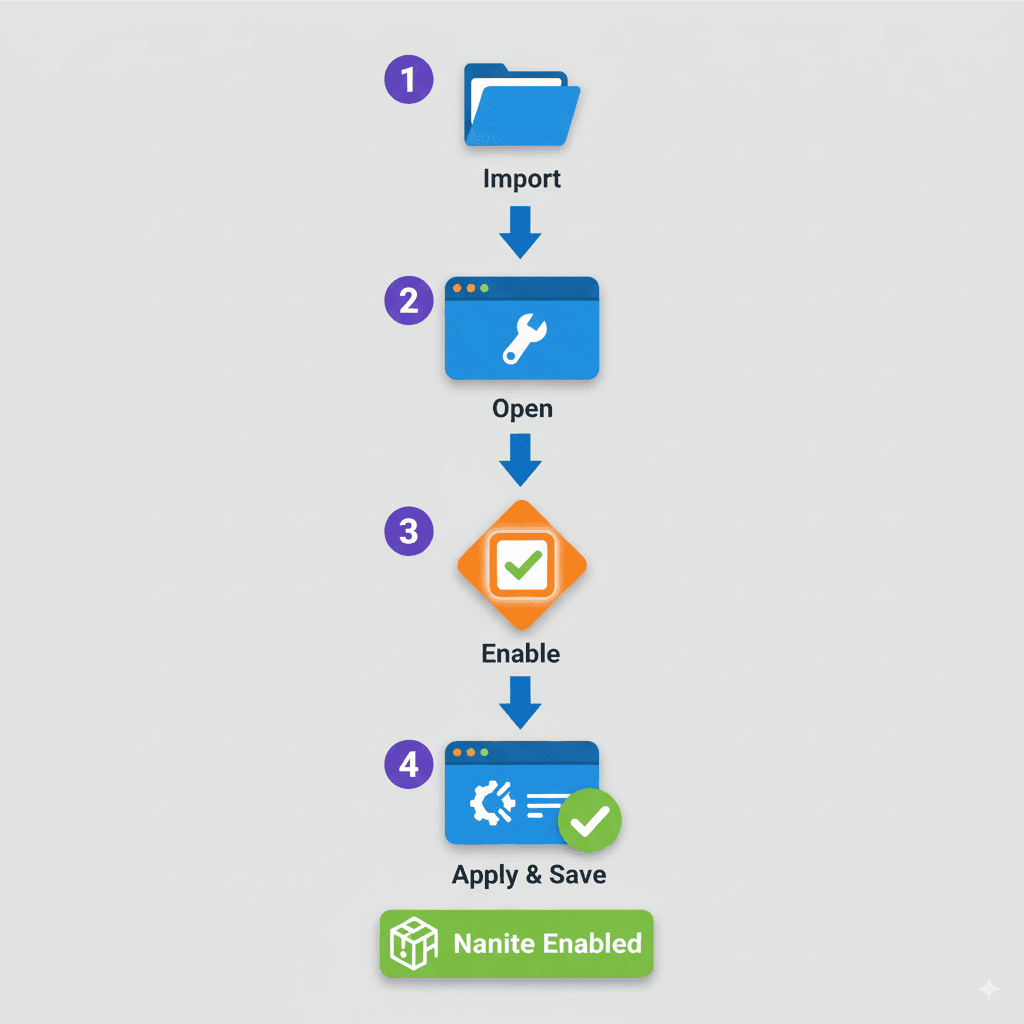
Alright, enough theory. Let me show you exactly how I set up Nanite in my projects. This is the same process I've used dozens of times, and trust me, once you see how simple it is, you'll wonder why anyone still creates manual LODs.
The beauty of enabling Nanite is that there's literally no complex code required. Here's what you do:
- Import your high-polygon mesh into your Unreal Engine project
- Open the mesh in the static mesh editor
- In the Details panel, under the "Nanite Settings" section, check the "Enable Nanite Support" box
- Click "Apply Changes" and save the mesh
That's it. Seriously. No scripting, no complex setup, just a single checkbox.
But here's where it gets interesting for us programmers. While Nanite is mostly automatic, you can still control its settings and behavior through C++ and Blueprints. For example, if you want to check whether a mesh is actually using Nanite:
// C++
UStaticMeshComponent* MyMesh = ...;
if (MyMesh && MyMesh->GetStaticMesh() && MyMesh->GetStaticMesh()->IsNaniteEnabled())
{
    // This is a Nanite mesh
}
I use this kind of check in my debugging tools to make sure my optimization is working correctly.
The Real-World Magic I've Seen in Action
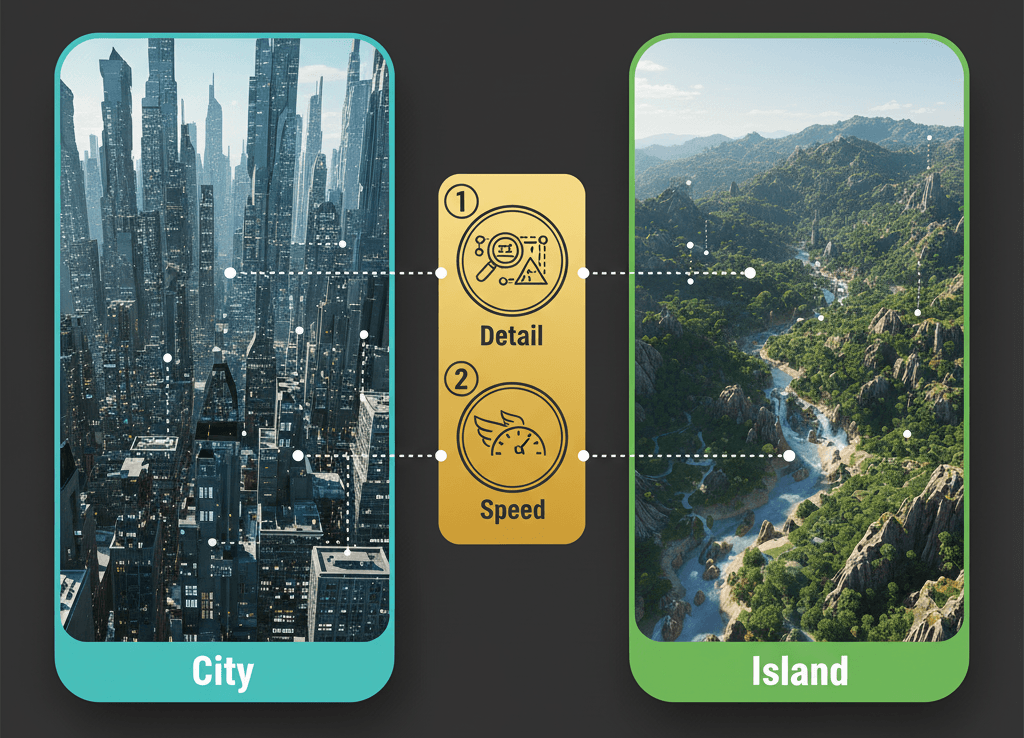
You know what really convinced me that Nanite wasn't just a tech demo? Seeing it work in actual games that millions of people play. Let me share two examples that absolutely blew my mind:
The Matrix Awakens: An Unreal Engine 5 Experience
The entire city in this tech demo is built with Nanite - and I mean the entire city. Every building, every car, every piece of debris is a high-polygon Nanite mesh. When you're flying through the city, there's this seamless transition from ground level to soaring above the skyscrapers, and the level of detail never drops. No pop-in, no performance stutters, just this incredibly detailed world that feels alive.
What fascinates me about this implementation is the scale - we're talking about a massive open world where traditional LOD systems would have required an army of artists working for months just to optimize everything.
Fortnite Chapter 4
Here's what's really impressive - Epic rebuilt their entire Fortnite island using Nanite for Chapter 4. The terrain, the foliage, the buildings - everything got the Nanite treatment. And this isn't some single-player experience running on a high-end PC. This is a competitive multiplayer game running on everything from mobile devices to consoles.
The result? The game world feels more vibrant and detailed than ever before, with a level of visual fidelity that would have been impossible with traditional rendering techniques at this scale.
Your Step-by-Step Blueprint for Nanite Mastery
Let me walk you through three essential workflows that every game developer should master. These are the exact processes I use in my projects:
Blueprint 1: Enabling Nanite on a High-Poly Mesh
Scenario Goal: Import a high-polygon mesh (like something from Quixel Megascans) and enable Nanite to see those sweet performance benefits.
What You'll Need:
- A high-polygon static mesh
- Unreal Engine 5 project
My Step-by-Step Process:
- Import the mesh into your Unreal Engine project
- Open the mesh in the static mesh editor
- In the Details panel, under the "Nanite Settings" section, check the "Enable Nanite Support" box
- Click "Apply Changes" and save the mesh
Trust me, the first time you see a million-polygon mesh running smoothly in real-time, it's magical.
Blueprint 2: Visualizing Nanite Clusters
Scenario Goal: Use Nanite's built-in visualization tools to actually see how the system works in real-time.
What You'll Need:
- A scene with several Nanite meshes
My Debugging Process:
- In the main viewport, click on the "View Mode" dropdown
- Select "Nanite Visualization" and then choose one of the visualization options, such as "Clusters" or "Triangles"
- Move the camera around the scene to see how Nanite adjusts the level of detail in real-time
This is honestly one of the coolest debugging tools I've ever used. Watching the clusters adapt as you move around is like seeing the Matrix code.
Blueprint 3: Checking if a Mesh is a Nanite Mesh in Blueprints
Scenario Goal: Create a Blueprint that can programmatically check if a static mesh is using Nanite.
What You'll Need:
- A Blueprint actor
My Blueprint Setup:
- Create a new Blueprint class based on
Actor - Add a
StaticMeshComponentto the Blueprint - In the Event Graph, get the
StaticMeshfrom the component and use theIs Nanite Enablednode to check if it's a Nanite mesh
// In the Event Graph of your Blueprint:
// Get Static Mesh Component -> Get Static Mesh -> Is Nanite Enabled -> Print String
This kind of runtime checking is super useful when you're building tools or debugging performance issues.
What This Actually Means for Your Game Projects
The benefits of understanding how Nanite work in Unreal Engine 5 go way beyond just having prettier graphics. Here's what this technology actually delivers for your projects:
- Unprecedented Detail - Your artists can create assets with millions of polygons, and you can actually use them in your game. No more compromises between visual quality and performance.
- Massive Performance Gains - Nanite dramatically reduces the number of draw calls and the amount of data sent to the GPU. In my projects, I've seen frame rates stay consistent even when adding incredibly detailed geometry.
- Faster Development Workflow - This is the big one for indie developers and students. No more spending weeks creating LODs means more time for actual game development.
- Future-Proofing - Nanite is evolving constantly. Learning it now means you'll be ready for whatever improvements Epic adds next.
A few pro tips from my experience:
- Use Nanite for Opaque Materials: Nanite works best with opaque materials. While some support for masked materials exists, transparent and translucent materials aren't fully supported yet.
- Combine Nanite with Lumen: For the best visual results, pair Nanite with Lumen, UE5's dynamic global illumination system. The combination is absolutely stunning.
- Monitor Nanite Performance: Always use the Nanite visualization tools to monitor performance and catch any potential issues early.
Verified: Source
Ready to Start Building Your First Game?
Understanding Nanite is just the beginning of mastering modern game development. If you're excited about creating professional-quality games and want to learn from industry veterans, I've put together a comprehensive course that takes you from the basics to building complete game experiences.
My Game Development Fundamentals course covers everything from Unity basics to advanced optimization techniques, including how to leverage cutting-edge technologies like Nanite in your projects. You'll build actual games, learn industry best practices, and get the hands-on experience that game studios are looking for.
Join hundreds of students who have already transformed their game development skills and landed positions at top gaming companies.
The Bottom Line on Nanite
Here's what it comes down to - Nanite represents a fundamental shift in how we think about 3D graphics in games. After working with it extensively, I can say with confidence that this technology removes one of the biggest bottlenecks in game development: the compromise between visual quality and performance.
For student developers, mastering how Nanite work in Unreal Engine 5 isn't just about learning a new tool - it's about understanding the future of game graphics. The skills you develop working with virtualized geometry today will serve you throughout your entire career in game development.
The best part? You can start experimenting with Nanite right now, today, in UE5. Download some high-poly assets from Quixel Megascans, enable Nanite support, and watch your development workflow transform.
Key Takeaways
- Nanite is a virtualized geometry system that allows film-quality, high-polygon assets to be used directly in games without traditional performance costs
- Software rasterization approach makes Nanite more efficient than hardware rasterization for processing massive triangle counts
- Single checkbox enablement in the mesh editor - no complex coding required to start using Nanite
- Automatic LOD generation eliminates weeks of manual optimization work that used to be necessary
- Cluster-based rendering groups triangles into manageable units that can be rendered or culled together
- Real-time visualization tools let you see exactly how Nanite adapts detail levels as you move through your scene
- Works best with opaque materials - transparent and translucent materials have limited support currently
- Combine with Lumen lighting for maximum visual impact in your game projects
Common Questions
What is Nanite and how does it work differently from traditional rendering?
Nanite is a virtualized geometry system that stores full high-polygon meshes on disk and streams only visible parts into memory for real-time rendering. Unlike traditional rendering that requires multiple LOD versions, Nanite automatically handles detail scaling using software rasterization.
How do I enable Nanite on my static meshes?
Simply open your static mesh in the editor, go to the Details panel, find "Nanite Settings," and check "Enable Nanite Support." Click "Apply Changes" and save - no coding required.
When should I use Nanite versus traditional LODs?
Use Nanite for high-detail static meshes, especially environment assets and props. Stick with traditional LODs for meshes requiring complex materials, vertex animations, or when targeting older hardware.
Why does Nanite use software rasterization instead of hardware?
Software rasterization is actually more efficient for processing the massive triangle counts that Nanite handles. The custom rasterizer is optimized specifically for this workload.
What are Nanite clusters and how do they work?
Clusters are groups of triangles within a Nanite mesh that get rendered or culled as single units. This clustering system forms the foundation of Nanite's efficient rendering pipeline.
Can I check if a mesh is using Nanite in code?
Yes, you can use MyMesh->GetStaticMesh()->IsNaniteEnabled() in C++ or the "Is Nanite Enabled" node in Blueprints to programmatically check Nanite status.
What types of materials work best with Nanite?
Opaque materials work best with Nanite. Masked materials have some support, but transparent and translucent materials aren't fully supported yet.
How does Nanite affect game performance?
Nanite provides massive performance gains through constant, low draw call counts regardless of scene complexity, and reduced GPU data transfer compared to traditional rendering.
What real games are using Nanite successfully?
The Matrix Awakens tech demo uses Nanite for the entire city environment, and Fortnite Chapter 4 rebuilt their island using Nanite for terrain, foliage, and buildings.
What visualization tools does Nanite provide for debugging?
Nanite includes built-in visualization modes like "Clusters" and "Triangles" that you can access through the viewport's View Mode dropdown to see real-time detail adaptation.
Should I combine Nanite with other UE5 features?
Yes, combining Nanite with Lumen (UE5's dynamic lighting system) produces the best visual results and takes full advantage of both technologies.
What are the current limitations of Nanite I should know about?
Nanite doesn't support vertex animations, has limited transparent material support, and works best with static geometry rather than dynamic or animated meshes.