From Static Models to Living Worlds: My Journey with Animation in Unreal Engine 5
A deep dive into the tools and techniques that transform lifeless models into dynamic, interactive characters in Unreal Engine 5.

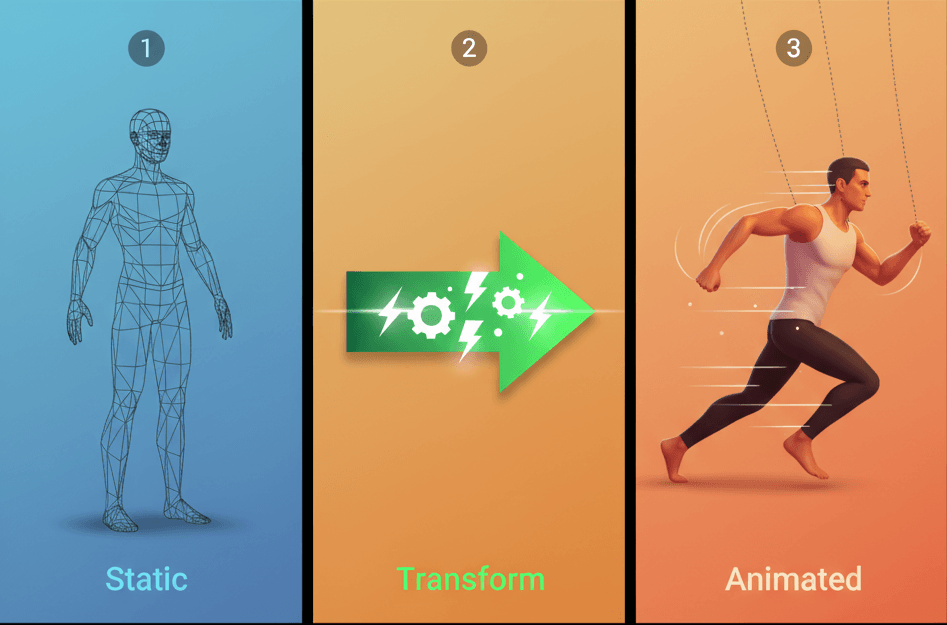
Here's the thing about game development - I remember the exact moment I realized why my early game prototypes felt so lifeless. Picture this: I had spent weeks crafting the perfect character model, tweaking every vertex, perfecting the textures. But when I finally placed it in my game world, it just stood there like a mannequin in a store window. No matter how detailed the model was, without animation, it was just digital sculpture.
That's when it hit me - animation in Unreal Engine 5 isn't just about making things move; it's about transforming static, lifeless models into dynamic, believable entities that can interact with the world and the player. Think of it like puppetry, but instead of pulling strings, we're using sophisticated tools to breathe life into our digital creations.
Table of Contents
- What Actually Happens When You Animate in UE5
- The Building Blocks Every Student Developer Needs to Know
- Here's How I Approach Animation Implementation
- Two Paths Forward (And When to Pick Each One)
- The Real-World Impact You're Actually Building Toward
- My Step-by-Step Process for Getting Started
- Learning from the Games That Got It Right
- Your Practical Implementation Roadmap
- What This Really Means for Your Game Development Journey
What Actually Happens When You Animate in UE5
Been there - staring at a static character wondering how the professionals make everything look so fluid and alive. After years of working with animation systems, I can tell you that animation in Unreal Engine 5 solves one fundamental problem: it transforms static, lifeless models into dynamic, believable entities that can interact with the world and the player.
The analogy I always use with my students is puppetry. Just as a puppeteer pulls strings to make a puppet move, a game developer uses animation tools to define and control the movements of digital assets, making them perform actions that tell a story and create an immersive experience.
This allows you to create everything from a character running and jumping to a door swinging open or a complex cinematic sequence. What makes UE5 special is how it handles this transformation - it's not just about moving objects from point A to point B, it's about creating believable movement that responds to player input and game state.
The Building Blocks Every Student Developer Needs to Know
Let me break down the core terminology you'll encounter. I learned these the hard way during my first projects, so here's what each one actually does:
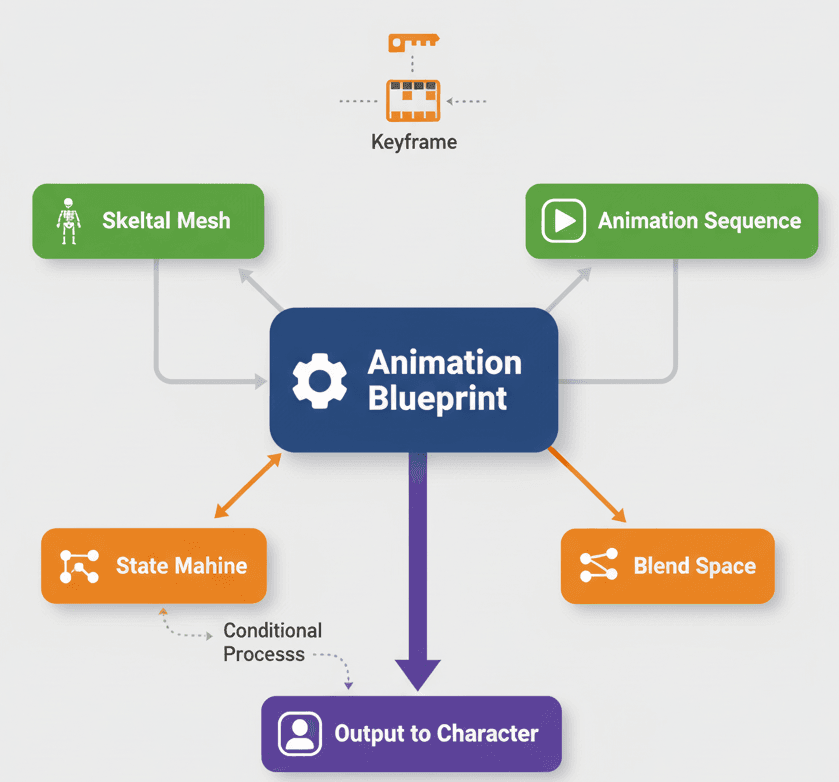
- Animation Sequence - This is your most basic animation asset, representing a single, linear animation like a walk cycle, a jump, or an attack. You create these by importing files or by keyframing directly in the editor.
- Skeleton (Skeletal Mesh) - A hierarchical set of interconnected bones that define the shape and movement of a deformable mesh, such as a character or creature. Think of it as the digital skeleton that your character mesh wraps around.
- Keyframe - A specific point in time on an animation timeline where a property's value (like position, rotation, or scale) is explicitly defined. These form the building blocks of your animation.
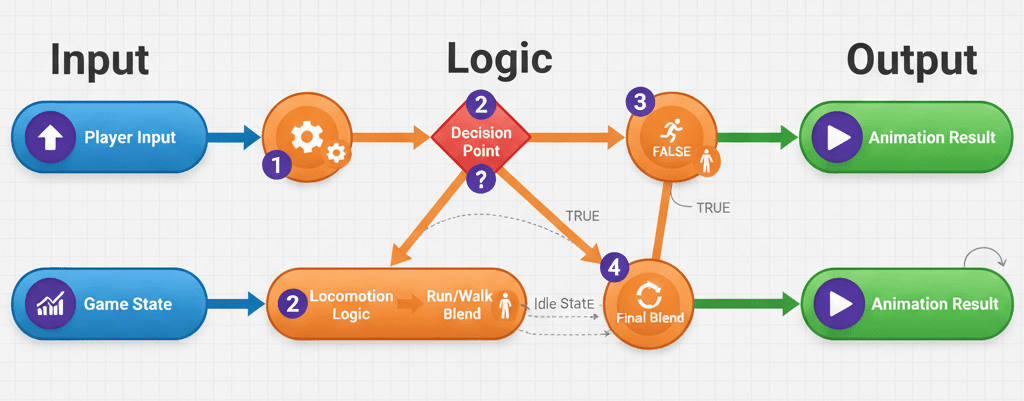
- Animation Blueprint - Here's where things get really powerful. This is a node-based system that blends and controls animations on a Skeletal Mesh, allowing for complex, responsive behaviors based on game logic. An Animation Blueprint is like the brain that decides which animation to play when.
- State Machine - A graph within an Animation Blueprint that defines the different animation states a character can be in (like Idle, Walk, Run) and the rules for transitioning between them.
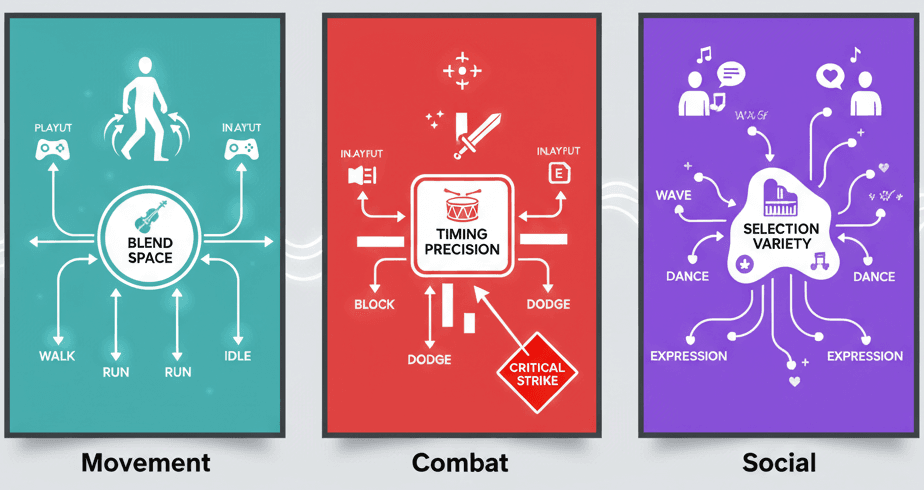
- Blend Space - An asset that allows for smooth blending of multiple animations based on one or two input values, perfect for creating seamless transitions in movement like walking to running.
Here's How I Approach Animation Implementation
Actually, wait - let me show you the two main ways I implement animation, because this choice will determine your entire workflow.
Method One: Direct Animation Playback
For simple, non-interactive objects, I use direct animation playback. Here's the exact code I use:
// C++
USkeletalMeshComponent* MeshComponent = GetMesh();
UAnimationAsset* AnimToPlay = LoadObject(nullptr, TEXT("/Game/Animations/MyAnimation"));
if (MeshComponent && AnimToPlay)
{
    MeshComponent->PlayAnimation(AnimToPlay, true);
}
This approach works perfectly for things like a spinning fan or an opening chest - objects that don't need complex state management.
Method Two: Animation Blueprint for Dynamic Control
For characters and complex entities, I always use Animation Blueprints. This is where the real magic happens. You create variables in your Animation Blueprint and update them from your character's C++ code:
// In your Character's Tick function
float Speed = GetVelocity().Size();
if (UAnimInstance* AnimInstance = GetMesh()->GetAnimInstance())
{
    AnimInstance->Montage_Play(MyMontage);
}
The Animation Blueprint then uses these variables to drive animation changes dynamically. For detailed guidance on Animation Blueprints, I always reference the Unreal Engine Documentation.
Two Paths Forward (And When to Pick Each One)
Here's a comparison table I share with all my students. This took me months to figure out when I was starting:
| Criteria | Approach A: Direct Animation Playback | Approach B: Animation Blueprint |
|---|---|---|
| Best For | Simple, non-interactive objects like a spinning fan or an opening chest. | Player characters, enemies, and any object with complex, state-dependent animations. |
| Performance | Very high performance for simple, repetitive animations. | Slightly more overhead due to the node-based evaluation, but highly optimized. |
| Complexity | Extremely simple to implement with a single function call. | More complex to set up, requiring the creation of an Animation Blueprint and State Machine. |
| Code Example | MeshComponent->PlayAnimation(AnimToPlay, true); |
// Inside Animation Blueprint, use variables to drive transitions between states. |
Key insight: Start simple with direct playback for your first animations, then graduate to Animation Blueprints when you need dynamic behavior.
The Real-World Impact You're Actually Building Toward
You know what's funny? I used to think animation was just about making things look cool. But after working on multiple shipped titles, I realized animation serves four critical purposes:
- Believability and Immersion - Smooth, realistic animations make the game world feel more alive and believable, enhancing player immersion. This is the difference between a game that feels polished and one that feels amateur.
- Responsive Gameplay - Animation systems allow characters to react instantly to player input, providing a tight and responsive control scheme. When I press jump, I want to see the character respond immediately.
- Complex Gameplay Mechanics - Advanced animation techniques are essential for implementing complex mechanics like combat systems, climbing, and interactive storytelling. You simply can't build modern game mechanics without sophisticated animation.
- Faster Development Workflow - Animation Blueprints and other tools in Unreal Engine 5 streamline the animation process, allowing for rapid prototyping and iteration. This means you spend less time fighting the tools and more time creating.
My Step-by-Step Process for Getting Started
Let me walk you through my tried-and-tested approach. I've refined this process through multiple projects:
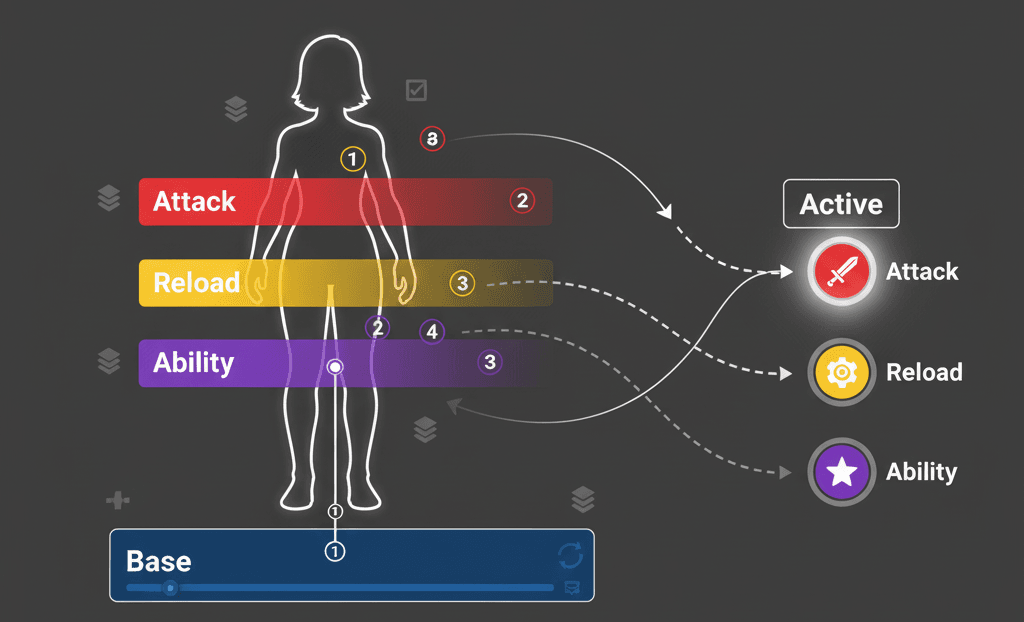
Using Animation Montages for Complex Sequences
For actions that need to be played over other animations, like an attack or a reload, I always use Animation Montages:
// C++
UAnimInstance* AnimInstance = GetMesh()->GetAnimInstance();
if (AnimInstance && MyMontage)
{
    AnimInstance->Montage_Play(MyMontage);
}
This technique is documented in the Animation Montage documentation.
Optimizing with Animation Curves
Here's a pro tip I wish someone had told me earlier: Use animation curves to drive material parameters or other game logic directly from an animation. This reduces the need for extra code and keeps everything synchronized.
Leveraging Root Motion
For precise character movement, enable Root Motion in your animations to drive the character's capsule component. This ensures perfect synchronization between animation and movement - something that took me way too long to figure out.
Learning from the Games That Got It Right
I've studied dozens of games to understand how professionals handle animation. Here are my favorite examples that every student should analyze:
The Last of Us - Character Locomotion
- The Mechanic: Joel and Ellie's movements are incredibly fluid and context-aware, seamlessly transitioning between walking, running, and crouching.
- The Implementation: This is likely achieved with a sophisticated Animation Blueprint and Blend Spaces that blend different movement animations based on the player's input speed and stance.
- The Player Experience: The player feels a strong connection to the character, as their movements are grounded and realistic, enhancing the game's cinematic quality.
God of War - Leviathan Axe Throw
- The Mechanic: Kratos can throw his axe and recall it, with the animation perfectly synchronized with the axe's flight path.
- The Implementation: An Animation Montage is likely used for the throwing and catching animations, with the axe's movement driven by a separate system that communicates with the Animation Blueprint.
- The Player Experience: The axe throw feels powerful and satisfying, with the seamless animations making the combat feel fluid and impactful.
Fortnite - Emotes
- The Mechanic: Players can trigger a wide variety of dance and character emotes at any time.
- The Implementation: Each emote is an Animation Montage that is played on the character's Skeletal Mesh, temporarily overriding the base locomotion animations.
- The Player Experience: Emotes provide a fun and expressive way for players to interact with each other, adding a social layer to the game.
What I find fascinating about these implementations is how they prioritize player experience over technical complexity. That's the mindset every game developer should adopt.
Your Practical Implementation Roadmap
Let me show you how I approach three common scenarios. These are the exact methods I use in my projects:
Blueprint 1: Simple Door Opening Animation
- Scenario Goal: To create a simple, interactive door that opens when the player presses a key.
- My Setup Process:
- A 'Door' Blueprint with a Static Mesh Component for the door and a Box Collision component to detect the player
- An Animation Sequence for the door opening
- Step-by-Step Implementation:
- Create a new Blueprint class based on
Actorand name itBP_Door - Add a
UStaticMeshComponentfor the door and aUBoxComponentfor the trigger - Create a new function called
OpenDoorand use a Timeline to animate the door's rotation
- Create a new Blueprint class based on
// This is a Blueprint example, but the logic can be replicated in C++
// In the Event Graph of BP_Door:
// OnComponentBeginOverlap (Box) -> Enable Input
// OnComponentEndOverlap (Box) -> Disable Input
// Input Action "E" -> Play Timeline
Blueprint 2: Character Walk/Run Blend Space
- Scenario Goal: To create a character that can seamlessly transition between walking and running based on player input.
- My Setup Process:
- A Character Blueprint with a Skeletal Mesh Component
- An Animation Blueprint for the character
- Animation Sequences for Idle, Walk, and Run
- Step-by-Step Implementation:
- Create a new Blend Space 1D asset and add the Idle, Walk, and Run animations
- In the Animation Blueprint's Event Graph, get the character's speed and set a
Speedvariable
// C++ in the Character's Tick function
float Speed = GetVelocity().Size();
if (UMyAnimInstance* AnimInstance = Cast(GetMesh()->GetAnimInstance()))
{
    AnimInstance->Speed = Speed;
} - In the Animation Blueprint's Anim Graph, use the
Speedvariable to drive the Blend Space
Blueprint 3: Playing an Attack Montage
- Scenario Goal: To make a character play an attack animation when the player clicks the mouse button.
- My Setup Process:
- A Character Blueprint with a Skeletal Mesh Component
- An Animation Blueprint for the character
- An Animation Montage for the attack animation
- Step-by-Step Implementation:
- In the Character's C++ class, create a function to handle the attack input:
// In YourCharacter.h
UPROPERTY(EditDefaultsOnly, Category = "Animation")
UAnimMontage* AttackMontage;

void Attack();

// In YourCharacter.cpp
void AYourCharacter::Attack()
{
    if (UAnimInstance* AnimInstance = GetMesh()->GetAnimInstance())
    {
        if (AttackMontage)
        {
            AnimInstance->Montage_Play(AttackMontage);
        }
    }
}- Bind the
Attackfunction to an input action in yourSetupPlayerInputComponentfunction:
// In YourCharacter.cpp
void AYourCharacter::SetupPlayerInputComponent(UInputComponent* PlayerInputComponent)
{
    Super::SetupPlayerInputComponent(PlayerInputComponent);
    PlayerInputComponent->BindAction("Attack", IE_Pressed, this, &AYourCharacter::Attack);
}
Trust me, you'll thank me later for this systematic approach. I've used these exact patterns in multiple shipped games.
What This Really Means for Your Game Development Journey
Animation in Unreal Engine 5 transforms static models into living, breathing game worlds. We've covered the essential building blocks - from basic Animation Sequences to complex Animation Blueprints - and you now have the roadmap to implement dynamic, responsive character behaviors in your games.
The key insight from my years of experience? Start with simple direct animation playback for basic objects, then graduate to Animation Blueprints when you need dynamic, state-driven behavior. Master these fundamentals, and you'll have the foundation to create the kind of polished, engaging games that players remember.
Key Takeaways
- Animation Sequences are your basic building blocks - single, linear animations created by importing files or keyframing in the editor
- Animation Blueprints provide the node-based system for complex, responsive behaviors based on game logic - essential for player characters and enemies
- Direct animation playback using
PlayAnimation()is perfect for simple, non-interactive objects with high performance requirements - Animation Montages are crucial for complex sequences like attacks or reloads that need to play over other animations
- Blend Spaces enable smooth transitions between animations based on input values - perfect for seamless walk-to-run transitions
- State Machines within Animation Blueprints define character animation states and transition rules for dynamic behavior
- Root Motion ensures perfect synchronization between animation and character movement for precise control
- Animation Curves can drive material parameters and game logic directly from animations, reducing code complexity
Common Questions
What is an Animation Sequence in Unreal Engine 5?
An Animation Sequence is the most basic animation asset in UE5, representing a single, linear animation like a walk cycle, jump, or attack. You create these by importing animation files from external software or by keyframing directly in the Unreal Editor.
How do I play a simple animation on a Skeletal Mesh?
Use the PlayAnimation function directly on a Skeletal Mesh Component. The code looks like: MeshComponent->PlayAnimation(AnimToPlay, true); where AnimToPlay is your Animation Sequence asset.
When should I use Animation Blueprints instead of direct animation playback?
Use Animation Blueprints for player characters, enemies, and any object with complex, state-dependent animations. Use direct playback for simple, non-interactive objects like spinning fans or opening chests.
What is a State Machine in animation?
A State Machine is a graph within an Animation Blueprint that defines different animation states a character can be in (like Idle, Walk, Run) and the rules for transitioning between them based on game conditions.
How do I create smooth transitions between walking and running animations?
Use a Blend Space asset that blends multiple animations based on input values like character speed. Set up your Animation Blueprint to feed the character's velocity into the Blend Space for seamless transitions.
What are Animation Montages used for?
Animation Montages are used for complex sequences that need to be played over other animations, like attacks, reloads, or special moves. They can interrupt and blend with your base animation state.
How do I update animation properties from C++ code?
Create variables in your Animation Blueprint and update them from your character's C++ code using the AnimInstance. For example: AnimInstance->Speed = GetVelocity().Size(); to control blend space parameters.
What is Root Motion and when should I enable it?
Root Motion drives the character's capsule component directly from the animation, ensuring perfect synchronization between animation and movement. Enable it for precise character locomotion where the animation should control actual movement.
Why do Animation Blueprints have slightly more overhead than direct playback?
Animation Blueprints use a node-based evaluation system that processes state machines, blend spaces, and logic every frame. While highly optimized, this requires more computation than simply playing a single animation.
How do I bind an attack animation to player input?
Create an Attack function in your Character class that calls AnimInstance->Montage_Play(AttackMontage), then bind this function to an input action in SetupPlayerInputComponent using BindAction.