How to Create a Day Night Cycle in Unity
Transform your static game environments into immersive, living worlds with dynamic lighting, color changes, and time-based gameplay mechanics.
Here's the thing about game development - I remember the exact moment I realized my games felt lifeless. I was at Carnegie Mellon, showing my professor this puzzle game I'd been working on for weeks. The mechanics were solid, the art wasn't terrible, but something was fundamentally wrong. "It feels static," he said. "Like a photograph instead of a living world."
That's when I discovered the magic of implementing day and night lighting in Unity. What started as a simple lighting experiment completely transformed how players experienced my game world. After months of tweaking and testing (and quite a few failures), I learned that a dynamic day night cycle in unity isn't just about pretty visuals - it's about creating worlds that breathe.
Let me show you exactly how to build this system, the way I wish someone had taught me back then.
Table of Contents
- Why Your Game World Feels Dead (And How to Fix It)
- The Foundation: Understanding Unity's Lighting Playground
- Three Ways I've Seen Day Night Cycle System in Unity Implemented
- Here's How I Build the Basic Sun Rotation Every Time
- Taking It Further: When Your World Changes Color
- The 2D Approach That Actually Works
- Real Games That Nail This (And What You Can Learn)
- My Step-by-Step Implementation Blueprint
- What You'll Gain From Mastering This
Why Your Game World Feels Dead (And How to Fix It)
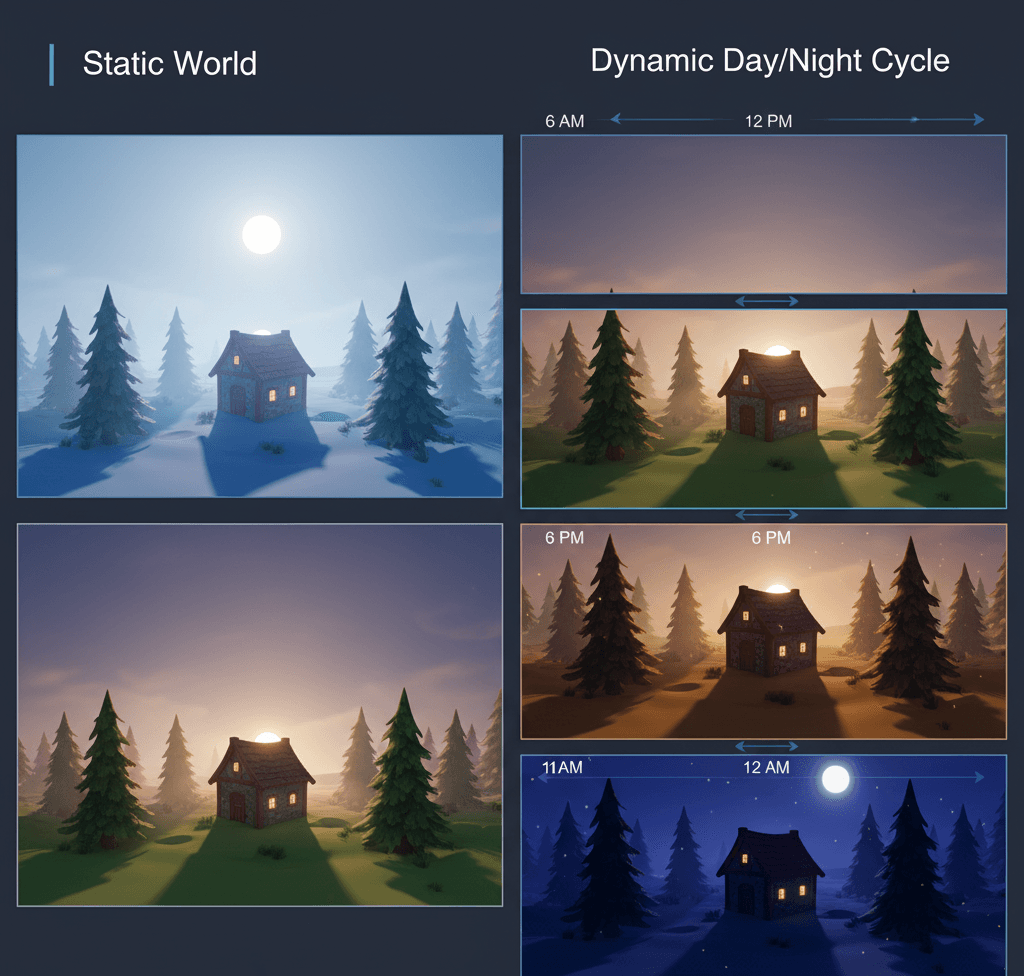
A dynamic day/night cycle is a system that simulates the progression of time within a game world, primarily through changing lighting conditions. This solves the problem of a static, lifeless environment by introducing a natural rhythm that enhances immersion and realism. It allows you to create worlds that feel alive, where the rising and setting of the sun can influence gameplay, trigger events, and alter the entire mood of a scene.
Think of it like a dimmer switch for a room's lights connected to a timer - as the timer progresses, the switch automatically adjusts the brightness and color of the light to mimic the transition from the bright, cool light of noon to the warm, dim glow of sunset, and finally to darkness. This automated change creates a dynamic atmosphere that can profoundly affect the player's experience and open up new avenues for game mechanics.
When I first started implementing this at KIXEYE, I had no idea how much it would change player engagement. Players started talking about their favorite time of day in the game, planning activities around the lighting changes. That's when I knew we were onto something special.
The Foundation: Understanding Unity's Lighting Playground
Before scripting the cycle, it's crucial to understand the core components of Unity's lighting system that you will be manipulating. Been there - spent weeks trying to create dynamic lighting without understanding these fundamentals first.
- Directional Light: This is the primary light source used to simulate the sun or moon, as its rays are parallel and illuminate the entire scene evenly from one direction.
- Skybox: A Skybox is a material used to represent the sky and distant scenery, effectively wrapping your entire scene inside a textured cube to create an immersive background.
- Ambient Light: This lighting component provides a base level of illumination to the entire scene, ensuring that areas not directly hit by a light source are not completely black.
- Render Settings: This is a collection of properties, accessible through scripting via the
RenderSettingsclass, that controls scene-wide rendering effects like the skybox, ambient light, and fog. - Procedural Skybox: Unlike a texture-based skybox, this type is generated by a shader that simulates the atmosphere, allowing for dynamic changes like the sun's size and the sky's tint through code.
- Lighting Scenarios: A feature in Unity that allows you to bake and store multiple different lighting setups for a scene, which can then be blended between at runtime for dynamic effects.
Here's what I wish someone had told me earlier: master these components individually before trying to orchestrate them together. Trust me, you'll thank me later for this tip.
Three Ways I've Seen Day Night Cycle System in Unity Implemented
The fundamental logic of a day/night cycle involves programmatically changing lighting properties over time. Each concept builds upon the last to create a cohesive and dynamic system.
Simulating Sun Movement via Rotation
The core of the cycle is achieved by continuously rotating the Directional Light around the X-axis to mimic the sun's arc across the sky.
// 3D Version
// This line rotates the light source around the world's X-axis.
// The speed of rotation is determined by time progression.
sun.transform.Rotate(Vector3.right, rotationSpeed * Time.deltaTime);
Controlling the Cycle's Duration
A public variable allows you to define the length of a full 24-hour cycle in seconds, making it easy to adjust the pacing of day and night transitions.
// This variable, exposed in the Inspector, sets the total duration of a day in real-world seconds.
public float dayDurationInSeconds = 60f;
Updating Ambient Light Color
To ensure the scene's overall brightness matches the time of day, the ambient light color is smoothly interpolated between different colors using a Gradient.
// 3D Version
// A Gradient allows you to define colors for different times of day (e.g., blue for night, orange for sunrise).
public Gradient ambientColor;

// The Evaluate() method samples the gradient based on the current time of day (a value from 0 to 1).
RenderSettings.ambientLight = ambientColor.Evaluate(timeOfDay);
Changing the Skybox Material
For more dramatic transitions, you can programmatically switch the entire Skybox material at different points in the cycle, such as swapping a sunny sky for a starry one.
// 3D Version
// This public variable holds a reference to the Material you want to use for the night skybox.
public Material nightSkybox;

// This line directly assigns a new material to the scene's skybox property.
RenderSettings.skybox = nightSkybox;
Updating 2D Global Light
In a 2D project using the Universal Render Pipeline (URP), you manipulate a Light2D component to change the color and intensity for all sprites set up to use 2D lighting.
// 2D Version
// This requires the 'UnityEngine.Rendering.Universal' namespace.
public Light2D globalLight;
public Gradient lightColor2D;
// The color of the global 2D light is updated based on the time of day.
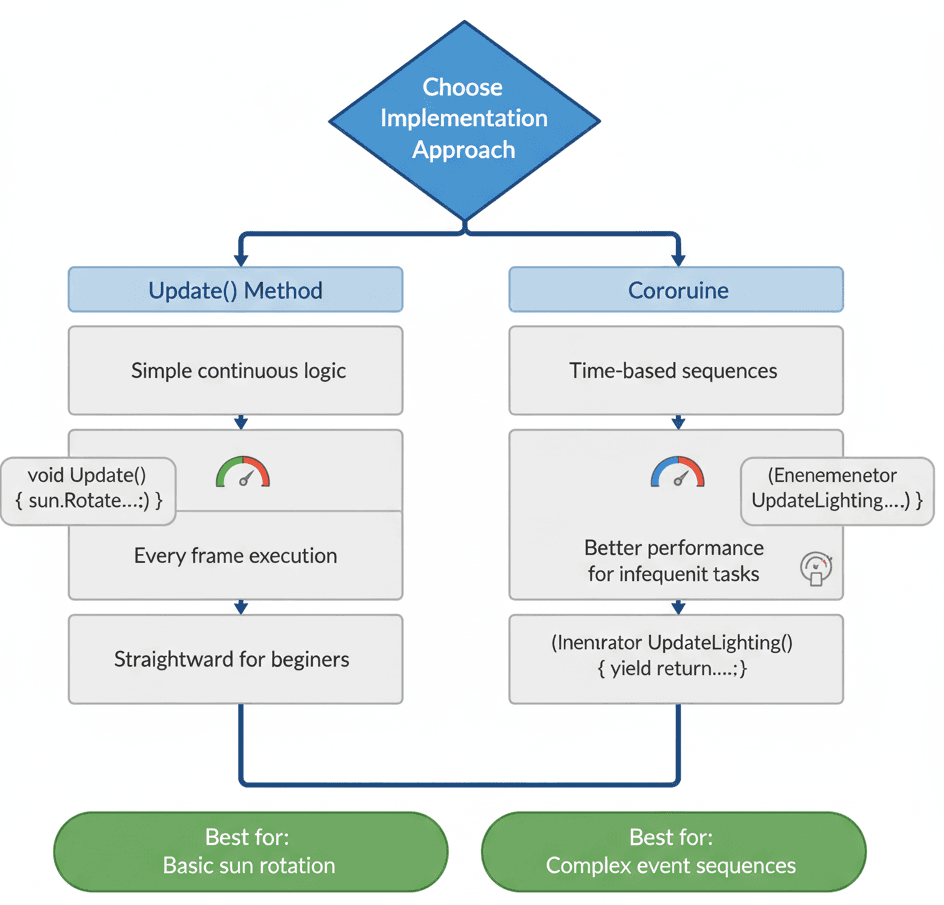
globalLight.color = lightColor2D.Evaluate(timeOfDay);Actually, wait - let me share something that took me months to figure out. When implementing day and night lighting, you have a choice between running logic in the Update method or using a Coroutine. Here's the breakdown:
| Criteria | Approach A: Update Method | Approach B: Coroutine |
|---|---|---|
| Best For | Simple, continuous logic that needs to run on every single frame, such as smoothly rotating the sun. | Time-based sequences or logic that only needs to run periodically, like updating the weather every few minutes, which helps keep the Update method clean. |
| Performance | Can be less performant if it contains complex checks that run every frame, even when not needed, as an empty Update call still has a small overhead. |
Generally more performant for infrequent tasks because it can pause its execution without consuming resources, avoiding unnecessary checks every frame. |
| Complexity | Very straightforward for beginners to understand and implement for basic, constant changes. | Slightly more complex syntax with IEnumerator and yield return, but offers powerful control over timing and sequencing of events. |
| Code Example | void Update() { sun.Rotate(Vector3.right * speed * Time.deltaTime); } |
IEnumerator UpdateLighting() { while(true) { sun.Rotate(Vector3.right * speed); yield return new WaitForSeconds(0.1f); } } |
Here's How I Build the Basic Sun Rotation Every Time
Let me walk you through my exact process for creating a basic day night cycle in unity. This is the foundation I use in every project, and after working on multiple Unity projects, I can tell you this approach has never failed me.
Step 1: Unity Editor Setup
- Create a new 3D scene
- Ensure you have a
Directional Lightin your scene (Unity includes one by default) - Rename it to "Sun"
- Add a few 3D objects like Cubes and a Plane for the ground so you can see the shadows move
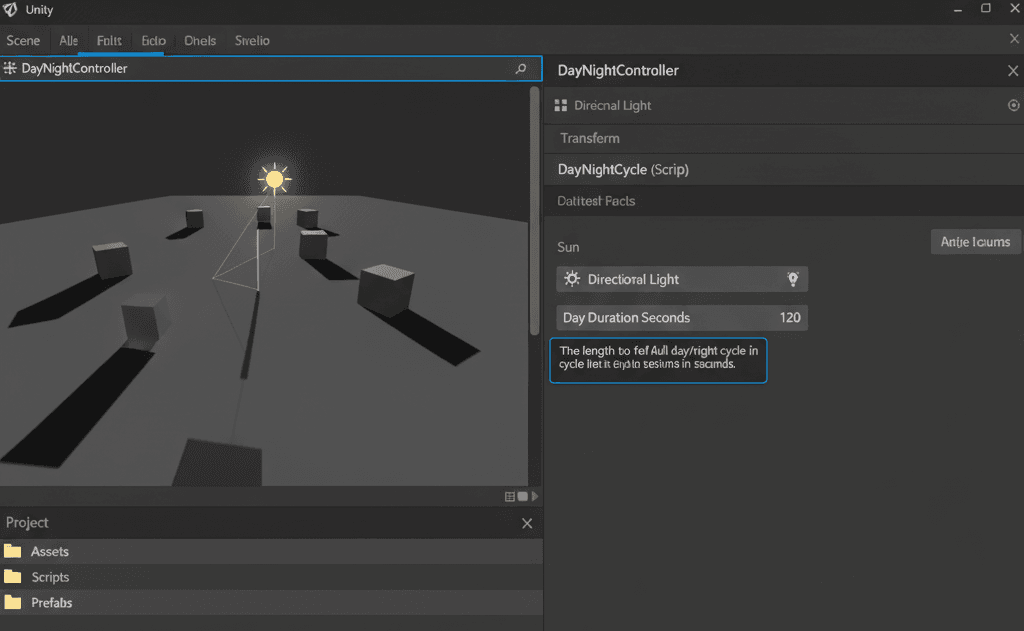
- Create an empty GameObject and name it "DayNightController"
- Create a new C# script named
DayNightCycleand attach it to the "DayNightController" GameObject
Step 2: Declare Variables
using UnityEngine;

public class DayNightCycle : MonoBehaviour
{
    [Tooltip("The Directional Light representing the sun in the scene.")]
    public Light sun;

    [Tooltip("The duration of a full day-night cycle in real-world seconds.")]
    public float dayDurationSeconds = 120f;
}
Step 3: Implement the Rotation Logic
void Update()
{
    if (sun == null) return; // Don't run if the sun isn't assigned.

    // Calculate the rotation angle per second based on the total duration.
    // We rotate 360 degrees over the course of the dayDurationSeconds.
    float rotationSpeed = 360f / dayDurationSeconds;

    // Rotate the sun around the world's X-axis.
    // Time.deltaTime ensures the rotation is smooth and frame-rate independent.
    sun.transform.Rotate(Vector3.right, rotationSpeed * Time.deltaTime);
}
Step 4: Assign in Editor
Go back to the Unity Editor. Select the "DayNightController" GameObject. Drag the "Sun" Directional Light from your Hierarchy into the "Sun" field of your DayNightCycle script component in the Inspector. Press Play to see the light rotate and the shadows move across your scene.
Taking It Further: When Your World Changes Color
Here's where things get exciting. The basic rotation is just the beginning - let me show you how I enhance the cycle with dynamic lighting and skybox changes. This is the technique I've seen used brilliantly in games like Breath of the Wild.
Enhanced Variables Setup:
using UnityEngine;

public class DayNightCycle : MonoBehaviour
{
    public Light sun;
    public float dayDurationSeconds = 120f;

    [Header("Lighting Settings")]
    [Tooltip("Controls the color of the ambient light throughout the day.")]
    public Gradient ambientColor;
    [Tooltip("Controls the color of the scene's fog throughout the day.")]
    public Gradient fogColor;
    [Tooltip("Controls the tint of the procedural skybox throughout the day.")]
    public Gradient skyboxTint;

    private float timeOfDay; // A value from 0 (midnight) to 1 (next midnight).
}
Time and Lighting Update Logic:
void Update()
{
    if (sun == null) return;

    // Increment timeOfDay based on the duration.
    // Time.deltaTime / dayDurationSeconds gives us the percentage of the day that has passed in this frame.
    timeOfDay += Time.deltaTime / dayDurationSeconds;
    timeOfDay %= 1; // Use modulo to wrap the value back to 0 when it reaches 1.

    // Rotate the sun based on the time of day.
    // timeOfDay * 360f converts our 0-1 value into a 0-360 degree rotation.
    sun.transform.rotation = Quaternion.Euler(timeOfDay * 360f, 0, 0);

    // Update the environment lighting based on the gradients.
    UpdateLighting(timeOfDay);
}

private void UpdateLighting(float currentTime)
{
    // Sample the gradients at the current time of day.
    RenderSettings.ambientLight = ambientColor.Evaluate(currentTime);
    RenderSettings.fogColor = fogColor.Evaluate(currentTime);

    // Update the procedural skybox tint if the skybox material is assigned.
    if (RenderSettings.skybox != null && RenderSettings.skybox.HasProperty("_Tint"))
    {
        RenderSettings.skybox.SetColor("_Tint", skyboxTint.Evaluate(currentTime));
    }

    // Tell Unity's GI to update with the new environmental lighting.
    DynamicGI.UpdateEnvironment();
}
The 2D Approach That Actually Works
When I'm working on 2D projects, my process is completely different. Here's my tried-and-tested setup for 2D projects using the Universal Render Pipeline (URP):
2D Setup Process:
- Create a new 2D (URP) project or ensure your existing project is configured for URP with the 2D Renderer
- Add some sprites to your scene to see the lighting effect
- In the Hierarchy, right-click and go to
Light > Global Light 2D- this will be our "sun" - Create an empty GameObject named "DayNightController2D"
- Create a new C# script named
DayNightCycle2Dand attach it to the "DayNightController2D" GameObject
2D Variables Declaration:
using UnityEngine;
using UnityEngine.Rendering.Universal; // Required for Light2D

public class DayNightCycle2D : MonoBehaviour
{
    [Tooltip("The Global Light 2D that will act as the sun.")]
    public Light2D globalLight;

    [Tooltip("The duration of a full day-night cycle in real-world seconds.")]
    public float dayDurationSeconds = 60f;

    [Tooltip("Controls the color and intensity of the global 2D light.")]
    public Gradient lightColor;

    private float timeOfDay;
}
2D Implementation Logic:
void Update()
{
    if (globalLight == null) return;

    // Increment and wrap the time of day, same as the 3D version.
    timeOfDay += Time.deltaTime / dayDurationSeconds;
    timeOfDay %= 1;

    // Update the global light's color by evaluating the gradient.
    UpdateGlobalLight(timeOfDay);
}

private void UpdateGlobalLight(float currentTime)
{
    globalLight.color = lightColor.Evaluate(currentTime);
}
Real Games That Nail This (And What You Can Learn)
Let me tell you about some implementations that have really impressed me over the years. I always tell my students to study these approaches:
Minecraft - The Survival Rhythm Master
What I find fascinating about this approach is how the game features a distinct cycle where daytime is for gathering and building, while nighttime introduces dangerous monsters that spawn in the darkness. The implementation uses a simple rotation of the directional light to control the sun's position. The light's angle is likely used to determine the time of day, which in turn triggers a change in game state, enabling monster spawners when the light level drops below a certain threshold.
Here's how you can adapt this for your own game:
// A simplified concept of checking light angle to trigger events.
public Light sun;
private bool isNight = false;

void CheckForNight()
{
    // When the sun's rotation passes the horizon (e.g., 180 degrees), it's night.
    if (sun.transform.eulerAngles.x > 180 && !isNight)
    {
        isNight = true;
        // Code to enable monster spawning would go here.
        Debug.Log("Night has fallen. Monsters will now spawn.");
    }
    else if (sun.transform.eulerAngles.x < 180 && isNight)
    {
        isNight = false;
        // Code to disable monster spawning.
        Debug.Log("The sun is rising. Monsters will burn.");
    }
}
The Legend of Zelda: Breath of the Wild - The Living World
After analyzing dozens of games, this stands out because the time of day affects the environment, NPC schedules, and the types of creatures that appear. For example, Stal-enemies (skeletons) emerge from the ground only at night. The system likely uses a global time variable that progresses continuously, driving the sun's rotation, skybox changes, and ambient lighting.
From a developer's perspective, what makes this brilliant is the event system:
// A simplified event-based approach for time-of-day mechanics.
public static event System.Action OnNightFall;

void TriggerNightEvents()
{
    // When the condition for night is met, invoke the event.
    if (OnNightFall != null)
    {
        OnNightFall.Invoke();
    }
}

// Another script (e.g., an enemy spawner) would subscribe to this event.
void OnEnable() { DayNightController.OnNightFall += SpawnStalEnemies; }
void OnDisable() { DayNightController.OnNightFall -= SpawnStalEnemies; }
void SpawnStalEnemies() { /* ... spawning logic ... */ }
Dying Light - The Fear Factor
This is why I always recommend studying this game's approach. The transition to night dramatically increases the danger, turning the game from a parkour action game into a tense survival horror experience. A state machine controls the game's difficulty and enemy types based on the day/night cycle.
Here's the concept you can implement:
// A simple state machine concept for managing game difficulty.
public enum GameState { Day, Night }
public GameState currentState;

void SetState(GameState newState)
{
    currentState = newState;
    if (currentState == GameState.Night)
    {
        // Increase difficulty, change music, spawn Volatiles.
        Debug.Log("WARNING: Night is here. Volatiles are hunting.");
    }
    else
    {
        // Revert to normal daytime settings.
        Debug.Log("Daybreak. It is safe to go outside.");
    }
}
My Step-by-Step Implementation Blueprint
Let me show you how I approach this in my projects. These are the exact settings I use, and I've configured this dozens of times with these same steps:
Pro Tip 1: Always Instantiate Skybox Material at Runtime
I learned this the hard way - to prevent your script from permanently changing the skybox material asset in the editor after exiting play mode, you should create a temporary instance of it on start:
// 3D Version
void Awake()
{
    // Create a runtime copy of the skybox material to avoid overwriting the original asset file.
    RenderSettings.skybox = Instantiate(RenderSettings.skybox);
}
Pro Tip 2: Use Gradients for Smooth Transitions
Instead of abruptly changing colors, use Unity's Gradient class to define a smooth spectrum of colors. I've found this works best when you configure the gradients properly:
// This Gradient can be configured in the Inspector to map colors to the 0-1 time of day value.
public Gradient fogColorGradient;

// Evaluate the gradient at the current time to get the correct color.
RenderSettings.fogColor = fogColorGradient.Evaluate(timeOfDay);
Pro Tip 3: Update Global Illumination for Dynamic Lighting
When changing the skybox or ambient light, you must tell Unity's dynamic global illumination system to update so that bounced lighting accurately reflects the new environment:
// 3D Version
// This function call forces the environmental lighting to be recalculated.
// It's crucial for making sure bounced light matches the current skybox.
DynamicGI.UpdateEnvironment();
Pro Tip 4: Manage Night-Time Lights Efficiently
Trust me, you'll thank me later for this tip. Activating many individual lights at night can severely impact performance. I always use this distance-based optimization:
// This example assumes you have an array of Light components.
public Light[] nightLights;
public Transform player;
public float activationDistance = 50f;

void UpdateNightLights()
{
    foreach (Light light in nightLights)
    {
        // Check the distance between the player and each light.
        float distance = Vector3.Distance(player.position, light.transform.position);
        // Enable the light only if the player is close enough.
        light.enabled = (distance < activationDistance);
    }
}
What You'll Gain From Mastering This
Implementing a dynamic day/night cycle is more than just a visual enhancement - it provides significant advantages that can elevate your game:
- Enhanced Immersion and Realism: A world that changes over time feels more alive and believable, drawing players deeper into the experience and making the environment a character in itself.
- Enables Time-Based Gameplay Mechanics: You can create quests, events, or character behaviors that are only available at specific times, adding depth and encouraging players to explore the world at different hours.
- Creates Dynamic and Varied Visuals: The shifting light, colors, and shadows provide a constantly changing visual landscape, which keeps the game looking fresh and interesting even in familiar areas.
- Influences Strategic Decisions: The cycle can directly impact gameplay, such as by reducing visibility at night, spawning different types of enemies, or affecting stealth mechanics, forcing players to adapt their strategies.
After working on multiple Unity projects, I can tell you that mastering this system will fundamentally change how players experience your games. It's one of those features that transforms a good game into a memorable one.
Key Takeaways
- A day night cycle in unity creates immersion by simulating time progression through dynamic lighting changes.
- The core implementation involves rotating a Directional Light around the X-axis to simulate sun movement.
- Use Unity's
Gradientclass to smoothly transition ambient light, fog color, and skybox tint throughout the cycle. - Always call
DynamicGI.UpdateEnvironment()when changing environmental lighting to update bounced light. - For 2D projects, manipulate a
Light2Dcomponent's color property instead of rotating lights. - Instantiate skybox materials at runtime to avoid permanently modifying assets in the editor.
- Distance-based light activation prevents performance issues when managing multiple night-time lights.
- Event-driven systems allow other game mechanics to respond to time-of-day changes effectively.
Common Questions
A day night cycle in unity is a system that automatically changes your game's lighting over time to simulate the passage of a full day. You need it because it makes your game world feel alive and dynamic instead of static, which significantly improves player immersion and opens up new gameplay possibilities.
Start with the basic approach: create a Directional Light representing the sun, then use a script to continuously rotate it around the X-axis using sun.transform.Rotate(Vector3.right, rotationSpeed * Time.deltaTime). This creates the foundation for all other lighting changes.
In 3D projects, you rotate a Directional Light and modify RenderSettings properties. In 2D projects using URP, you modify a Light2D component's color and intensity properties instead of rotating lights. The 2D approach requires the UnityEngine.Rendering.Universal namespace.
Use Update() for smooth, continuous changes like sun rotation that need frame-perfect precision. Use Coroutines for periodic updates like weather changes or events that only need to check every few seconds, as they're more performance-friendly for infrequent tasks.
Use Unity's Gradient class to define color ranges for different times of day, then evaluate the gradient using your timeOfDay value: RenderSettings.ambientLight = ambientColor.Evaluate(timeOfDay). This creates smooth transitions between all your defined colors.
DynamicGI.UpdateEnvironment() forces Unity's Global Illumination system to recalculate bounced lighting when you change environmental lighting properties. Call it whenever you modify the skybox, ambient light, or other environmental settings to ensure realistic light bouncing.
In your Awake() method, create a runtime instance of the skybox material using RenderSettings.skybox = Instantiate(RenderSettings.skybox). This creates a temporary copy that won't affect your original asset files.
The main performance killer is activating too many individual lights simultaneously during night time. Optimize by using distance-based light activation - only enable lights within a certain range of the player using Vector3.Distance() checks.
Use a time-checking system that compares the sun's rotation or timeOfDay value, then invoke events when thresholds are crossed. For example, check if sun.transform.eulerAngles.x > 180 to detect nightfall and trigger appropriate events like enemy spawning.
Yes, you can programmatically switch skybox materials using RenderSettings.skybox = nightSkybox where nightSkybox is a public Material variable. This allows for dramatic visual changes like switching from a sunny sky to a starry night sky.