Master Lighting in Unreal Engine 5: From Beginner Confusion to Professional Scenes
Learn professional lighting techniques with Static, Stationary, and Movable lights. Includes code examples, optimization tips, and complete setups for stunning game visuals.

I remember my first week at CMU's Entertainment Technology program, staring at a completely black Unreal Engine viewport, wondering why my carefully modeled spaceship looked like it was floating in the void of space. The issue wasn't my modeling skills—it was lighting. Or rather, the complete lack of it.
Here's the thing: lighting isn't just about making things visible. It's about creating mood, guiding player attention, and making your digital worlds feel real. I've seen brilliant student projects fail to impress simply because the lighting felt flat or unrealistic. But I've also watched beginners transform their scenes from amateur to professional with just a few lighting tweaks.
After working on multiple Unity and Unreal projects, I've learned that mastering lighting in Unreal Engine comes down to understanding one crucial concept: light mobility. Get this right, and you'll have both stunning visuals and smooth performance.
Table of Contents
- Why Your Game World Looks Dead Without Proper Lighting
- The Three Types of Light Mobility That Will Change Everything
- Here's What Each Light Type Actually Does (With Real Code)
- When to Use What: My Quick Reference Guide
- Why This Knowledge Will Transform Your Projects
- My Battle-Tested Tips for Professional Lighting
- How The Last of Us, Cyberpunk, and Fortnite Handle Lighting
- Three Complete Lighting Setups You Can Build Today
Why Your Game World Looks Dead Without Proper Lighting
At its core, lighting in a game engine solves the fundamental problem of visibility and mood. Without it, your meticulously crafted world is just a black void. Proper lighting allows you to create atmosphere, guide the player's eye, and make digital objects feel tangible and grounded in their environment.
Think of it like a filmmaker lighting a movie set; a brightly lit, sunny room feels cheerful and safe, while a single, flickering bulb in a dark basement immediately creates tension and fear. The same assets can tell completely different stories just by changing how they are lit. Lighting is the tool that transforms a collection of 3D models into a believable, emotionally resonant world for the player to inhabit.
During my time working on mobile games at KIXEYE, I learned this lesson the hard way. We had this gorgeous medieval castle environment that looked amazing in our 3D software, but when we imported it into the game engine, it felt lifeless. The problem wasn't the art—it was that we hadn't properly planned our lighting strategy from the beginning.
The Three Types of Light Mobility That Will Change Everything
Before you can light a scene effectively, you need to understand the language of lighting in Unreal Engine. These terms define how light is calculated and how it behaves, which directly impacts both the visual quality and performance of your game.
Let me break down the essential terminology:
- Light Source: This is the actual object in your scene that emits light, such as a Point Light (like a lightbulb), a Spot Light (like a flashlight), or a Directional Light (like the sun).
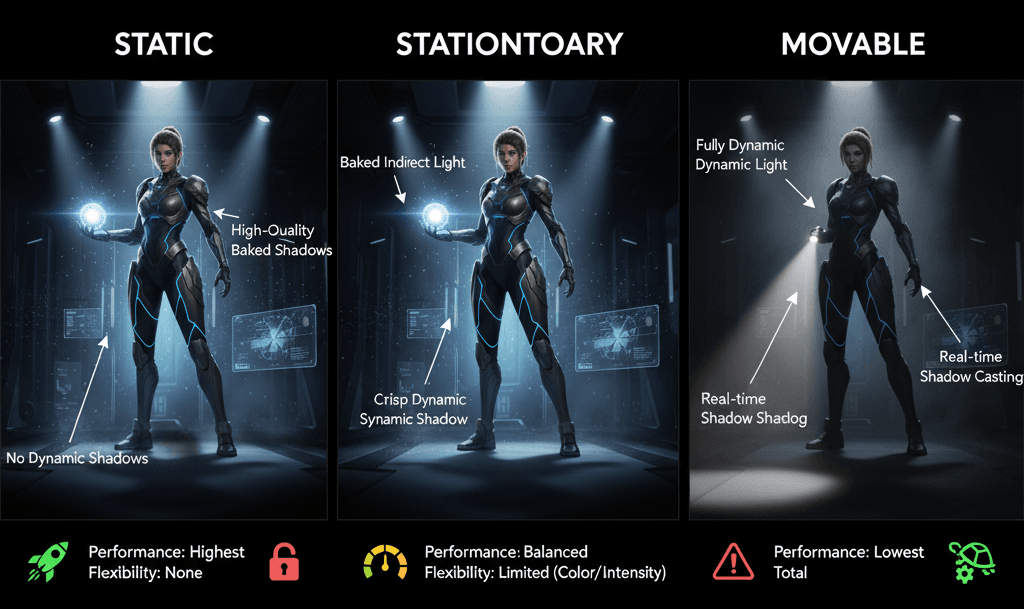
- Light Mobility: This critical setting determines how a light and its shadows are calculated, falling into one of three categories that represent a trade-off between performance and dynamic capability.
- Baked Lighting (Static): This refers to a process where complex light calculations, like bounced light and soft shadows, are pre-calculated in the editor and saved into texture maps called lightmaps.
- Dynamic Lighting (Movable): This describes lighting that is calculated in real-time every frame, allowing the light to move, change color, and cast shadows from moving objects.
- Lightmass: This is Unreal Engine's high-quality global illumination solver used to generate baked lighting data for Static and Stationary lights, creating realistic bounced light and soft shadows.
- Lumen: This is Unreal Engine 5's fully dynamic Global Illumination and reflections system that provides realistic bounced lighting in real-time, primarily for Movable lights.
With those terms in mind, let's categorize the three crucial Light Mobility settings you'll be using:
- Static: This mobility setting is for lights that will never change at all during gameplay. Their entire contribution to the scene, including direct light, bounced light, and shadows, is baked into lightmaps by Lightmass, making them incredibly cheap to render at runtime.
- Stationary: This is a hybrid mobility setting for lights that do not move but can change in other ways, such as their color and intensity. Stationary lights bake their indirect (bounced) lighting but cast dynamic shadows for moving objects, offering a balance between performance and dynamic interaction.
- Movable: This mobility setting is for lights that are fully dynamic and can be moved, changed, or toggled on and off at any time during gameplay. All lighting and shadow calculations happen in real-time, offering the most flexibility at the highest performance cost.
Here's What Each Light Type Actually Does (With Real Code)
Understanding the why behind each mobility type is key. While you set these in the editor's Details panel rather than in code, their behavior is what you'll control through C++ or Blueprints.
Static Lights are for "Set-it-and-Forget-it" Illumination
These lights are the most performant because all their complex calculations are done upfront. Once you "Build" the lighting, their effect is stamped onto the environment. They cannot be changed at runtime.
Setting Mobility in the Editor:
Select a light in your scene, go to the Details panel, and under the Transform section, set its Mobility to Static.
Stationary Lights Offer a "Best of Both Worlds" Compromise
They provide high-quality baked indirect lighting for atmosphere while allowing dynamic shadows from characters and other moving objects, which is crucial for grounding them in the world. You can change their color or intensity via code, but you cannot move them.
Changing Intensity in Blueprints:
// Get a reference to your Stationary light component
UPointLightComponent* MyStationaryLight = ...;

// Change its intensity during gameplay
MyStationaryLight->SetIntensity(5000.0f);
Movable Lights Provide Maximum Flexibility
These are essential for any light source that needs to move or change dramatically. Think of a player's flashlight, a car's headlights, or an explosion's flash. They are calculated every frame, which makes them the most performance-intensive option.
Toggling a Movable Light in C++:
// In your character's header file (.h)
UPROPERTY()
class USpotLightComponent* FlashlightComponent;

// In your character's source file (.cpp), after setting it up
void AMyCharacter::ToggleFlashlight()
{
    if (FlashlightComponent)
    {
        // Flips the visibility on or off
        FlashlightComponent->ToggleVisibility();
    }
}
Verified: Unreal Engine Docs - Light Types and Their Mobility
When to Use What: My Quick Reference Guide
Choosing the right light mobility is one of the most important optimization decisions you'll make. This table breaks down the trade-offs.
| Criteria | Approach A: Static | Approach B: Stationary | Approach C: Movable |
|---|---|---|---|
| Best For | Unchanging environmental lights like sun in a fixed-time scene, or ceiling lights in a building that are always on. | Fixed light sources that need to cast dynamic shadows or change color/intensity, like a flickering lamp or a traffic light. | Any light that moves or needs to be toggled, such as a player flashlight, car headlights, or muzzle flashes. |
| Performance | Highest performance. The rendering cost is extremely low after the initial light bake. | Medium performance. Balances the cost of baked lighting with real-time dynamic shadows. | Lowest performance. All lighting and shadow calculations are done in real-time, which can be very expensive. |
| Flexibility | None. Cannot be changed in any way at runtime. | Limited. Can change color and intensity, but cannot move. Supports light functions. | Total. Can move, rotate, change color, intensity, and be toggled on/off at will. |
| Setup | Requires a "Light Build" process (using Lightmass) to see the final result. | Requires a "Light Build" for its indirect lighting, but direct shadows are real-time. | Works instantly out-of-the-box with no build process required (especially with Lumen). |
Why This Knowledge Will Transform Your Projects
Understanding and correctly using these lighting mobilities is not just a technical exercise; it's fundamental to good game development.
Massively Improved Performance: By using Static and Stationary lights wherever possible, you free up valuable processing power, allowing for higher frame rates and more complex scenes, which is especially critical for mobile and VR development.
Achieve Photorealistic Visuals: Baked lighting from Static and Stationary lights, calculated by Lightmass, can produce incredibly soft, realistic bounced light and shadows that are often higher quality than what can be achieved in real-time.
Enables Dynamic and Interactive Gameplay: Movable lights are the key to creating interactive experiences. A player-controlled flashlight, destructible lights, or time-of-day systems are only possible with fully dynamic lighting.
Establishes Mood and Atmosphere: The choice of lighting directly controls the emotional tone of your scene. The soft, pre-calculated shadows of a Static light create a very different feeling from the harsh, moving shadows of a Movable light.
My Battle-Tested Tips for Professional Lighting
Writing professional, optimized lighting setups involves thinking about efficiency from the start.
Aggressively Use Static Lighting: For any light that doesn't absolutely need to change or cast dynamic shadows, always default to Static. This should be the vast majority of lights in a typical scene.
Minimize Shadow-Casting Movable Lights: Dynamic shadows are expensive. For small, decorative Movable lights (like tiny status indicators on a machine), disable their ability to cast shadows to save performance.
Disabling Shadows in C++:
// Get a reference to a light component
UPointLightComponent* DecorativeLight = ...;

// This light will still illuminate the area but won't cast shadows
DecorativeLight->SetCastShadows(false);
Keep Light Attenuation Radii Tight: The larger a light's area of influence, the more expensive it is to calculate. Always shrink the Attenuation Radius to be as small as possible while still achieving your desired look.
Setting Attenuation in the Editor:
Select a Point, Spot, or Rect light. In the Details panel, under the Light section, adjust the Attenuation Radius to control how far the light reaches.
Use Stationary Lights for Key Interactions: Place Stationary lights near doorways, windows, or key gameplay areas where characters will be moving. This gives you the performance benefit of baked lighting for the environment while still getting high-quality dynamic shadows on your characters.
Verified: Epic Developer Community - Optimizing Performance with Lights
How The Last of Us, Cyberpunk, and Fortnite Handle Lighting
Let me share how some of my favorite games implement these lighting techniques brilliantly:
The Last of Us Part II: The Survival Horror Flashlight
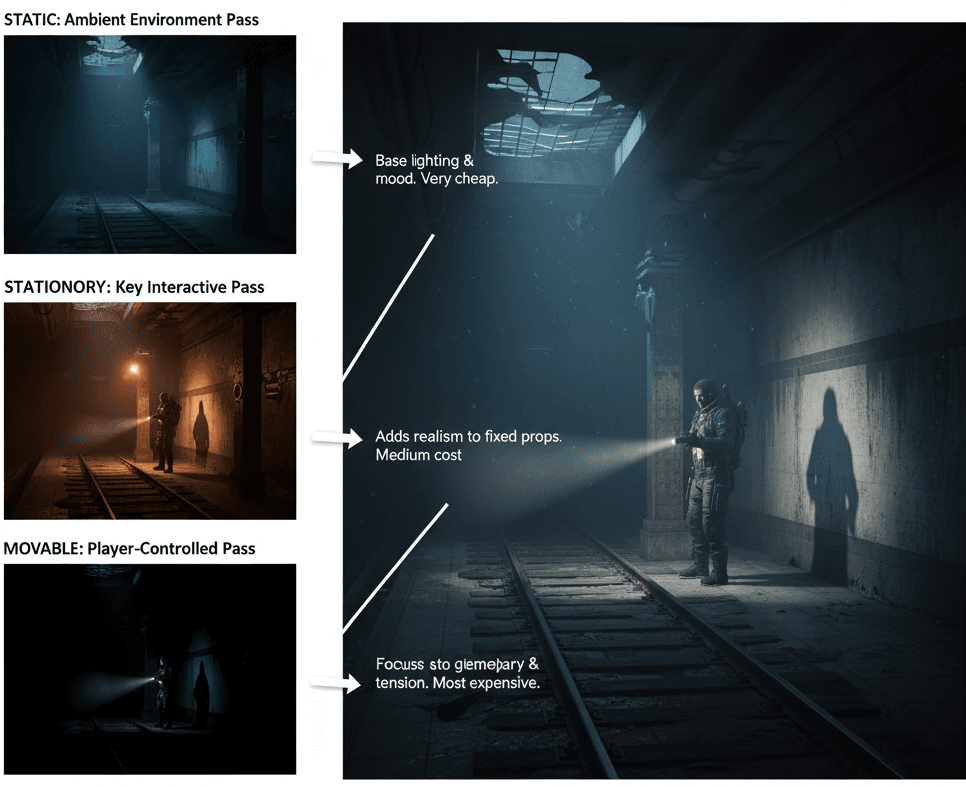
The player uses a physically-based flashlight with a visible beam to navigate incredibly dark, spore-filled interiors. This is a classic use case for a Movable Spot Light attached to the player character. The environment itself is likely lit with a combination of high-quality Static lights (for baked ambient light) and Stationary lights (for fixed light sources like lamps) to achieve stunning visual fidelity while keeping performance high. The flashlight needs to be Movable to cast dynamic shadows from enemies and highlight interactive objects in real-time.
The Player Experience: The Movable flashlight creates intense moments of tension. Its beam cutting through the darkness focuses the player's attention, while the dynamic shadows it casts can startle the player when an enemy suddenly appears.
Cyberpunk 2077: The Neon-Soaked Metropolis
Night City is a vibrant metropolis filled with thousands of neon signs, advertisements, and streetlights that create a dense, colorful, and atmospheric urban environment. The vast majority of these lights are likely Static or Stationary. Static lights would be used for signs that are always on, baking their colorful glow onto the surrounding buildings for maximum performance. Stationary lights would be perfect for streetlights that cast dynamic shadows as the player and vehicles pass underneath them, providing a crucial sense of realism.
The Player Experience: The mix of baked and dynamic lighting creates a visually stunning and believable city. The baked neon glows make the world feel rich and lived-in, while the dynamic shadows from Stationary lights make the player feel grounded and present in the environment.
Fortnite: The Dynamic Day/Night Cycle
The game features a full day/night cycle where the sun moves across the sky, dynamically changing the lighting and shadows across the entire island. The sun, represented by a Directional Light, must be set to Movable. This is the only way it can change its rotation and color throughout the match to simulate the time of day. The engine's Lumen system is crucial here for calculating the bounced light from the sun in real-time as it moves.
The Player Experience: The moving sun creates a dynamic and evolving battlefield. Long shadows cast during sunrise and sunset can provide cover or reveal enemy positions, directly impacting gameplay strategy from one minute to the next.
Three Complete Lighting Setups You Can Build Today
Here are three distinct scenarios to take you from a blank map to a working, well-lit mechanic that you can implement right now.
The Architectural Visualization Scene (Static Lighting)
Scenario Goal: To create a high-quality, photorealistic interior scene with soft, beautiful lighting, where performance is maximized because nothing needs to move or change.
Unreal Engine Editor Setup:
- Create a new Level (
File > New Level > Basic). - Add some basic geometry to form a room (e.g., using the
Modelingtools to create a floor, walls, and a ceiling). Make sure to leave an opening for a window. - Place a
Directional Light(for the sun) and aSky Light(for ambient light from the sky) into the scene from thePlace Actorspanel. - Add a
Lightmass Importance Volumefrom theVolumestab in thePlace Actorspanel and scale it to encompass your entire room.
Step-by-Step Implementation:
- Set Light Mobility to Static: Select the
Directional Light. In its Details panel, find the Transform section and set Mobility to Static. Do the same for theSky Light. This tells Unreal that these lights will be fully baked. - Position the Sun: Rotate the
Directional Lightso that sunlight streams through the window opening you created. You can hold Ctrl + L and move your mouse to interactively change the time of day and see a rough preview. - Configure Lightmass Settings: To get high-quality baked lighting, you need to increase the bake quality. Go to
World Settings(if it's not open, go toWindow > World Settings). Under theLightmasssection, increaseNum Indirect Lighting Bouncesto around 10 andIndirect Lighting Qualityto 2 or higher. - Build the Lighting: This is the final step where Lightmass performs its calculations. In the main toolbar, click the dropdown arrow next to Build and select Build Lighting Only. The quality setting will determine how long this takes. Once complete, your scene will be illuminated with high-quality, performant static lighting.
Verified: Unreal Engine Docs - GPU Lightmass Global Illumination
The Flickering Horror Lamp (Stationary Lighting)
Scenario Goal: To create a spooky, flickering light that illuminates an area and casts dynamic shadows from moving objects, but remains performance-friendly by baking its indirect light.
Unreal Engine Editor Setup:
- Create a simple room or hallway.
- From the
Place Actorspanel, add aPoint Lightand position it where you want your flickering lamp to be. - Right-click in the Content Browser and create a new
Blueprint Class. ChooseActoras the parent class and name itBP_FlickeringLight. - Open
BP_FlickeringLight, add aPoint Lightcomponent from theAddbutton, and drag it onto theDefaultSceneRoot.
Step-by-Step Code Implementation (Blueprint):
- Set Mobility to Stationary: Select the
Point Lightcomponent inside your Blueprint. In its Details panel, set its Mobility to Stationary. This is the key to getting both baked indirect light and dynamic shadows. - Create a Timeline: Go to the Event Graph. Right-click and add an
Event BeginPlaynode. Drag off its execution pin and search forAdd Timeline. Name the timeline "FlickerTimeline". - Configure the Timeline: Double-click the timeline to open it. Click the
+ Trackbutton and add aFloat Track. Name it "Intensity". Right-click on the graph and add several keyframes at different times and with different values (e.g., between 0.5 and 1.0) to create an erratic, random-looking curve. Set the timeline toLoop. - Drive the Light Intensity: Go back to the Event Graph. Drag a reference to your
Point Lightcomponent into the graph. From theUpdatepin of the timeline, drag a wire and search forSet Intensity. Connect the "Intensity" float output from the timeline to theNew Intensityinput of theSet Intensitynode. You will also need to multiply this value by a large number (e.g., 5000) to get a visible brightness. Now, when the game starts, the timeline will play and continuously change the light's intensity based on the curve you created.
Verified: Epic Developer Community - Flickering Light Tutorial
The Player-Controlled Flashlight (Movable Lighting)
Scenario Goal: To implement a classic first-person flashlight that the player can toggle on and off with a key press.
Unreal Engine Editor Setup:
- Use the
Third PersonorFirst Persontemplate project. - Open your character's Blueprint (e.g.,
BP_ThirdPersonCharacter). - In the Components panel, click
Addand search forSpot Light. Name it "Flashlight". - In the Viewport, position the
Flashlightcomponent so it's attached to the character's hand or in front of the camera. Parent it to theCameraorMeshso it moves with the player.
Step-by-Step Code Implementation (C++):
1. Declare Components and Function in Header (.h file):
// MyCharacter.h

#pragma once

#include "CoreMinimal.h"
#include "GameFramework/Character.h"
#include "MyCharacter.generated.h"

class USpotLightComponent;
class UInputMappingContext;
class UInputAction;
struct FInputActionValue;

UCLASS()
class AMyCharacter : public ACharacter
{
    GENERATED_BODY()

public:
    AMyCharacter();

protected:
    virtual void BeginPlay() override;
    virtual void SetupPlayerInputComponent(class UInputComponent* PlayerInputComponent) override;

    // The flashlight component
    UPROPERTY(VisibleAnywhere, BlueprintReadOnly, Category = "Components")
    USpotLightComponent* FlashlightComponent;

    // Input Action for toggling the flashlight
    UPROPERTY(EditDefaultsOnly, Category = "Input")
    UInputAction* ToggleFlashlightAction;

    // Function to be called by the input action
    void ToggleFlashlight(const FInputActionValue& Value);
};
2. Implement Logic in Source (.cpp file):
// MyCharacter.cpp

#include "MyCharacter.h"
#include "Components/SpotLightComponent.h"
#include "EnhancedInputComponent.h"
#include "EnhancedInputSubsystems.h"

AMyCharacter::AMyCharacter()
{
    // Create the flashlight component
    FlashlightComponent = CreateDefaultSubobject(TEXT("Flashlight"));
    FlashlightComponent->SetupAttachment(RootComponent);

    // CRUCIAL: Set mobility to Movable
    FlashlightComponent->SetMobility(EComponentMobility::Movable);

    // Start with the flashlight off
    FlashlightComponent->SetVisibility(false);
}

void AMyCharacter::SetupPlayerInputComponent(UInputComponent* PlayerInputComponent)
{
    Super::SetupPlayerInputComponent(PlayerInputComponent);

    // Use the Enhanced Input system
    if (UEnhancedInputComponent* EnhancedInputComponent = Cast(PlayerInputComponent))
    {
        // Bind the function to the Input Action
        EnhancedInputComponent->BindAction(ToggleFlashlightAction, ETriggerEvent::Triggered, this, &AMyCharacter::ToggleFlashlight);
    }
}

void AMyCharacter::ToggleFlashlight(const FInputActionValue& Value)
{
    // Simple toggle logic
    if (FlashlightComponent)
    {
        FlashlightComponent->ToggleVisibility();
    }
}
3. Editor Binding: In the Unreal Editor, create an Input Action asset named IA_ToggleFlashlight and link it to a key (e.g., 'F') in an Input Mapping Context. Then, in your BP_MyCharacter Blueprint, assign IA_ToggleFlashlight to the Toggle Flashlight Action property you exposed. Now, pressing 'F' will call your C++ function and toggle the light.
Verified: YouTube - C++ Flashlight Tutorial
Ready to Start Building Your First Game?
Now that you understand how to add lighting in Unreal Engine and create professional-looking scenes, you're ready to tackle more advanced game development challenges. But here's what I've learned after years in the industry: lighting is just one piece of the puzzle.
The students who succeed in game development are the ones who understand how all the systems work together—physics, gameplay programming, UI design, and yes, lighting. That's why I created comprehensive courses that take you from the absolute basics to building complete, professional game experiences.
If you're serious about game development and want to avoid the trial-and-error approach that cost me months of frustration, check out our structured game development courses at Outscal. We'll teach you not just the technical skills, but the industry knowledge that transforms hobbyists into professional developers.
Key Takeaways
- Light Mobility is Everything: Static lights offer maximum performance, Stationary lights balance quality with flexibility, and Movable lights provide complete control at the highest cost
- Default to Static: Use Static lighting for any light source that never needs to change—this should be 80% of your lights in most scenes
- Stationary Lights are Perfect for Character Interactions: They provide baked indirect lighting for performance while casting real-time shadows from moving objects
- Movable Lights Enable Dynamic Gameplay: Essential for flashlights, car headlights, explosions, and any interactive lighting mechanic
- Build Process Required: Static and Stationary lights need a "Build Lighting" process to see final results, while Movable lights work instantly
- Performance Scales with Light Count: Each additional dynamic light affects frame rate—optimize by disabling shadows on decorative lights and keeping attenuation radii tight
- Professional Games Mix All Three Types: The Last of Us, Cyberpunk, and Fortnite all strategically combine Static, Stationary, and Movable lights for optimal results
- Quality vs Performance Trade-off: Lightmass provides higher quality baked results than real-time calculations, making Static lights visually superior for unchanging elements
Common Questions
Static lights are pre-calculated and cannot change during gameplay, offering the best performance. Stationary lights can change color and intensity but cannot move, providing a balance between quality and performance. Movable lights are fully dynamic and can be moved, rotated, and toggled, but require the most processing power.
Start by adding a Directional Light for your main light source (like the sun) and a Sky Light for ambient lighting. Both can be found in the Place Actors panel. Set them to Static mobility for best performance, then use the Build Lighting option to see the final result.
Use Static lighting for environmental elements that never change—ceiling lights, outdoor lighting, architectural lighting. Use Dynamic (Movable) lighting for interactive elements like player flashlights, car headlights, or any light that needs to move or be toggled during gameplay.
Building lighting calculates complex light bouncing and shadows that aren't visible in real-time preview. The build process uses Lightmass to create high-quality baked lighting that often looks much better than the editor preview, especially for Static and Stationary lights.
Prioritize Static lights wherever possible, disable shadows on small decorative lights, keep attenuation radii as small as effective, and use Stationary lights instead of Movable lights for fixed sources that need dynamic shadows.
Lightmass is Unreal Engine's system for calculating high-quality baked lighting and global illumination. You need it whenever you use Static or Stationary lights, as it generates the lightmaps that make these lights look realistic with proper light bouncing and soft shadows.
No, Static lights cannot be modified in any way during gameplay. If you need to change a light's properties, use Stationary lights (for color/intensity changes) or Movable lights (for complete control including movement).
Use a Stationary Point Light with a Blueprint that controls its intensity over time. Create a Timeline with varying keyframe values and connect it to the light's SetIntensity function to create realistic flickering effects while maintaining performance benefits.
Lightmass is for baking high-quality static lighting into texture maps, while Lumen is Unreal Engine 5's real-time global illumination system. Lightmass works with Static and Stationary lights, while Lumen primarily supports Movable lights for fully dynamic scenes.
Heavily favor Static lights to minimize real-time calculations, use fewer and smaller shadow-casting lights, reduce attenuation radii, and consider disabling expensive features like dynamic shadows on less important lights. Mobile hardware requires aggressive lighting optimization for good performance.
Stationary lights offer the best of both worlds—they bake their indirect lighting for performance and quality like Static lights, but can still cast dynamic shadows from moving objects and be modified at runtime like Movable lights, making them perfect for interactive scenes.
They use primarily Static lights for environmental elements (neon signs, building lights) that are baked into the scene, Stationary lights for streetlights and interactive elements, and reserve Movable lights only for truly dynamic elements like vehicle headlights or player equipment.