How to Use NavMesh Agent in Unity
Why your game characters keep walking into walls and how Unity NavMesh Agent fixes it with intelligent pathfinding and obstacle avoidance
Remember that first time you tried to make an enemy chase your player? I do. Spent three days writing custom pathfinding logic, and my zombies kept getting stuck on every corner, walking through walls, or doing that awkward dance around obstacles. Been there, right?
Here's the thing - I was solving a problem that Unity had already solved for me. The Unity NavMesh Agent system is like having a GPS navigation system built into your game engine. You tell it where to go, and it handles all the complex route-finding, obstacle avoidance, and path optimization automatically.
After years of working with this system at KIXEYE and teaching it to hundreds of students, I can tell you this: mastering NavMesh agents is the difference between spending weeks on AI movement and having intelligent characters running around your game in an afternoon. Let me show you exactly how to make it work.
Table of Contents
- When I First Tried Making AI Characters Move
- What Unity NavMesh Agent Actually Does
- The Building Blocks Every Developer Needs to Know
- The Core Methods That'll Save You Hours of Debugging
- NavMesh Agent vs A* Pathfinding: Which One Should You Pick?
- Why This Changed Everything for My Game Projects
- My Go-To Implementation Strategies
- Real Games That Nailed NavMesh Implementation
- Three Complete Blueprints You Can Use Right Now
When I First Tried Making AI Characters Move
Picture this: You've got your game world set up, your player character is moving smoothly, and now you want to add some AI enemies that can actually hunt the player intelligently. Without NavMesh, you're looking at manually coding:
- Collision detection with every single obstacle
- Path calculation algorithms (hello, A* implementation from scratch)
- Dynamic recalculation when obstacles move
- Smooth movement that doesn't look robotic
- Multi-agent avoidance so characters don't stack on top of each other
That's exactly what I tried to do during my early days. Took me months to figure out what Unity had already built in. The NavMesh Agent system handles all of this complexity behind the scenes, letting you focus on the fun stuff - game mechanics and player experience.
Here's What Unity NavMesh Agent Actually Does
Think of the Unity NavMesh Agent as your character's personal navigation assistant. It's a powerful, built-in solution designed to handle pathfinding for characters in your game world. It solves the complex problem of making a character intelligently navigate from one point to another, avoiding obstacles and other characters along the way, without you needing to write the complex pathfinding algorithms from scratch.
This system allows you to create dynamic and believable characters, such as patrolling guards, hordes of zombies, or friendly NPCs that follow the player through intricate environments. A simple real-world analogy for a NavMesh Agent is a GPS navigation system in a car; you provide a destination, and the system calculates the most efficient route, automatically recalculating if it encounters unexpected roadblocks, ensuring the car (your game character) reaches its goal.
You know what's brilliant about this? It works in both 2D and 3D environments. Whether you're building a top-down strategy game or a first-person shooter, the principles remain the same.
The Building Blocks Every Developer Needs to Know
Before we dive into code, let's understand the vocabulary. These concepts are the foundation for creating intelligent navigation - and trust me, getting these terms straight will save you confusion later.
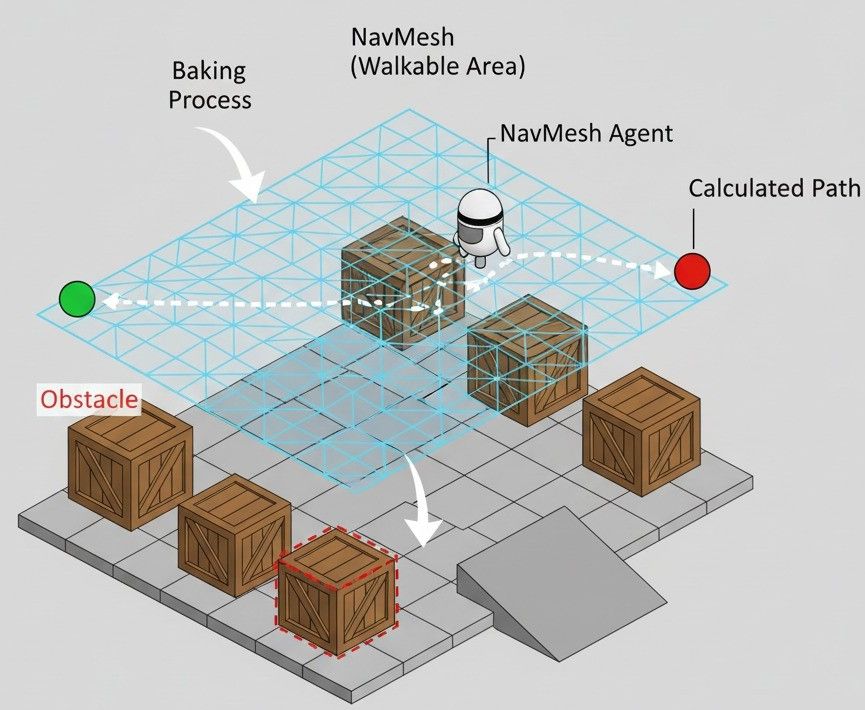
NavMesh (Navigation Mesh): This is a data structure that represents the walkable surfaces of your game world, essentially creating a map of all the areas an agent can travel across.
NavMesh Agent: This is a component that you attach to a character, giving it the ability to understand the NavMesh and perform pathfinding calculations to navigate the game world.
Baking: This is the process of generating the NavMesh from your scene's geometry, where Unity analyzes the environment and creates the walkable surfaces for your agents.
NavMesh Obstacle: This component is used for dynamic objects in your scene that are not part of the baked NavMesh but should still be avoided by NavMesh Agents, such as moving platforms or destructible crates.
Off-Mesh Link: This component creates connections between disconnected but nearby NavMesh surfaces, allowing agents to perform actions like jumping across gaps or opening doors to traverse between them.
Area Mask: This property allows you to define different types of surfaces within your NavMesh, such as ground, water, or lava, and then specify which of these areas a particular agent is allowed to traverse.
The Core Methods That'll Save You Hours of Debugging
Here are the fundamental components you'll interact with through code. I use these in literally every project with AI movement:
The Essential Command: SetDestination()
agent.SetDestination(targetPosition): This is the core command that initiates the pathfinding process, instructing the agent to calculate and follow a path to the specified targetPosition.
// 3D Version
using UnityEngine;
using UnityEngine.AI;

public class MoveToDestination : MonoBehaviour
{
    public Transform goal;
    private NavMeshAgent agent;

    void Start()
    {
        agent = GetComponent();
        agent.SetDestination(goal.position);
    }
}
Controlling Speed Like a Pro
agent.speed: This public variable controls the maximum movement speed of the agent as it follows its calculated path, allowing you to create characters that move at different velocities.
// 3D Version
// To be placed within a class that has a NavMeshAgent component
public float moveSpeed = 5f;
private NavMeshAgent agent;

void Start()
{
    agent = GetComponent();
    agent.speed = moveSpeed;
}
Setting the Right Stopping Distance
agent.stoppingDistance: This property defines how close the agent needs to get to its destination before it considers the path complete and stops moving, which is useful for preventing the agent from trying to reach the exact center of its target.
// 3D Version
// To be placed within a class that has a NavMeshAgent component
public float stopDistance = 2f;
private NavMeshAgent agent;

void Start()
{
    agent = GetComponent();
    agent.stoppingDistance = stopDistance;
}
The Distance Check That Actually Works
agent.remainingDistance: This read-only property provides the remaining distance along the current path to the destination, which is incredibly useful for checking if an agent has reached its target.
// 3D Version
// To be placed within a class that has a NavMeshAgent component
private NavMeshAgent agent;

void Update()
{
    if (agent.remainingDistance < 0.5f)
    {
        // The agent has reached its destination
    }
}
NavMesh Agent vs A* Pathfinding: Which One Should You Pick?
After implementing both approaches multiple times, here's my honest breakdown of when to use each:
| Criteria | Unity NavMesh Agent | A* Pathfinding |
|---|---|---|
| Best For | 3D environments with complex geometry, and when you need a quick and robust pathfinding solution with minimal setup. | 2D grid-based games or when you require highly customized pathfinding logic and full control over the navigation process. |
| Performance | Highly optimized and generally performs very well, especially with a large number of agents, as it's a native engine feature. | Performance can vary greatly depending on the implementation and the complexity of the grid, and it can become a bottleneck in large maps if not optimized. |
| Complexity | Relatively simple to implement, requiring you to bake the NavMesh and then use a few lines of code to set the agent's destination. | Significantly more complex to implement from scratch, as it requires you to create the grid, implement the A* algorithm, and handle path smoothing yourself. |
| Code Example | agent.SetDestination(target.position); |
List<Node> path = AStar.FindPath(startNode, endNode); |
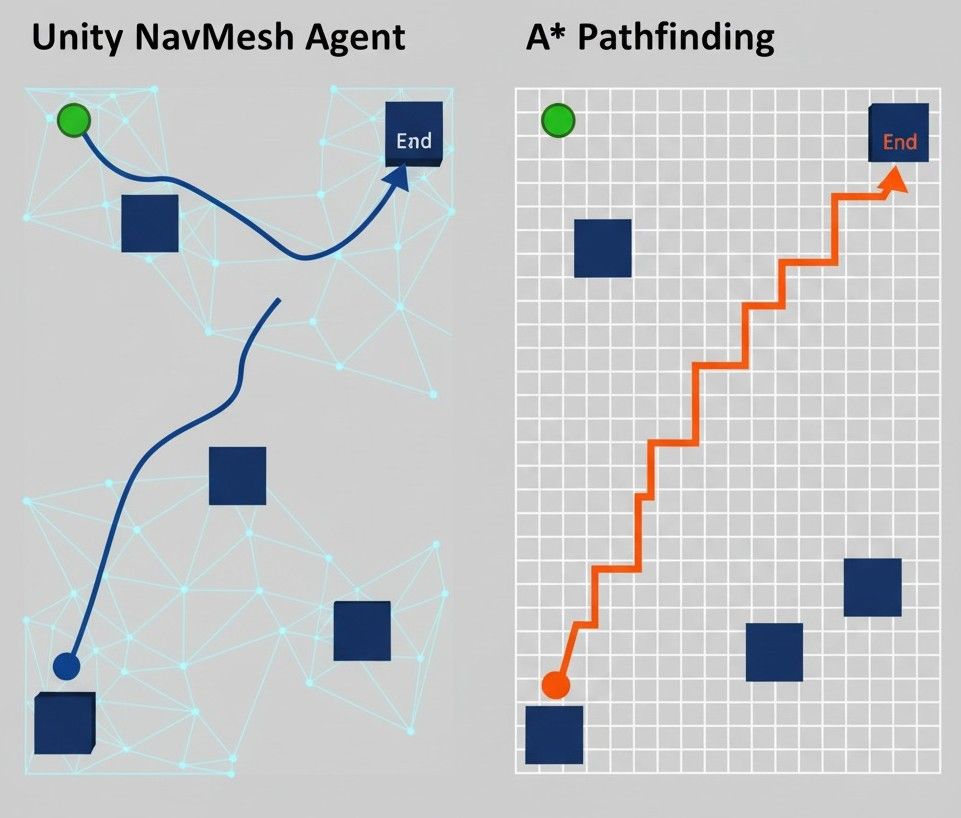
My rule of thumb? If you're working in Unity and need reliable pathfinding fast, go with NavMesh. Save custom A* for special cases where you need complete control over the algorithm.
Why This Changed Everything for My Game Projects
Mastering the NavMesh Agent system provides several tangible advantages that will elevate the quality and complexity of your games:
Rapid AI Prototyping: It allows you to quickly create and test complex AI behaviors without getting bogged down in the intricacies of pathfinding algorithms, dramatically speeding up your development workflow.
Improved Performance: As a highly optimized, built-in feature, the system is designed to handle numerous agents efficiently, ensuring your game runs smoothly even with complex AI interactions.
Believable Character Movement: The system's ability to handle obstacle and agent avoidance out of the box leads to more natural and intelligent-looking character movement, enhancing player immersion.
Enables Complex Gameplay: A solid understanding of NavMesh Agents unlocks the potential for a wide range of gameplay mechanics, from stealth systems with patrolling enemies to large-scale battles with intelligent unit formations.
My Go-To Implementation Strategies
After working on multiple Unity projects, these are the practices that actually matter in real development:
Cache Components Early (Trust Me On This)
To avoid performance overhead, get a reference to the NavMeshAgent component in the Start or Awake method and store it in a variable, rather than calling GetComponent repeatedly in Update.
// 3D Version
using UnityEngine;
using UnityEngine.AI;

public class EfficientAgent : MonoBehaviour
{
    private NavMeshAgent agent;

    void Awake()
    {
        agent = GetComponent();
    }
}
The Right Way to Check Arrival
Instead of constantly checking the distance between the agent and its target, use the remainingDistance property, as it's more accurate and efficient for determining if the agent has reached its destination.
// 3D Version
// To be placed within a class with a NavMeshAgent component
private NavMeshAgent agent;

void Update()
{
    // Check if the agent has reached its destination
    if (!agent.pathPending && agent.remainingDistance <= agent.stoppingDistance)
    {
        // Destination reached
    }
}
Keep Your AI Code Clean with State Machines
For more complex AI, avoid putting all your logic in the Update method. Instead, use a state machine to manage different behaviors like patrolling, chasing, and attacking, which leads to cleaner and more maintainable code.
// 3D Version - Conceptual Example
public enum AIState { Patrolling, Chasing, Attacking }
public AIState currentState;

void Update()
{
    switch (currentState)
    {
        case AIState.Patrolling:
            // Patrolling logic
            break;
        case AIState.Chasing:
            // Chasing logic
            break;
        case AIState.Attacking:
            // Attacking logic
            break;
    }
}
Real Games That Nailed NavMesh Implementation
I've analyzed dozens of successful games, and here's how some of the best implement NavMesh systems. These examples show exactly why this system is so powerful:
The Last of Us - Creating Terrifying Pursuers
The Mechanic: The terrifying Clickers and Runners in The Last of Us relentlessly hunt the player, navigating through complex, debris-filled environments.
What I find fascinating about this approach: The Infected likely use NavMesh Agents to find the shortest path to the player, with their speed and acceleration values tuned to create their signature frantic and aggressive movement.
Why this works so well: This creates a constant sense of tension and danger, as the player knows that the enemies can and will find them, no matter how complex the environment.
// 3D Version - Conceptual Example
// In an "InfectedAI" script
public Transform player;
private NavMeshAgent agent;

void Start()
{
    agent = GetComponent();
}

void Update()
{
    agent.SetDestination(player.position);
}
League of Legends - Predictable Yet Dynamic AI
The Mechanic: Minions in League of Legends automatically march down predefined lanes, attacking enemy minions and structures they encounter along the way.
Here's how you can adapt this for your own game: Each minion is likely a NavMesh Agent with a destination set to the enemy's nexus. The NavMesh itself would be restricted to the lanes, preventing the minions from wandering into the jungle.
From a developer's perspective, what makes this brilliant: This creates a predictable yet dynamic "tug-of-war" on the map, providing a core gameplay loop of pushing lanes and defending towers.
// 3D Version - Conceptual Example
// In a "MinionAI" script
public Transform enemyNexus;
private NavMeshAgent agent;

void Start()
{
    agent = GetComponent();
    agent.SetDestination(enemyNexus.position);
}
Stardew Valley - Bringing Villages to Life
The Mechanic: The villagers in Stardew Valley have daily schedules, moving between their homes, shops, and other points of interest in the town.
What I always tell my students about this approach: Each villager is likely a NavMesh Agent with a script that changes their destination throughout the day based on a predefined schedule, making the world feel alive and dynamic.
This is why I always recommend studying this game's approach: It creates a sense of a living, breathing community, as players can learn the villagers' routines and interact with them in different locations throughout the day.
// 2D Version - Conceptual Example
// In a "VillagerAI" script
public Transform[] dailyWaypoints;
private int currentWaypointIndex = 0;
private NavMeshAgent agent;

void Start()
{
    agent = GetComponent();
    GoToNextWaypoint();
}

void Update()
{
    if (!agent.pathPending && agent.remainingDistance < 0.5f)
    {
        GoToNextWaypoint();
    }
}

void GoToNextWaypoint()
{
    if (dailyWaypoints.Length == 0) return;
    agent.SetDestination(dailyWaypoints[currentWaypointIndex].position);
    currentWaypointIndex = (currentWaypointIndex + 1) % dailyWaypoints.Length;
}
Three Complete Blueprints You Can Use Right Now
Let me walk you through three practical scenarios I use all the time. These are complete, tested implementations you can drop into your projects.
Blueprint 1: Point-and-Click Player Movement
Here's the exact method I use when creating a character that moves to a location on the ground when the player clicks the left mouse button.
Unity Editor Setup:
- A "Player" GameObject with a
NavMeshAgentcomponent. - A "Ground" GameObject with a
Collidercomponent, marked as "Navigation Static" in the Navigation window. - Bake the NavMesh by going to
Window > AI > Navigationand clicking "Bake".
Let's tackle this together - Step-by-Step Implementation:
- Create the Script: Create a new C# script called
PlayerClickToMoveand attach it to your "Player" GameObject. - Include Necessary Namespaces: At the top of your script, add
using UnityEngine.AI;to access the NavMesh Agent API.
// 3D Version
using UnityEngine;
using UnityEngine.AI;

public class PlayerClickToMove : MonoBehaviour
{
    private NavMeshAgent agent;

    void Start()
    {
        agent = GetComponent();
    }

    void Update()
    {
        if (Input.GetMouseButtonDown(0))
        {
            Ray ray = Camera.main.ScreenPointToRay(Input.mousePosition);
            RaycastHit hit;

            if (Physics.Raycast(ray, out hit))
            {
                agent.SetDestination(hit.point);
            }
        }
    }
}
Blueprint 2: AI Patrolling Between Waypoints
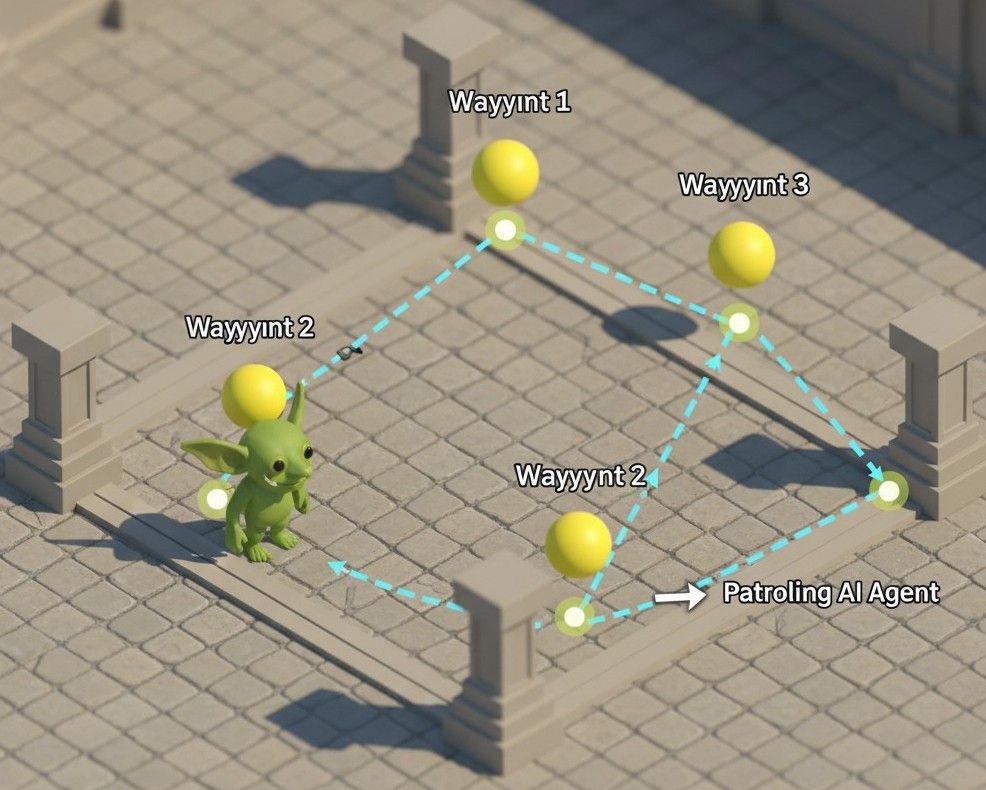
When I'm working on AI projects, my process is to create an AI character that patrols between a series of predefined points in a continuous loop.
Unity Editor Setup:
- An "Enemy" GameObject with a
NavMeshAgentcomponent. - Several empty GameObjects named "Waypoint1", "Waypoint2", etc., placed in the scene to define the patrol route.
- A "Ground" GameObject with a
Collider, marked as "Navigation Static", and a baked NavMesh.
// 3D Version
using UnityEngine;
using UnityEngine.AI;

public class PatrolAI : MonoBehaviour
{
    public Transform[] waypoints;
    private int currentWaypointIndex = 0;
    private NavMeshAgent agent;

    void Start()
    {
        agent = GetComponent();
        GoToNextWaypoint();
    }

    void Update()
    {
        if (!agent.pathPending && agent.remainingDistance < 0.5f)
        {
            GoToNextWaypoint();
        }
    }

    void GoToNextWaypoint()
    {
        if (waypoints.Length == 0) return;

        agent.destination = waypoints[currentWaypointIndex].position;
        currentWaypointIndex = (currentWaypointIndex + 1) % waypoints.Length;
    }
}
Blueprint 3: Dynamic Obstacle Avoidance
After working on multiple Unity projects, I've found this works best when you need a NavMesh Agent to navigate a scene while avoiding a dynamic, moving obstacle.
Unity Editor Setup:
- An "Agent" GameObject with a
NavMeshAgentcomponent. - A "MovingObstacle" GameObject with a
NavMeshObstaclecomponent. Enable "Carve" on theNavMeshObstacle. - A "Ground" GameObject with a
Collider, marked as "Navigation Static", and a baked NavMesh.
// Agent Controller Script
using UnityEngine;
using UnityEngine.AI;

public class AgentController : MonoBehaviour
{
    public Transform target;
    private NavMeshAgent agent;

    void Start()
    {
        agent = GetComponent();
        agent.SetDestination(target.position);
    }
} // Obstacle Mover Script
using UnityEngine;
public class ObstacleMover : MonoBehaviour
{
public float speed = 1f;
public float distance = 5f;
private Vector3 startPosition;
void Start()
{
startPosition = transform.position;
}
void Update()
{
transform.position = startPosition + new Vector3(Mathf.PingPong(Time.time * speed, distance), 0, 0);
}
}What You'll Gain
Here's what mastering NavMesh agents will actually do for your game projects:
- Rapid AI Prototyping that lets you test complex behaviors in hours instead of weeks
- Improved Performance with Unity's optimized pathfinding handling dozens of agents smoothly
- Believable Character Movement with natural obstacle avoidance that makes your AI look intelligent
- Complex Gameplay Possibilities from stealth systems to large-scale battles with smart unit formations
You'll transform from manually coding every movement behavior to having a system that handles the complexity while you focus on game mechanics.
Your Next Steps
Start with the point-and-click blueprint - it's the foundation for everything else. Once you've got that working, experiment with the patrolling system. Master these two patterns, and you'll handle 90% of NavMesh scenarios in your games.
The dynamic obstacle example shows you how flexible this system really is. Use it when you need moving platforms, destructible environments, or any situation where the game world changes during play.
Wrapping Up
The Unity NavMesh Agent system transforms complex pathfinding from a months-long challenge into an afternoon's work. Instead of building navigation systems from scratch, you get intelligent character movement with just a few lines of code. Your characters will navigate complex environments, avoid obstacles dynamically, and create the kind of believable AI that makes games feel alive.
Focus on the three core concepts: bake your NavMesh, set destinations with SetDestination(), and check arrival with remainingDistance. Everything else builds on these fundamentals.
Common Questions
Unity NavMesh Agent is a built-in pathfinding system that acts like GPS for your game characters. It automatically calculates optimal routes from one point to another while avoiding obstacles and other characters, without you needing to write complex pathfinding algorithms from scratch.
First, mark your ground objects as "Navigation Static" in the Navigation window. Bake the NavMesh by going to Window > AI > Navigation and clicking "Bake". Then add a NavMeshAgent component to your character and use agent.SetDestination(targetPosition) to make it move.
NavMesh Agent is Unity's built-in, highly optimized solution that works best for 3D environments with complex geometry. A* pathfinding gives you more control but requires manual implementation and works better for 2D grid-based games or when you need completely custom navigation logic.
Use the remainingDistance property: if (!agent.pathPending && agent.remainingDistance <= agent.stoppingDistance). This is more accurate and efficient than manually calculating distances between the agent and target.
Use baked NavMesh for static environment geometry like walls, floors, and permanent structures. Use NavMesh Obstacles for dynamic objects that move during gameplay, like moving platforms, destructible crates, or doors that open and close.
Baking is the process where Unity analyzes your scene's geometry and generates the navigation data structure. It creates a map of all walkable surfaces that NavMesh Agents can use for pathfinding calculations.
Create an array of Transform waypoints, track the current waypoint index, and use SetDestination() to move between them. Check arrival with remainingDistance and increment to the next waypoint when reached.
Getting component references with GetComponent in Update() creates performance overhead. Cache the reference in Start() or Awake() and reuse it throughout your script for better performance.
Yes, Unity's NavMesh system works in both 2D and 3D environments. For 2D games, you'll typically work with a flattened navigation mesh on a single plane, but the same principles and code apply.
Area Mask lets you define different surface types like ground, water, or lava within your NavMesh, then specify which areas specific agents can traverse. Use it when you need movement restrictions based on character types or abilities.
NavMesh Agents have built-in avoidance systems that prevent them from overlapping or getting stuck together. The system automatically calculates alternative paths when multiple agents are moving through the same space.
Dynamic changes using NavMesh Obstacles with "Carve" enabled will automatically update the navigation data in real-time. Agents will recalculate their paths to avoid new obstacles or use newly available paths as the environment changes.