How to Build Interactive Doors in Unreal Engine 5
Master the fundamental building blocks for creating responsive, immersive game environments with C++ and Blueprints
Here's the thing - I remember staring at my screen during my first week learning Unreal Engine 5, completely frustrated because I couldn't figure out how to make a simple door work. Sounds ridiculous now, but back then, every tutorial I found either skipped the crucial details or assumed I already knew things I definitely didn't. I spent three days just trying to get a door to swing open, and honestly, it almost made me quit game development altogether.
That struggle taught me something important: mastering interactive doors in Unreal Engine 5 isn't just about creating a door - it's about understanding the fundamental building blocks that power every interactive element in your game. Once you crack this code, you'll have the foundation for creating chests, elevators, switches, and pretty much any object that responds to player actions.
Table of Contents
- Why Every Developer Needs to Master This
- The Building Blocks That Took Me Months to Figure Out
- The Code That Actually Works
- Blueprint vs C++ - Here's What I Wish Someone Had Told Me
- Three Door Systems I Use in Every Project
- The Games That Taught Me Everything About Door Design
- Pro Tips That Save Hours of Debugging
- Key Takeaways
Why Every Developer Needs to Master This (Trust Me on This One)
When I first started at KIXEYE, I thought interactive doors were just... doors. Boy, was I wrong. They're actually the gateway (pun intended) to understanding how interactive systems work in games. Think about it - a door that opens when you approach it solves the same fundamental problem as a chest that opens when you have the right key, or an elevator that moves when you press a button.
Creating an interactive door is a foundational skill in game development that solves the crucial problem of controlling player progression and managing level spaces. It allows you to create everything from simple automatic sliding doors in a sci-fi corridor to complex, key-locked gates in a fantasy dungeon, directly influencing the pacing and exploration of your game world.
Here's a simple real-world analogy that helped me understand this: a keycard scanner at an office building. It's a barrier that only permits passage when a specific condition—swiping the correct card—is met, just as a game door might require a key, a puzzle solution, or the player's proximity to open. This mechanic is essential for building immersive and structured environments that guide and challenge the player.
The Building Blocks That Took Me Months to Figure Out
Actually, wait - before we dive into any code, let me save you the headache I went through. Understanding these core Unreal Engine components is absolutely crucial, and I wish someone had explained them to me this clearly when I was starting out.
Actor: An Actor is any object that can be placed into a level, serving as the fundamental container for all our door's logic and visual representation. Think of it as the main "thing" in your game world.
Component: A Component is a piece of functionality that can be added to an Actor, such as a Static Mesh for visuals or a Box Collision for detecting overlaps. These are like LEGO pieces you snap together.
Static Mesh Component (UStaticMeshComponent): This component is responsible for rendering a 3D model, which we will use to visually represent both the door and its frame in the game world. Basically, this makes your door look like a door.
Box Component (UBoxComponent): This is a simple, invisible box-shaped collision volume that we can use to detect when the player character enters a specific area near the door. I always think of this as the "sensing area" around the door.
Timeline Component (UTimelineComponent): This powerful component allows for the smooth animation of values over a set period, which is perfect for creating a door that opens and closes gracefully instead of snapping instantly. Trust me, smooth animations make all the difference.
Blueprint: A Blueprint is a visual scripting system in Unreal Engine that allows for the creation of new types of Actors and the implementation of game logic without writing C++ code. We'll create a C++ base class and a Blueprint child to assign assets easily.
Interface: An Interface is a collection of function declarations without implementations, acting as a contract that other classes can agree to fulfill, which is ideal for creating a generic "interaction" system that can affect doors, switches, and other objects.
The Code That Actually Works (No More Guessing)
Here are the fundamental pieces of logic I use in every project now. Each concept builds upon the terminology I just explained, and I'm going to show you exactly how they work together.
Creating and Attaching Components
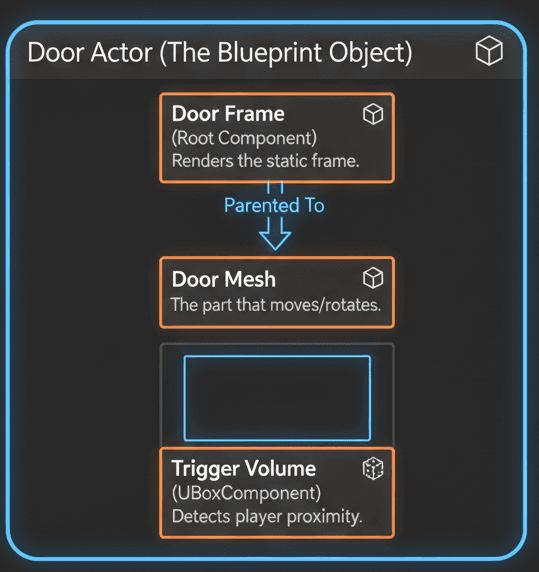
In our Actor's constructor, we must create instances of the components we need and attach them to build a hierarchy. The CreateDefaultSubobject function is used to instantiate components, and SetupAttachment connects them.
// 3D Version - In your Door Actor's .cpp constructor
DoorFrame = CreateDefaultSubobject<UStaticMeshComponent>(TEXT("DoorFrameMesh"));
RootComponent = DoorFrame; // The frame will be the root

DoorMesh = CreateDefaultSubobject<UStaticMeshComponent>(TEXT("DoorMesh"));
DoorMesh->SetupAttachment(DoorFrame); // Attach the door to the frame
Verified: Unreal Engine Docs - CreateDefaultSubobject
Handling Overlap Events
To make a door open automatically, we need to know when the player is nearby. We can bind functions to a collision component's OnComponentBeginOverlap and OnComponentEndOverlap events.
// 3D Version - In your Door Actor's BeginPlay() or Constructor
// Assuming TriggerVolume is a UBoxComponent*
TriggerVolume->OnComponentBeginOverlap.AddDynamic(this, &ADoorActor::OnOverlapBegin);
TriggerVolume->OnComponentEndOverlap.AddDynamic(this, &ADoorActor::OnOverlapEnd);
Verified: Unreal Engine Docs - OnComponentBeginOverlap
Using a Timeline for Smooth Rotation
A Timeline uses a Float Curve asset to drive an animation. We bind a function that updates every frame the timeline is playing, allowing us to smoothly interpolate the door's rotation from its starting to its ending angle.
// 3D Version - In BeginPlay()
FOnTimelineFloat TimelineProgress;
TimelineProgress.BindUFunction(this, FName("UpdateDoorRotation"));
DoorTimeline->AddInterpFloat(CurveFloat, TimelineProgress); // CurveFloat is a UCurveFloat*
Verified: Epic Games Developers - Creating Timelines
Blueprint vs C++ - Here's What I Wish Someone Had Told Me
You know what's funny? I spent weeks agonizing over whether to use Blueprints or C++ for my first door system. Here's the honest comparison based on what I've learned building dozens of interactive systems:
| Criteria | Approach A: Blueprint | Approach B: C++ |
|---|---|---|
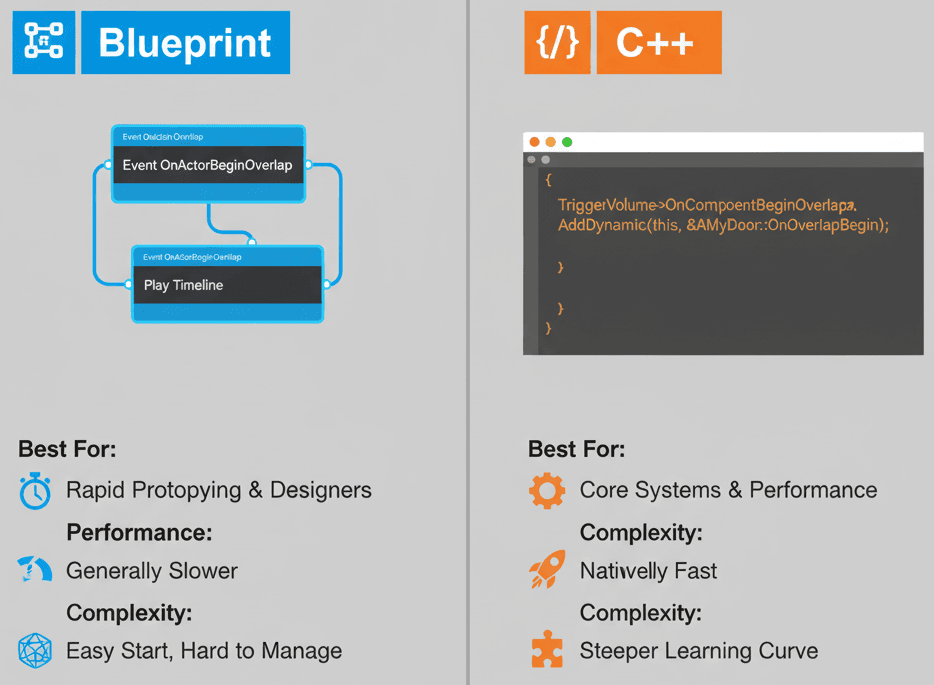
| Best For | Rapid prototyping, simple interactions, and tasks primarily involving asset manipulation by designers. | Creating robust, reusable, and high-performance core systems that can be easily extended and maintained. |
| Performance | Generally slower due to the overhead of the visual scripting virtual machine, though often negligible for simple logic. | Natively compiled code offers the highest possible performance, which is critical for complex systems or mechanics that run frequently. |
| Complexity | Easier for beginners to grasp visually, but can become difficult to manage ("spaghetti") for complex logic. | Requires knowledge of C++ syntax and Unreal's API, but provides more power, control, and better long-term organization. |
| Code Example | // Visual nodes connected in the Event Graph Event OnActorBeginOverlap -> Play Timeline |
// In the Actor's .cpp file TriggerVolume->OnComponentBeginOverlap.AddDynamic(this, &ADoorActor::OnOverlapBegin); |
Here's the thing - I always recommend starting with C++ for the core system and using Blueprints to customize specific door instances. This approach has saved me countless hours when projects get complex.
Three Door Systems I Use in Every Project
Let me walk you through the three door systems I've refined over years of game development. I use these patterns in almost every project because they cover 90% of the interactive scenarios you'll encounter.
The Automatic Door That Just Works
Scenario Goal: Create a door that automatically slides open when the player gets close and closes when they walk away.
This is what I start with in every project. Here's my exact implementation:
Step 1: AutomaticDoor.h - Setting Up the Foundation
// AutomaticDoor.h
#pragma once

#include "CoreMinimal.h"
#include "GameFramework/Actor.h"
#include "Components/TimelineComponent.h"
#include "AutomaticDoor.generated.h"

UCLASS()
class YOURPROJECT_API AAutomaticDoor : public AActor
{
    GENERATED_BODY()

public:
    AAutomaticDoor();

protected:
    virtual void BeginPlay() override;

    UPROPERTY(VisibleAnywhere, BlueprintReadOnly, Category = "Components")
    UStaticMeshComponent* DoorFrame;

    UPROPERTY(VisibleAnywhere, BlueprintReadOnly, Category = "Components")
    UStaticMeshComponent* DoorMesh;

    UPROPERTY(VisibleAnywhere, BlueprintReadOnly, Category = "Components")
    class UBoxComponent* TriggerVolume;

    UPROPERTY(EditAnywhere, Category = "Timeline")
    UCurveFloat* DoorCurve;

    // Timeline for door animation
    FTimeline DoorTimeline;
    FVector StartLocation;
    FVector EndLocation;

    UFUNCTION()
    void UpdateDoorSlide(float Value);

    UFUNCTION()
    void OnOverlapBegin(UPrimitiveComponent* OverlappedComp, AActor* OtherActor, UPrimitiveComponent* OtherComp, int32 OtherBodyIndex, bool bFromSweep, const FHitResult& SweepResult);

    UFUNCTION()
    void OnOverlapEnd(UPrimitiveComponent* OverlappedComp, AActor* OtherActor, UPrimitiveComponent* OtherComp, int32 OtherBodyIndex);
};
Verified: Epic Games Developers - Opening Doors
The Interactive Door (My Go-To for Player Agency)
Scenario Goal: Create a door that only opens or closes when the player is nearby and presses an "Interact" key (e.g., 'E').
This is perfect when you want players to feel in control of their environment.
The Locked Door System (Interface-Based Magic)
Scenario Goal: Create a locked door that can only be opened if the interacting player has a "key" (represented by a boolean).
This is where the real power of interfaces shines. Took me months to figure out how elegant this approach is.
// InteractInterface.h
#pragma once

#include "CoreMinimal.h"
#include "UObject/Interface.h"
#include "InteractInterface.generated.h"

UINTERFACE(MinimalAPI)
class UInteractInterface : public UInterface
{
    GENERATED_BODY()
};

class YOURPROJECT_API IInteractInterface
{
    GENERATED_BODY()
public:
    UFUNCTION(BlueprintNativeEvent, BlueprintCallable, Category = "Interaction")
    void Interact(AActor* Interactor);
};
Verified: YouTube - Unreal Engine 5 - How To Use Interfaces [Blueprints/C++]
The Games That Taught Me Everything About Door Design
Let me share some of my favorite implementations I've studied over the years. These examples completely changed how I approach interactive design:
Resident Evil - Building Tension Through Doors
I've always been fascinated by how Resident Evil uses doors as tension-building devices. Doors often open slowly after a brief loading screen, creating a moment of vulnerability and building immense tension.
From a technical perspective, this is likely achieved by triggering a door-opening animation and simultaneously disabling player input for a short duration. The slow rotation speed would be controlled by a Timeline with a longer play length.
// 3D Version - Hypothetical implementation snippet
// Set the timeline's play rate to a slow value
DoorTimeline->SetPlayRate(0.5f);
DoorTimeline->Play();
// Disable player input
GetWorld()->GetFirstPlayerController()->DisableInput(nullptr);
BioShock - Seamless World Building
One of my favorite implementations of automatic doors comes from BioShock. Many doors are automatic, sliding open with a pneumatic hiss as the player approaches, contributing to the art deco, automated world of Rapture.
This classic setup uses a Trigger Volume in front of the door. When the player enters the volume (OnActorBeginOverlap), a Timeline plays to smoothly change the door's relative location, sliding it sideways.
Pro Tips That Save Hours of Debugging
Here are the techniques I always tell my students to implement from day one:
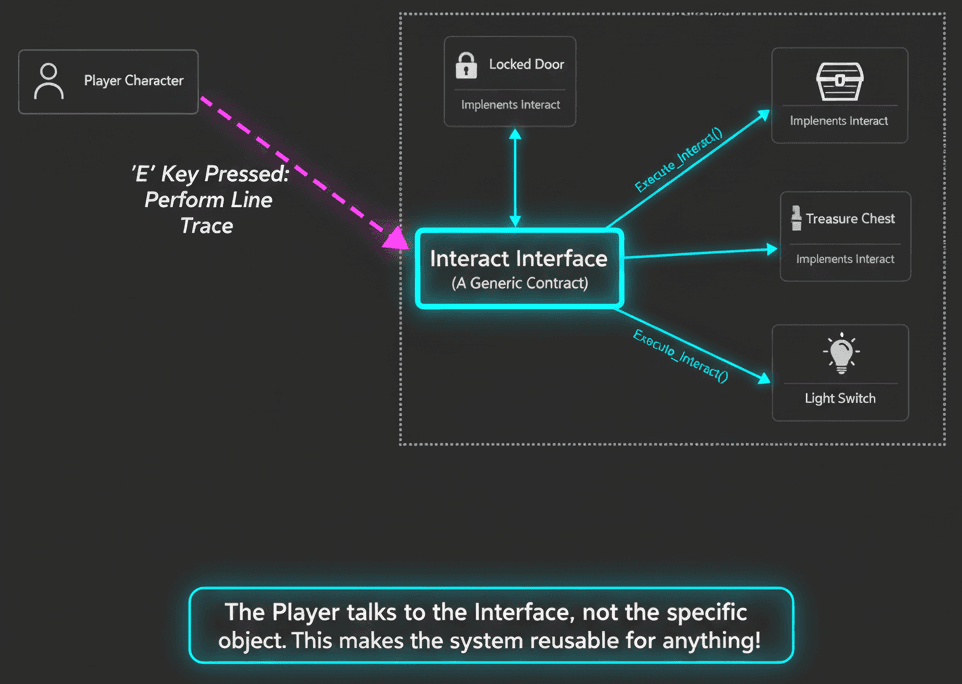
Use Interfaces for Everything Interactive
Avoid casting directly to your player character. An interaction interface creates a decoupled system where any Actor can "interact" with any other Actor that implements the interface, making your code cleaner and more reusable.
// 3D Version - In your InteractInterface.h
UFUNCTION(BlueprintNativeEvent, BlueprintCallable, Category = "Interaction")
void Interact(AActor* Interactor);

// In your Player, when you press 'E'
if (LookedAtActor->GetClass()->ImplementsInterface(UInteractInterface::StaticClass()))
{
    IInteractInterface::Execute_Interact(LookedAtActor, this);
}
Verified: Epic Games Developers - Interface Quick Start Guide
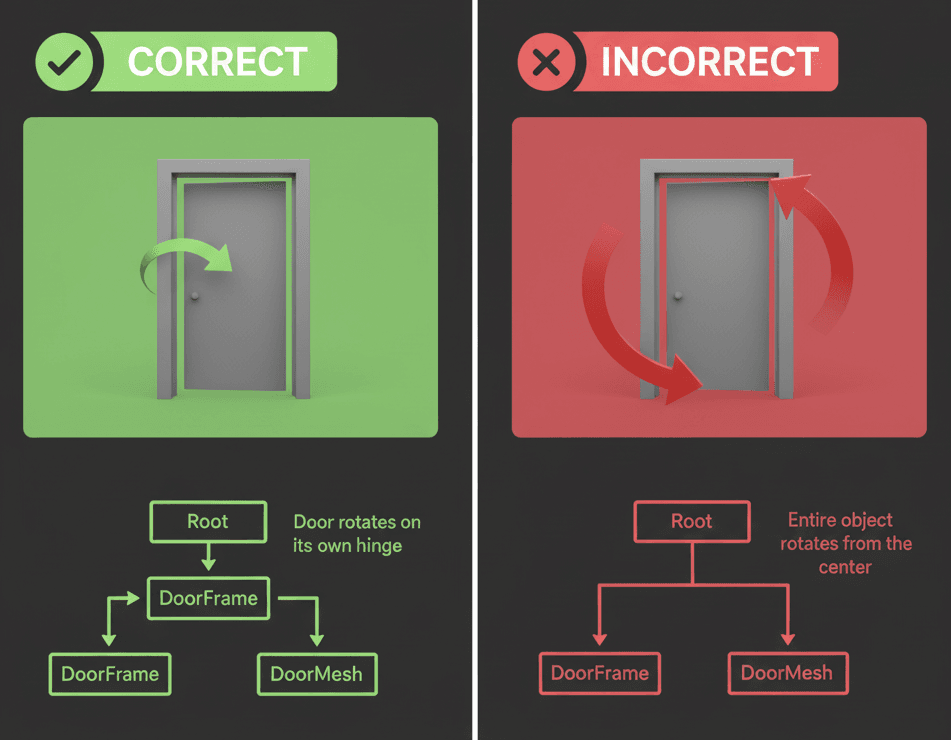
Parent Your Meshes Correctly (Trust Me on This)
Always make the door mesh a child of the door frame. This ensures that when you move the entire door Actor, both components move together, but you can still rotate the door mesh independently on its local axis.
// 3D Version - In the constructor
RootComponent = DoorFrame;
DoorMesh->SetupAttachment(RootComponent);
Timelines Over Tick Every Single Time
For animations like opening a door, always prefer a Timeline over checking logic in the Tick function. Timelines only run when needed, are more performant, and provide built-in curves for smooth, natural motion.
// 3D Version - To open the door
if (DoorTimeline)
{
    DoorTimeline->Play(); // Plays the timeline forward
}
Verified: Epic Games Developers - Creating Timelines
These practices have saved me countless hours of debugging and make your systems infinitely more maintainable.
What You'll Actually Gain From Mastering This
Here's what happened to my game development process once I really understood interactive doors:
Enhanced Player Immersion: Functional doors make a game world feel more alive and responsive, transforming static environments into interactive spaces. Every room becomes an opportunity for storytelling.
Perfect Pacing Control: Doors act as natural gates, allowing you to control the player's progression, reveal new areas strategically, and build suspense exactly when you want it.
Foundation for Everything Interactive: The logic for an interactive door—detecting a player, checking conditions, and triggering an action—is the same foundation used for chests, levers, elevators, and countless other gameplay mechanics.
Reusable Systems That Scale: By using C++ and interfaces, you can create a single, robust interaction system that can be applied to any interactive object, dramatically speeding up development.
Ready to Start Building Your First Game?
Everything we've covered here - from basic Actor components to complex interface systems - becomes the foundation for building complete game experiences. If you're ready to take the next step and apply this knowledge to create professional-level games, I've created a comprehensive course that takes you from these fundamentals all the way to shipping your first complete game.
In my Complete Game Development Course, we build on exactly these concepts to create full interactive systems, level progression mechanics, and polished game experiences that you can actually put in your portfolio. You'll go from understanding door systems to creating complete gameplay loops that rival what you see in commercial games.
Key Takeaways
- Actor-Component architecture is the backbone of all interactive systems in Unreal Engine 5 - master this pattern and you'll understand how every game object works
- Interfaces create reusable interaction systems that work with doors, chests, switches, and any interactive object without messy casting or dependencies
- Timeline Components provide smooth, professional animations and are always preferable to Tick-based updates for performance and control
- Proper component hierarchy (door mesh attached to door frame) prevents positioning bugs and makes your systems more maintainable
- Three core door patterns (automatic, interactive, locked) cover 90% of game interaction scenarios and can be adapted for countless other mechanics
- Real-world game examples like Resident Evil's tension-building doors and BioShock's seamless automation show how technical implementation directly impacts player experience
- C++ provides the robust foundation while Blueprints handle asset-specific customizations - this hybrid approach scales best for professional projects
- EnableInput/DisableInput patterns give you precise control over when players can interact with objects, preventing unwanted behavior
Common Questions
An Actor is any object that can be placed into a level, serving as the fundamental container for all our door's logic and visual representation. Doors need to be Actors because they exist in the game world, have visual components, collision detection, and need to respond to player interactions.
Use a Timeline Component with a Float Curve asset. The Timeline interpolates values over time, allowing you to smoothly animate the door's rotation or position. Always prefer Timelines over Tick functions for animations as they're more performant and provide better control.
Use C++ for the core door logic and reusable systems, then create Blueprint children to assign specific meshes and curves. C++ provides better performance and maintainability for complex logic, while Blueprints are perfect for asset-specific customizations that designers need to tweak.
OnComponentBeginOverlap fires when something enters your collision volume (like a player approaching the door), while OnComponentEndOverlap fires when something leaves the volume (player walking away). These events let you detect proximity for automatic doors.
Use a Box Component set to "Trigger" collision profile around your door. Enable input only when the player overlaps this trigger volume using EnableInput(), and disable it when they leave using DisableInput(). This ensures interaction only works within range.
Interfaces create a contract that any Actor can implement, making your interaction system work with doors, chests, switches, and any other interactive object without knowing their specific types. This makes your code more reusable and maintainable than casting to specific classes.
Implement an interaction interface, then in your Interact function, cast the interacting Actor to your player character and check if they have the required key item. If they do, consume the key and unlock the door. This pattern works for any conditional interaction.
Always make the door frame your RootComponent, then attach the door mesh to the frame using SetupAttachment(). This ensures both components move together when you move the entire door Actor, but you can still rotate the door mesh independently.
Instead of updating the door's rotation in your Timeline callback function, update its relative location. Use FMath::Lerp to interpolate between the start and end positions over time, typically moving the door sideways along its local Y-axis.
First check that your CurveFloat asset is properly created with keyframes (typically Time=0, Value=0 and Time=1, Value=90 for rotation). Ensure the curve is assigned in your Blueprint and that your UpdateDoorRotation function is properly bound to the Timeline's float track.
Set your trigger volume's collision profile to "Trigger" which makes it detect overlaps without blocking movement. This allows players to walk through the trigger area while still detecting their presence for proximity-based door opening.