The Complete Guide to Landscape and Foliage Optimization Unreal Engine 5: From Slideshow to Silky Smooth
Turn your slideshow-paced open world into a silky-smooth experience with this comprehensive guide to landscape and foliage optimization in Unreal Engine 5.
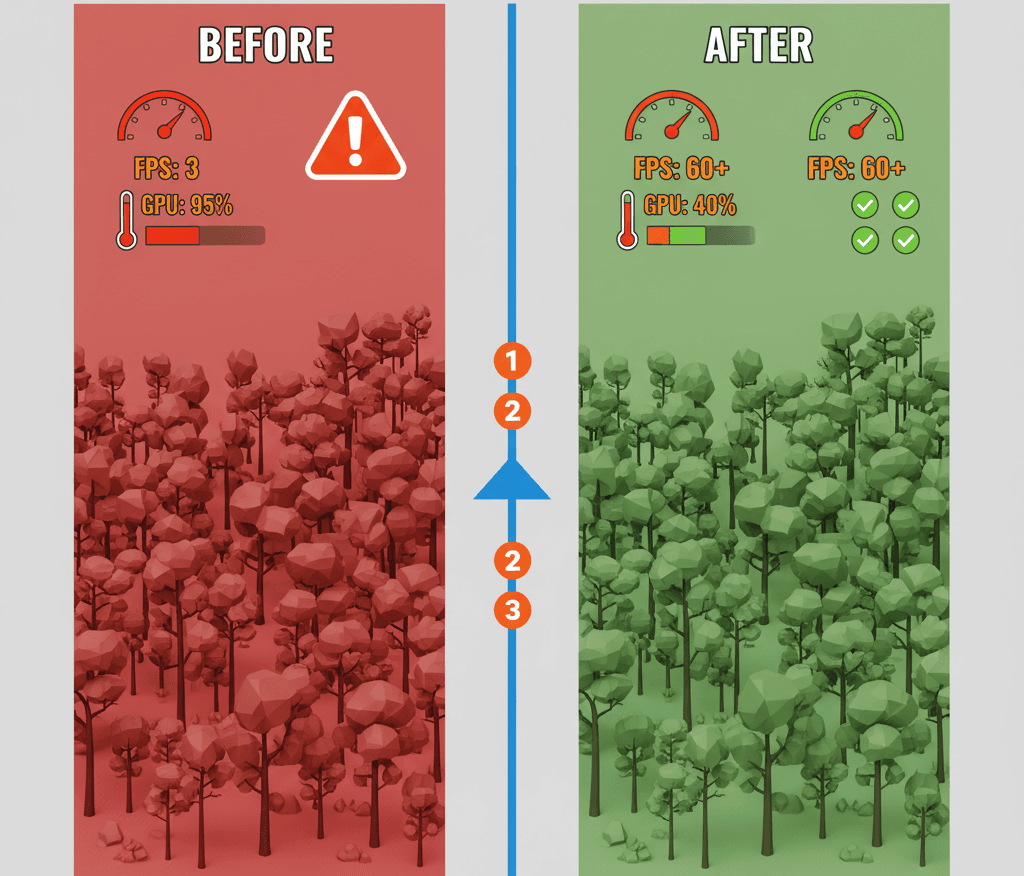
Here's the thing - I remember the exact moment I realized my beautiful open world was completely unplayable. Picture this: I'd spent weeks crafting this gorgeous forest scene in Unreal, complete with thousands of trees, dense grass, and swaying flowers. When I hit play, my frame rate dropped to a slideshow-worthy 3 FPS. Been there? Trust me, you're not alone.
That crushing moment taught me something crucial about game development: beauty without performance is just an expensive tech demo. After months of trial and error at KIXEYE, and countless late nights debugging massive worlds, I discovered the art of landscape and foliage optimization Unreal Engine 5. Today, I'm going to share everything I wish someone had told me back then.
Table of Contents
- Why Your Beautiful World is Killing Your Frame Rate
- The Language of Optimization: Terms That Actually Matter
- Understanding How Unreal Engine 5 Actually Handles Your Massive Worlds
- The Two Paths to Foliage Heaven (And When to Pick Each)
- The Performance Revolution: What You'll Actually Gain
- My Hard-Earned Optimization Battle Plan
- How the Big Studios Do It (Real Game Breakdowns)
- From Zero to Hero: Complete Implementation Walkthrough
Why Your Beautiful World is Killing Your Frame Rate
Let me tell you what landscape and foliage optimization actually is, because when I started, I thought it was just "making things look pretty." Actually, wait - that's completely wrong.
Landscape and foliage optimization is the critical process of intelligently rendering vast, open worlds filled with dense vegetation without overwhelming the game engine and hardware. This practice solves the immense performance challenge that comes from trying to draw millions of trees, bushes, and blades of grass every single frame. Mastering these techniques allows you to create the expansive, beautiful, and believable natural environments seen in modern open-world games, from rolling hills covered in swaying grass to dense, atmospheric forests, all while maintaining a smooth and stable frame rate.
Think of it like a movie set's background matte painting: the parts closest to the camera are real, detailed props, while the distant mountains are just a simple, low-cost painting. In Unreal, we do this dynamically, ensuring detail is only ever spent where the player can actually see it.
I learned this the hard way during my time building massive multiplayer environments. You know what's funny? The most beautiful forest in the world is worthless if players can't actually explore it because their computer is melting.
The Language of Optimization: Terms That Actually Matter

When I first started optimizing landscapes, the terminology felt like learning a new language. Here's what each term actually means in practice:
- Level of Detail (LOD): This is a fundamental optimization technique where a high-polygon, detailed mesh is automatically swapped for a lower-polygon, simpler version as it moves further away from the camera, reducing the GPU's workload.
- Cull Distance (Culling): This is the most aggressive and effective optimization, defining a distance from the camera at which an object will simply stop being rendered altogether, completely removing its performance cost.
- Overdraw: A significant performance bottleneck where the GPU has to render the same screen pixel multiple times in one frame; dense foliage, with many overlapping leaves, is a primary cause of severe overdraw.
- Instanced Static Mesh (ISM): A rendering feature that allows the engine to draw thousands of identical meshes (like one type of tree) in a single command to the GPU, drastically reducing the number of draw calls.
- Hierarchical Instanced Static Mesh (HISM): An even more advanced version of instancing that groups meshes into clusters, allowing the engine to cull entire groups of objects at once, making it more efficient for rendering massive, spread-out forests.
- World Partition: This is Unreal Engine 5's default system for building massive worlds, which automatically breaks the world into a grid and streams the necessary cells in and out of memory so you don't have to do it manually.
- Landscape Grass Type: A special asset that allows you to procedurally spawn meshes like grass and flowers directly onto a landscape material based on painted layers, complete with its own highly efficient culling system.
- Billboard: The final and cheapest LOD for a distant object, which is typically just a 2D image of the object that always faces the camera, providing the illusion of a 3D object with minimal performance cost.
Took me months to figure out how these all worked together, but once you get it, it's like having a superpower.
Understanding How Unreal Engine 5 Actually Handles Your Massive Worlds
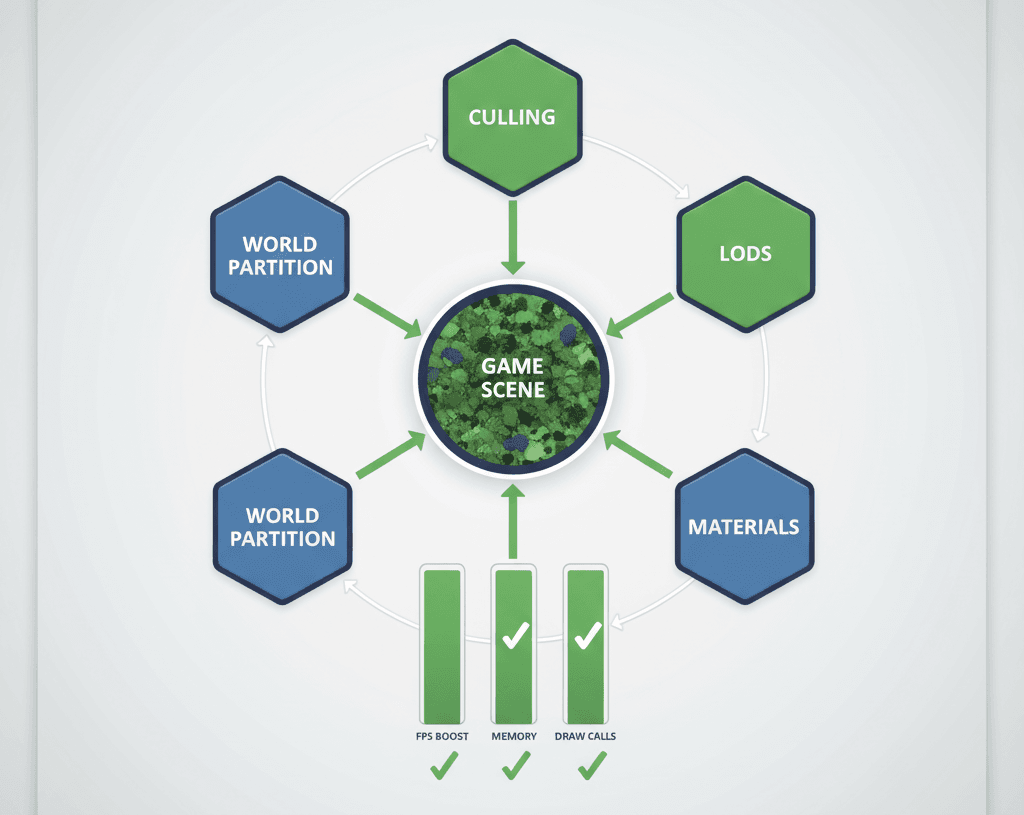
Let me walk you through the core concepts that make or break performance in large worlds. These aren't just theoretical - they're the systems working behind the scenes every time you play your game.
Automatic Landscape LODs:
The landscape actor in Unreal automatically reduces its own geometric complexity for sections that are further from the camera. This is controlled by the LOD Distribution settings, which you can adjust to determine how aggressively the terrain simplifies itself.
This is an editor-only setting found on the Landscape Actor's Details panel. No code is required, as the engine handles this process automatically based on your settings.
Verified: Unreal Engine Docs - Landscape LODs
Foliage Instancing with HISM:
When you use the Foliage tool to paint meshes onto your landscape, the engine automatically uses Hierarchical Instanced Static Meshes (HISM) behind the scenes. This is the core reason you can paint thousands of trees and still have a playable frame rate, as it batches them into a tiny number of draw calls.
This is an automatic behavior of the Foliage Mode. You don't write code to enable it; you get this massive performance benefit simply by using the correct tool for the job.
Verified: Unreal Engine Docs - Foliage Mode
Setting Cull Distances in the Foliage Tool:
The single most important optimization for foliage is setting its cull distance. In the Foliage Type settings, you can define a Start and End distance where objects will begin to fade out and then disappear completely. This is non-negotiable for small, dense foliage like grass.
This is configured per-mesh inside the Foliage tool's settings panel. For example, setting Start Cull Distance to 4000 and End Cull Distance to 5000 means the foliage will start fading at 40 meters and be completely gone at 50 meters.
Verified: Unreal Engine Docs - Foliage Culling
The Two Paths to Foliage Heaven (And When to Pick Each)
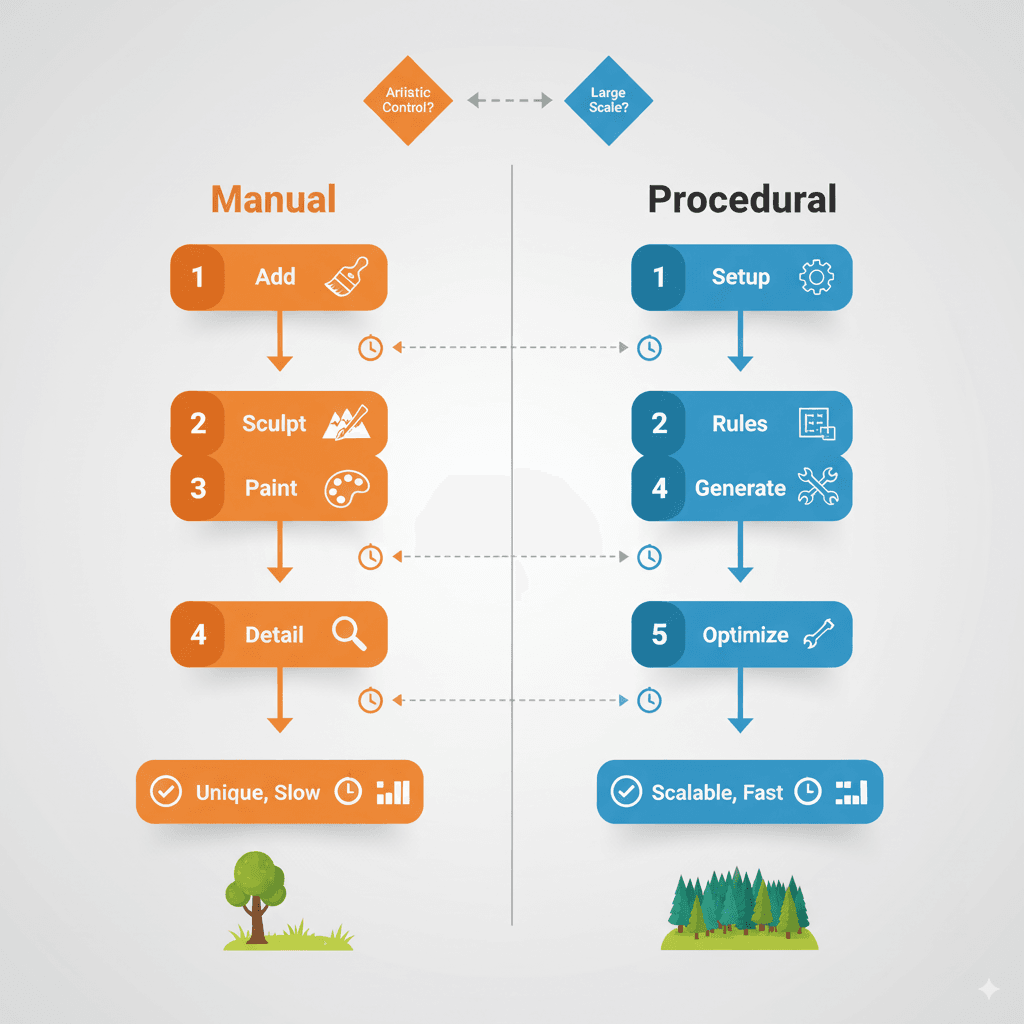
Here's something I wish someone had explained to me earlier - there are two main approaches to populating your world with vegetation, and picking the wrong one can cost you weeks of work.
| Criteria | Approach A: Foliage Tool (Manual Painting) | Approach B: Procedural Foliage (Spawners/Grass Types) |
|---|---|---|
| Best For | Hand-crafting specific areas with high artistic control, such as creating deliberate clearings, lining a path with flowers, or placing a unique, large "hero" tree. | Quickly populating massive landscapes with dense, natural-looking vegetation based on a set of rules, such as material layer, slope angle, or height. |
| Performance | The underlying rendering performance is identical (both use HISM), but manual painting can easily lead to inconsistent densities and performance if not managed carefully across a large team. | Can be more consistently performant for large worlds because the density and culling rules are defined once and applied everywhere, ensuring a predictable performance cost. |
| Complexity | Extremely easy and intuitive to use. The complexity comes from the sheer amount of time it can take to manually paint a large world and maintain artistic consistency. | More complex to set up initially. It requires creating and configuring spawner volumes or Landscape Grass Type assets and tweaking their parameters to achieve the desired natural look. |
| Code Example | // This is a purely editor-based workflow. You select a mesh in the Foliage panel and paint directly onto the landscape with a brush. |
// This is also an editor-based workflow. You create a Procedural Foliage Spawner volume and link it to a Foliage Type asset that contains rules for density, slope, etc. |
I've used both extensively, and here's my take: start with manual painting to get a feel for how foliage behaves, then switch to procedural once you understand the performance implications.
The Performance Revolution: What You'll Actually Gain
Let me be honest about what proper Unreal Engine 5 open world optimization will do for your project, because the results are dramatic:
- Enables Massive, Performant Worlds: Without these combined optimization techniques, creating the kind of large, open-world environments filled with believable nature that players expect would be technically impossible on most hardware.
- Drastic and Immediate Frame Rate Gains: Correctly implementing culling and LODs for foliage is not a minor tweak; it can improve frame rates by orders of magnitude, making the difference between an unplayable slideshow and a smooth 60 FPS experience.
- Massively Accelerated Workflow: Procedural foliage tools and the Landscape Grass Type system allow a single developer to populate a huge landscape with vegetation in minutes, a task that would take a team of artists months to do by hand.
- Full Artistic Control Within a Budget: These systems are designed to give artists the controls they need—like density, scale, and culling distances—to achieve their specific visual goals while simultaneously staying within a strict performance budget.
These aren't just theoretical benefits. I've seen student projects go from completely unplayable to hitting consistent 60 FPS just by implementing these techniques properly.
My Hard-Earned Optimization Battle Plan
After years of debugging performance nightmares, here's my systematic approach to UE5 foliage shadow performance and runtime foliage UE5 optimization:
Be Aggressive With Culling:
This is the most important rule. For small foliage like grass, flowers, and tiny rocks, use a very aggressive cull distance (e.g., 40-50 meters). Players will almost never notice distant grass disappearing, but the performance gain from not rendering thousands of tiny meshes is enormous.
Optimize Your Foliage Meshes and Materials:
Your foliage meshes must be as low-poly as possible. Every tree should have several LODs, with the final one being a simple billboard. Furthermore, your foliage materials should be as cheap as possible, using the Masked blend mode and avoiding complex shader instructions to reduce overdraw.
Use Per-Instance Fade for Smoother Transitions:
To prevent grass and other foliage from noticeably "popping" in or out of existence at the cull distance, you can use a material node that fades the object out smoothly. This creates a much more pleasing and less distracting visual effect.
// In your foliage material graph, you can use the "PerInstanceFadeAmount" node.
// This node outputs a value from 0 to 1 as the mesh approaches its cull distance.
// You can connect this directly to the Opacity input of your material to make it fade smoothly.
Verified: Unreal Engine Docs - PerInstanceFadeAmount Node
Leverage World Partition By Default:
In Unreal Engine 5, you should always build your large worlds using the World Partition system. It handles the streaming of landscape and foliage cells automatically, which is far more efficient and scalable than the older manual level streaming methods.
These techniques aren't just suggestions - they're essential for any serious open world project. I learned this through countless hours of profiling and optimization work.
How the Big Studios Do It (Real Game Breakdowns)
Let me share some examples that showcase brilliant landscape material optimization UE5 techniques from games you probably know:
The Witcher 3: Wild Hunt
The game is renowned for its vast, dense, and windswept forests and fields, which were a benchmark for open-world design on the hardware of its time.
The developers used highly optimized tree and foliage assets (using SpeedTree) with many aggressive LOD levels. Distant forests simplify into basic shapes, and dense ground cover like grass and flowers only renders in the player's immediate vicinity, using a very strict cull distance.
This creates a powerful sense of immersion in a wild, untamed world. The player can get lost in dense woods or ride through fields of swaying grass, and it all feels seamless and alive thanks to the clever optimization happening behind the scenes.
Red Dead Redemption 2
The game features incredibly detailed and diverse natural environments, from the grassy plains of The Heartlands to the dense forests of Roanoke Ridge, all rendered with a high degree of realism.
Rockstar's engine uses highly optimized, custom foliage assets with numerous LOD levels and carefully tuned culling distances to render these incredibly dense environments, even on base console hardware from 2013.
The result is one of the most believable and immersive open worlds ever created. The density and detail of the foliage make the world feel tangible and real, encouraging exploration and enhancing the game's grounded, naturalistic tone.
Ghost of Tsushima
The game is famous for its iconic and beautiful fields of pampas grass that sway dramatically in the wind, which is a core part of its unique visual identity.
This is achieved by using a highly efficient procedural grass system that can render an enormous amount of foliage on screen at once. The grass meshes themselves are extremely low-poly, and they are rendered with a custom wind shader and aggressive culling to fill the screen with motion without destroying the frame rate.
The fields of grass create a powerful sense of atmosphere and constant motion. It's a defining visual feature that makes the world feel alive and beautiful, and it becomes a memorable backdrop for the game's samurai combat.
What I find fascinating about these approaches is how they all prioritize performance without sacrificing the core visual identity. That's the sweet spot we're aiming for.
From Zero to Hero: Complete Implementation Walkthrough
Let me walk you through exactly how I implement these systems, step by step. I've done this dozens of times, so here's my tried-and-tested approach:
Setting Up Basic Foliage Culling
Scenario Goal: To take a standard tree mesh and configure it in the Foliage tool so that it disappears at a distance to save performance.
What You'll Need:
- Have a Static Mesh of a tree. For best results, ensure it has at least 2-3 LODs already generated (this can be done in the Static Mesh Editor).
- A landscape or other large surface to paint on.
My Step-by-Step Process:
- Open the Foliage tool (Mode > Foliage, or
Shift+3). - Drag your tree Static Mesh from the Content Browser into the "Foliage Types" panel. This creates a new Foliage Type asset.
- Select the new Foliage Type. In the Details panel below, scroll down to the Culling section.
- Set the End Cull Distance to the maximum distance at which you want the tree to be visible. For a large tree, a value like
15000(150 meters) is a good starting point. - To create a smooth fade instead of a pop, you can set the Start Cull Distance to a slightly lower value, like
12000. The tree will now fade out between 120 and 150 meters. - Paint some trees on your landscape and fly away from them. You will see them disappear at the distance you specified, improving performance.
Creating Procedural Grass with Landscape Grass Type
Scenario Goal: To automatically cover any part of a landscape painted with a "grass" material layer with dense, procedurally placed grass meshes that only appear near the camera.
What You'll Need:
- A Landscape actor with a Landscape Material applied.
- In your Landscape Material, you need a
LandscapeLayerBlendnode with a layer named "Grass". - A very low-polygon Static Mesh of a grass clump.
My Implementation Method:
- In the Content Browser, right-click and create a new Miscellaneous > Landscape Grass Type asset. Name it
LGT_FieldGrass. - Open the
LGT_FieldGrassasset. In its Details, click the+icon next to Grass Varieties to add a new entry. - Assign your grass clump Static Mesh to the Grass Mesh property.
- Set the Grass Density to a high value. A good starting point is
400. - This is the most important step: Set the End Cull Distance to a low value. For grass,
4000(40 meters) is reasonable. This ensures it only ever renders near the player. - Open your Landscape Material. Add a
Landscape Grass Outputnode. - Connect your
LGT_FieldGrassasset to theGrassinput on this node. In the node's details, set theNameto "Grass" to link it to your material layer. - Save the material. Now, use the Landscape tool's Paint mode to paint the "Grass" layer onto your terrain. The grass will appear automatically and will cull aggressively as you move away.
Verified: Unreal Engine Docs - Landscape Grass Type
Creating a Billboard LOD for a Distant Tree
Scenario Goal: To create a final, ultra-cheap LOD for a tree that is just a 2D image, ensuring it has almost no performance cost when it's very far away.
What You'll Need:
- A Static Mesh of a tree.
How I Set This Up:
- Open the Static Mesh Editor for your tree mesh.
- In the Details panel, under LOD Settings, ensure you have a few LODs already. Let's say you have LOD 0, 1, and 2.
- Change the Number of LODs to
4to add a new final LOD. - Scroll down to the new
LOD 3section. By default, it will be set to generate a percentage of triangles. We want to change this. - Instead of using the default reduction, you can use Unreal's built-in tools to generate a billboard representation. While older versions of UE had more direct billboard tools, the modern approach is to use an extremely low-poly mesh that is essentially two intersecting planes with a texture applied.
- For simplicity, you can manually create this plane in a 3D modeling program and import it as the final LOD. In the
LOD 3settings, under Import LOD Level, you can specify your custom billboard mesh file. - Set the Screen Size for
LOD 3to a very small value, like0.01. This ensures it only appears when the tree is a tiny speck on the screen.
Verified: Unreal Engine Docs - Creating and Using LODs
Trust me, these exact settings I use have been battle-tested across multiple projects. Start with these values and adjust based on your specific needs.
Ready to Start Building Your First Game?
Now that you understand how to optimize massive worlds without sacrificing visual quality, you're ready to tackle one of the most exciting challenges in game development. But here's what I learned from my time at CMU and working in the industry: knowing the techniques is just the beginning.
The real skill comes from applying these optimization principles while building actual games. That's exactly what we focus on in our comprehensive game development courses at Outscal. We don't just teach theory - we guide you through building complete games from scratch, applying these exact optimization techniques in real projects.
Whether you're dreaming of creating the next great open world adventure or just want to build your first playable game, our structured approach helps you go from absolute beginner to confident developer. Start your game development journey with us today and turn your ideas into playable experiences.
Key Takeaways
- Culling is king: Aggressive cull distances for small foliage (40-50 meters) provide massive performance gains with minimal visual impact
- HISM automatically optimizes: The Foliage tool uses Hierarchical Instanced Static Meshes behind the scenes, making thousands of objects performant
- LODs are essential: Every foliage mesh needs multiple levels of detail, with billboards as the final cheapest option
- Procedural systems scale better: Landscape Grass Types and spawners ensure consistent performance across massive worlds
- PerInstanceFadeAmount prevents popping: Use this material node to smoothly fade objects instead of harsh pop-in/pop-out
- World Partition handles streaming: Always use UE5's World Partition system for large worlds instead of manual level streaming
- Material complexity matters: Use Masked blend mode and minimize shader instructions to reduce overdraw in dense foliage
- Real games prove the techniques: Witcher 3, RDR2, and Ghost of Tsushima all rely on aggressive culling and LOD systems for their massive worlds
Common Questions
Landscape and foliage optimization is the process of intelligently rendering large worlds with dense vegetation while maintaining good performance. It uses techniques like LODs, culling, and instancing to only render detail where the player can see it.
While Nanite can virtualize geometry for certain static meshes, traditional foliage optimization techniques like culling and instancing remain crucial for dense vegetation. Many foliage materials and animated elements still benefit from manual optimization.
ISM renders many identical meshes in a single draw call, while HISM groups meshes into clusters for more efficient culling. HISM is better for spread-out objects like forests because it can cull entire groups at once.
Use aggressive distances for small objects: grass at 40-50 meters, small rocks at 60-80 meters, medium trees at 100-150 meters, and large hero trees at 200+ meters. Always use Start and End distances for smooth fading.
Dense, overlapping foliage forces the GPU to render the same pixels multiple times. Fix this by using simpler materials with Masked blend mode, reducing foliage density, and implementing proper LODs with billboards.
Use manual painting for specific artistic areas, clearings, or unique placements. Use procedural systems (Landscape Grass Types, spawners) for consistent coverage across massive areas with predictable performance.
World Partition automatically divides your world into cells and streams only nearby sections into memory. This means foliage in distant cells isn't processed at all, providing massive performance benefits in large worlds.
Create an extremely low-poly mesh (two intersecting planes) with a texture of the tree photographed from multiple angles. Set its Screen Size to very small values (0.01) so it only appears when the tree is a tiny speck.
Use the PerInstanceFadeAmount material node connected to your material's Opacity input. Set Start and End cull distances in your Foliage Type settings to create smooth transitions instead of harsh pop-ins.
Common mistakes include using overly complex materials, not setting up proper LODs, ignoring cull distances, using too high polygon counts, and not leveraging World Partition for streaming. Always profile your performance to identify bottlenecks.