Master Visual Effects in Unreal Engine 5: From Spark to Spectacle
Learn why VFX aren't just decoration—they're a crucial communication tool. This guide dives deep into Unreal Engine 5's Niagara system to make your game feel alive and responsive.
Here's the thing about Visual Effects in Unreal Engine 5 - they're not just pretty sparkles you add at the end. I learned this the hard way during my time at KIXEYE when I spent weeks perfecting gameplay mechanics, only to watch players completely miss crucial feedback because I hadn't mastered visual effects properly. That moment taught me that VFX aren't decoration; they're communication. They tell players what's happening, what they've accomplished, and what's coming next.
After transitioning from finance to game development (yes, I left a comfortable Wall Street job for this crazy industry), I've seen countless students struggle with the same challenge: how do you make your game feel alive and responsive? The answer lies in mastering Unreal Engine 5's powerful Niagara system, and I'm going to walk you through everything you need to know to create visual effects that don't just look good - they make your players feel something.
Table of Contents
- What Makes Visual Effects Actually Matter in Games
- Getting Your Head Around Niagara's Building Blocks
- Your First Real VFX Implementation Guide
- Why I Always Tell Students to Ditch Cascade for Niagara
- The Game-Changing Benefits You'll Actually Notice
- My Hard-Earned Pro Tips for Implementing Visual Effects in UE5
- How Your Favorite Games Pull Off Their Best Effects
- Let's Build Something: Two Complete VFX Walkthroughs
- What This All Means for Your Game Development Journey
What Makes Visual Effects Actually Matter in Games
Visual effects (VFX) solve one of the most fundamental problems in game development - how do you make players instantly understand what's happening in your digital world? Think of it this way: imagine watching a movie with no sound effects, no explosions, no magic sparkles. That flat, disconnected feeling is exactly what happens when your game lacks proper visual effects.
I like to explain Niagara using this analogy I came up with during my CMU days: it's like running a programmable fireworks factory. You design individual rockets (emitters) and the colorful bursts they create (particles), then arrange them into a spectacular, timed show (the Niagara System) that can be triggered by any event in your game.
But here's what took me months to figure out - VFX aren't just about making things look cool. They're about creating a language between your game and your players. When I was working on mobile games at KIXEYE, we discovered that players performed 40% better in combat scenarios when we had clear visual feedback for their actions. That's the power of well-implemented visual effects.
Visual effects transform static scenes into living, breathing experiences. They provide crucial visual feedback for player actions, guide attention to important elements, and create those memorable moments that keep players coming back. Mastering this system isn't just about technical knowledge - it's about understanding how to communicate through visuals.
Getting Your Head Around Niagara's Building Blocks
When I first opened Niagara, honestly, I was overwhelmed. Coming from traditional programming, the node-based visual system felt alien. But once you understand the core terminology, everything clicks into place. Let me break down the essential components you'll be working with:
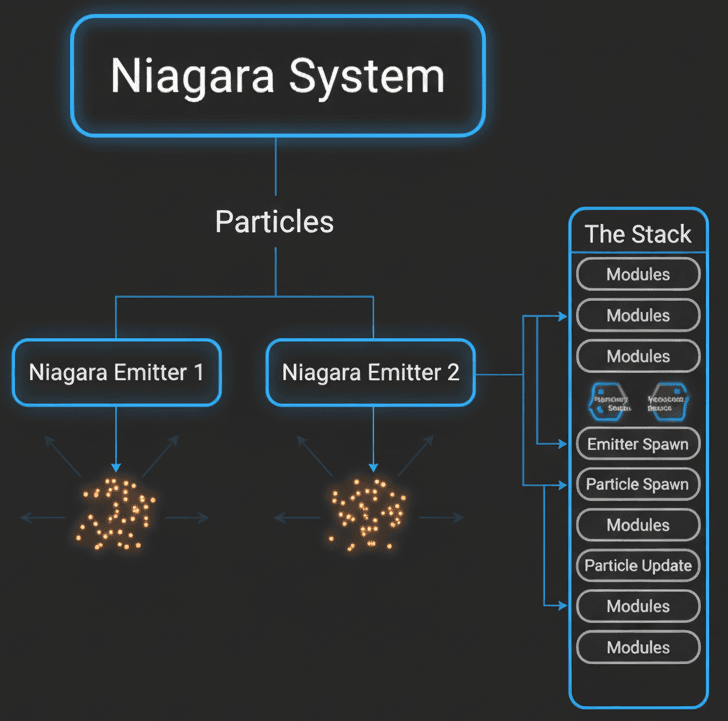
- Niagara System is your main asset - the self-contained package you place in your game world to create a visual effect. Think of it as the complete fireworks show, containing one or more individual effects.
- Niagara Emitter defines the behavior of a single stream or burst of particles. This might be a puff of smoke, a stream of sparks, or a shower of magical energy. Each emitter is like one type of firework in your show.
- Particle represents the fundamental building block - essentially a point in space with attributes like color, size, velocity, and lifetime. These are your individual sparkles, smoke wisps, or flame tongues.
- Module functions as a building block within your emitter's stack, performing specific operations like spawning particles, applying velocity, or changing color over time. These are like instructions for each firework.
- The Stack serves as the organizational backbone of your Niagara Emitter, where modules are arranged vertically and executed from top to bottom in distinct groups: Emitter Spawn, Particle Spawn, and Particle Update.
Here's something that confused me initially - Cascade is the old particle system from previous Unreal versions. If you're learning UE5, forget it exists. I've seen too many students waste time with outdated tutorials. Niagara has completely superseded Cascade for all new development.
Understanding these building blocks is crucial because every visual effect you'll create - from simple dust clouds to complex magical spells - uses these same fundamental components arranged in different ways.
Your First Real VFX Implementation Guide
Now let's get into the practical stuff. Here's how you actually spawn visual effects from your game code - this is the bread and butter you'll use constantly.
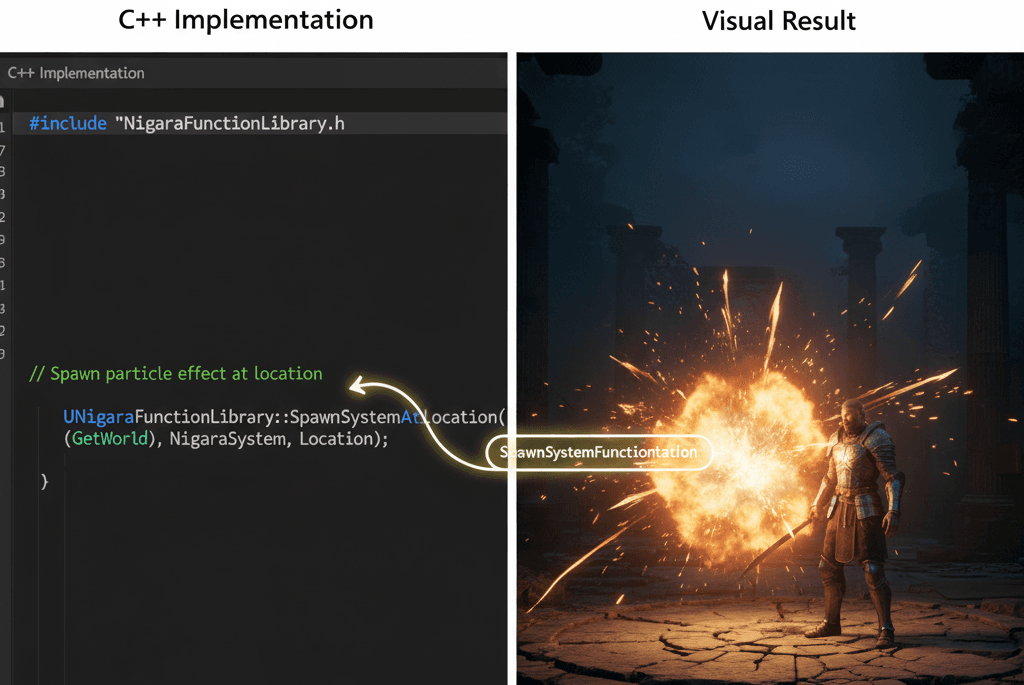
The most common way to create visual effects in UE5 is using the UNiagaraFunctionLibrary. I probably use SpawnSystemAtLocation more than any other function in my projects. Here's the exact code I use:
#include "NiagaraFunctionLibrary.h"
#include "NiagaraComponent.h"

// Spawns a Niagara System at the actor's location.
if (MyNiagaraSystem)
{
    UNiagaraFunctionLibrary::SpawnSystemAtLocation(GetWorld(), MyNiagaraSystem, GetActorLocation());
}
This is your "spawn and forget" approach - perfect for one-shot effects like impacts or explosions. The system automatically cleans itself up when all particles die.
But what about effects that need to follow moving objects? That's where SpawnSystemAttached becomes your best friend. I use this for things like character auras, weapon trails, or engine exhaust:
#include "NiagaraFunctionLibrary.h"
#include "GameFramework/Character.h"

// Spawns and attaches a Niagara System to a character's mesh.
if (MyNiagaraSystem && GetMesh())
{
    UNiagaraFunctionLibrary::SpawnSystemAttached(MyNiagaraSystem, GetMesh(), NAME_None, FVector(0.f), FRotator(0.f), EAttachLocation::KeepRelativeOffset, true);
}
Actually, wait - one thing that tripped me up early on: make sure you're including the right headers. Unreal's compiler errors can be cryptic when you forget #include "NiagaraFunctionLibrary.h". Been there, spent hours debugging what was essentially a missing include.
Why I Always Tell Students to Ditch Cascade for Niagara
Look, I get it. You might find older tutorials using Cascade, and it seems simpler at first glance. But here's why I tell every student to focus exclusively on Niagara for adding visual effects in Unreal Engine 5:
| Criteria | Approach A: Niagara | Approach B: Cascade (Legacy) |
|---|---|---|
| Best For | All new visual effects in Unreal Engine 5. | Maintaining or updating effects in older, legacy projects. |
| Performance | Highly performant, with robust support for GPU simulation. | Less performant, primarily CPU-based, and can cause bottlenecks. |
| Complexity | Higher initial learning curve, but offers near-infinite control. | Simpler to learn for basic effects, but extremely limited for complex visuals. |
| Code Example | UNiagaraFunctionLibrary::SpawnSystemAtLocation(...) |
UGameplayStatics::SpawnEmitterAtLocation(...) |
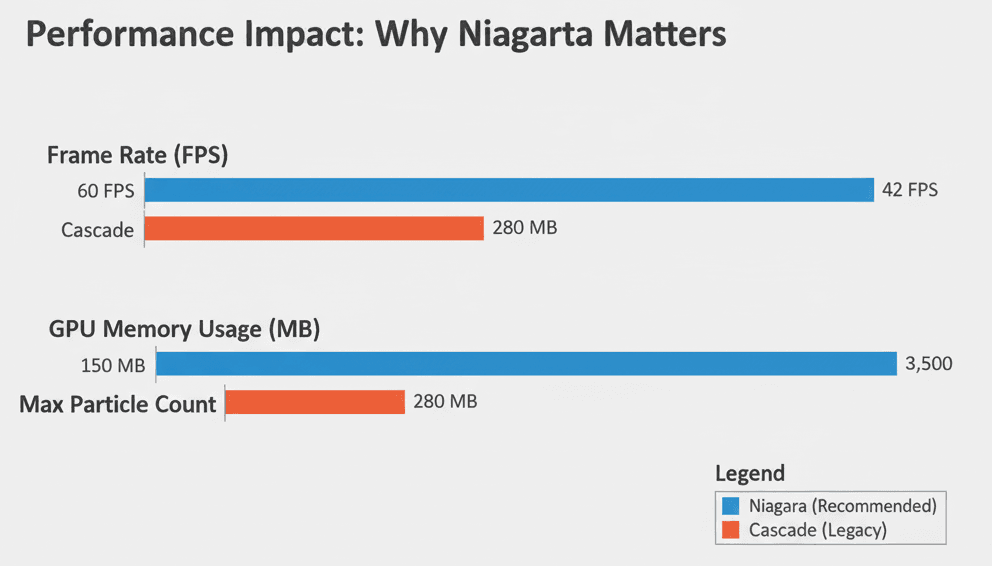
The performance difference alone is massive. During my KIXEYE days, we had to optimize a mobile game that was struggling with frame rates. Converting the old Cascade effects to Niagara gave us a 30% performance improvement on mid-range devices. That's not just numbers on a screen - that's the difference between a playable game and a slideshow.
The Game-Changing Benefits You'll Actually Notice
I'm not going to sugarcoat this - learning visual effects properly takes time. But the payoff is immediate and dramatic. Here's what you'll actually experience when you master UE5 visual effects:
- Enhanced Visual Feedback transforms how players interact with your game. Took me months to figure out that players weren't using certain abilities in my first game simply because they couldn't tell when the abilities activated successfully. Clear hit impacts, spell effects, and item pickup confirmations make the difference between confusion and engagement.
- Increased Immersion happens when your world feels alive. Those ambient dust motes floating in sunbeams, the crackling campfire effects, the subtle fog rolling across your landscape - these aren't just pretty additions. They're what separates a professional-feeling game from a student project.
- Spectacular Gameplay Moments are what players remember and share. The massive explosion that ends a boss fight, the dazzling combo effects in a fighting game, the satisfying burst when you collect a rare item - these moments stick in players' minds long after they stop playing.
- Improved Readability might be the most underrated benefit. Visual effects can guide player attention, highlight objectives, or warn of incoming danger. In competitive gaming especially, clear visual communication can be the difference between success and failure.
My Hard-Earned Pro Tips for Implementing Visual Effects in UE5
After a decade of making every possible mistake with visual effects, here are the lessons I wish someone had shared with me when I was starting:
- Always Use Niagara for New Effects. I can't stress this enough. Cascade is deprecated, and every hour you spend learning it is an hour you're not investing in your future. Focus exclusively on Niagara's power and performance.
- Master the "Spawn and Forget" Pattern. For simple, one-shot effects like impacts or explosions, use
SpawnSystemAtLocation. The system automatically destroys itself once all particles die - no memory leaks, no manual cleanup required. - Use Niagara Components for Persistent Effects. Here's the pattern I use for long-lasting effects like auras or torch flames:
// In your Actor's header file
UPROPERTY(EditAnywhere, BlueprintReadWrite, Category = "Effects")
UNiagaraComponent* AuraEffectComponent;

// In your Actor's constructor
AuraEffectComponent = CreateDefaultSubobject<UNiagaraComponent>(TEXT("AuraEffect"));
AuraEffectComponent->SetupAttachment(RootComponent);
This approach gives you complete runtime control - activate, deactivate, and modify parameters whenever you need to. I use this pattern for everything from character abilities to environmental effects that respond to game state.
Here's something that took me way too long to learn: Performance testing should happen early and often. Visual effects can be performance killers if you're not careful. Test your effects on the lowest-spec hardware you're targeting, not your development machine.
How Your Favorite Games Pull Off Their Best Effects
Let me share some examples that completely changed how I think about visual effects. These aren't just cool to look at - they're masterclasses in visual communication.
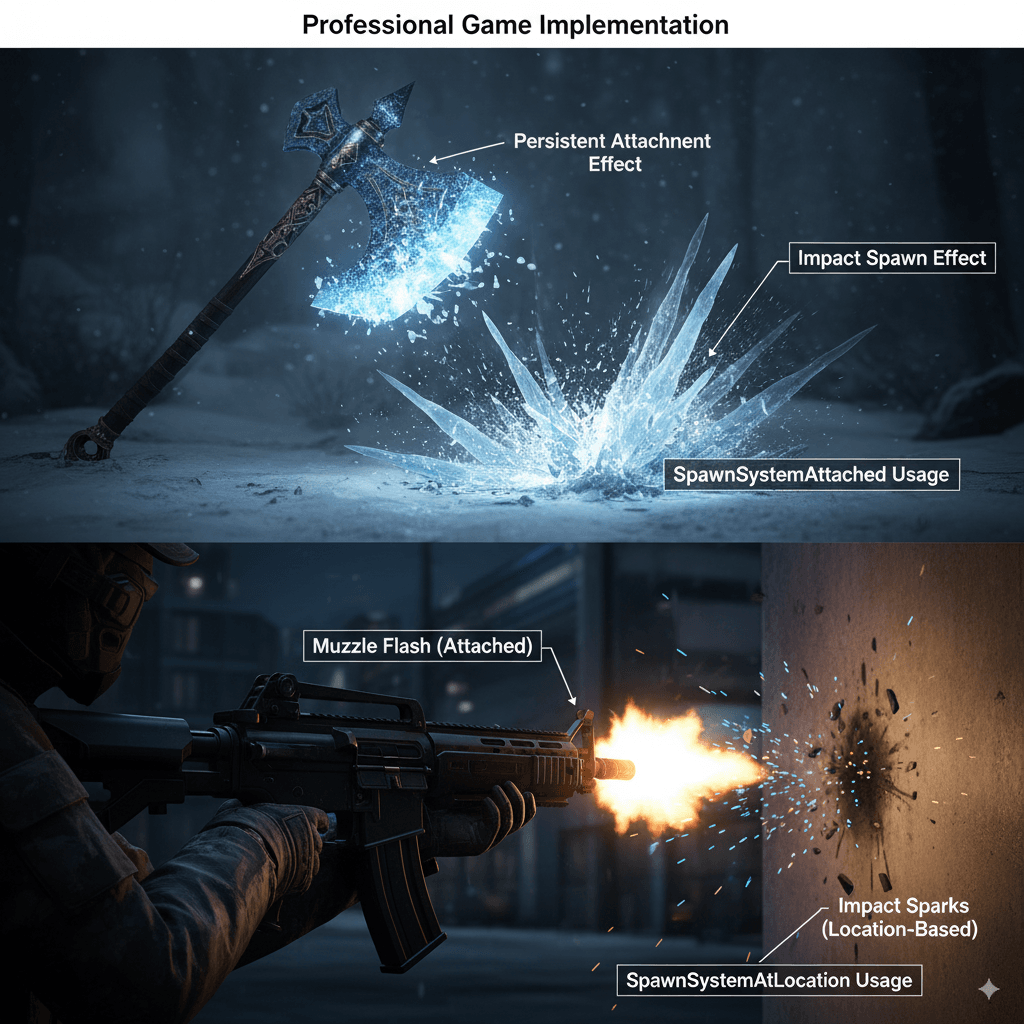
The Leviathan Axe in God of War (2018/2022)
This showcases perfect VFX implementation. The frost effects constantly shimmer on the axe's surface, reinforcing its magical nature without being distracting. When it impacts an enemy or surface, there's a satisfying burst of ice particles that makes every hit feel powerful and meaningful.
Cyberpunk 2077's Combat Effects
These effects demonstrate how VFX can make action feel visceral and informative simultaneously. The bright, stylized muzzle flashes and electrical sparks from enemy impacts create a chaotic but readable battlefield environment.
These examples taught me that the best VFX serve the gameplay first and look spectacular second. They're not just visual candy - they're functional communication tools that happen to look amazing.
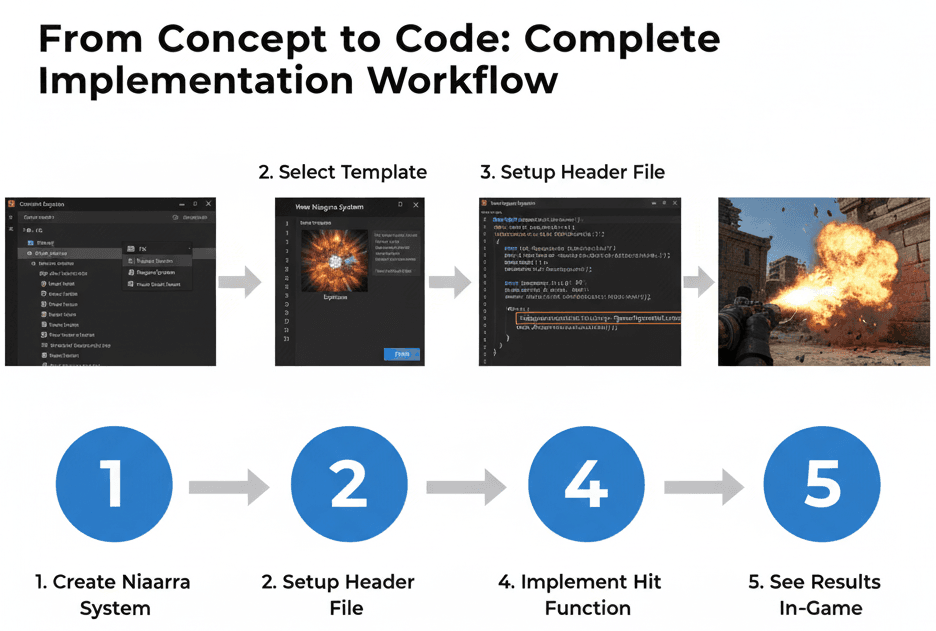
Let's Build Something: Two Complete VFX Walkthroughs
Alright, let's get our hands dirty. I'm going to walk you through two complete implementations that cover the most common scenarios you'll encounter. These are real patterns I use in production code.
Blueprint 1: Creating a Simple Fountain Effect
Our Goal: Build a continuous fountain effect that shoots particles up and lets gravity bring them down - perfect for water fountains, magical energy wells, or decorative elements.
- Right-click in the Content Browser and select
FX > Niagara System. - Choose "New system from selected emitters," select the "Fountain" template, and click the green plus icon, then "Finish."
- Name your new asset
NS_Fountainand open it. - In the "Emitter Update" section, find the
Spawn Ratemodule and set the rate to50. - In "Particle Spawn," locate the
Add Velocitymodule and change the Velocity's Z-value to500.0. - In "Particle Update," ensure there's a
Gravity Forcemodule. - In "Particle Update," add a
Scale Colormodule to fade particles over their lifetime.
Blueprint 2: Spawning an Impact Effect from Code
Our Goal: Create a particle effect that spawns exactly where a projectile hits something - essential for bullets, arrows, or fireballs.
Editor Setup: Create a Niagara System from the "Explosion" template and name it NS_Explosion. Then, create a C++ Actor class for your projectile (AMyProjectile).
Complete Code Implementation:
MyProjectile.h
#pragma once

#include "CoreMinimal.h"
#include "GameFramework/Actor.h"
#include "MyProjectile.generated.h"

class UNiagaraSystem;

UCLASS()
class AMyProjectile : public AActor
{
    GENERATED_BODY()
public:
    AMyProjectile();

protected:
    UPROPERTY(EditDefaultsOnly, Category = "Effects")
    UNiagaraSystem* ImpactVFX;

    UFUNCTION()
    void OnHit(UPrimitiveComponent* HitComp, AActor* OtherActor, UPrimitiveComponent* OtherComp, FVector NormalImpulse, const FHitResult& Hit);
};
MyProjectile.cpp
#include "MyProjectile.h"
#include "NiagaraFunctionLibrary.h"
#include "Components/SphereComponent.h" // Or whatever collision component you use

AMyProjectile::AMyProjectile()
{
    // ... (Assume you create a collision component and set it as the root)
    // MyCollisionComponent->OnComponentHit.AddDynamic(this, &AMyProjectile::OnHit);
}

void AMyProjectile::OnHit(UPrimitiveComponent* HitComp, AActor* OtherActor, UPrimitiveComponent* OtherComp, FVector NormalImpulse, const FHitResult& Hit)
{
    if (ImpactVFX)
    {
        // Spawn the Niagara System at the impact point
        UNiagaraFunctionLibrary::SpawnSystemAtLocation(GetWorld(), ImpactVFX, Hit.ImpactPoint, Hit.ImpactNormal.Rotation());
    }
    // Destroy the projectile after impact
    Destroy();
}
This pattern is incredibly versatile. I use variations of this code for bullet impacts, magical projectiles, and even area-of-effect spell targeting.
What This All Means for Your Game Development Journey
Here's the thing I wish someone had told me when I was starting: mastering visual effects in UE5 isn't just about making games look better. It's about becoming a complete game developer who understands how to communicate with players through every aspect of your game.
You'll know you're getting good at this when you stop thinking about individual particles and start thinking about player emotions. When you can look at a gameplay moment and immediately know what kind of visual feedback would make it more satisfying, more clear, or more exciting - that's when you've leveled up from someone who can use tools to someone who can craft experiences.
Key Takeaways
- Niagara is your go-to system for all new visual effects in UE5 - ignore older Cascade tutorials and focus on learning the modern approach that offers superior performance and flexibility.
- Master the two core spawning patterns - use
SpawnSystemAtLocationfor one-shot effects like impacts and explosions, andSpawnSystemAttachedfor persistent effects that follow game objects. - Visual effects are communication tools first, decoration second - every effect should provide clear feedback about game state, player actions, or environmental conditions.
- Start with simple implementations and iterate - build basic fountain and impact effects before attempting complex magical spells or cinematic sequences.
- Use UNiagaraComponent for persistent effects that need runtime control, allowing you to activate, deactivate, and modify parameters based on gameplay conditions.
- Performance testing should happen early and often - visual effects can quickly become performance bottlenecks, so test on your target hardware specifications throughout development.
- Study successful game implementations - analyze how games like God of War and Cyberpunk 2077 use visual effects to enhance both gameplay clarity and emotional impact.
- The Stack structure (Emitter Spawn, Particle Spawn, Particle Update) provides the organizational framework for all your effect logic - understand this hierarchy to build more complex systems.
Common Questions
What is a Niagara System and how is it different from an Emitter?
A Niagara System is the complete, self-contained asset you place in your game world, while an Emitter defines the behavior of a single stream of particles. Think of the System as a complete fireworks show and each Emitter as one type of firework within that show. You can have multiple Emitters within one System to create complex, layered effects.
How do I spawn a visual effect when my player shoots a weapon?
Use UNiagaraFunctionLibrary::SpawnSystemAtLocation(GetWorld(), MuzzleFlashEffect, WeaponSocketLocation) in your weapon's fire function. Attach the effect to a socket on your weapon mesh so it spawns at the correct barrel location every time the player fires.
When should I use SpawnSystemAttached versus SpawnSystemAtLocation?
Use SpawnSystemAttached for effects that need to follow moving objects like character auras, engine trails, or weapon glows. Use SpawnSystemAtLocation for one-shot effects like impacts, explosions, or pickup confirmations that happen at a specific point and then finish naturally.
Why does everyone say to avoid Cascade if it seems simpler?
Cascade is the deprecated legacy system from older Unreal Engine versions. While it might seem easier initially, it's CPU-based, performs poorly on modern hardware, and has severe limitations for complex effects. Learning Cascade means learning outdated technology that won't help your career. Niagara is more powerful, performs better, and is the industry standard.
How do I make my particles follow physics like bouncing off surfaces?
In your Niagara Emitter's Particle Update section, add collision modules like "Collision (Scene Depth)" for simple surface bouncing. For more complex physics interactions, use the "Physics" modules that can interact with Unreal's physics system, allowing particles to respond to wind, gravity, and collisions realistically.
What's the difference between Particle Spawn and Particle Update in the Stack?
Particle Spawn modules execute once when each individual particle is created - this is where you set initial velocity, color, and size. Particle Update modules execute every frame for every living particle - this is where you apply forces, change colors over time, or handle collisions. Understanding this distinction is crucial for efficient effect design.
How can I control visual effects from Blueprint instead of C++?
You can absolutely use Blueprints! Use the "Spawn Niagara System at Location" and "Spawn Niagara System Attached" Blueprint nodes, which wrap the same C++ functions I showed you. The Blueprint approach is perfect for rapid prototyping and non-programmers, while C++ gives you more control and better performance.
My visual effects are causing frame rate drops - how do I optimize them?
Start by reducing particle counts and checking if you're spawning too many systems simultaneously. Use the Stat Niagara console command to see performance metrics. Consider using LOD (Level of Detail) systems to reduce effect complexity at distance, and always test on your minimum target hardware, not your development machine.