Mastering Collision in Unity: From Frustrating Bugs to Flawless Game Mechanics
Learn Unity's collision system systematically to create believable game worlds where objects interact physically and predictably
Picture this: You've just spent weeks perfecting your character's animations, carefully tuning the movement speed, and polishing every visual detail. You hit play, confident that everything will work perfectly. Your character takes a step forward and... falls straight through the ground into an endless void.
I remember when this exact scenario happened during my early days learning Unity. The character model looked perfect, the ground was clearly visible, but somehow the collision in Unity just wasn't working. I spent hours checking transforms, repositioning objects, and even questioning whether I understood basic physics at all.
Here's what I learned the hard way: Unity's collision system isn't magic. It's a systematic approach to making digital objects interact with each other in a physical way. Think of it like giving your game objects invisible, intangible shells that the physics engine can see and react to. Once you understand how these invisible shells work and how to configure them properly, you'll never have that sinking feeling of watching your character disappear into the abyss again.
The beauty of Unity's collision system is that it solves the fundamental problem every game developer faces - making things feel solid and interactive in a digital world. Whether you're building a simple platformer or a complex 3D adventure, mastering collision detection in Unity is the foundation that makes everything else possible.
Table of Contents
- What Really Happens When Game Objects Bump Into Each Other
- The Essential Collision Vocabulary Every Unity Developer Needs
- Writing Your First Collision Detection Code (Both 2D and 3D)
- When to Use Physical Collisions vs. Trigger Zones
- Real Games That Nail Collision Detection (And What We Can Learn)
- My Step-by-Step Process for Bulletproof Collision Systems
- Performance Tricks I Wish Someone Had Taught Me Earlier
- Three Complete Project Blueprints You Can Build Right Now
What Really Happens When Game Objects Bump Into Each Other
At Carnegie Mellon, we spent a lot of time studying how digital physics engines work. But here's the thing - you don't need a computer science degree to understand Unity's collision system. At its core, it's solving one simple problem: making digital objects interact with each other in a way that feels real.
Unity's collision system works like playing pool. The cue ball, the other balls, and the table edges all have defined shapes and rules for how they interact when they touch. Unity provides both those shapes (called Colliders) and the rules (the physics engine). This combination allows you to build complex, emergent gameplay based on simple physical interactions.
When I explain this to students, I always use the analogy of invisible bubbles around every object. These bubbles can detect when they touch other bubbles, and when they do, Unity can either make them bounce off each other realistically or simply trigger an event (like collecting a coin). The key insight is that these bubbles don't have to perfectly match what you see on screen - they're optimized for performance and gameplay, not visual accuracy.
This system enables everything from a character standing firmly on the ground to a basketball bouncing realistically off a backboard. The magic happens when you combine simple collision rules to create complex, believable interactions that players can intuitively understand and predict.
The Essential Collision Vocabulary Every Unity Developer Needs
Before we dive into code, let me share the vocabulary that took me months to fully understand. These terms are the building blocks for all physical interactions in Unity, and getting them clear in your head will save you countless debugging hours.
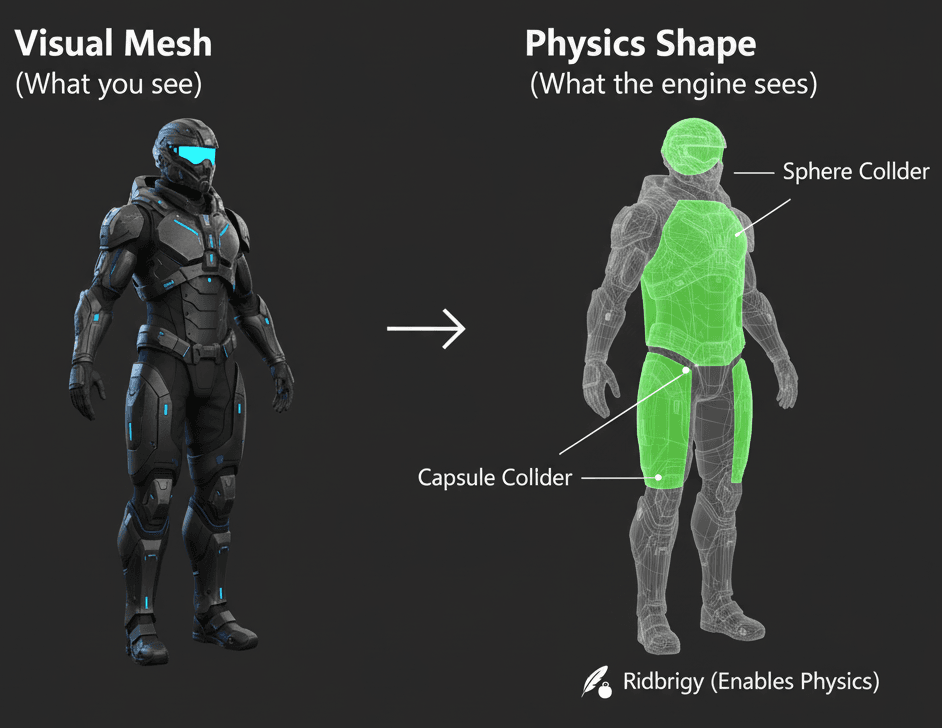
Collider / Collider2D: This is an invisible component that defines the physical shape of a GameObject for collision detection. Here's the crucial part I wish someone had told me earlier - the Collider's shape doesn't have to perfectly match the visual mesh of the object. Simpler shapes are often used for better performance.
Rigidbody / Rigidbody2D: This component allows a GameObject to be controlled by Unity's physics engine, enabling it to react to forces like gravity and collisions with other objects. For any collision to be registered and acted upon, at least one of the interacting GameObjects must have a Rigidbody component.
Static Collider: A GameObject that possesses a Collider component but lacks a Rigidbody is considered a static collider. This means it's expected to remain stationary and will not be moved by physics interactions. Think walls, floors, and platforms.
Dynamic Rigidbody: This refers to a GameObject that has both a Collider and a Rigidbody component, allowing it to be fully simulated by the physics engine. These objects can move, fall, and react to forces from other objects.
Kinematic Rigidbody: This is a special type of Rigidbody that is not affected by the physics engine's forces but can still be moved via its Transform. This is perfect for player-controlled characters or animated platforms that need to interact with other physics objects.
Trigger: A Collider can be configured as a Trigger by checking its "Is Trigger" property. This causes it to detect when other Colliders enter its volume without causing a physical collision response. This is ideal for creating zones that initiate events, like opening a door or collecting a power-up.
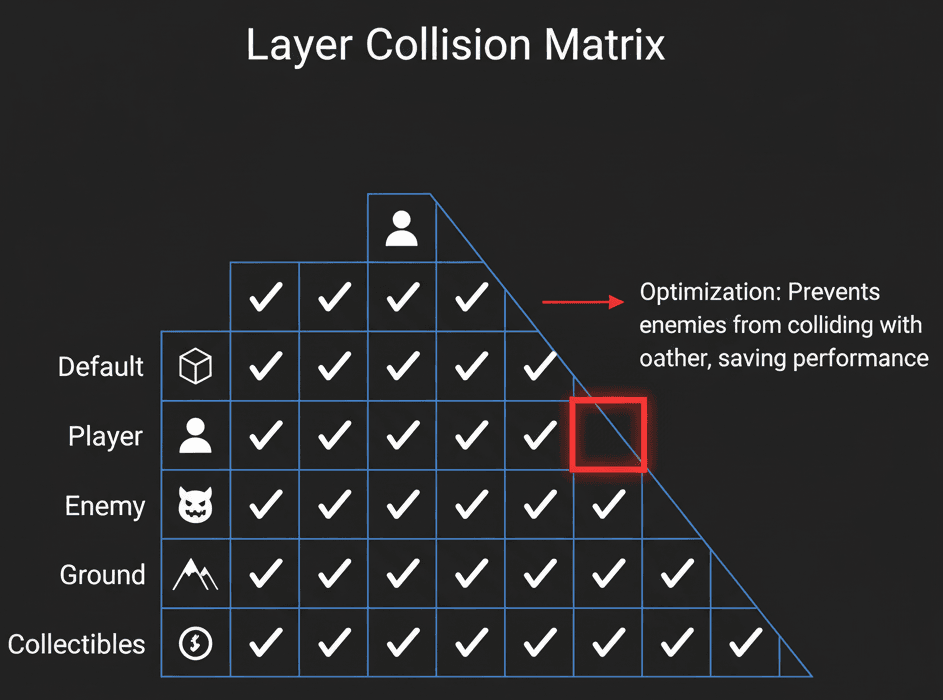
Collision Matrix: Found in the Project Settings, the Layer Collision Matrix is a powerful optimization tool that allows you to define which layers of GameObjects are allowed to interact with each other, preventing unnecessary physics calculations.
Writing Your First Collision Detection Code (Both 2D and 3D)
Now let's get our hands dirty with some actual code. Understanding the components is just the first step - the real magic happens when you bring them to life with scripts. Here's how to detect collision in Unity using the essential collision events.
Colliders Define the Shape
Colliders are the foundation of the collision system. You add them to your GameObjects to give them a physical presence that the physics engine can understand.
Rigidbodies Enable Physics Simulation
For objects to move and react to collisions in a physically realistic way, they need a Rigidbody. This component tells Unity to apply forces, gravity, and collision responses to the GameObject.
Collision Events Are Handled in Scripts
Unity provides special functions that are automatically called on your scripts when a collision or trigger event occurs. The most common are OnCollisionEnter for physical collisions and OnTriggerEnter for trigger events.
3D Version
using UnityEngine;

public class CollisionDetector3D : MonoBehaviour
{
    // This function is called when this collider/rigidbody has begun touching another rigidbody/collider.
    void OnCollisionEnter(Collision collisionInfo)
    {
        // The 'collisionInfo' parameter contains information about the collision, like the object we hit.
        Debug.Log("Detected a physical collision with " + collisionInfo.gameObject.name);
    }
}
2D Version
using UnityEngine;

public class CollisionDetector2D : MonoBehaviour
{
    // This function is called when an incoming collider makes contact with this object's collider (2D physics only).
    void OnCollisionEnter2D(Collision2D collisionInfo)
    {
        // The 'collisionInfo' parameter works similarly, providing details about the 2D collision event.
        Debug.Log("Detected a 2D physical collision with " + collisionInfo.gameObject.name);
    }
}
Triggers Detect Overlaps Without Physical Interaction
When you need to know if an object has entered a specific area without stopping its movement, you use a trigger. This is perfect for collectibles, checkpoints, or detection zones.
3D Version
using UnityEngine;

public class TriggerZone3D : MonoBehaviour
{
    // This function is called when another collider enters this object's trigger collider.
    void OnTriggerEnter(Collider other)
    {
        // The 'other' parameter is the collider of the object that entered our trigger zone.
        Debug.Log(other.gameObject.name + " has entered the trigger zone.");
    }
}
2D Version
using UnityEngine;

public class TriggerZone2D : MonoBehaviour
{
    // This function is called when another collider enters this object's trigger collider (2D physics only).
    void OnTriggerEnter2D(Collider2D other)
    {
        // In 2D, the parameter is of type Collider2D.
        Debug.Log(other.gameObject.name + " has entered the 2D trigger zone.");
    }
}
When to Use Physical Collisions vs. Trigger Zones
One question I get constantly from students is: "When should I use OnCollisionEnter versus OnTriggerEnter?" After working on dozens of Unity projects, I've developed a clear decision framework that I always share.
| Criteria | OnCollisionEnter | OnTriggerEnter |
|---|---|---|
| Best For | Creating solid, physical interactions where objects should realistically block, bounce, or push each other, such as walls, floors, and bouncing projectiles. | Detecting when an object enters a specific, non-physical area to initiate an event, like collecting coins, activating traps, or reaching a checkpoint. |
| Performance | Can be more performance-intensive as the physics engine must calculate and apply collision response forces, including friction and bounciness. | Generally more performant because the physics engine only needs to detect the overlap and does not calculate or apply any physical response forces. |
| Complexity | Implementation is straightforward for physical responses, but requires careful management of Rigidbody properties like mass and drag for desired behavior. | Simpler to implement for event-based logic, as you only need to react to the entry event without worrying about physical forces. |
| Code Example | void OnCollisionEnter(Collision col) { if(col.gameObject.tag == "Wall") { Debug.Log("Player hit a wall!"); } } |
void OnTriggerEnter(Collider other) { if(other.CompareTag("Player")) { Debug.Log("Player entered the zone!"); } } |
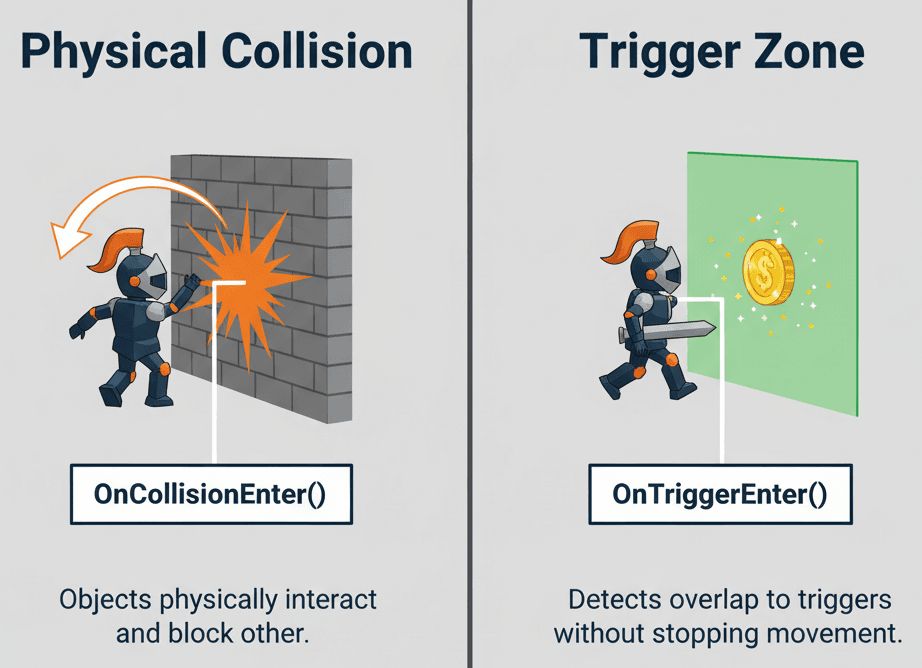
The key insight I learned during my time at KIXEYE is that most game mechanics actually use triggers, not physical collisions. Physical collisions are for when you want realistic physics responses. Triggers are for everything else - and that's most of your game logic.
Real Games That Nail Collision Detection (And What We Can Learn)
Let me share some brilliant implementations I've studied over the years. These examples show how simple collision systems create iconic gameplay mechanics.
Super Mario Bros.: The Art of Vertical Collision Checking
I've always been fascinated by how Super Mario Bros. handles Mario's ability to jump on Goombas to defeat them. This likely uses a combination of collision detection and scripting. A trigger or collider on the top of the Goomba detects a collision from Mario. A script then checks the vertical velocity or position of Mario relative to the Goomba. If Mario is descending and hits the top, the Goomba is defeated; otherwise, Mario takes damage.
The player experience here is brilliant - there's a satisfying and direct sense of interaction, where the physical act of jumping on an enemy has a clear and immediate consequence.
// Simplified example of Goomba logic
void OnCollisionEnter2D(Collision2D collision)
{
    if (collision.gameObject.CompareTag("Player"))
    {
        // Check if the player is coming from above
        if (collision.contacts[0].normal.y < -0.5)
        {
            Debug.Log("Goomba defeated!");
            Destroy(gameObject);
        }
    }
}
The Legend of Zelda: Breath of the Wild: Kinematic Physics Magic
What I find fascinating about Breath of the Wild's Magnesis rune system is how it demonstrates perfect kinematic rigidbody usage. When Magnesis is active, a raycast or sphere check likely identifies metallic objects. Once an object is selected, its Rigidbody is likely set to Kinematic, and its transform is updated to follow the player's reticle, allowing it to collide with and affect other dynamic objects in the world without being affected by gravity itself.
This system gives the player a powerful sense of control and agency over the game world, turning environmental objects into tools for solving puzzles and combat.
Portal: Momentum Conservation Through Collision
Here's one that blew my mind when I first analyzed it: Portal's objects passing through portals maintain their momentum. The portal surfaces are triggers. When an object with a Rigidbody enters a portal's trigger, a script captures its velocity vector. The object is then teleported to the corresponding exit portal's position, and the captured velocity is reapplied, but rotated relative to the exit portal's orientation.
This creates mind-bending puzzles and a unique sense of fluid motion, as the player learns to manipulate physics to their advantage.
My Step-by-Step Process for Bulletproof Collision Systems
After debugging countless collision issues, I've developed a systematic approach that I use in every project. Let me walk you through my exact method for implementing collision detection in Unity.
Use Layers and the Collision Matrix
I always categorize GameObjects into different layers (e.g., "Player", "Enemy", "Ground") and use the Layer Collision Matrix to prevent unnecessary collision checks. For example, you can prevent two enemies from colliding with each other.
To set this up, go to Edit > Project Settings > Physics (or Physics 2D) and use the matrix to uncheck interactions between specific layers.
Choose the Right Rigidbody Type
Here's something I learned the hard way: don't use a Dynamic Rigidbody for everything. If an object will be moved by scripts or animations but needs to affect other physics objects (like a moving platform), set its Rigidbody to Kinematic.
Favor Primitive Colliders
While Mesh Colliders can be precise, they are computationally expensive. Whenever possible, I use a combination of primitive colliders (Box, Sphere, Capsule) to approximate the shape of objects. This is known as creating a compound collider.
Use CompareTag for Efficiency
When checking what you've collided with, using other.gameObject.CompareTag("Player") is more efficient and generates less garbage than other.gameObject.tag == "Player".
// Less efficient way
if (other.gameObject.tag == "Player")
{
    // Logic here
}

// More efficient way
if (other.gameObject.CompareTag("Player"))
{
    // Logic here
}
Performance Tricks I Wish Someone Had Taught Me Earlier
During my early projects, I made every performance mistake you can imagine with collision systems. Here are the optimization techniques that actually matter for student projects.
Collision Matrix: Your Best Friend for Performance
Understanding tools like the Layer Collision Matrix allows you to tell the physics engine which interactions to ignore, significantly reducing the computational overhead and improving your game's performance.
Kinematic vs Dynamic: Choose Wisely
Don't use Dynamic Rigidbodies for everything. Moving platforms, elevators, and player-controlled characters often work better as Kinematic Rigidbodies.
Compound Colliders Beat Complex Meshes
Complex mesh colliders look accurate but kill performance. I always use combinations of simple shapes instead.
Tag Comparison Optimization
This small optimization adds up when you're checking hundreds of collisions per frame. Always use CompareTag() instead of direct string comparison.
Three Complete Project Blueprints You Can Build Right Now
Let me share three complete implementation guides that I use when teaching collision systems. These are the exact approaches I use when starting new projects.
Blueprint 1: Reliable Character Ground Check
Scenario Goal: Create a system that reliably detects if a player character is touching the ground, which is essential for enabling a jump mechanic.
Unity Editor Setup:
- Create a "Player" GameObject.
- Add a
Rigidbody(orRigidbody2D) and aCapsuleCollider(orCapsuleCollider2D) to the Player. - Create a "Ground" GameObject with a
BoxCollider(orBoxCollider2D). - Create a new Layer named "Ground" and assign the "Ground" GameObject to this layer.
3D Version
using UnityEngine;

public class PlayerController : MonoBehaviour
{
    public float moveSpeed = 5f;
    public float jumpForce = 7f;
    private Rigidbody rb;
    private bool isGrounded;

    void Start()
    {
        rb = GetComponent();
    }

    private void OnCollisionStay(Collision collision)
    {
        // Check if the object we are colliding with is on the "Ground" layer.
        if (collision.gameObject.layer == LayerMask.NameToLayer("Ground"))
        {
            isGrounded = true;
        }
    }

    private void OnCollisionExit(Collision collision)
    {
        // When we stop colliding with the ground, we are no longer grounded.
        if (collision.gameObject.layer == LayerMask.NameToLayer("Ground"))
        {
            isGrounded = false;
        }
    }

    void Update()
    {
        // Check for the jump button (default is Space bar) and if the player is grounded.
        if (Input.GetButtonDown("Jump") && isGrounded)
        {
            // Apply an upward force to the Rigidbody to make the player jump.
            rb.AddForce(Vector3.up * jumpForce, ForceMode.Impulse);
        }
    }
}
2D Version
using UnityEngine;

public class PlayerController2D : MonoBehaviour
{
    public float moveSpeed = 5f;
    public float jumpForce = 7f;
    private Rigidbody2D rb;
    private bool isGrounded;

    void Start()
    {
        rb = GetComponent();
    }

    private void OnCollisionStay2D(Collision2D collision)
    {
        if (collision.gameObject.layer == LayerMask.NameToLayer("Ground"))
        {
            isGrounded = true;
        }
    }

    private void OnCollisionExit2D(Collision2D collision)
    {
        if (collision.gameObject.layer == LayerMask.NameToLayer("Ground"))
        {
            isGrounded = false;
        }
    }

    void Update()
    {
        if (Input.GetButtonDown("Jump") && isGrounded)
        {
            rb.AddForce(Vector2.up * jumpForce, ForceMode2D.Impulse);
        }
    }
}
Blueprint 2: Interactive Item Pickup System
Scenario Goal: Implement a system where a player can walk over an item (like a coin or health pack) to "pick it up," destroying the item and triggering an effect.
Unity Editor Setup:
- A "Player" GameObject with a
Rigidbodyand aCollider. - A "Coin" prefab with a
Colliderset to be a Trigger. - Assign the "Player" GameObject to the "Player" tag.
3D Version
using UnityEngine;

public class PickupItem : MonoBehaviour
{
    // This function is called when another Collider enters this GameObject's trigger Collider.
    private void OnTriggerEnter(Collider other)
    {
        // We use CompareTag for an efficient check to see if the object that entered is the Player.
        if (other.CompareTag("Player"))
        {
            // If it is the player, we log a message and then destroy the coin GameObject.
            Debug.Log("Coin collected!");
            Destroy(gameObject);
        }
    }
}
2D Version
using UnityEngine;

public class PickupItem2D : MonoBehaviour
{
    // The 2D version of the function takes a Collider2D as its parameter.
    private void OnTriggerEnter2D(Collider2D other)
    {
        if (other.CompareTag("Player"))
        {
            Debug.Log("2D Coin collected!");
            Destroy(gameObject);
        }
    }
}
Blueprint 3: Automatic Sliding Door
Scenario Goal: Create a door that automatically opens when the player approaches it and closes when the player moves away.
Unity Editor Setup:
- A "Player" GameObject with a
RigidbodyandCollider, tagged as "Player". - A "Door" parent GameObject.
- As a child of "Door", create a "DoorFrame" with a
BoxCollider. - As another child of "Door", create a "DoorTrigger" with a large
BoxColliderset to be a Trigger. This trigger area will detect the player. - The actual sliding door panel (e.g., a Cube) as a child of "Door", which will be animated.
using UnityEngine;

public class DoorController : MonoBehaviour
{
    public Transform doorPanel; // The part of the door that will move
    public Vector3 openPosition; // The target position when the door is open
    public float moveSpeed = 3f;

    private Vector3 closedPosition; // The starting position of the door
    private bool isPlayerNear = false;

    void Start()
    {
        // Store the initial local position of the door panel as its closed state.
        closedPosition = doorPanel.localPosition;
    }

    private void OnTriggerEnter(Collider other)
    {
        if (other.CompareTag("Player"))
        {
            isPlayerNear = true;
        }
    }

    private void OnTriggerExit(Collider other)
    {
        if (other.CompareTag("Player"))
        {
            isPlayerNear = false;
        }
    }

    void Update()
    {
        Vector3 targetPosition = isPlayerNear ? openPosition : closedPosition;

        // Use Vector3.Lerp to smoothly interpolate the door's position over time.
        doorPanel.localPosition = Vector3.Lerp(doorPanel.localPosition, targetPosition, Time.deltaTime * moveSpeed);
    }
}
What You'll Gain from Mastering Unity's Collision System
Mastering collision in Unity isn't just a technical exercise - it's a gateway to creating compelling and dynamic gameplay. Here's what changes when you really understand collision detection:
Enables Core Gameplay Mechanics: Collision detection is the foundation for countless game mechanics, including jumping, shooting, driving, and any form of physical interaction between the player and the world.
Creates Believable and Immersive Worlds: Proper collision handling makes your game world feel solid and real. Players can stand on platforms, bump into walls, and interact with objects in a way that meets their real-world expectations.
Unlocks Emergent Gameplay: When you set up a robust physics-based collision system, you create the potential for unscripted, emergent situations where the interaction of simple physics rules leads to complex and interesting outcomes.
Improves Performance Through Optimization: Understanding tools like the Layer Collision Matrix allows you to tell the physics engine which interactions to ignore, significantly reducing the computational overhead and improving your game's performance.
From my experience helping hundreds of students transition into game development, mastering these fundamentals separates hobby projects from professional-quality games.
Your Next Steps
Start with the ground check blueprint - it's the foundation for almost every character controller. Once that's working smoothly, implement the pickup system to understand triggers. Finally, challenge yourself with the automatic door to see how collision detection can drive complex behaviors.
Practice with both 2D and 3D versions of each blueprint. The concepts are identical, but getting comfortable with both APIs will make you a more versatile developer.
Remember: every professional game developer has written thousands of collision detection scripts. The more you practice these patterns, the more natural they'll become.
Wrapping Up: From Falling Through Floors to Flawless Physics
That character falling through the floor that I mentioned at the beginning? It happened because I didn't understand the relationship between Colliders and Rigidbodies. Once I learned the systematic approach I've shared with you - setting up proper components, choosing the right collision types, and implementing the event functions correctly - those frustrating bugs became a thing of the past.
Unity's collision system might seem complex at first, but it's really just a set of tools for making objects interact believably. Master these fundamentals, and you'll have the foundation for creating any type of game mechanic you can imagine.
The collision in Unity system is your gateway to creating games that feel solid, responsive, and professionally polished.
Key Takeaways:
- Unity's collision system uses invisible Colliders and Rigidbodies to make objects interact physically
- OnCollisionEnter detects physical impacts, while OnTriggerEnter detects overlaps without physics response
- Layer Collision Matrix optimization prevents unnecessary collision calculations and improves performance
- Kinematic Rigidbodies are perfect for player-controlled characters and animated platforms
- Use CompareTag() instead of direct string comparison for better performance
- Primitive colliders (Box, Sphere, Capsule) are more efficient than complex Mesh Colliders
- Ground checking systems require OnCollisionStay and OnCollisionExit for reliable detection
- Trigger zones enable non-physical interactions like item collection and area detection
Common Questions
Collision detection in Unity is a system that allows game objects to detect when they touch or overlap with other objects. It uses invisible components called Colliders to define object shapes and Rigidbodies to enable physics interactions.
Use the OnCollisionEnter() function in a script attached to a GameObject with a Collider and Rigidbody. This function automatically runs when a collision occurs, giving you access to information about what was hit.
OnCollisionEnter detects physical collisions where objects bounce off each other, while OnTriggerEnter detects when objects overlap without any physical response. Triggers are perfect for pickups and zone detection.
Use Unity 2D collision (with Collider2D and Rigidbody2D) for 2D games like platformers or top-down games. Use 3D collision (Collider and Rigidbody) for 3D games. The concepts are identical, but the APIs are separate.
This usually happens when objects lack proper Colliders or when the collision matrix is set to ignore interactions between certain layers. Make sure both objects have Colliders and check your Physics settings.
Use the Layer Collision Matrix to prevent unnecessary collision checks, favor primitive colliders over mesh colliders, and use CompareTag() instead of string comparison when checking object types.
A Kinematic Rigidbody is not affected by physics forces but can still collide with other objects. Use it for player characters, moving platforms, or any object you want to control through scripts rather than physics.
Use OnCollisionStay() to continuously check if your character is touching ground-tagged objects, and OnCollisionExit() to detect when they leave the ground. This prevents issues with brief contact breaks.