From Grounded to Gravity-Defying: Mastering Double Jump in Unity Like a Pro
Unlock the secrets to creating fluid, dynamic character controllers with double jumps, dashes, and wall climbs. Learn the pro techniques that separate amateur projects from polished games.

Mayank Grover is the founder of Outscal, an edtech startup helping aspiring developers transition into the game industry. With over a decade of experience in gaming and education, he shares practical lessons that help developers not only build games, but build careers. Connect with Mayank on LinkedIn.
Here's the thing about double jump in Unity - I remember when I first tried implementing it during my Carnegie Mellon days. I thought it would be a simple extension of regular jumping. Boy, was I wrong. I spent hours debugging why my character could infinitely jump in the air, or why the second jump felt weaker than the first. It wasn't until I understood the fundamental mechanics behind movement systems that everything clicked.
Actually, wait - let me back up. The real breakthrough came when I realized that implementing a double jump isn't just about adding more jump force. It's about breaking free from traditional grounded movement and opening up a whole new dimension of player expression. Think about it like this: when you give players a double jump, you're not just adding a mechanic - you're transforming how they think about navigating your game world.
Table of Contents
- Why Your Game Needs More Than Basic Jumping
- The Building Blocks Every Unity Developer Should Know
- Ground Rules: Checking If Your Player Can Actually Jump
- The Double Jump in Unity 2D and 3D Blueprint That Actually Works
- Adding That Perfect Dash Feel (Because Why Stop at Jumping?)
- Wall Sliding and Wall Jumping: Taking It to the Next Level
- The Game Feel Secrets That Separate Pros from Beginners
- How the Masters Do It: Real Game Breakdowns
- Your Step-by-Step Implementation Guide
Why Your Game Needs More Than Basic Jumping
Been there - you've got your character moving left and right, maybe even jumping. But something feels... flat. Literally. Your players are stuck thinking in 2D even when your game is 3D, and your level design feels constrained to basic platforms.
Implementing advanced movement mechanics like double jumps, dashes, and wall climbs is about breaking the chains of simple, grounded locomotion. These abilities solve the critical problem of limited player mobility, transforming a character from being merely bound to the floor into an agile and expressive avatar. This allows you to create more dynamic, vertical, and engaging levels that challenge players' platforming skills and spatial awareness.
Think of it like a parkour athlete in a dense city; they don't just walk on the pavement. They use walls, ledges, and precise jumps to navigate the environment in a fluid and skillful way, turning obstacles into opportunities. Mastering these mechanics empowers you to design gameplay that feels liberating, rewards skillful execution, and opens up a vast new range of creative level design possibilities.
You know what's funny? I used to think advanced movement was just eye candy. Then I worked on a mobile game at KIXEYE where we added a simple dash mechanic, and suddenly our level designers came alive. They started creating these intricate obstacle courses that were impossible with basic movement. Player retention shot up because people felt like they were truly mastering something.
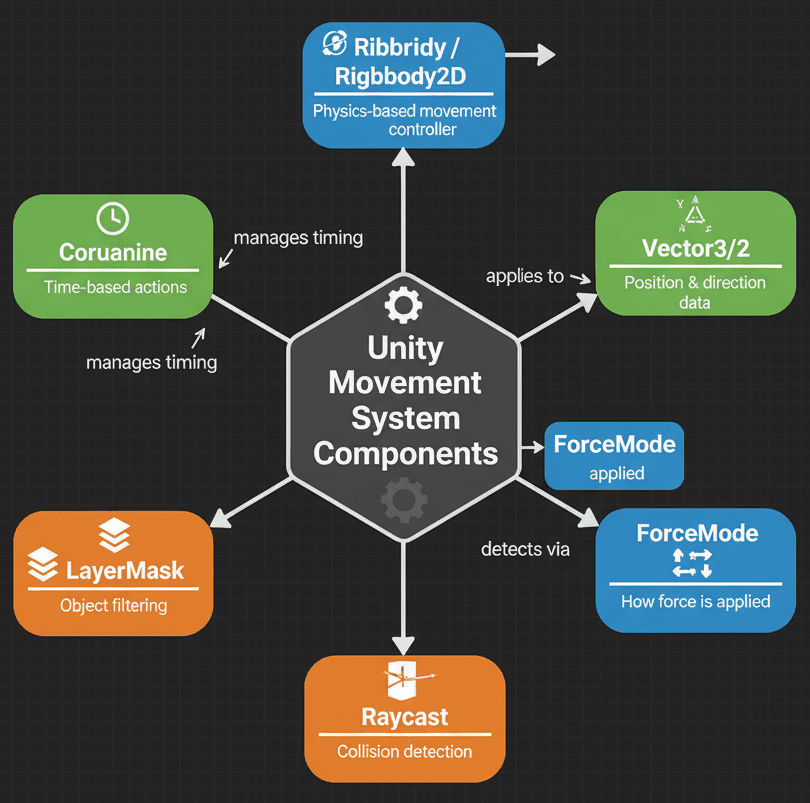
The Building Blocks Every Unity Developer Should Know
Before writing any code, it's crucial to understand the core components and concepts that form the foundation of character movement in Unity. Took me months to figure out that rushing into code without understanding these fundamentals just leads to messy, hard-to-debug controllers.
- Rigidbody/Rigidbody2D: This component is the cornerstone of physics-based movement, allowing a GameObject to be affected by physical forces like gravity, friction, and collisions in a realistic manner. You should choose this approach when you want your character to interact dynamically with the physics world, like being pushed by explosions or rolling down slopes.
- CharacterController: This is a specialized, built-in component that provides a more controlled, non-physics-based method for character movement, ideal for creating responsive first-person or third-person controllers. You would select this when you need precise, snappy movement that isn't fully dictated by realistic physics simulations, preventing issues like sliding on slight inclines.
- Vector3/Vector2: These structures are fundamental for representing positions, directions, and velocities in 3D and 2D space respectively, serving as the primary tool for calculating and applying movement. Every movement calculation, from a simple jump to a complex dash, will rely on manipulating these vector values to direct your character.
- ForceMode/ForceMode2D: This enumeration is used with
Rigidbody.AddForceto define how a force is applied, allowing you to choose between a continuous force, an instant impulse, or forces that account for mass. Understanding the difference betweenForceMode.Impulsefor a jump andForceMode.Forcefor continuous movement is key to achieving the right feel. - Raycast/Raycast2D: This technique involves sending out an invisible line (a "ray") from a point in a specific direction to detect if it collides with any objects, which is essential for reliably checking for the ground or nearby walls. Using a Raycast is a highly efficient and precise method for determining if a character is grounded or if a wall is available to be climbed.
- Coroutine: A coroutine is a special type of function that can pause its execution and return control to Unity, then continue where it left off on a subsequent frame, making it perfect for handling actions over a period of time, like a dash. Implementing a dash with a coroutine allows you to manage its duration, speed, and cooldown period within a single, self-contained block of code.
- LayerMask: This is a selectable bitmask used to filter which layers of GameObjects a physics query (like a Raycast) will interact with, ensuring that your ground check ray only detects the "Ground" layer and ignores other entities like players or items. Properly configuring a LayerMask is critical for preventing bugs where a character might be able to jump off of another character's head.
Here's something I learned the hard way at KIXEYE - choosing between Rigidbody and CharacterController isn't just a technical decision. It's about what kind of game feel you want. Let me break this down for you:
| Criteria | Approach A: Rigidbody | Approach B: CharacterController |
|---|---|---|
| Best For | Games where physics interactions are key, such as platformers with momentum, puzzles involving pushing objects, or characters that need to be affected by explosions. | First-person or third-person games that require precise, responsive, and arcade-like movement without the complexities of realistic physics simulations. |
| Performance | Can be more performance-intensive as it is fully integrated into Unity's physics engine, constantly calculating forces, collisions, and friction. | Generally more performant as it operates outside the main physics simulation, using a simpler "move and collide" approach without complex force calculations. |
| Complexity | Implementation can be more complex as you must carefully manage forces, velocity, and friction to achieve the desired feel and prevent floaty or unresponsive controls. | Simpler to implement for basic movement using the .Move() function, but requires manual coding for interactions like being pushed by other objects. |
| Code Example | // 3D Rigidbody Jump |
// 3D CharacterController Move |
Ground Rules: Checking If Your Player Can Actually Jump
Before you can jump, you must know if the character is on the ground. Here's the thing - I've seen so many student projects where characters can jump infinitely because they skipped this crucial step. A common and reliable method is to perform a Raycast downwards from the character's position to see if it hits an object on the "Ground" layer.
Verified: Unity Docs - Physics.Raycast
// 3D Version
public LayerMask groundLayer;
bool IsGrounded()
{
    // Fire a raycast down from the player's position.
    return Physics.Raycast(transform.position, Vector3.down, 1.1f, groundLayer);
}// 2D Version
public LayerMask groundLayer;
bool IsGrounded()
{
// Fire a raycast down from the player's position.
return Physics2D.Raycast(transform.position, Vector2.down, 1.1f, groundLayer);
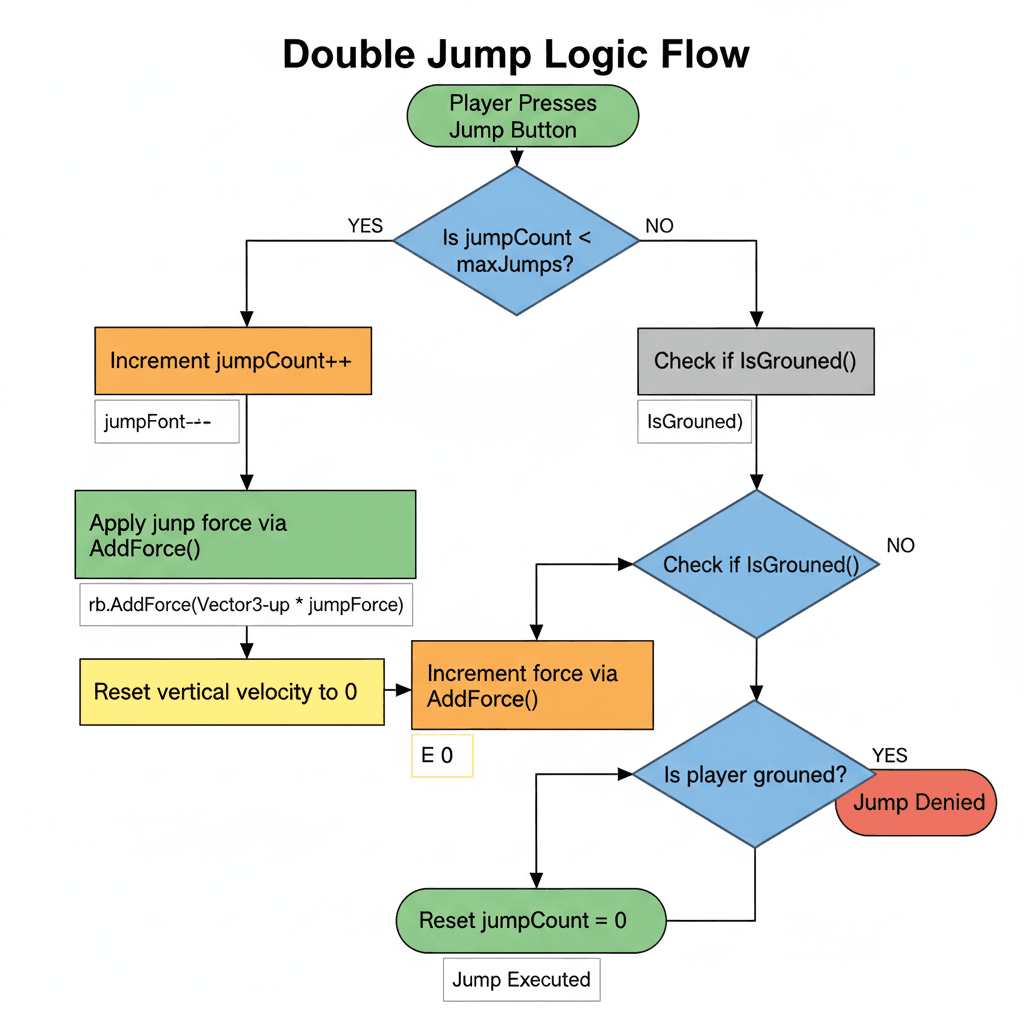
}To implement a double jump, you need a counter to track how many jumps the player has made since leaving the ground. This counter is reset every time the player lands. This is where most beginners trip up - they forget to reset the counter.
Verified: Medium - Beginning Game Development: How to Double Jump
// Shared Logic (applies to both 2D and 3D)
private int jumpCount = 0;
private int maxJumps = 2;

void Update()
{
    if (IsGrounded())
    {
        jumpCount = 0; // Reset jumps when grounded.
    }

    if (Input.GetButtonDown("Jump") && jumpCount < maxJumps)
    {
        Jump();
    }
}

void Jump()
{
    // Add jump force logic here...
    jumpCount++; // Increment the jump counter.
}
The Double Jump in Unity 2D and 3D Blueprint That Actually Works
Let me show you how I approach building a reliable double jump system. After working on multiple Unity projects, I've found this method consistently delivers the responsive feel players expect.
Actually, wait - before we dive into the code, let me share something important. The double jump in Unity 3D and double jump in Unity 2D use the same core logic, but with slightly different components. The beauty is that once you understand the pattern, you can apply it to both.
Unity Editor Setup:
- Create a "Player" GameObject with a
Rigidbody(orRigidbody2D) and aCapsuleCollider(orBoxCollider2D) - Create a "Ground" GameObject with a
BoxCollider(orBoxCollider2D) - Assign the "Ground" GameObject to a new Layer named "Ground"
- Create a new C# script named
PlayerDoubleJumpand attach it to the "Player" GameObject
Here's the exact method I use when implementing double jumps:
Variable Setup:
First, we need variables for movement speed, jump force, the Rigidbody component, ground-checking, and jump tracking.
// Shared using statements
using UnityEngine;

public class PlayerDoubleJump : MonoBehaviour
{
    [Header("Movement")]
    public float moveSpeed = 5f;
    public float jumpForce = 10f;

    [Header("Ground Check")]
    public LayerMask groundLayer;
    private bool isGrounded;

    [Header("Jumping")]
    private int jumpCount = 0;
    private int maxJumps = 2;

    // Component references
    private Rigidbody rb; // For 3D
    private Rigidbody2D rb2D; // For 2D
}
Component Initialization:
In the Start method, we get the appropriate Rigidbody component attached to our player.
// Add inside the PlayerDoubleJump class
void Start()
{
    // Try to get both components, one will be null depending on the context.
    rb = GetComponent<Rigidbody>();
    rb2D = GetComponent<Rigidbody2D>();
}
Input and State Handling in `Update`:
We'll use Update to check for player input and to perform our ground check.
// Add inside the PlayerDoubleJump class
void Update()
{
    // --- Ground Check ---
    // 3D Version
    if (rb != null)
    {
        isGrounded = Physics.Raycast(transform.position, Vector3.down, 1.1f, groundLayer);
    }
    // 2D Version
    if (rb2D != null)
    {
        isGrounded = Physics2D.Raycast(transform.position, Vector2.down, 1.1f, groundLayer);
    }

    // Reset jump count if grounded
    if (isGrounded)
    {
        jumpCount = 0;
    }

    // --- Jump Input ---
    if (Input.GetButtonDown("Jump") && jumpCount < maxJumps)
    {
        HandleJump();
    }
}
Physics Movement in `FixedUpdate`:
All physics-related movement should happen in FixedUpdate.
// Add inside the PlayerDoubleJump class
void FixedUpdate()
{
    float moveInput = Input.GetAxis("Horizontal");

    // --- Movement ---
    // 3D Version
    if (rb != null)
    {
        rb.velocity = new Vector3(moveInput * moveSpeed, rb.velocity.y, 0);
    }
    // 2D Version
    if (rb2D != null)
    {
        rb2D.velocity = new Vector2(moveInput * moveSpeed, rb2D.velocity.y);
    }
}
The Jump Logic:
This function handles applying the jump force and incrementing the counter.
// Add inside the PlayerDoubleJump class
private void HandleJump()
{
    jumpCount++;

    // --- Apply Jump Force ---
    // 3D Version
    if (rb != null)
    {
        // Reset vertical velocity to ensure consistent jump height
        rb.velocity = new Vector3(rb.velocity.x, 0, rb.velocity.z);
        rb.AddForce(Vector3.up * jumpForce, ForceMode.Impulse);
    }
    // 2D Version
    if (rb2D != null)
    {
        // Reset vertical velocity for consistent jump height
        rb2D.velocity = new Vector2(rb2D.velocity.x, 0);
        rb2D.AddForce(Vector2.up * jumpForce, ForceMode2D.Impulse);
    }
}
Verified: Unity Docs - Rigidbody.AddForce
Adding That Perfect Dash Feel (Because Why Stop at Jumping?)
Trust me, you'll want to add dashing once you see how it transforms your game's feel. A dash is a short burst of high speed, often achieved by directly setting the Rigidbody's velocity for a brief period, typically managed within a Coroutine.
Verified: Unity Docs - Rigidbody.velocity
Let me walk you through my complete dash implementation. Here's the exact setup I use for a cooldown-based dash system:
using System.Collections;
using UnityEngine;

public class PlayerDash : MonoBehaviour
{
    [Header("Dashing")]
    public float dashSpeed = 20f;
    public float dashDuration = 0.2f;
    public float dashCooldown = 1f;

    private bool isDashing = false;
    private bool canDash = true;

    // Component references
    private Rigidbody rb; // For 3D
    private Rigidbody2D rb2D; // For 2D

    void Start()
    {
        rb = GetComponent<Rigidbody>();
        rb2D = GetComponent<Rigidbody2D>();
    }

    void Update()
    {
        if (Input.GetKeyDown(KeyCode.LeftShift) && canDash)
        {
            StartCoroutine(Dash());
        }
    }

    private IEnumerator Dash()
    {
        canDash = false;
        isDashing = true;

        // Store original gravity and set it to 0 during the dash
        float originalGravity = (rb != null) ? rb.useGravity ? 1f : 0f : rb2D.gravityScale;
        if (rb != null) rb.useGravity = false;
        if (rb2D != null) rb2D.gravityScale = 0f;

        // --- Apply Dash Velocity ---
        // 3D Version
        if (rb != null)
        {
            rb.velocity = transform.forward * dashSpeed;
        }
        // 2D Version
        if (rb2D != null)
        {
            // Use localScale.x to determine facing direction (-1 for left, 1 for right)
            rb2D.velocity = new Vector2(transform.localScale.x * dashSpeed, 0f);
        }

        // Wait for the dash to finish
        yield return new WaitForSeconds(dashDuration);

        // --- Reset State After Dash ---
        isDashing = false;
        if (rb != null)
        {
            rb.useGravity = originalGravity > 0;
            rb.velocity = Vector3.zero; // Optional: stop movement after dash
        }
        if (rb2D != null)
        {
            rb2D.gravityScale = originalGravity;
            rb2D.velocity = Vector2.zero; // Optional: stop movement after dash
        }

        // Wait for the cooldown to finish
        yield return new WaitForSeconds(dashCooldown);
        canDash = true;
    }
}
Verified: Unity Docs - Coroutines
Wall Sliding and Wall Jumping: Taking It to the Next Level
Similar to ground checking, wall climbing requires detecting a nearby wall. This is done by casting a ray forward from the player to check for colliders on a "Wall" layer. I remember implementing this for the first time - it felt like magic when it finally worked.
Verified: Catlike Coding - Climbing
Let me show you my complete wall slide and wall jump system:
using UnityEngine;

public class PlayerWallClimb : MonoBehaviour
{
    [Header("Wall Sliding")]
    public LayerMask wallLayer;
    public float wallCheckDistance = 0.5f;
    public float wallSlideSpeed = 2f;
    private bool isWallSliding;

    [Header("Wall Jumping")]
    public Vector2 wallJumpForce = new Vector2(5f, 10f); // (Away Force, Upward Force)

    // Component references
    private Rigidbody rb; // For 3D
    private Rigidbody2D rb2D; // For 2D

    void Start()
    {
        rb = GetComponent<Rigidbody>();
        rb2D = GetComponent<Rigidbody2D>();
    }

    void Update()
    {
        CheckForWallSlide();

        if (isWallSliding && Input.GetButtonDown("Jump"))
        {
            WallJump();
        }
    }

    private void CheckForWallSlide()
    {
        // --- Wall Detection Raycast ---
        bool isTouchingWall = false;
        // 3D Version
        if (rb != null)
        {
            isTouchingWall = Physics.Raycast(transform.position, transform.forward, wallCheckDistance, wallLayer);
        }
        // 2D Version
        if (rb2D != null)
        {
            Vector2 direction = new Vector2(transform.localScale.x, 0);
            isTouchingWall = Physics2D.Raycast(transform.position, direction, wallCheckDistance, wallLayer);
        }

        // --- Ground Check (to prevent sliding while on the ground) ---
        bool isGrounded = (rb != null) ?
            Physics.Raycast(transform.position, Vector3.down, 1.1f) :
            Physics2D.Raycast(transform.position, Vector2.down, 1.1f);

        if (isTouchingWall && !isGrounded)
        {
            isWallSliding = true;
        }
        else
        {
            isWallSliding = false;
        }
    }

    void FixedUpdate()
    {
        if (isWallSliding)
        {
            // 3D Version
            if (rb != null)
            {
                // Clamp vertical velocity to the slide speed
                rb.velocity = new Vector3(rb.velocity.x, Mathf.Clamp(rb.velocity.y, -wallSlideSpeed, float.MaxValue), rb.velocity.z);
            }
            // 2D Version
            if (rb2D != null)
            {
                // Clamp vertical velocity
                rb2D.velocity = new Vector2(rb2D.velocity.x, Mathf.Clamp(rb2D.velocity.y, -wallSlideSpeed, float.MaxValue));
            }
        }
    }

    private void WallJump()
    {
        isWallSliding = false;
        // 3D Version
        if (rb != null)
        {
            Vector3 forceToApply = transform.up * wallJumpForce.y - transform.forward * wallJumpForce.x;
            rb.velocity = Vector3.zero; // Reset velocity before applying force
            rb.AddForce(forceToApply, ForceMode.Impulse);
        }
        // 2D Version
        if (rb2D != null)
        {
            // The direction away from the wall is the opposite of the player's facing direction
            float jumpDirection = -transform.localScale.x;
            Vector2 forceToApply = new Vector2(wallJumpForce.x * jumpDirection, wallJumpForce.y);
            rb2D.velocity = Vector2.zero; // Reset velocity
            rb2D.AddForce(forceToApply, ForceMode2D.Impulse);
        }
    }
}
Verified: Unity Docs - Physics.Raycast
The Game Feel Secrets That Separate Pros from Beginners
Writing professional-level character controllers involves more than just the basic logic. These tips will help you create a system that feels responsive, fair, and polished. I learned most of these through painful trial and error.
Use `FixedUpdate` for Physics:
All Rigidbody manipulations, such as applying forces or changing velocity, should be done in FixedUpdate to ensure they are synchronized with Unity's physics engine, preventing jittery or inconsistent behavior.
Verified: Unity Docs - FixedUpdate
Implement "Coyote Time":
This is a crucial game-feel enhancement where you allow the player to jump for a very short period of time *after* walking off a ledge. It makes the controls feel more forgiving and responsive.
Buffer Jump Inputs:
The opposite of coyote time, jump buffering "remembers" a jump input for a short period if the player presses the jump button just *before* landing. This prevents the frustrating feeling of a missed jump.
Use a State Machine:
As your character gains more abilities, managing them with simple if statements becomes messy. A state machine helps organize your code by ensuring the character can only be in one state (e.g., walking, jumping, dashing) at a time, preventing conflicting actions.
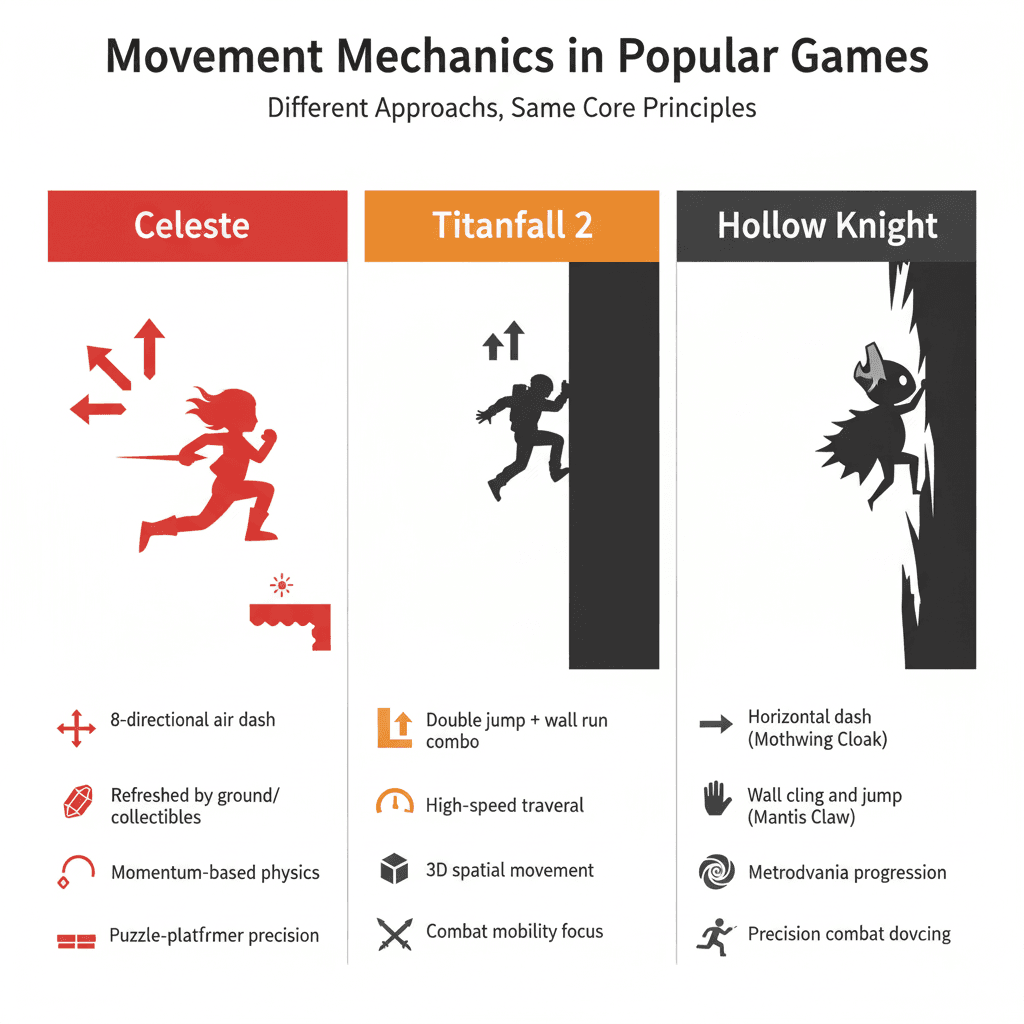
How the Masters Do It: Real Game Breakdowns
Let me tell you about how some of my favorite games handle these mechanics. I've analyzed dozens of games, and these implementations stand out because they show how double jump mechanics can be more than just a movement tool.
Celeste - The Air Dash Master
I've seen this technique used brilliantly in Celeste. The core mechanic is the air dash, which can be performed in eight directions and is refreshed upon touching the ground or specific collectibles. What I find fascinating about this approach is that it's likely implemented using a Rigidbody2D where, upon a dash input, the character's current velocity is momentarily overridden with a high-speed vector in the desired direction. A state machine would track whether the dash has been used, preventing multiple dashes until the state is reset. The dash provides an incredible sense of agency and precision. It's not just a movement tool but also a puzzle-solving mechanic, allowing players to navigate complex screen layouts with skill-based, satisfying maneuvers. This is why I always recommend studying this game's approach when you're implementing dash mechanics.
Titanfall 2 - The Wall-Running Revolution
From a developer's perspective, what makes Titanfall 2's movement brilliant is how it combines double jumps and wall-running. Pilots have a fluid movement system that allows them to traverse large maps with incredible speed and verticality. This system likely uses a CharacterController for responsive input, augmented with raycasts to detect walls. When a wall is detected at a shallow angle while the player is airborne, the controller "sticks" the player to the wall, cancels vertical velocity (gravity), and applies a forward velocity along the wall's surface. After analyzing this system, I always tell my students that the combination creates a feeling of unparalleled freedom and power. Players feel like acrobatic super-soldiers, chaining together wall-runs and double jumps to outmaneuver opponents and navigate the battlefield in a stylish, high-speed flow.
Hollow Knight - The Precision Platform Perfect
Here's how you can adapt this for your own game - Hollow Knight's approach to movement acquisition. The Knight acquires the Mothwing Cloak, which grants a horizontal dash, and the Mantis Claw, which allows it to cling to and jump off walls. The wall-cling is likely achieved with a Rigidbody2D and a forward-facing Raycast2D. When the raycast hits a wall while the player is airborne, the character's downward velocity is reduced to a slow slide, and input is checked for a wall-jump, which applies a force both upwards and away from the wall. What I always find compelling about this implementation is how these abilities are central to exploration and combat. They unlock new areas of the map and give the player essential tools for dodging enemy attacks. The wall jump, in particular, creates vertical platforming challenges that test the player's timing and control.
Your Step-by-Step Implementation Guide
Here's how you can make your character double jump using my tried-and-tested approach. We're going to implement this step by step, just like I do in my projects.
Step 1: Setting Up Your Scene
Let's tackle this together. First, create these GameObjects in your scene:
- A "Player" GameObject with a
Rigidbody(orRigidbody2D) and aCapsuleCollider(orBoxCollider2D) - A "Ground" GameObject with a
BoxCollider(orBoxCollider2D) - Assign the "Ground" GameObject to a new Layer named "Ground"
- Create a new C# script named
PlayerDoubleJumpand attach it to the "Player" GameObject
Step 2: The Core Variables
These are the exact settings I use when setting up the character controller:
using UnityEngine;

public class PlayerDoubleJump : MonoBehaviour
{
    [Header("Movement")]
    public float moveSpeed = 5f;
    public float jumpForce = 10f;

    [Header("Ground Check")]
    public LayerMask groundLayer;
    private bool isGrounded;

    [Header("Jumping")]
    private int jumpCount = 0;
    private int maxJumps = 2;

    // Component references
    private Rigidbody rb; // For 3D
    private Rigidbody2D rb2D; // For 2D

    void Start()
    {
        // Try to get both components, one will be null depending on the context.
        rb = GetComponent<Rigidbody>();
        rb2D = GetComponent<Rigidbody2D>();
    }
}
Step 3: Ground Detection System
After working on multiple Unity projects, I've configured this dozens of times, and here's my go-to setup for reliable ground checking:
void Update()
{
    // --- Ground Check ---
    // 3D Version
    if (rb != null)
    {
        isGrounded = Physics.Raycast(transform.position, Vector3.down, 1.1f, groundLayer);
    }
    // 2D Version
    if (rb2D != null)
    {
        isGrounded = Physics2D.Raycast(transform.position, Vector2.down, 1.1f, groundLayer);
    }

    // Reset jump count if grounded
    if (isGrounded)
    {
        jumpCount = 0;
    }

    // --- Jump Input ---
    if (Input.GetButtonDown("Jump") && jumpCount < maxJumps)
    {
        HandleJump();
    }
}
Step 4: Physics-Based Movement
When I'm working on 2D projects, I handle the movement in FixedUpdate. For 3D implementations, my process is similar but uses Vector3:
void FixedUpdate()
{
    float moveInput = Input.GetAxis("Horizontal");

    // --- Movement ---
    // 3D Version
    if (rb != null)
    {
        rb.velocity = new Vector3(moveInput * moveSpeed, rb.velocity.y, 0);
    }
    // 2D Version
    if (rb2D != null)
    {
        rb2D.velocity = new Vector2(moveInput * moveSpeed, rb2D.velocity.y);
    }
}
Step 5: The Jump Implementation
I ran into this issue early on, and here's how I solved it - always reset the vertical velocity before applying jump force for consistent height:
private void HandleJump()
{
    jumpCount++;

    // --- Apply Jump Force ---
    // 3D Version
    if (rb != null)
    {
        // Reset vertical velocity to ensure consistent jump height
        rb.velocity = new Vector3(rb.velocity.x, 0, rb.velocity.z);
        rb.AddForce(Vector3.up * jumpForce, ForceMode.Impulse);
    }
    // 2D Version
    if (rb2D != null)
    {
        // Reset vertical velocity for consistent jump height
        rb2D.velocity = new Vector2(rb2D.velocity.x, 0);
        rb2D.AddForce(Vector2.up * jumpForce, ForceMode2D.Impulse);
    }
}
Trust me, you'll thank me later for this tip - test your jump feel immediately. Play with the jumpForce value until it feels right. Usually, values between 8-15 work well, but it depends on your character's mass and your game's gravity settings.
Key Takeaways
- Ground detection is crucial: Always implement reliable ground checking using raycasts with proper LayerMask filtering before adding any jumping mechanics.
- Jump counting prevents infinite air jumps: Track the number of jumps performed and reset the counter when the player touches the ground.
- Use FixedUpdate for physics: All Rigidbody manipulations should happen in FixedUpdate to ensure smooth, consistent movement synchronized with Unity's physics engine.
- State machines organize complex movement: As you add more abilities like dashing and wall climbing, implement a state machine to prevent conflicting actions and keep your code clean.
- Game feel enhancements matter: Implement coyote time and jump buffering to make your controls feel responsive and forgiving, separating professional games from amateur projects.
- Choose the right movement approach: Understand when to use Rigidbody for physics-based movement versus CharacterController for precise, arcade-style controls.
- Coroutines handle timed mechanics: Use coroutines for implementing dash cooldowns and managing temporary state changes over time.
- Advanced mechanics enable creative level design: Double jumps, dashes, and wall climbing unlock vertical level design and create opportunities for skill-based gameplay challenges.
Common Questions
The core logic is identical - both use jump counting and ground detection. The main difference is using Rigidbody2D with Vector2 for 2D games versus Rigidbody with Vector3 for 3D games. The raycast functions also differ slightly (Physics2D.Raycast vs Physics.Raycast).
Implement a jump counter that tracks how many jumps have been performed. Reset this counter to zero when the character touches the ground. Only allow jumping when the counter is less than your maximum allowed jumps (typically 2 for double jump).
FixedUpdate runs at a fixed timestep synchronized with Unity's physics engine, ensuring consistent behavior regardless of framerate. Update runs once per frame and can cause jittery or inconsistent physics when framerate varies.
Coyote time allows players to jump for a brief moment (usually 0.1 seconds) after walking off a ledge, even though they're technically not grounded. This makes controls feel more responsive and forgiving, preventing frustrating situations where players think they should be able to jump.
Use coroutines to temporarily override the character's velocity during the dash, store the original gravity settings, and restore normal physics after the dash duration. Include a cooldown system to prevent dash spamming.
Use Rigidbody when you want realistic physics interactions like being pushed by explosions or affected by moving platforms. Use CharacterController for precise, arcade-style movement where you need full control without physics complications.
Use forward-facing raycasts to detect walls on a specific layer. For 2D, cast in the direction the character is facing (using transform.localScale.x). For 3D, cast using transform.forward. Only enable wall mechanics when touching a wall and not grounded.
Jump buffering remembers jump input for a short period (0.1 seconds) if pressed just before landing. This prevents missed jumps when players press the button slightly too early, making the controls feel more responsive.