Motion Capture Unreal Engine 5: From Awkward Actor to Realistic Character (The Real Developer's Guide)
Discover the complete developer's guide to implementing high-quality motion capture in your Unreal Engine 5 projects, from Live Link setup to professional animation retargeting.
Here's the thing about motion capture Unreal Engine 5 - I remember my first attempt at creating realistic character animation. I spent weeks keyframing every single movement, trying to make my character walk without looking like a robot having an existential crisis. The results? Let's just say my character moved like they were perpetually walking through invisible molasses.
Then I discovered motion capture. It was like switching from drawing stick figures to having a professional artist show up at your door. But here's what nobody tells you when you're starting out - mocap isn't just about strapping sensors to someone and hoping for the best. There's a whole ecosystem in Unreal Engine 5 that can make or break your mocap workflow, and I learned this the hard way during my early projects.
Table of Contents
- Why Motion Capture Changes Everything for Student Developers
- Breaking Down the Mocap Ecosystem (What Actually Matters)
- The Three Types of Motion Capture You Need to Know
- Live Link: Your Real-Time Connection to Professional Animation
- Recording with Take Recorder (Without Losing Your Mind)
- Animation Retargeting: Making Any Motion Work on Any Character
- Real Game Studios Are Using This Right Now
- Let's Build Something: iPhone Face Capture Walkthrough
- What This Unlocks for Your Game Projects
Why Motion Capture Changes Everything for Student Developers
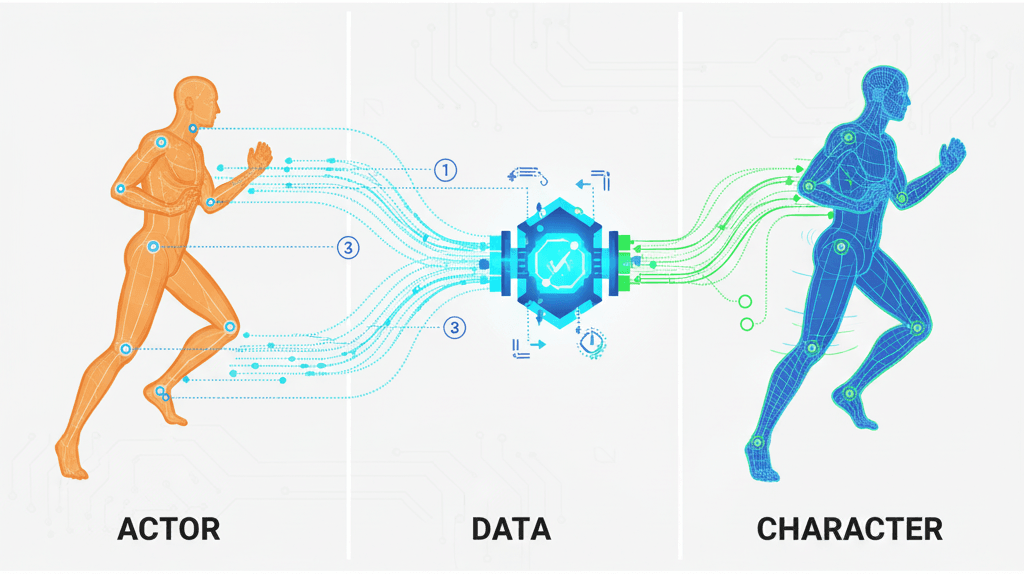
Motion capture, or "mocap" as we call it in the industry, is essentially digital tracing for animation. Remember when you were a kid and you'd trace over pictures to get perfect drawings? That's exactly what motion capture does for character animation, except instead of tracing a drawing, you're tracing real human movement and translating it into digital data to animate your 3D models.
The core problem it solves is something every game developer faces: creating realistic, lifelike animation is incredibly time-consuming and difficult to achieve with traditional keyframe animation. I've seen talented students spend months perfecting a single walk cycle, only to have it still look slightly off.
Motion capture allows you to create highly realistic and nuanced character performances, from subtle facial expressions to dynamic, full-body movements. Think about it - instead of guessing how a person naturally moves their shoulders when they're sad, you can capture the actual movement of a real person experiencing that emotion.
Breaking Down the Mocap Ecosystem (What Actually Matters)
Before diving into the technical implementation, you need to understand the different approaches and terminology. I learned this the hard way - jumping into mocap without understanding these fundamentals is like trying to cook without knowing the difference between salt and sugar.
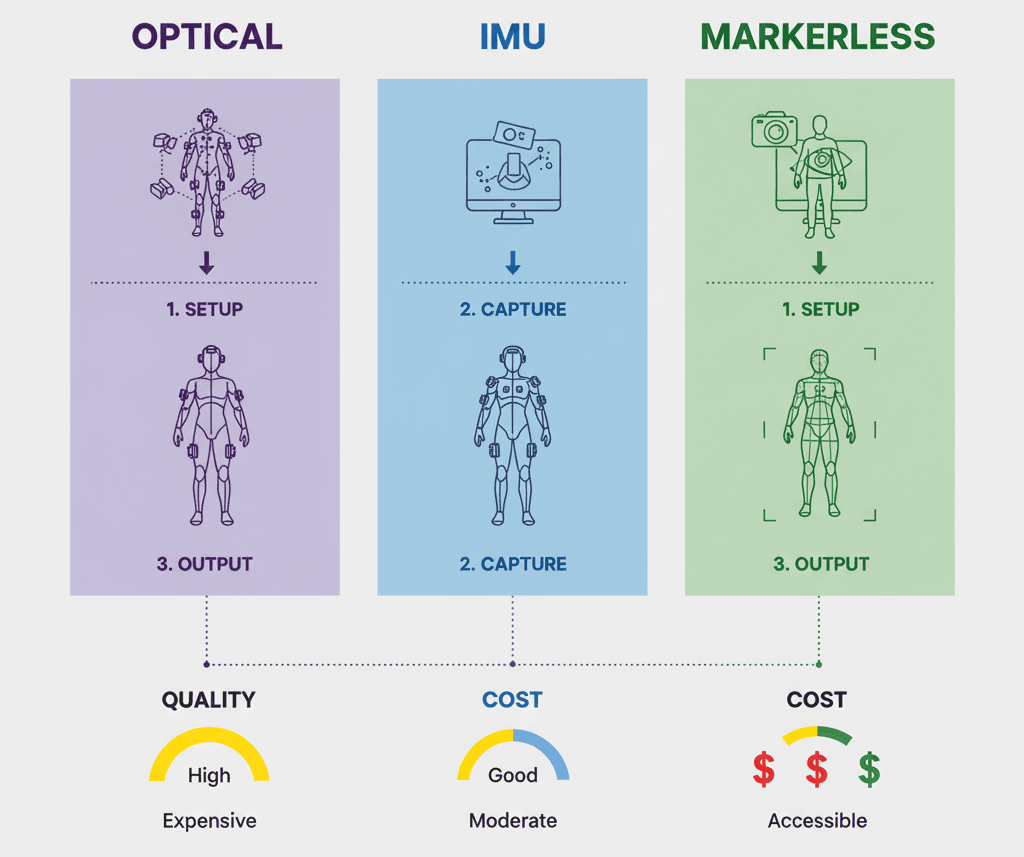
Optical Motion Capture uses cameras to track a series of markers attached to an actor's body. It's known for high accuracy and ability to capture large volumes. Think of those movie behind-the-scenes shots where actors are covered in ping pong balls - that's optical mocap.
Inertial Motion Capture (IMU - Inertial Measurement Units) uses a series of sensors placed on an actor's body to track their movement. IMU systems are more portable and less susceptible to occlusion than optical systems. These are great for indie developers because you don't need a specialized studio.
Markerless Motion Capture is the newest approach that uses computer vision and AI to track an actor's movement without markers or special suits. It offers a more convenient and less intrusive workflow - basically, just point a camera and go.
Here's what these terms actually mean in Unreal Engine 5:
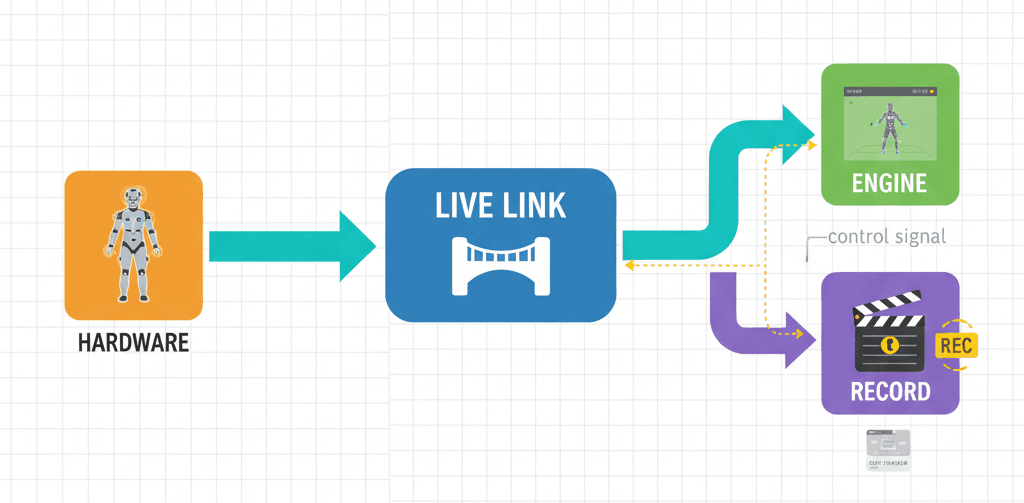
- Live Link is a powerful feature that allows you to stream data from external sources, such as motion capture systems, directly into the engine in real-time. This is your bridge between the physical world and your game.
- Take Recorder is a tool that allows you to record animation, including motion capture data, into a Level Sequence for later use. Think of it as your animation DVR.
- Animation Retargeting is the process of transferring animation from one skeleton to another. This is essential because your character probably has different proportions than your mocap actor.
- IK Rig (Inverse Kinematics Rig) is a system that allows you to control a character's limbs in a more intuitive way. In mocap context, IK Rigs help with retargeting by solving the mathematical puzzle of "if the hand needs to be here, where should the elbow be?"
The Three Types of Motion Capture You Need to Know
Let me break down the practical differences between these approaches, because choosing the wrong one for your project can waste weeks of development time:
| Criteria | Optical Motion Capture | Inertial Motion Capture | Markerless Motion Capture |
|---|---|---|---|
| Best For | High-end productions, precise full-body capture | Indie projects, portable setups, outdoor recording | Quick prototyping, facial capture |
| Accuracy | Extremely high (sub-millimeter precision) | Good (suitable for most game applications) | Variable (depends on lighting/setup) |
| Setup Time | Hours (calibration, marker placement) | Minutes (put on suit, calibrate sensors) | Seconds (point camera and record) |
| Cost | $50,000+ for professional systems | $1,000-$15,000 for decent systems | Free to $500 (just need good cameras) |
| Limitations | Requires controlled environment, markers can fall off | Drift over long takes, magnetic interference issues | Limited precision, lighting dependent |
Live Link: Your Real-Time Connection to Professional Animation
The core of the motion capture workflow in Unreal Engine revolves around Live Link. This is where things get exciting - Live Link is the bridge between your motion capture hardware and Unreal Engine, and it's surprisingly straightforward once you understand the setup.
You'll need to enable the Live Link plugin and the plugin for your specific mocap device. Here's the fundamental concept in code:
// This is a conceptual example. The actual implementation will vary depending on the device.
// In your project's build.cs file:
PublicDependencyModuleNames.AddRange(new string[] { "LiveLink", "YourMocapPlugin" });
What's happening here is that you're telling Unreal Engine to include the necessary modules for Live Link functionality. Each mocap device manufacturer provides their own plugin that works with Live Link.
The beauty of Live Link is that it works in real-time. When I first saw this in action at CMU, I was blown away - you could see the character moving in the engine at the exact same time as the actor in the mocap volume. It's like having a digital puppet that perfectly mimics your movements.
Verified: Unreal Engine Docs - Live Link
Recording with Take Recorder (Without Losing Your Mind)
Once your device is connected via Live Link, you use Take Recorder to record the motion capture data. Here's where many students get confused - they think recording is just hitting a button. Actually, there's a systematic approach that prevents hours of frustration later.
You can add the actor you want to animate to the Take Recorder and start recording. The process can be controlled through Python scripting, which is incredibly useful for batch operations:
# This is a conceptual example. Take Recorder is primarily a UI-based tool.
# You can, however, control it with Python scripting.
import unreal

# Get the Take Recorder panel
take_recorder_panel = unreal.TakeRecorderBlueprintLibrary.get_take_recorder_panel()

# Start recording
take_recorder_panel.start_recording()
What this code does is programmatically control Take Recorder, which becomes essential when you're doing multiple takes or working with a team. Instead of manually clicking through the interface every time, you can script your recording workflow.
Verified: Unreal Engine Docs - Take Recorder
Animation Retargeting: Making Any Motion Work on Any Character
After you've recorded your motion capture data, you'll need to retarget it to your character. This is where the magic happens - and where most students hit their first major roadblock. Animation retargeting is done using the IK Rig and IK Retargeter assets in Unreal Engine 5.
// This is a conceptual example. Retargeting is a visual process in the editor.
// You would create an IK Rig for your source and target skeletons,
// then create an IK Retargeter to map the bones between them.
Here's what's actually happening: Unreal Engine is solving complex mathematical problems to figure out how to translate motion from one skeleton structure to another. If your mocap actor is 6 feet tall and your game character is 4 feet tall, the engine calculates how to proportionally adjust every joint and bone.
The IK Rig system is particularly clever because it doesn't just scale movements - it preserves the intent of the motion. When someone reaches for an object, the retargeting system ensures your character's hand actually reaches the object, even if their arm proportions are completely different.
Verified: Unreal Engine Docs - IK Rigs
Comparing Your Options: Live vs Imported Workflows
When it comes to motion capture, you have two main approaches for getting the data into your project. Here's the honest comparison based on my experience with both:
| Criteria | Approach A: Live Link Recording | Approach B: Importing FBX |
|---|---|---|
| Best For | Real-time feedback, virtual production, and iterative workflows. | Offline workflows, batch processing, and working with external animation teams. |
| Performance | Can be performance-intensive, especially with multiple actors. | No real-time performance cost, as the animation is pre-recorded. |
| Complexity | Requires setting up Live Link and ensuring a stable connection. | Simpler setup, but requires exporting and importing files. |
| Code Example | unreal.TakeRecorderBlueprintLibrary.start_recording() |
unreal.EditorAssetLibrary.import_asset(source_path, dest_path) |
I typically recommend Live Link recording for student projects because you get immediate feedback. There's nothing quite like seeing your character move in real-time as you act out the motions. For FBX imports, you're working blind until you bring the data in and test it.
Real Game Studios Are Using This Right Now
Let me tell you about how professional studios are implementing these exact techniques in games you probably know and love.
The Last of Us Part II is known for its incredibly realistic and emotional character performances. Naughty Dog used a combination of full-body performance capture and facial capture to create the game's cinematics. This allowed them to capture the actors' performances with a high degree of fidelity. The realistic animation helps create a strong emotional connection between the player and the characters, making the story more impactful.
God of War (2018) features a single, unbroken camera shot for the entire playthrough. The developers used motion capture to create long, continuous takes of the actors' performances. This was then stitched together in the engine to create the seamless camera shot. The single-shot camera creates a very immersive and cinematic experience, making the player feel like they are right there with Kratos and Atreus.
Hellblade: Senua's Sacrifice features a main character who suffers from psychosis. The developers used motion capture to create a realistic and sensitive portrayal of her condition. The developers worked with neuroscientists and people who have experienced psychosis to ensure that their portrayal was accurate. They used motion capture to capture the subtle nuances of the actress's performance. The realistic animation helps create a powerful and empathetic portrayal of mental illness, allowing players to better understand the main character's struggles.
What's fascinating about these implementations is that they're all using the same fundamental techniques available in Unreal Engine 5. The difference is in the execution, attention to detail, and understanding of how to use mocap to serve the story.
The Professional Techniques You Should Know
Here are the optimization techniques I wish someone had taught me when I was starting out:
- Use a Clean Plate: When recording, it's good practice to record a "clean plate" of the actor in a neutral pose. This can be used to help with retargeting and to remove any unwanted offsets in the data. Basically, you're giving the system a reference point for "normal" before you start the actual performance.
- Use the Euler Filter to Clean Up Data: The Euler filter in the Animation Curve Editor can remove gimbal lock and other rotational artifacts from your motion capture data. Gimbal lock is a mathematical issue where you lose a degree of freedom in rotation - it makes animations look jerky and unnatural.
Verified: Unreal Engine Docs - Animation Curve Editor
- Use a Control Rig for Post-Mocap Adjustments: A Control Rig can be used to make adjustments to your motion capture data after it has been recorded. This is useful for fixing any errors or for adding secondary animation. Sometimes the mocap data is 95% perfect, but you need to tweak that final 5% to make it work perfectly in your game context.
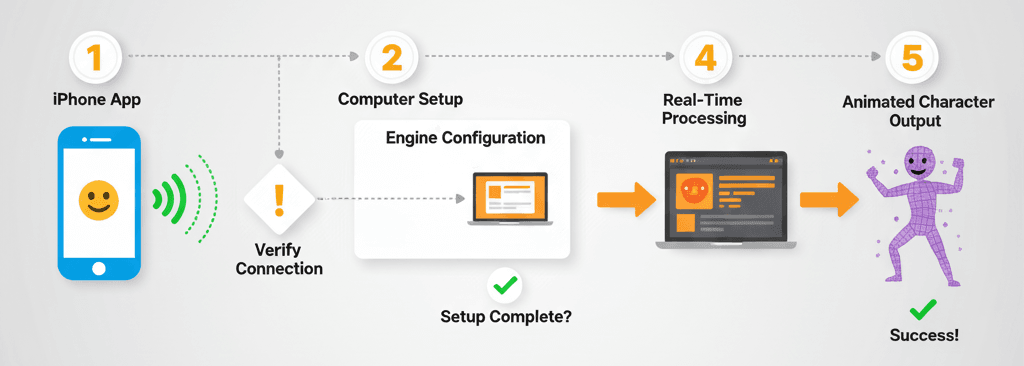
Let's Build Something: iPhone Face Capture Walkthrough
Here's the thing - I always tell my students to start with something they can actually build and test today. Face capture with an iPhone is perfect for this because almost everyone has the hardware needed.
Our Goal: Capture facial animation from an iPhone using the Live Link Face app and apply it to a character in Unreal Engine.
Setting Up Your Project:
- Enable the
Live LinkandARKitplugins in your project. - Download the Live Link Face app on your iPhone.
- Ensure your computer and iPhone are on the same Wi-Fi network.
- In Unreal Engine, open the Live Link window (
Window > Virtual Production > Live Link). - Add a
LiveLinkComponentto your character Blueprint.
The Implementation Process:
Connect to iPhone: In the Live Link window, add a new source and select Live Link Face. Your iPhone should appear in the list. Select it to connect.
Set Subject in Animation Blueprint: In your character's Animation Blueprint, add a Live Link Pose node. Select your iPhone as the Live Link Subject Name.
Connect to Output Pose: Connect the Live Link Pose node to the Output Pose node in your Animation Blueprint.
Drive Morph Targets: The Live Link Face app will stream blendshape (morph target) data to Unreal Engine. You can use this data to drive the morph targets on your character's face.
// In your character's Animation Blueprint, you can get the blendshape values from the Live Link component.
// This is a conceptual example, as it's typically done in the AnimGraph.
float BrowDownValue = LiveLinkComponent->GetBlendshapeValue("BrowDownLeft");
What this code does is extract specific facial expression data from the iPhone and apply it to your character. The "BrowDownLeft" corresponds to the left eyebrow moving down - one of the many facial expressions the iPhone can detect.
Verified: Unreal Engine Docs - Live Link Face
The beauty of this system is that you can see your character's face changing in real-time as you make different expressions. It's incredibly satisfying to see your digital character smile when you smile.
What This Unlocks for Your Game Projects
Mastering motion capture in Unreal Engine 5 opens up several game-changing advantages for your development projects:
- Achieve High-Fidelity Animation: Motion capture is the best way to create realistic and nuanced character animation that is difficult to achieve with traditional keyframing. Instead of spending weeks perfecting a walk cycle, you can capture natural movement in minutes.
- Increase Production Speed: For certain types of animation, motion capture can be significantly faster than keyframing, allowing you to create more content in less time. This is especially valuable for student projects where time is always limited.
- Enable Virtual Production: Real-time motion capture is a cornerstone of virtual production, allowing filmmakers to see their virtual characters and environments live on set. Even as a student, you can create impressive demo reels using these techniques.
- Create More Believable Characters: The subtle nuances of human movement captured with mocap can make your characters feel more alive and believable. Players can sense authentic movement, even if they can't articulate why it feels "right."
Ready to Start Building Your First Game?
Everything we've covered today - from Live Link setup to professional retargeting techniques - becomes even more powerful when you understand how to integrate these skills into complete game projects. If you're ready to go beyond tutorials and start building games that could actually ship, I've designed a course that takes you from basic concepts to creating professional-quality game experiences.
The course covers not just motion capture, but the entire game development pipeline: character creation, animation systems, gameplay programming, and the industry workflows that studios actually use. You'll work on real projects, build a portfolio that stands out to employers, and learn the problem-solving skills that separate hobbyists from professional game developers.
Start building your game development career here - because the game industry needs developers who understand both the technical skills and the creative vision to bring characters to life.
Your Next Steps
Based on everything we've covered, here's what I recommend you tackle first:
Start with the iPhone face capture walkthrough - it's the quickest way to see motion capture working in your own project. Once you've got that running, experiment with different expressions and see how the blendshapes respond.
Next, explore the different mocap approaches based on your budget and project needs. If you're working solo, markerless capture might be your best bet. If you're part of a team, consider pooling resources for an IMU system.
The learning path from here should include deeper dives into Animation Blueprints, understanding skeletal mesh optimization, and exploring how mocap integrates with gameplay systems. The foundation we've built today supports all of these advanced topics.
Key Takeaways
- Motion capture in Unreal Engine 5 uses Live Link as the bridge between hardware and engine, enabling real-time streaming of movement data directly into your project
- Three main mocap types serve different needs: Optical for high-end precision, IMU for portable indie setups, and markerless for quick prototyping and facial capture
- Take Recorder captures mocap data into Level Sequences and can be controlled programmatically through Python scripting for batch operations
- Animation retargeting with IK Rigs and IK Retargeter solves the mathematical challenge of applying motion from one skeleton to characters with completely different proportions
- Professional studios like Naughty Dog and Sony Santa Monica use these exact Unreal Engine 5 mocap techniques for AAA productions, proving the industry-standard nature of this workflow
- iPhone face capture through Live Link Face provides an immediately accessible entry point into mocap, requiring only an iPhone and Wi-Fi connection
- Clean plates, Euler filters, and Control Rigs are essential post-capture optimization techniques that separate amateur mocap from professional-quality results
- Real-time Live Link recording offers immediate feedback but requires stable connections, while FBX import workflows provide simpler setup for offline processing
Common Questions
What is motion capture and how does it work in Unreal Engine 5?
Motion capture records real-world movement and translates it into digital data for 3D character animation. In Unreal Engine 5, this works through Live Link, which streams data from mocap hardware directly into the engine, allowing real-time visualization and recording through Take Recorder.
How do I connect my motion capture device to Unreal Engine?
Enable the Live Link plugin and your device-specific plugin in your project, then add your device as a Live Link source in the Live Link window. Each device manufacturer provides compatible plugins that work with UE5's Live Link system.
What's the difference between optical, inertial, and markerless motion capture?
Optical mocap uses cameras to track markers on actors for high precision but requires controlled environments. Inertial mocap uses body-worn sensors that are more portable but can drift over time. Markerless uses AI and computer vision, requiring only cameras but with variable accuracy depending on conditions.
Do I need expensive equipment to start with mocap in UE5?
No - you can start with iPhone face capture using the free Live Link Face app, or use markerless solutions with standard cameras. Professional optical systems cost $50,000+, but IMU systems start around $1,000, and markerless solutions can cost as little as $500.
How does animation retargeting work with motion capture data?
Animation retargeting uses IK Rigs and IK Retargeter assets to mathematically translate motion from one skeleton structure to another. It preserves the intent of movements while adjusting for different character proportions, ensuring hands still reach objects even if arm lengths differ.
What is Take Recorder and why is it important?
Take Recorder captures motion capture data into Level Sequences for later use, essentially acting as your animation DVR. It can be controlled through Python scripting for batch operations and integrates seamlessly with Live Link data streams.
Can I use motion capture data from other software in Unreal Engine?
Yes, you can import FBX files containing mocap data from external applications. This approach is simpler for setup but lacks the real-time feedback benefits of Live Link recording, making it better suited for offline workflows.
How do professional game studios use motion capture?
Studios like Naughty Dog combine full-body and facial capture for emotional performances, while God of War uses continuous mocap takes for seamless cinematics. Hellblade demonstrates how mocap can accurately portray complex character conditions when combined with expert consultation.
What are the most common mistakes when starting with mocap in UE5?
Common mistakes include skipping the clean plate recording, not using Euler filters to remove rotational artifacts, inadequate retargeting setup, and expecting perfect results without post-capture refinement using Control Rigs.
Which approach should I choose: Live Link recording or importing FBX files?
Choose Live Link recording for real-time feedback, virtual production, and iterative workflows, but be prepared for performance overhead. Choose FBX import for offline workflows, batch processing, and when working with external animation teams, as it has no real-time performance cost.
How do I set up iPhone face capture with Live Link Face?
Download Live Link Face app on your iPhone, ensure both devices are on the same Wi-Fi network, enable Live Link and ARKit plugins in UE5, add your iPhone as a Live Link Face source, then connect the Live Link Pose node to your character's Animation Blueprint.
What optimization techniques should I know for mocap data?
Essential techniques include recording clean plates for reference, using Euler filters in the Animation Curve Editor to remove gimbal lock, and implementing Control Rigs for post-capture adjustments and secondary animation refinement.