Why Mastering Prefabs in Unity Changed Everything About My Game Development Career
Master Unity's most underestimated feature that'll make or break your first serious game project
Here's the thing about prefabs in Unity - they're probably the most underestimated feature that'll make or break your first serious game project. I remember when I was working on my thesis project at CMU, spending countless hours manually placing and configuring hundreds of enemy objects, only to realize I needed to change one small script parameter across all of them. That's when I learned the hard way why every professional game developer swears by prefabs.
Been there? You're not alone. Most students I mentor at Outscal make the same mistake - they dive into Unity thinking they can just duplicate GameObjects in the scene and call it a day. Then reality hits when they need to update 50 enemy health values or fix a bug that exists in 200 bullet objects.
Let me share what took me months to figure out, and how understanding prefabs transformed not just my projects, but my entire approach to game development.
Table of Contents
- The Cookie Cutter Revelation - What Prefabs Actually Are
- Breaking Down the Prefab Family Tree
- The Core Magic - How Prefabs Work Under the Hood
- Public Reference vs Resources.Load - Which Path Should You Take?
- Why This Single Concept Unlocks Professional Development
- The Battle-Tested Practices I Wish Someone Told Me Earlier
- Real Games That Prove Prefabs Are Game-Changers
- Three Bulletproof Blueprints You Can Build Today
The Cookie Cutter Revelation - What Prefabs Actually Are
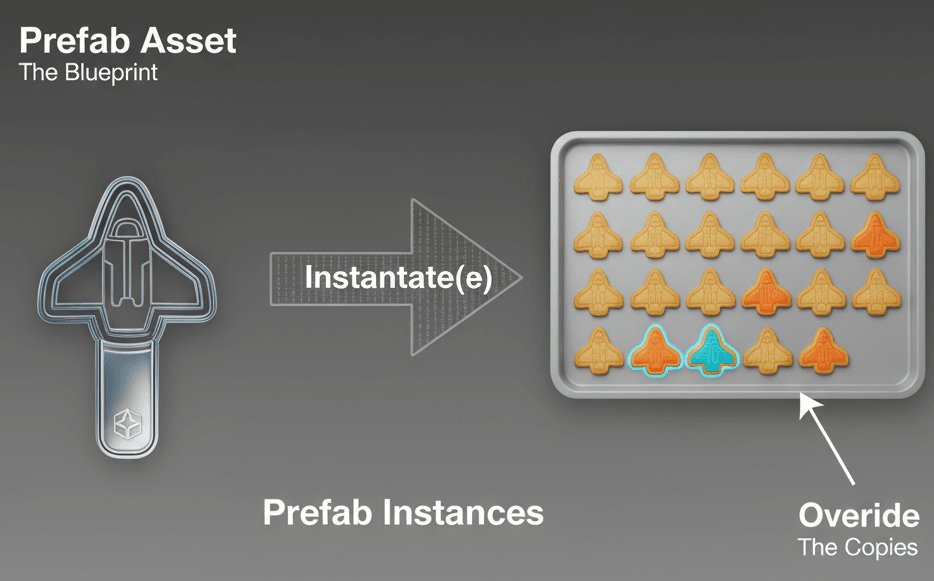
Actually, wait - before we dive into code, let me tell you what prefabs really solve. Imagine you've perfectly designed a collectible coin, an enemy spaceship, or a bullet projectile, complete with models, scripts, and sound effects. The problem is, you don't just need one; you need hundreds, maybe thousands, and you need to be able to update all of them at once if you decide to make a change.
Prefabs solve this by allowing you to save a fully configured GameObject as a reusable template. This template, or "Prefab," can then be used to create endless copies, known as instances, throughout your game. A simple real-world analogy is a cookie cutter: you design the shape once, and then you can press out as many identical cookies as you need, ensuring consistency and saving an immense amount of time.
This is exactly how create prefab unity workflows should function in your projects. You know what's funny? I spent my first month at KIXEYE manually updating UI elements across 12 different scenes before my senior developer introduced me to prefab variants. That coffee break conversation literally saved me weeks of work.
Breaking Down the Prefab Family Tree
Before we jump into creating and scripting prefabs, let's understand the vocabulary. Trust me, knowing these terms will save you from the confusion I experienced when I first started:
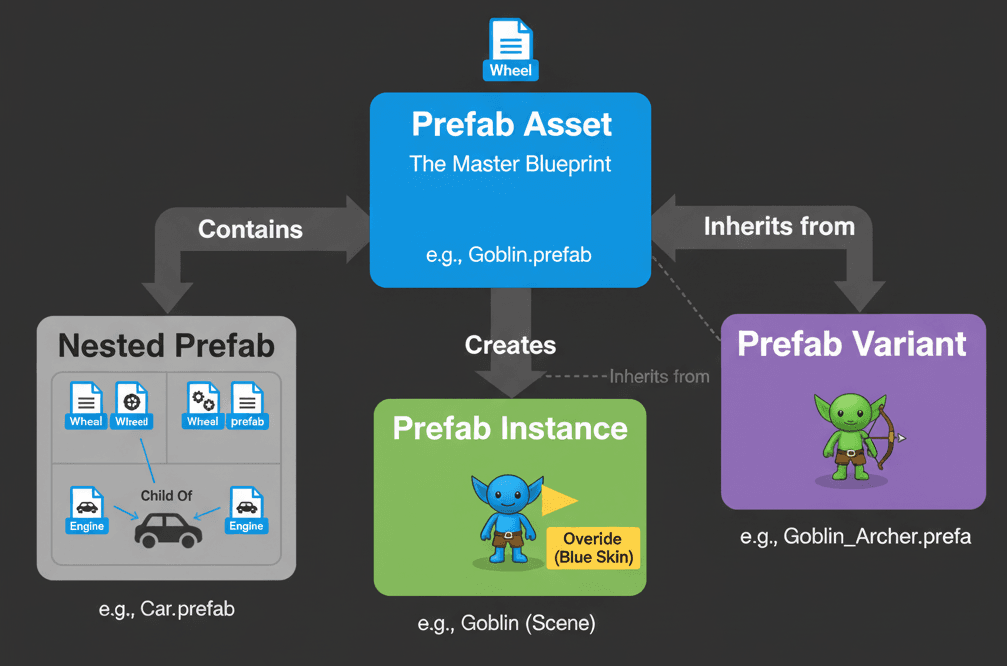
Prefab Asset: This is the master template that lives in your Project window, acting as the blueprint for all its copies and is identifiable by its .prefab file extension.
Prefab Instance: This is a live copy of a Prefab Asset that has been placed into a Scene; it is linked to the master template and will inherit any changes made to it.
Prefab Overrides: These are modifications made to a single Prefab Instance in a Scene that differ from the Prefab Asset, such as changing a material color or a script variable for just one copy.
Nested Prefab: This powerful feature allows you to embed one Prefab within another, creating complex, modular objects while still allowing each part to be updated from its own master template. For example, a "Car" Prefab could contain four instances of a "Wheel" Prefab.
Prefab Variant: This is a type of Prefab Asset that inherits from another Prefab (its "base"), allowing you to create variations of an object that share core properties but also have their own unique overrides. This is perfect for creating different tiers of an enemy, where a "Goblin" base Prefab could have "Goblin Archer" and "Goblin Shaman" variants with different weapons and stats.
The Core Magic - How Prefabs Work Under the Hood
Understanding the fundamental operations is key. Here are the core actions you'll perform, each one I'll show you with actual code that you can copy and use:
Creating a Prefab: This is typically done in the editor by dragging a configured GameObject from your Hierarchy window into the Project window, which automatically saves it as a Prefab Asset.
Instantiating a Prefab: This is where make prefab unity skills really shine. The Instantiate() function is your bread and butter for creating new instances at runtime:
using UnityEngine;

public class SimpleSpawner : MonoBehaviour
{
    // Assign your Prefab in the Inspector
    public GameObject objectToSpawn;

    void Start()
    {
        // Spawn the prefab at the spawner's position with no rotation
        Instantiate(objectToSpawn, transform.position, Quaternion.identity);
    }
}
Editing a Prefab: You can edit a Prefab Asset by double-clicking it in the Project window to enter "Prefab Mode," a special editing environment where changes will affect all instances.
Applying Overrides: If you modify a Prefab Instance in the Scene and want to save those changes back to the master Prefab Asset for all other instances to inherit, you use the "Overrides" dropdown in the Inspector.
Verified: Unity Docs - Prefabs
Public Reference vs Resources.Load - Which Path Should You Take?
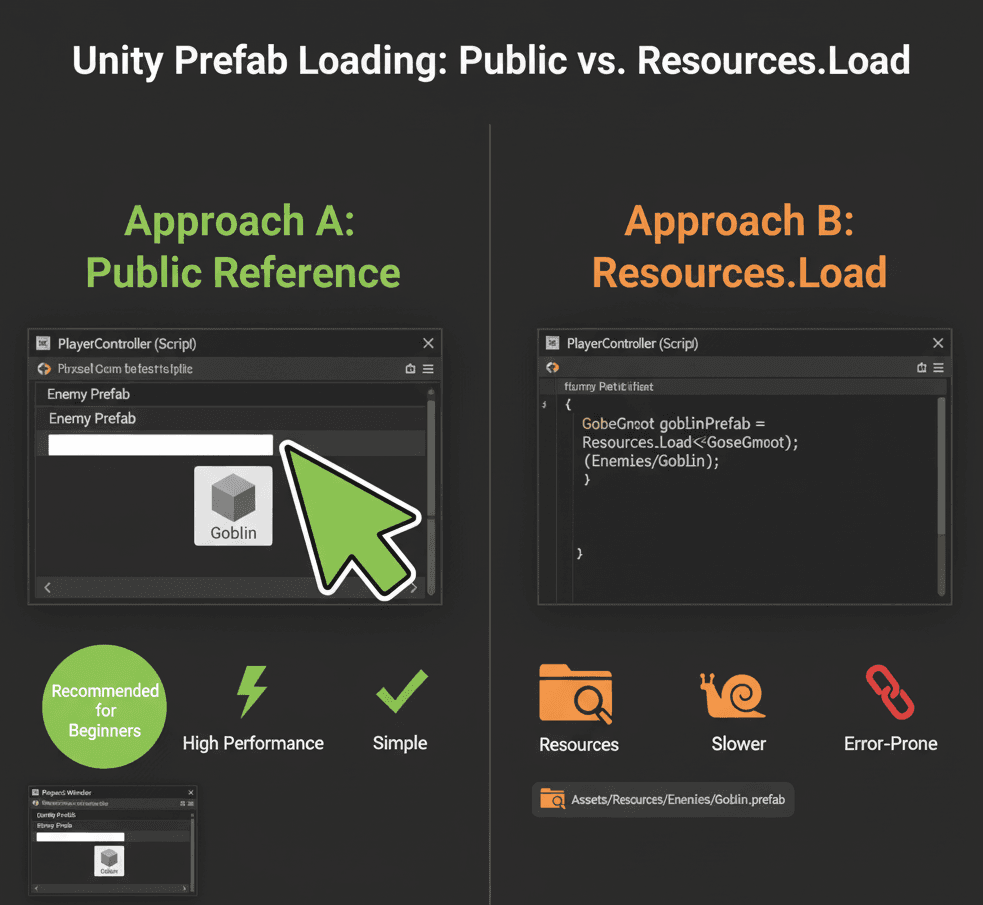
When I was starting out, I always wondered about the best way to load prefabs into scripts. After working on multiple projects, here's what I've learned about the two main approaches:
| Criteria | Approach A: Public Reference | Approach B: Resources.Load |
|---|---|---|
| Best For | Most common use cases, where you can link assets directly in the Inspector before running the game. | Dynamically loading assets by name without a direct link, useful for mods or DLC. |
| Performance | Very high performance, as the reference is serialized directly by Unity with no runtime search required. | Slower, as it involves a string-based search of the "Resources" folder at runtime, which can cause a performance hitch. |
| Complexity | Very simple and intuitive; just drag and drop the Prefab from the Project window onto the script's public field in the Inspector. | More complex, as it requires a special "Resources" folder and is prone to errors if asset names or paths are changed. |
| Code Example | public GameObject enemyPrefab; void Spawn() { Instantiate(enemyPrefab); } |
void Spawn() { GameObject prefab = Resources.Load("Enemies/Goblin") as GameObject; Instantiate(prefab); } |
I always recommend the public reference approach for beginners. It's cleaner, faster, and you'll avoid the headaches I had with broken string paths.
Why This Single Concept Unlocks Professional Development
Mastering prefabs isn't just a suggestion - it's what separates hobbyist projects from professional-level development workflows. Here's what I wish someone had told me earlier:
Massive Time Savings & Efficiency: Instead of manually placing and configuring hundreds of identical objects, you can do it once and reuse the Prefab infinitely.
Easy Global Updates: Modifying the base Prefab Asset instantly updates every single instance across all scenes in your project, making iteration and bug-fixing incredibly fast.
Dynamic & Procedural Gameplay: Prefabs are the engine for procedural generation. Spawning enemies, bullets, power-ups, and even entire level chunks at runtime is only possible through instantiating Prefabs.
Improved Project Organization: By creating a library of reusable Prefabs, you create a clean, modular, and easily manageable project structure.
Enables Team Collaboration: Prefabs allow different team members to work on different objects simultaneously without creating conflicts within the same scene file.
The Battle-Tested Practices I Wish Someone Told Me Earlier
Writing clean, optimized code with prefabs will set you apart. These are the professional tips that took me years to learn through trial and error:
Link Prefabs to Prefabs, Not Scene Instances: When a script on one Prefab needs a reference to another Prefab (like a gun needing a bullet Prefab), always link the Prefab Assets directly in the Inspector, not instances from the scene. This ensures the connection is never broken.
public class Gun : MonoBehaviour
{
    // Assign the BULLET PREFAB from your Project folder here
    public GameObject bulletPrefab;

    void Fire()
    {
        Instantiate(bulletPrefab, transform.position, transform.rotation);
    }
}
Use Object Pooling for Frequently Spawned Objects: This one took me months to figure out. Repeatedly calling Instantiate() and Destroy() (e.g., for bullets) can be slow and cause garbage collection spikes. An object pool pre-spawns a set of prefabs and simply enables/disables them as needed, which is far more performant.
// Conceptual Object Pooling Example
// Note: A full implementation is more complex.
public class BulletPool : MonoBehaviour
{
    public GameObject bulletPrefab;
    private List pooledBullets = new List();

    public GameObject GetBullet()
    {
        // Find an inactive bullet in the pool to reuse
        foreach (GameObject bullet in pooledBullets)
        {
            if (!bullet.activeInHierarchy)
            {
                bullet.SetActive(true);
                return bullet;
            }
        }
        // If no inactive bullets, create a new one
        GameObject newBullet = Instantiate(bulletPrefab);
        pooledBullets.Add(newBullet);
        return newBullet;
    }
}
Decouple Logic from Prefab Data: A Prefab can hold data (like health, speed, etc.), but the logic that acts on that data should be in separate, reusable scripts. This makes your code more modular.
Verified: Unity Best Practices - 50 Tips for Working with Unity
Real Games That Prove Prefabs Are Game-Changers
Let me tell you about how some of my favorite games use this technique brilliantly. These examples really opened my eyes to what's possible:
Enter the Gungeon - The Bullet Hell Master Class
I've studied this game extensively, and what I find fascinating about their approach is how they handle hundreds of different bullet types. Each unique bullet is almost certainly a prefab. When a weapon is fired, the corresponding bullet prefab is instantiated and given a velocity. This allows for an enormous variety of projectiles without needing to have every single one pre-loaded in the scene.
From a developer's perspective, what makes this brilliant is that the player experiences a chaotic, visually diverse "bullet hell" where every enemy and weapon feels distinct - a feat made manageable through prefabs.
Minecraft - The Perfect Item Drop System
Here's how you can adapt this for your own game. When a player defeats a monster like a Zombie or a Skeleton, it drops items like rotten flesh or bones. The item drop is likely a prefab containing the 3D model, a collider, and a script with item data. When the enemy's health reaches zero, it instantiates this "item drop" prefab at its position, which then falls to the ground for the player to collect.
This is why I always recommend studying this game's approach - it provides a tangible and rewarding feedback loop for defeating enemies.
Vampire Survivors - Object Pooling in Action
After analyzing dozens of games, this stands out because the player character automatically fires a barrage of different weapons, filling the screen with projectiles. Each projectile (axe, knife, holy water) is a prefab. The game's systems instantiate these prefabs at timed intervals, applying different movement logic to each. This is a prime example where object pooling is critical to handle the sheer number of objects being created and destroyed each second.
What I always tell my students is to look at how this game manages performance - the player feels an immense sense of growing power as the screen fills with projectiles, all managed efficiently under the hood.
Three Bulletproof Blueprints You Can Build Today
Let me show you how I approach three common scenarios. These are the exact methods I use when working with students:
Blueprint 1: Spawning Collectible Coins
Scenario Goal: Create a coin prefab that spawns at random positions every few seconds.
Unity Editor Setup:
- Create a 3D Cylinder (
GameObject -> 3D Object -> Cylinder). Name itCoin. - Scale the
Cointo look like a coin (e.g., X: 1, Y: 0.1, Z: 1). - Create a new Material, color it yellow, and apply it to the
Coin. - Add a
Rigidbodycomponent to theCoinbut uncheck "Use Gravity" so it floats. - Check the "Is Trigger" box on its
Capsule Collidercomponent. - Drag the configured
Coinfrom the Hierarchy into your Project window to create the Prefab. You can now delete the coin from the scene. - Create an empty GameObject in the scene and name it
CoinSpawner.
Step-by-Step Code Implementation:
1. Create a new C# script named CoinSpawner and attach it to your CoinSpawner GameObject.
2. Add the necessary variables. We need a reference to our Coin Prefab and a timer.
using UnityEngine;

public class CoinSpawner : MonoBehaviour
{
    // Drag your Coin Prefab from the Project window onto this slot in the Inspector
    public GameObject coinPrefab;

    public float spawnInterval = 2.0f; // Time between spawns
    private float timer;
}
3. In the Update method, we'll implement a simple timer to control the spawning frequency.
// Inside the CoinSpawner class
void Update()
{
    // Add the time since last frame to our timer
    timer += Time.deltaTime;

    // If the timer has exceeded the spawn interval
    if (timer >= spawnInterval)
    {
        SpawnCoin();
        // Reset the timer
        timer = 0f;
    }
}
4. Finally, create the SpawnCoin method. This will calculate a random position and then Instantiate the Prefab.
// Inside the CoinSpawner class
void SpawnCoin()
{
    // Generate a random position within a 10x10 area on the XZ plane
    float randomX = Random.Range(-5f, 5f);
    float randomZ = Random.Range(-5f, 5f);
    Vector3 randomPosition = new Vector3(randomX, 0.5f, randomZ);

    // Create a new instance of the coinPrefab at the random position with no rotation
    Instantiate(coinPrefab, randomPosition, Quaternion.identity);
}
Blueprint 2: A 2D Player Shooting Projectiles
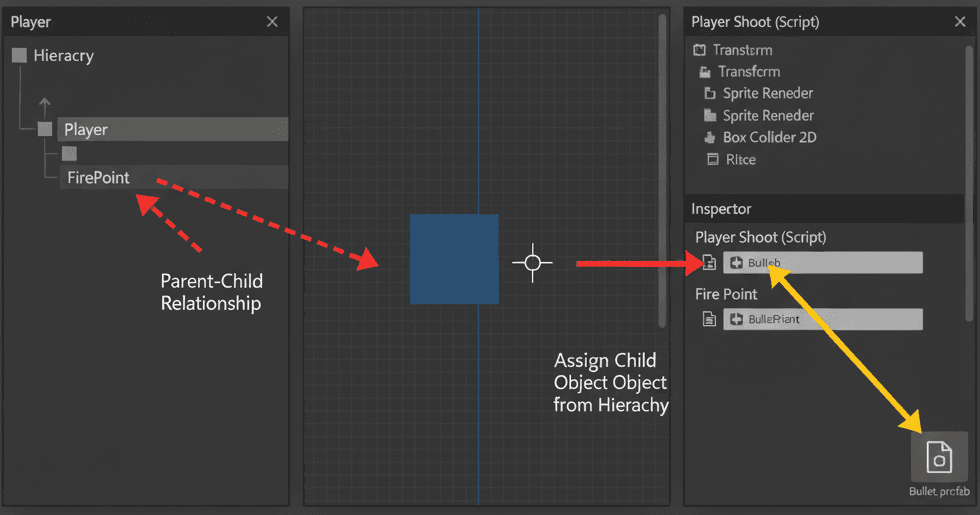
This is how I handle player prefab unity 2d scenarios in my projects:
Scenario Goal: Create a 2D player that can fire projectile prefabs in the direction it's facing.
Unity Editor Setup:
- Create a 2D Sprite (
GameObject -> 2D Object -> Sprites -> Square). Name itPlayer. - Create another 2D Sprite, this time a
Circle. Name itBullet. Scale it down to be much smaller than the player. - Add a
Rigidbody2Dto theBulletand set itsGravity Scaleto 0. - Add a
CircleCollider2Dto theBullet. - Drag the
Bulletfrom the Hierarchy into the Project window to create the Prefab. Delete the original from the scene. - Create an empty GameObject named
FirePointand make it a child of thePlayer. Position it just in front of where the player will shoot from.
Step-by-Step Code Implementation:
1. Create a new C# script named PlayerShoot and attach it to the Player GameObject.
2. Define the variables for the bullet Prefab, the fire point, and the bullet's speed.
using UnityEngine;

public class PlayerShoot : MonoBehaviour
{
    // Assign the Bullet Prefab in the Inspector
    public GameObject bulletPrefab;
    // Assign the child FirePoint GameObject in the Inspector
    public Transform firePoint;
    public float bulletSpeed = 20f;
}
3. In the Update method, check for player input to trigger the Shoot method.
// Inside the PlayerShoot class
void Update()
{
    // Check if the "Fire1" button (default: Left Mouse Button or Left Ctrl) is pressed
    if (Input.GetButtonDown("Fire1"))
    {
        Shoot();
    }
}
4. Implement the Shoot method. This will instantiate the bullet and give it a velocity.
// Inside the PlayerShoot class
void Shoot()
{
    // 2D Version
    // Instantiate the bullet at the firePoint's position and rotation
    GameObject bullet = Instantiate(bulletPrefab, firePoint.position, firePoint.rotation);

    // Get the Rigidbody2D component from the instantiated bullet
    Rigidbody2D rb = bullet.GetComponent();

    // Add force to the bullet to make it move forward
    rb.AddForce(firePoint.up * bulletSpeed, ForceMode2D.Impulse);
}
Blueprint 3: Creating a Destructible Barrel
Here's my go-to approach for prefab unity 3d destructible objects:
Scenario Goal: Create a barrel that, when destroyed, spawns a "broken barrel" prefab in its place.
Unity Editor Setup:
- Create a 3D
Cylinder. Name itBarrel. - Create a new Prefab with a few smaller, scattered pieces of a cylinder to represent the broken barrel. Name this Prefab
BrokenBarrel. - Ensure the
Barrelhas aCollidercomponent.
Step-by-Step Code Implementation:
1. Create a new C# script named Destructible and attach it to the Barrel GameObject.
2. Add variables for health and a reference to the BrokenBarrel Prefab.
using UnityEngine;

public class Destructible : MonoBehaviour
{
    public float health = 50f;
    // Assign the BrokenBarrel Prefab in the Inspector
    public GameObject brokenVersionPrefab;
}
3. Create a public method to apply damage. This could be called by a bullet's script, for example.
// Inside the Destructible class
public void TakeDamage(float amount)
{
    health -= amount;
    if (health <= 0f)
    {
        Die();
    }
}
4. Implement the Die method. This will instantiate the broken version and destroy the original barrel GameObject.
// Inside the Destructible class
void Die()
{
    // 3D Version
    // Spawn the broken version of the barrel at the current barrel's position and rotation
    if (brokenVersionPrefab != null)
    {
        Instantiate(brokenVersionPrefab, transform.position, transform.rotation);
    }

    // Destroy the original barrel GameObject
    Destroy(gameObject);
}
Verified: Unity Docs - Object.Instantiate
Ready to Start Building Your First Game?
If you're excited about applying these prefab techniques in a real project, I've got something that'll accelerate your learning journey. At Outscal, we've designed a comprehensive Unity game development course that takes you from understanding these fundamentals to building professional-quality games.
You'll get hands-on experience implementing everything we've covered here - from basic prefab creation to advanced object pooling systems - while building actual games you can add to your portfolio. Our course includes mentorship from industry professionals who've worked at companies like KIXEYE, EA, and more.
Start your game development journey with our Unity course and transform from someone who understands prefabs to someone who builds amazing games with them.
Key Takeaways
- Prefabs in Unity are reusable templates that save massive amounts of time and ensure consistency across your game objects
- Always link Prefab Assets to other Prefab Assets in the Inspector, never scene instances, to maintain clean connections
- Use object pooling for frequently spawned objects like bullets to avoid performance issues and garbage collection spikes
- Master the three types: Assets, Instances, and Variants to create modular, scalable game architectures
- Nested prefabs enable complex hierarchies where you can update individual components while maintaining the overall structure
- Dynamic gameplay relies on runtime instantiation - enemies, projectiles, and power-ups all spawn through prefab instantiation
- Real games like Enter the Gungeon and Vampire Survivors prove that prefab mastery enables complex, performant gameplay systems
- Start with public references over Resources.Load for simpler, more maintainable code as a beginner
Common Questions
A prefab is a reusable template of a configured GameObject that you can instantiate multiple times throughout your game. Think of it as a cookie cutter - you design the shape once and press out as many identical copies as needed, ensuring consistency and saving time.
Simply drag a configured GameObject from your Hierarchy window into the Project window. Unity automatically saves it as a Prefab Asset with a .prefab file extension that you can reuse across scenes.
A Prefab Asset is the master template stored in your Project window, while a Prefab Instance is a live copy placed in a scene that's linked to and inherits changes from the master template.
Use public references for most situations - they're faster, simpler, and you just drag the prefab into the Inspector. Only use Resources.Load when you need to dynamically load assets by name, like for modding systems.
Use the Instantiate() function: Instantiate(prefabReference, position, rotation). Make sure your script has a public GameObject field assigned with your prefab in the Inspector.
Prefab Overrides are modifications made to a single instance that differ from the master prefab, like changing one enemy's health value. Use them when you need slight variations while keeping the base template intact.
Object pooling prevents performance issues when frequently spawning and destroying objects like bullets. Instead of creating new instances repeatedly, you reuse existing ones by enabling/disabling them.
A Nested Prefab contains other prefabs within it, like a car containing four wheel prefabs. This creates modular systems where you can update individual components while maintaining the overall structure.
Prefab Variants inherit from a base prefab but can have their own unique properties. Create them when you need variations of an object, like different enemy types that share core functionality but have different weapons or stats.
Keep prefabs linked to other prefab assets (not scene instances), separate logic from data, use descriptive naming conventions, and organize them in folders by category (Enemies, Projectiles, UI, etc.).
They create prefabs for each unique bullet type with different behaviors, visual effects, and movement patterns. When weapons fire, they instantiate the appropriate bullet prefab, enabling hundreds of diverse projectiles without performance issues.
Linking scripts to scene instances instead of prefab assets, which breaks connections when scenes change. Always drag prefabs from the Project window into Inspector fields, not from the scene hierarchy.