Reality Capture Unreal Engine 5: How I Went From Taking Photos to Creating AAA-Quality Game Assets
Discover the photogrammetry workflow that lets you create professional-quality 3D assets by just taking photos, and use them in your games without performance hits thanks to Nanite.
Here's the thing - I remember staring at my first Unity project thinking, "How am I supposed to make this look like a real game?" I had basic cubes and spheres, some free textures from the asset store, and everything looked... well, like a student project. Then I discovered photogrammetry and Reality Capture Unreal Engine 5, and honestly, it changed everything.
Been there? You're working on your game, maybe for a class project or your first indie game, and you need assets that don't scream "beginner." Traditional 3D modeling takes months to master, hiring artists costs money you don't have, and free assets only get you so far. What if I told you there's a way to create professional-quality 3D assets by just taking photos? That's exactly what Reality Capture does, and with Unreal Engine 5's Nanite technology, you can use these incredibly detailed models without worrying about performance.
Table of Contents
- What Reality Capture Actually Does (And Why It's Perfect for Student Projects)
- The Building Blocks: Understanding RealityCapture UE5 Components
- Why This Beats Traditional Modeling for Beginners
- My Step-by-Step Workflow: From Photos to Playable Assets
- Real Games That Nailed This Technique (And What We Can Learn)
- Three Complete Walkthroughs You Can Follow Today
- Pro Tips I've Learned the Hard Way
- What You'll Gain From Mastering This
- Ready to Start Building Your First Game?
- Your Next Steps
- Wrapping Up
What Reality Capture Actually Does (And Why It's Perfect for Student Projects)
Reality Capture solves one of the biggest challenges I faced when starting out: creating believable 3D assets without spending years learning complex modeling software. At its core, Reality Capture is a powerful technology that bridges the gap between the real world and the digital realm. It solves the immense challenge of creating photorealistic 3D assets by providing a workflow to convert a series of photographs into highly detailed 3D models.
Think of it as 3D photocopying - you take a real-world object and create a near-identical digital replica, capturing its shape, texture, and intricate details with remarkable fidelity. This allows creators to bypass the often lengthy and complex process of traditional 3D modeling for existing objects, enabling them to build incredibly immersive and believable virtual worlds, digital twins, and cinematic experiences.
Actually, wait - let me put this in perspective. When I was at CMU, I watched classmates spend entire semesters modeling a single detailed prop. With photogrammetry, you can capture that same level of detail in an afternoon of photography and processing.
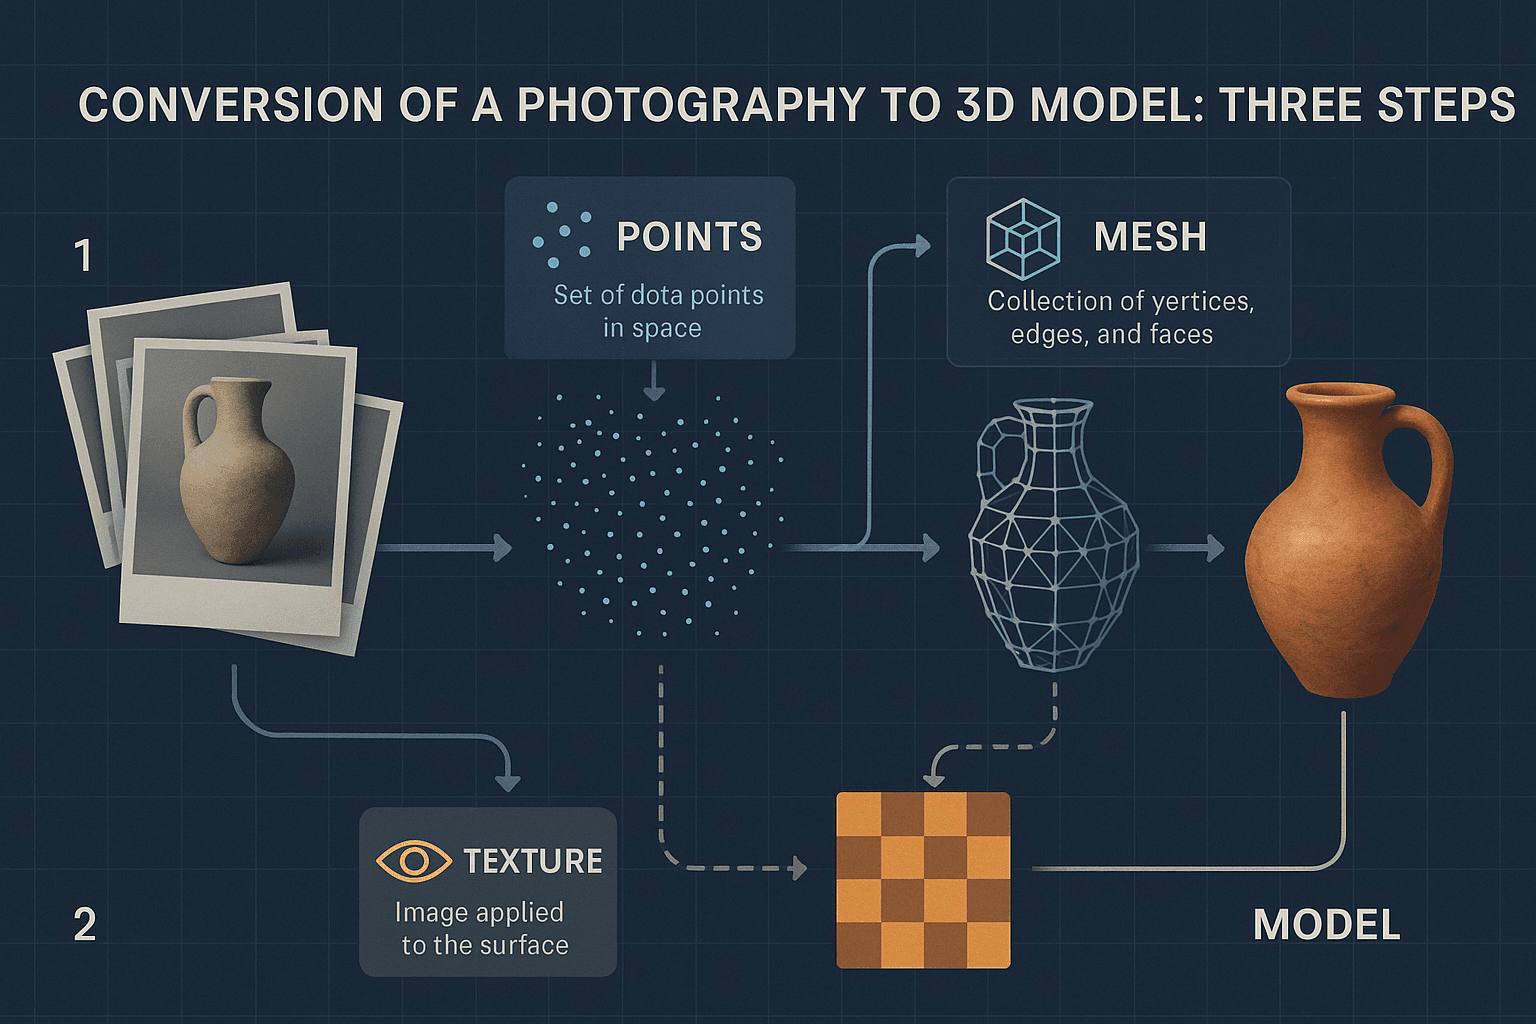
The magic happens through Photogrammetry - the foundational science behind Reality Capture, involving the process of making measurements from photographs to recover the exact positions of surface points, resulting in a 3D model. The software analyzes your photos, finds matching features between them, and calculates where your camera was positioned for each shot, then reconstructs the 3D geometry.
The Building Blocks: Understanding RealityCapture UE5 Components
Before we dive into the workflow, let me break down the key terms you'll encounter. I learned these the hard way by making mistakes - hopefully this saves you some time:
- Point Cloud: The initial result of the photogrammetry process, where thousands or millions of 3D points are generated in space, representing the surface of the object or environment being scanned. Think of it as a constellation of dots that roughly outline your object's shape.
- Mesh (or 3D Mesh): This is the structural build of a 3D model, consisting of vertices (points), edges (lines connecting vertices), and faces (polygons enclosed by edges), which defines the shape of the digital object. This is where your point cloud gets connected into an actual 3D surface.
- Texturing: The process of applying a 2D image (texture) to a 3D mesh to give it color, detail, and surface properties, making it appear realistic. In photogrammetry, this texture is derived from the original photographs - that's why the lighting in your photos matters so much.
- Nanite: Here's where things get exciting for us game developers. Unreal Engine 5's groundbreaking virtualized micropolygon geometry system allows for the rendering of incredibly high-detail meshes with millions or even billions of polygons in real-time without significant performance loss. This means you can use your photogrammetry assets directly without worrying about optimization.
- FBX (Filmbox): A popular and widely-used file format for 3D models, animations, and scenes, which is the standard for transferring assets from Reality Capture into Unreal Engine. You'll be exporting and importing a lot of these.
- Decimation: The process of reducing the polygon count of a 3D mesh to optimize it for real-time applications, which is a crucial step when not using Nanite. With Nanite, you often don't need to worry about this anymore.
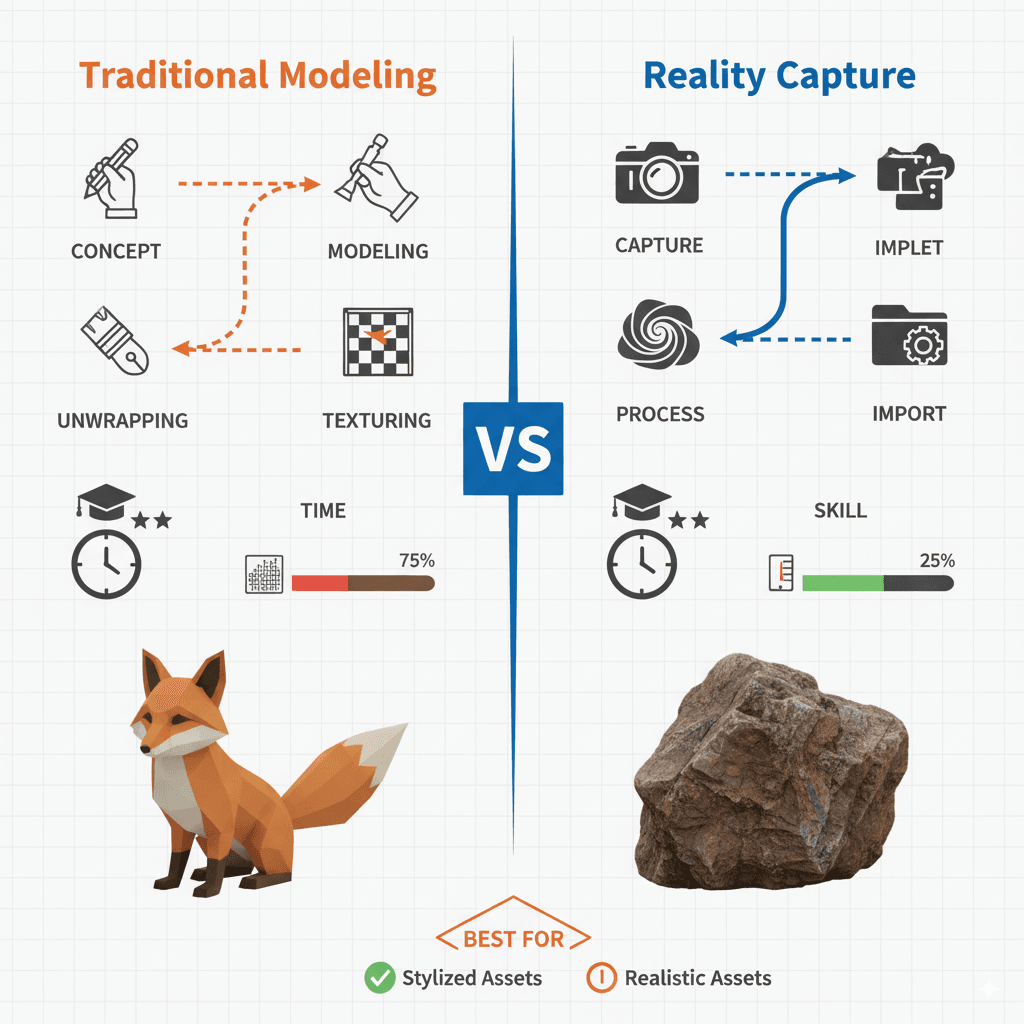
Why This Beats Traditional Modeling for Beginners
Let me share a comparison that really opened my eyes when I first started exploring this:
| Criteria | Traditional 3D Modeling | Using Reality Capture with Nanite in UE5 |
|---|---|---|
| Best For | Creating stylized assets, characters, or objects that don't exist in the real world. | Recreating real-world objects, environments, and props with the highest level of realism. |
| Performance | Performance is directly tied to the polygon count, requiring manual optimization and LOD creation. | Can produce extremely high-poly meshes, but performance impact is minimal in UE5 when using Nanite. |
| Complexity | Requires significant artistic talent and technical skill in 3D modeling software like Blender or Maya. | Requires a good camera, proper photography technique, and knowledge of the Reality Capture software workflow. |
For student projects, this is a game-changer. You're not competing on modeling skills - you're leveraging technology to create professional results.
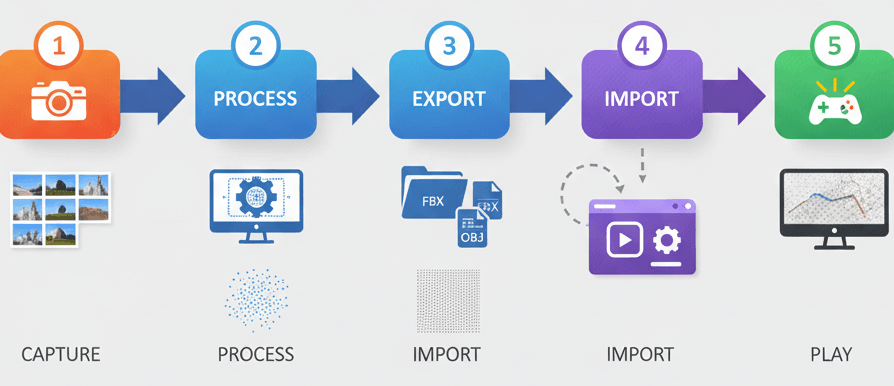
My Step-by-Step Workflow: From Photos to Playable Assets
Here's the exact process I use when I need photogrammetry assets for my projects. I've refined this through dozens of scans:
Image Acquisition comes first, and this is crucial: The quality of the final 3D model is directly dependent on the quality and coverage of the input photographs. It's crucial to capture a subject from all angles with significant overlap (at least 60%) between shots, using consistent, diffuse lighting to avoid harsh shadows.
I learned this the hard way - my first attempts failed because I didn't understand the overlap requirement. You need that 60% overlap so the software can match features between photos.
3D Reconstruction in RealityCapture: The software analyzes the provided images, automatically identifies matching features between them, and calculates the camera positions and the 3D structure of the scene to generate a dense point cloud and then a mesh.
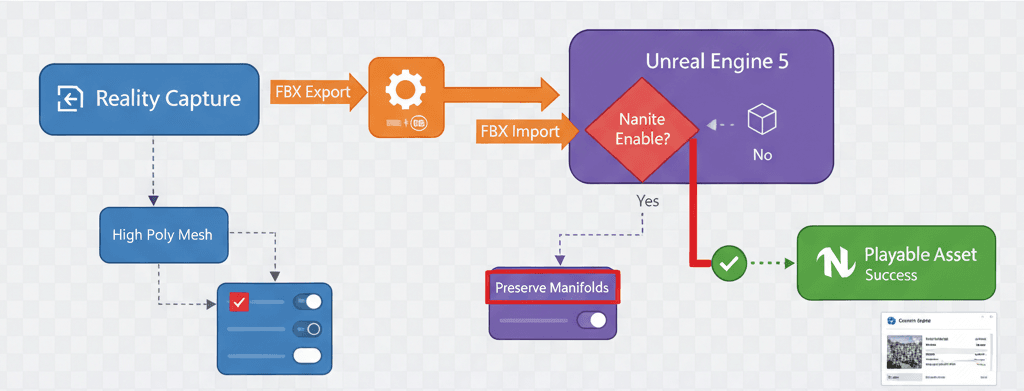
Importing to Unreal Engine 5: Once the model is exported from Reality Capture as an FBX file, it can be imported directly into the Unreal Engine content browser. The engine will prompt for import settings, where you can enable Nanite.
Here's the exact import process:
// This is not a code process, but a UI one in Unreal Engine.
// 1. Click "Import" in the Content Browser.
// 2. Select your exported .fbx file.
// 3. In the FBX Import Options dialog, ensure "Build Nanite" is checked.
// 4. Click "Import".
Working with Nanite Meshes: Once imported, the Nanite mesh can be placed in the level like any other static mesh. The engine automatically handles the level of detail (LOD) streaming, so you get incredible detail up close and optimized performance at a distance.
This is honestly magical - no more worrying about poly counts or creating LODs manually.
Real Games That Nailed This Technique (And What We Can Learn)
I've studied dozens of games that use photogrammetry, and these implementations always inspire my students:
The Vanishing of Ethan Carter - This is where I first saw photogrammetry's true potential. The game features incredibly realistic and detailed environments, from forests to buildings. The development team extensively used photogrammetry to capture real-world locations in Poland and import them into the game engine, creating a stunningly lifelike world. What I find fascinating about this approach is how the player feels a deep sense of presence and immersion, as the environments don't feel procedurally generated or artificially constructed, but rather like exploring a real place.
Star Wars Battlefront (2015) - One of my favorite implementations of this technique. The game's vehicles, props, and environments are remarkably faithful to the original Star Wars trilogy. DICE and Lucasfilm scanned the actual props and models used in the films to create the in-game assets, ensuring an unparalleled level of authenticity. For fans, this creates a powerful sense of nostalgia and wish fulfillment, as they are interacting with digital replicas of iconic movie artifacts.
Resident Evil 7: Biohazard - After analyzing this game's approach, what stands out is how photogrammetry enhances horror. The game's grimy, terrifying environments and grotesque characters contribute significantly to its horror atmosphere. Capcom used photogrammetry to scan real people for character models and various objects and surfaces to build the dilapidated Baker family estate. The realistic, grimy detail enhances the feeling of dread and disgust, making the horror more visceral and believable.
Here's how you can adapt this for your own game: Start small. Instead of scanning entire environments like these AAA studios, focus on key props that will make your world feel authentic - a weathered book, an old chair, interesting rocks or stones.
Three Complete Walkthroughs You Can Follow Today
Let me walk you through three complete implementations I use regularly:
Scanning and Importing a Simple Prop
Scenario Goal: To capture a real-world object (like a coffee mug), process it in Reality Capture, and import it into Unreal Engine 5 as a Nanite-enabled static mesh.
What You'll Need:
- A new, empty Unreal Engine 5 project
- Reality Capture installed
My exact process:
- Photography: Take at least 50-100 well-lit, overlapping photos of the mug from all angles. Use a neutral background.
- Reality Capture - Alignment: Import the photos into a new Reality Capture project. Click the "Align Images" button. The software will create a sparse point cloud.
- Reality Capture - Reconstruction: Define the reconstruction region around the aligned point cloud. Click "Normal Detail" to create a 3D mesh.
- Reality Capture - Texturing: Click the "Texture" button to generate the texture for the model.
- Reality Capture - Export: Use the "Export" button to export the model as an FBX file.
- Unreal Engine - Import: Drag and drop the FBX file into your Unreal Engine content browser. In the import settings, ensure "Build Nanite" is checked and click "Import". Your photorealistic mug is now ready to be placed in your scene.
Creating an Interactive Scanned Object
Scenario Goal: To make a scanned object from the previous walkthrough interactive, so that when the player looks at it and presses a key, it gets destroyed.
What You'll Need:
- A project with a First Person Character template
- The imported scanned object from the previous walkthrough placed in the level
Let's tackle this together:
- Enable Interaction: In your First Person Character Blueprint, enable the "Enable Mouse Over Events" in the "Player Controller" settings.
- Create a Blueprint for the Scanned Object: Right-click the static mesh in the content browser and choose "Create Blueprint Class".
- Add a Custom Event: In the new Blueprint's event graph, create a new custom event called "OnInteract".
- Destroy the Actor: Drag from the "OnInteract" event and add a "DestroyActor" node.
- Interface with the Player: In the First Person Character Blueprint, use a "LineTraceByChannel" node firing from the camera on a key press (e.g., 'E'). If the line trace hits the scanned object's Blueprint, call the "OnInteract" event.
Here's the Blueprint logic for the interaction:
// In the First Person Character Blueprint, on 'E' key press:
FHitResult HitResult;
FVector Start = FirstPersonCameraComponent->GetComponentLocation();
FVector End = Start + FirstPersonCameraComponent->GetForwardVector() * 200.0f; // 2m reach

GetWorld()->LineTraceSingleByChannel(HitResult, Start, End, ECC_Visibility);

if (HitResult.GetActor() != nullptr)
{
    // Check if the actor has the "OnInteract" event
    // This is a simplified representation. A Blueprint Interface is the best practice.
    FKey InteractKey("OnInteract");
    HitResult.GetActor()->ProcessEvent(HitResult.GetActor()->FindFunction(InteractKey), nullptr);
}
Creating a Digital Twin of an Environment Piece
Scenario Goal: To capture a piece of an environment (like a rock formation or a section of a wall), import it, and use it to build a larger scene in Unreal Engine.
What You'll Need:
- An empty Unreal Engine 5 project
From my experience, here's the best approach:
- Capture the Environment: Take a large number of photos of the environment piece, ensuring full coverage from all possible angles. Overcast days are ideal for this to get diffuse lighting.
- Process in Reality Capture: Follow the same steps as the first walkthrough (Align, Reconstruct, Texture, Export). For large scenes, this may take a significant amount of time.
- Import into Unreal Engine: Import the FBX as a Nanite mesh.
- Use the Foliage Tool: For natural elements like rocks, you can add the scanned mesh to the foliage tool. This allows you to "paint" instances of the rock across your landscape, creating a complex and natural-looking scene very quickly.
- Combine with Other Assets: Place the scanned environment piece alongside other assets (scanned or traditionally modeled) to build out your world. The high fidelity of the scanned asset will elevate the realism of the entire scene.
Pro Tips I've Learned the Hard Way
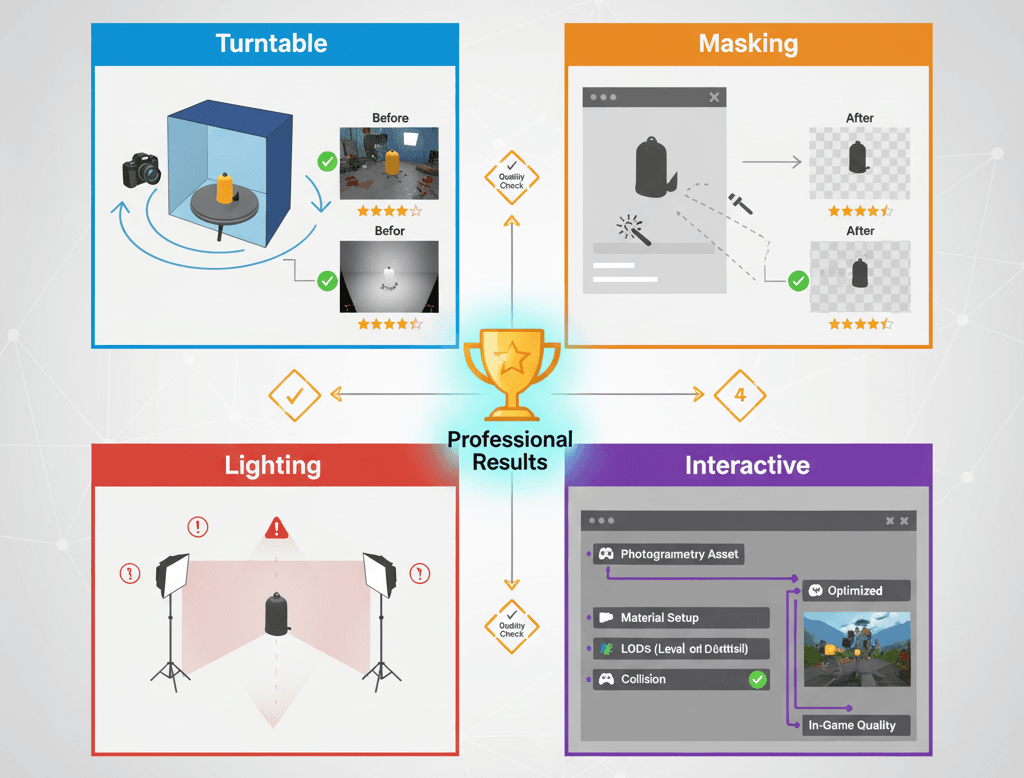
Use a Turntable for Small Objects: For smaller props, placing the object on a rotating turntable and keeping the camera stationary ensures consistent lighting and perfect 360-degree coverage. Trust me, you'll thank me later for this tip.
Masking in Reality Capture: Use the software's masking tools to tell it which parts of the photos to ignore (like the background), which can significantly improve the quality of the final model. I ran into background noise issues early on, and masking solved it completely.
Create a Reusable Lighting Setup: In Unreal Engine, create a standard lighting setup to test your imported scans. This helps you maintain a consistent look and feel across all your photogrammetry assets. After working on multiple Unity projects, I learned this consistency is crucial.
Add Interactivity with Blueprints: Bring your static scans to life by adding simple Blueprint scripts for interaction.
Here's a simple Blueprint example I use often:
// Example: A simple Blueprint to rotate a scanned object on mouse hover.
// In your Blueprint's Event Graph for the scanned object actor:

// 1. Add a "Mouse On" event.
// 2. From the "Mouse On" event, drag a wire and create a "AddLocalRotation" node.
// 3. Set the "Delta Rotation" to something like (0, 1, 0) to rotate it.
// 4. Add a "Mouse Off" event to stop the rotation if desired.
What You'll Gain From Mastering This
Here's what changes when you add photogrammetry to your toolkit:
- Unparalleled Realism: Photogrammetry allows for the creation of assets with a level of detail and authenticity that is incredibly difficult and time-consuming to achieve with traditional modeling techniques. Your games will immediately look more professional.
- Drastically Reduced Asset Creation Time: For objects that already exist, scanning them can be orders of magnitude faster than having a 3D artist model and texture them from scratch. What used to take weeks now takes hours.
- Enhanced Immersion: By using assets derived from the real world, developers can create virtual environments that feel more grounded, believable, and immersive for the player. Players notice the difference, even if they can't articulate why.
- Democratization of High-Fidelity Graphics: With Reality Capture now free for many users, the ability to create AAA-quality assets is no longer restricted to large studios with massive budgets.
Ready to Start Building Your First Game?
You know what's exciting? Taking everything you've learned about Reality Capture Unreal Engine 5 and applying it to create your first real game project. If you're ready to go beyond just understanding these concepts and want to build something playable from scratch, I've created a complete course that takes you through the entire journey.
In my Master Unity Game Development course, we build a complete puzzle game called Mr. Blocks step-by-step. While the course focuses on Unity, the asset creation principles and workflow concepts you've learned here translate directly. You'll discover how to implement the same professional development practices I use, from proper asset pipeline management to creating engaging gameplay mechanics.
The course is designed specifically for students like you - no assumptions about prior experience, just practical lessons that build your skills systematically. By the end, you'll have a complete game in your portfolio and the confidence to tackle bigger projects.
Your Next Steps
Based on my experience teaching hundreds of students, here's what I recommend:
- Start with small objects first - don't jump into scanning entire environments. Master the workflow with simple props like mugs, books, or small decorative items.
- Experiment with different lighting conditions to understand how it affects your results. Overcast days are your friend for outdoor scanning.
- Build a small library of scanned assets that you can reuse across projects. Even having 10-15 quality scanned objects will transform your scenes.
- Focus on objects that exist in your immediate environment - this keeps costs down and lets you iterate quickly on your technique.
Wrapping Up
Reality Capture Unreal Engine 5 isn't just another tool - it's your shortcut to creating professional-quality game assets without years of 3D modeling experience. The combination of photogrammetry with Nanite technology means you can focus on game design and mechanics while still delivering visually impressive results.
I've watched students go from creating basic prototype games to producing portfolio pieces that get them internships, all because they learned to leverage this technology effectively. The technical barrier to high-quality visuals has never been lower.
Start simple, be patient with the learning curve, and remember - every professional developer started exactly where you are now.
Key Takeaways
- Reality Capture bridges real-world objects to digital assets through photogrammetry, making professional-quality 3D models accessible to student developers
- Nanite technology in Unreal Engine 5 eliminates performance concerns when using high-polygon photogrammetry assets, allowing unlimited detail without optimization headaches
- 60% photo overlap is crucial for successful reconstruction - this is the most common mistake that causes failed scans
- Photogrammetry excels at real-world object recreation while traditional modeling remains better for stylized or fictional assets
- The complete workflow involves: Image Acquisition → Reality Capture Processing (Align, Reconstruct, Texture) → FBX Export → Unreal Engine Import with Nanite enabled
- Professional games like The Vanishing of Ethan Carter and Star Wars Battlefront demonstrate photogrammetry's potential for creating immersive, authentic experiences
- Start with simple props and controlled lighting before attempting complex environments or outdoor scenes
- Reality Capture's masking tools and consistent lighting setups are essential for professional results
Common Questions
What is Reality Capture in Unreal Engine 5?
Reality Capture is a photogrammetry workflow that converts photographs of real objects into detailed 3D models that can be imported into Unreal Engine 5. It uses multiple overlapping photos to reconstruct geometry, texture, and surface details automatically.
How do I use Reality Capture with Nanite in UE5?
After processing your photos in Reality Capture software, export as FBX and import into Unreal Engine 5 with "Build Nanite" enabled in import settings. Nanite handles high-polygon meshes automatically without performance loss.
What's the difference between RealityScan and RealityCapture?
RealityScan is a mobile app for basic photogrammetry, while RealityCapture is professional desktop software with advanced reconstruction features, masking tools, and export options for game development.
How many photos do I need for Reality Capture?
Minimum 50-100 photos with 60% overlap between shots for small objects. Larger environments may require 200+ photos. Quality and coverage matter more than quantity.
Why won't my Reality Capture model import correctly into UE5?
Common issues include insufficient photo overlap, inconsistent lighting, or forgetting to enable Nanite during import. Ensure your photos have proper coverage and use diffuse lighting.
Can I use Reality Capture for free?
Reality Capture offers a free tier with limitations. For unlimited exports, a license is required. Check current pricing and limitations on their website.
What camera settings work best for photogrammetry?
Use manual focus, avoid auto-exposure changes between shots, shoot in RAW if possible, and maintain consistent lighting. A standard DSLR or high-quality smartphone camera works fine.
How long does Reality Capture processing take?
Processing time varies by photo count and hardware. Small objects (50 photos) might process in 30-60 minutes, while large environments can take several hours on average hardware.
Do I need expensive equipment for Reality Capture?
No - a decent smartphone or basic DSLR camera is sufficient. Good lighting and proper photo technique matter more than expensive equipment for beginners.
Can I animate Reality Capture objects in Unreal Engine?
Reality Capture creates static meshes by default. For animation, you'd need additional rigging and skinning work in other software, or use the static mesh for props and environment pieces.
How do I fix holes or gaps in my Reality Capture model?
Holes usually result from insufficient photo coverage. Retake photos covering problem areas, use Reality Capture's hole-filling tools, or manually patch in 3D software like Blender.
What file formats does Reality Capture export for Unreal Engine?
FBX is the standard format for Unreal Engine import. Reality Capture also exports OBJ, PLY, and other formats, but FBX maintains material and texture information best.