How does the camera work in Unity: A Complete Guide on Camera Movement
Master Unity camera movement from student confusion to cinematic control with practical techniques and proven code examples
I remember my first Unity project at CMU. I had this brilliant platformer idea, spent weeks perfecting the player movement, and then... the camera. Oh, the camera. It either snapped around like a broken neck or lagged behind my character like it was stuck in molasses. Sound familiar?
Here's the thing - camera movement in Unity isn't just a technical hurdle you need to jump over. It's actually the invisible director of your entire game experience. Think about it: without proper camera control, even the most polished gameplay mechanics feel amateurish. Your players won't stick around to appreciate your clever level design if they're constantly fighting the camera to see what's happening.
The good news? After working on dozens of Unity projects and helping countless students through this exact problem, I've cracked the code on camera movement. Let me show you the systematic approach that actually works.
Table of Contents
- Why Unity Cameras Matter More Than You Think
- The Foundation: Camera Types That Actually Make Sense
- Here's How I Approach Camera Scripting (With Real Code)
- The Battle: Direct Movement vs. Smooth Following
- Why This Transforms Your Game Development
- The Pro Tips That Took Me Years to Learn
- Real Games, Real Solutions: What I've Learned From the Masters
- Let's Build This Together: Step-by-Step Implementation
- Your Next Move as a Developer
Why Unity Cameras Matter More Than You Think
When I first started game development, I thought cameras were just... there. You place one in the scene, point it at your player, and you're done, right? Wrong. So very wrong.
The Camera in Unity is the player's window into the game world, fundamentally solving the problem of how a 2D or 3D scene is viewed on a 2D screen. It allows you to frame the action, guide the player's focus, and establish the entire visual tone of your game. Think of the Unity Camera as a real-world film camera; you can position it, change its lens, and move it to create different shots and perspectives, ultimately defining how the player experiences the game's environment and events.
This control enables the creation of everything from a first-person shooter's intense, grounded viewpoint to a strategy game's expansive, top-down overview. Without a camera, the player would have no way of seeing the incredible worlds and mechanics you build.
After analyzing dozens of successful games during my time in the industry, I've seen how master-level camera work can make or break a player's connection to your game. It's not just about following the action - it's about creating immersion, clarity, and emotional impact.
The Foundation: Camera Types That Actually Make Sense
Before we dive into scripting camera behaviors, let me break down the core properties and types that define how a camera functions in Unity. Trust me, understanding these fundamentals will save you hours of debugging later.
Camera Component: This is the essential component that, when attached to a GameObject, allows it to render a view of the scene to the screen.
Projection: This setting determines the mathematical method the camera uses to flatten the 3D world onto a 2D screen, which significantly impacts the visual style of your game.
- Perspective Projection: This projection mode mimics how the human eye sees, making objects appear smaller as they move further away, which is ideal for creating a sense of depth and realism in 3D games.
- Orthographic Projection: This projection mode renders all objects at the same scale regardless of their distance from the camera, which is perfect for 2D games like platformers or top-down RPGs where a consistent, flat look is desired.
Field of View (FOV): Applicable only to perspective cameras, this property defines the width of the camera's viewing angle in degrees, where a wider FOV captures more of the scene, and a narrower FOV creates a zoomed-in effect.
Clipping Planes (Near & Far): These properties define the virtual range of the camera's vision, where objects closer than the 'Near' plane or farther than the 'Far' plane will not be rendered, which is crucial for performance optimization.
Viewport Rect: These four values (X, Y, Width, Height) determine where on the screen the camera's view will be drawn, allowing for the creation of split-screen multiplayer setups by assigning different cameras to different screen regions.
Depth: This integer value determines the rendering order when you have multiple cameras in a scene; cameras with a higher depth value will be drawn on top of those with a lower value.
Culling Mask: This property allows you to selectively render or ignore GameObjects based on their assigned "Layer," which is a powerful tool for optimizing performance or creating special visual effects.

Here's How I Approach Camera Movement in Unity (With Real Code)
Understanding the fundamental components of the Unity Camera is the first step. Now, let me show you the core concepts and how I manipulate them through code in my projects.
Finding Your Main Camera (The Right Way)
In many scenarios, you'll need a script to reference the primary camera in your scene. Unity provides a convenient way to do this by looking for the GameObject tagged "MainCamera".
using UnityEngine;

public class CameraFinder : MonoBehaviour
{
    void Start()
    {
        // Find and store a reference to the main camera
        Camera mainCamera = Camera.main;
    }
}
Verified: Unity Docs - Camera.main
Switching Between Views Dynamically
You can switch between Perspective and Orthographic projection at runtime to create dynamic visual effects or adapt to different gameplay states. I use this technique frequently in my projects.
using UnityEngine;

public class ProjectionSwitcher : MonoBehaviour
{
    private Camera cam;

    void Start()
    {
        cam = GetComponent<Camera>();
    }

    void Update()
    {
        // Switch to Orthographic on 'O' key press
        if (Input.GetKeyDown(KeyCode.O))
        {
            cam.orthographic = true;
        }

        // Switch to Perspective on 'P' key press
        if (Input.GetKeyDown(KeyCode.P))
        {
            cam.orthographic = false;
        }
    }
}
Verified: Unity Docs - Camera.orthographic
Creating Zoom Effects That Feel Natural
Modifying the FOV (Field of View) is a common technique I use for creating zoom effects or conveying a sense of speed in my games.
using UnityEngine;

public class FOVController : MonoBehaviour
{
    private Camera cam;

    void Start()
    {
        cam = GetComponent<Camera>();
    }

    void Update()
    {
        // Zoom in by decreasing FOV
        if (Input.GetKey(KeyCode.Z))
        {
            cam.fieldOfView -= 10f * Time.deltaTime;
        }

        // Zoom out by increasing FOV
        if (Input.GetKey(KeyCode.X))
        {
            cam.fieldOfView += 10f * Time.deltaTime;
        }
    }
}
Verified: Unity Docs - Camera.fieldOfView
The Battle: Direct Movement vs. Smooth Following
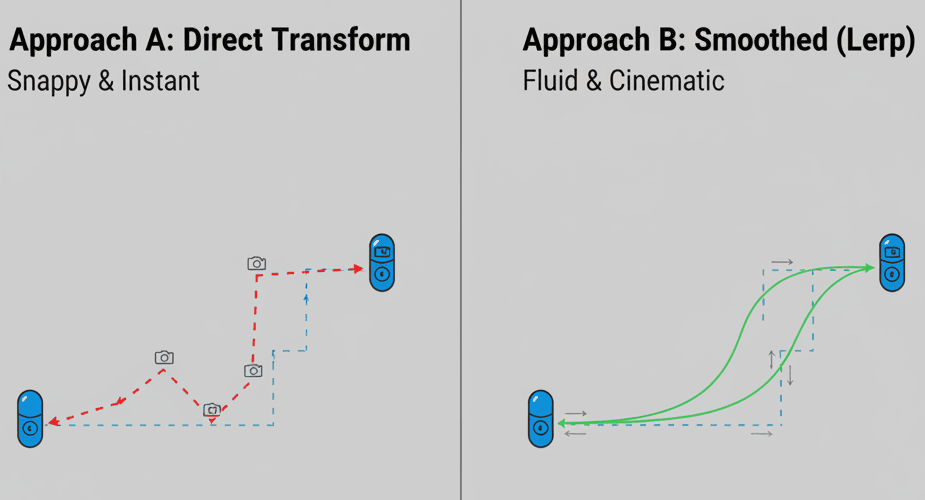
When it comes to camera movement, I've learned there are two main approaches that work well. Let me break down when I use each one:
| Criteria | Approach A: Direct Transform | Approach B: Smoothed (Lerp) |
|---|---|---|
| Best For | Scenarios requiring immediate, snappy camera movement, such as in a fast-paced arcade game or for editor tools. | Creating fluid, cinematic camera motion that eases into its target position, ideal for third-person follow cameras. |
| Performance | Extremely high performance as it involves a direct assignment of position values with minimal computational overhead. | Slightly more computationally intensive due to the interpolation calculation every frame, but generally negligible for a single camera. |
| Complexity | Very simple to implement, requiring only a single line of code to update the camera's position. | Requires a bit more logic to manage the start and end points of the interpolation, as well as a smoothing factor. |
| Code Example | transform.position = target.position + offset; |
transform.position = Vector3.Lerp(transform.position, target.position + offset, smoothing * Time.deltaTime); |
Why This Transforms Your Game Development
Mastering Unity camera movement isn't just a technical exercise - it directly translates to a better player experience and more dynamic gameplay. Here's what I've observed in my projects:
Enhanced Player Immersion: A well-controlled camera can make the player feel truly present in the game world, whether it's through a shaky-cam effect during an explosion or a smooth, cinematic pan over a beautiful landscape.
Improved Gameplay Clarity: By framing the action effectively, you can ensure the player always has the information they need to make informed decisions, reducing frustration and improving usability.
Enables Diverse Game Genres: The camera is a defining element of many game genres. A first-person camera is essential for an FPS, a top-down orthographic camera is the standard for RTS games, and a dynamic third-person camera is a hallmark of action-adventure titles.
Creates Cinematic Experiences: Through scripting, you can create cutscenes, dynamic camera shakes, and other cinematic effects that can elevate the storytelling and emotional impact of your game.
The Pro Tips That Took Me Years to Learn
Writing efficient and effective camera code is crucial for a polished game. Here are the insights I wish I had when starting out:
Cache Your Camera References
Repeatedly calling Camera.main can be inefficient. It's better to find the camera once in the Start method and store a reference to it. This is one of those optimization tips that seems obvious in retrospect.
using UnityEngine;

public class EfficientCameraAccess : MonoBehaviour
{
    private Camera mainCamera;

    void Start()
    {
        // Cache the main camera reference on start
        mainCamera = Camera.main;
    }

    void Update()
    {
        // Use the cached reference
        // Example: Get a ray from the camera
        Ray ray = mainCamera.ScreenPointToRay(Input.mousePosition);
    }
}
Verified: Unity Learn - Controlling Unity Camera Behavior
Use LateUpdate for Follow Cameras
To avoid jittery movement, it's best practice to update a follow camera's position in LateUpdate. This ensures that the camera moves after the player has completed their movement in Update. This was a game-changer for me when I discovered it.
using UnityEngine;

public class SmoothFollow : MonoBehaviour
{
    public Transform target;
    public Vector3 offset;
    public float smoothSpeed = 0.125f;

    void LateUpdate()
    {
        if (target != null)
        {
            Vector3 desiredPosition = target.position + offset;
            Vector3 smoothedPosition = Vector3.Lerp(transform.position, desiredPosition, smoothSpeed);
            transform.position = smoothedPosition;
        }
    }
}
Verified: Unity Docs - Vector3.Lerp
Optimize with Culling Masks
If you have multiple cameras for different purposes (e.g., one for the game world and one for the UI), use culling masks to ensure each camera only renders what it needs to. This can significantly improve performance.
using UnityEngine;

public class CullingMaskSetup : MonoBehaviour
{
    public Camera worldCamera;
    public Camera uiCamera;

    void Start()
    {
        // Set the world camera to render everything EXCEPT the UI layer
        worldCamera.cullingMask &= ~(1 << LayerMask.NameToLayer("UI"));

        // Set the UI camera to ONLY render the UI layer
        uiCamera.cullingMask = 1 << LayerMask.NameToLayer("UI");
    }
}
Verified: Unity Docs - Camera.cullingMask
Real Games, Real Solutions: What I've Learned From the Masters
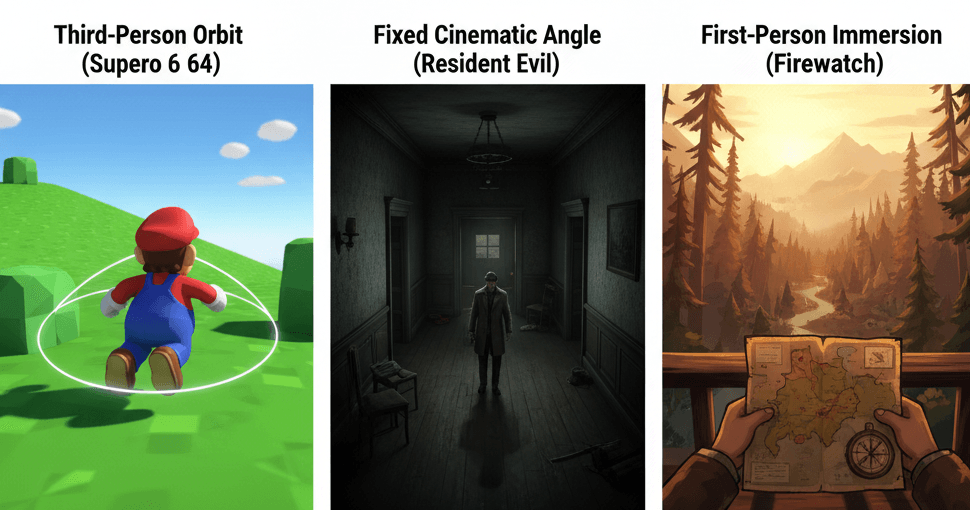
Let me share some examples of brilliant camera implementations that I've studied and drawn inspiration from:
Super Mario 64: The Pioneer of 3D Camera Control
I've seen this technique used brilliantly in Super Mario 64 - a third-person camera that intelligently follows Mario, but also allows the player to manually rotate it around him.
The Implementation: This likely involves a script that maintains a fixed distance and height from Mario, while also using player input to adjust its rotation around a pivot point (Mario's position). The camera would also have some basic AI to avoid clipping into walls.
The Player Experience: This gives the player a clear view of their surroundings, which is crucial for platforming, while also providing the freedom to look around and plan their next move.
using UnityEngine;

public class OrbitCamera : MonoBehaviour
{
    public Transform target;
    public float distance = 5.0f;
    public float xSpeed = 120.0f;
    public float ySpeed = 120.0f;

    private float x = 0.0f;
    private float y = 0.0f;

    void LateUpdate()
    {
        if (target)
        {
            x += Input.GetAxis("Mouse X") * xSpeed * Time.deltaTime;
            y -= Input.GetAxis("Mouse Y") * ySpeed * Time.deltaTime;

            Quaternion rotation = Quaternion.Euler(y, x, 0);
            Vector3 negDistance = new Vector3(0.0f, 0.0f, -distance);
            Vector3 position = rotation * negDistance + target.position;

            transform.rotation = rotation;
            transform.position = position;
        }
    }
}
Resident Evil: The Art of Fixed Perspective
One of my favorite implementations of cinematic camera work is in the original Resident Evil - fixed camera angles that change as the player moves from one area to another, creating a cinematic and often suspenseful feel.
The Implementation: This is achieved by having multiple cameras in the scene, each with a specific position and rotation. Trigger volumes are placed at the boundaries of each area, and when the player enters a trigger, the corresponding camera is activated, and the others are deactivated.
The Player Experience: The fixed angles create a sense of claustrophobia and limit the player's view, building tension as they can't always see what's around the next corner.
using UnityEngine;

public class CameraTrigger : MonoBehaviour
{
    public Camera cameraToActivate;

    private void OnTriggerEnter(Collider other)
    {
        if (other.CompareTag("Player"))
        {
            // Deactivate all other cameras
            Camera[] allCameras = FindObjectsOfType<Camera>();
            foreach (Camera cam in allCameras)
            {
                cam.gameObject.SetActive(false);
            }

            // Activate the designated camera
            cameraToActivate.gameObject.SetActive(true);
        }
    }
}
Firewatch: First-Person Immersion Done Right
What I find fascinating about Firewatch's approach is how they use a first-person camera that serves as the player's eyes, allowing them to interact with the world and experience the narrative from the protagonist's perspective.
The Implementation: The camera is parented to the player's head, and its rotation is controlled by the mouse input. This gives the player direct control over where they are looking.
The Player Experience: This creates a highly immersive experience, making the player feel like they are the one exploring the wilderness and uncovering the story.
using UnityEngine;

public class FirstPersonLook : MonoBehaviour
{
    public float mouseSensitivity = 100f;
    public Transform playerBody;
    float xRotation = 0f;

    void Start()
    {
        Cursor.lockState = CursorLockMode.Locked;
    }

    void Update()
    {
        float mouseX = Input.GetAxis("Mouse X") * mouseSensitivity * Time.deltaTime;
        float mouseY = Input.GetAxis("Mouse Y") * mouseSensitivity * Time.deltaTime;

        xRotation -= mouseY;
        xRotation = Mathf.Clamp(xRotation, -90f, 90f);

        transform.localRotation = Quaternion.Euler(xRotation, 0f, 0f);
        playerBody.Rotate(Vector3.up * mouseX);
    }
}
Let's Build This Together: Step-by-Step Implementation
Let me show you how I approach implementing camera movement in Unity, starting with the most common scenarios you'll encounter as a student developer.
Blueprint 1: Simple 2D Follow Camera
Here's the exact method I use when working on 2D projects - let's create a camera that smoothly follows a 2D player character as they move left and right.
Unity Editor Setup:
- A 'Player' GameObject with a
Rigidbody2Dand aBoxCollider2D. - A 'Main Camera' GameObject.
Step-by-Step Code Implementation:
1. Create a new C# script called FollowCamera2D and attach it to the 'Main Camera'.
2. Declare public variables for the player's Transform and an offset Vector3.
using UnityEngine;

public class FollowCamera2D : MonoBehaviour
{
    public Transform player;
    public Vector3 offset;
}
3. In LateUpdate, calculate the desired position of the camera by adding the offset to the player's position. We only want to follow the player on the X and Y axes, so we keep the camera's Z position constant.
void LateUpdate()
{
    if (player != null)
    {
        // Calculate the desired position
        Vector3 desiredPosition = new Vector3(player.position.x + offset.x, player.position.y + offset.y, transform.position.z);
        transform.position = desiredPosition;
    }
}
4. To make the movement smoother, we can use Vector3.Lerp. Add a smoothSpeed variable and modify LateUpdate.
using UnityEngine;

public class SmoothFollowCamera2D : MonoBehaviour
{
    public Transform player;
    public Vector3 offset;
    public float smoothSpeed = 0.125f;

    void LateUpdate()
    {
        if (player != null)
        {
            Vector3 desiredPosition = new Vector3(player.position.x + offset.x, player.position.y + offset.y, transform.position.z);
            Vector3 smoothedPosition = Vector3.Lerp(transform.position, desiredPosition, smoothSpeed);
            transform.position = smoothedPosition;
        }
    }
}
Verified: Unity Docs - Vector3.Lerp
Blueprint 2: First-Person Mouse Look
When I'm working on 3D implementations, my process is different. Let me show you how to implement a first-person camera that allows the player to look around using the mouse.
Unity Editor Setup:
- A 'Player' GameObject with a
CharacterControllercomponent. - The 'Main Camera' GameObject should be a child of the 'Player' GameObject, positioned at eye level.
Step-by-Step Code Implementation:
1. Create a new C# script called MouseLook and attach it to the 'Main Camera'.
2. Declare variables for mouse sensitivity and a reference to the player's Transform.
using UnityEngine;

public class MouseLook : MonoBehaviour
{
    public float mouseSensitivity = 100f;
    public Transform playerBody;
    private float xRotation = 0f;
}
3. In the Start method, lock the cursor to the center of the screen.
void Start()
{
    Cursor.lockState = CursorLockMode.Locked;
}
4. In Update, get the mouse input and calculate the rotation.
void Update()
{
    float mouseX = Input.GetAxis("Mouse X") * mouseSensitivity * Time.deltaTime;
    float mouseY = Input.GetAxis("Mouse Y") * mouseSensitivity * Time.deltaTime;

    // Rotate the player body left and right
    playerBody.Rotate(Vector3.up * mouseX);

    // Rotate the camera up and down
    xRotation -= mouseY;
    xRotation = Mathf.Clamp(xRotation, -90f, 90f); // Clamp the rotation to prevent flipping
    transform.localRotation = Quaternion.Euler(xRotation, 0f, 0f);
}
Verified: Unity Docs - Input.GetAxis
Blueprint 3: Top-Down RTS Camera
For strategy games, here's my go-to setup - a camera for a real-time strategy game that can be moved around the map with the keyboard and zoomed with the mouse wheel.
Unity Editor Setup:
- A 'Main Camera' GameObject positioned high above the scene, pointing downwards at an angle.
Step-by-Step Code Implementation:
1. Create a new C# script called RTSCamera and attach it to the 'Main Camera'.
2. Declare variables for movement speed and zoom speed.
using UnityEngine;

public class RTSCamera : MonoBehaviour
{
    public float moveSpeed = 20f;
    public float zoomSpeed = 10f;
    public float minZoom = 5f;
    public float maxZoom = 80f;
}
3. In Update, handle the keyboard input for movement.
void Update()
{
    // Keyboard movement
    float horizontal = Input.GetAxis("Horizontal");
    float vertical = Input.GetAxis("Vertical");

    Vector3 move = new Vector3(horizontal, 0, vertical) * moveSpeed * Time.deltaTime;
    transform.Translate(move, Space.World);
}
4. In the same Update method, handle the mouse scroll wheel input for zooming. For a perspective camera, we'll adjust the FOV. For an orthographic camera, we'll adjust the orthographicSize.
void Update()
{
    // ... (previous movement code)

    // Mouse zoom
    float scroll = Input.GetAxis("Mouse ScrollWheel");

    Camera cam = GetComponent<Camera>();
    if (cam.orthographic)
    {
        cam.orthographicSize -= scroll * zoomSpeed;
        cam.orthographicSize = Mathf.Clamp(cam.orthographicSize, minZoom, maxZoom);
    }
    else
    {
        cam.fieldOfView -= scroll * zoomSpeed;
        cam.fieldOfView = Mathf.Clamp(cam.fieldOfView, minZoom, maxZoom);
    }
}
Verified: Unity Docs - Input.GetAxis
Your Next Move as a Developer
After working on multiple Unity projects throughout my career, I've learned that mastering camera movement gives you the foundation to create truly engaging player experiences. Start with the 2D follow camera if you're building a platformer, or jump into the first-person setup for an exploration game.
The key is to practice these implementations, experiment with the smoothing values, and see how different settings affect the feel of your game. Each project will teach you something new about camera behavior and player psychology.
Don't be afraid to mix and match techniques - some of my best camera systems combine elements from multiple approaches, adapted to fit the specific needs of the game I'm building.
Wrapping Up: From Confusion to Confidence
Camera movement in Unity doesn't have to be the stumbling block that derails your game development journey. With the systematic approaches I've shared, you can transform your player's experience from frustrating camera battles to smooth, cinematic gameplay.
Remember, every professional game developer started exactly where you are now - wrestling with cameras that wouldn't cooperate. The difference is having a clear roadmap and proven techniques that actually work in real projects.
Your players will notice the difference immediately when you implement proper camera movement. They won't consciously think "wow, great camera work," but they'll feel more immersed, less frustrated, and more engaged with your game world.
Key Takeaways
- Cache your camera references using
Camera.mainin the Start method to avoid performance issues from repeated lookups - Use
LateUpdatefor follow cameras to ensure smooth movement after player position updates are complete - Choose between direct transform movement for snappy, arcade-style games and Vector3.Lerp for smooth, cinematic camera motion
- Implement culling masks when using multiple cameras to optimize performance by rendering only necessary objects
- Study successful games like Super Mario 64, Resident Evil, and Firewatch to understand how different camera approaches create specific player experiences
- Start with 2D follow cameras for platformers, first-person mouse look for exploration games, and top-down RTS cameras for strategy games
- FOV (Field of View) manipulation creates effective zoom effects and can convey speed or tension in your game
- Orthographic projection works best for 2D games while perspective projection creates depth and realism in 3D environments
Common Questions
Camera.main is Unity's built-in method to find the GameObject tagged "MainCamera" in your scene. Use it once in the Start method to cache a reference rather than calling it repeatedly, as frequent calls can impact performance.
Use Vector3.Lerp in the LateUpdate method to interpolate between the camera's current position and the desired position. The third parameter controls smoothing speed - values between 0.1-0.2 typically work well for most games.
Use perspective projection for 3D games where you want depth and realistic scaling - objects appear smaller with distance. Use orthographic projection for 2D games or top-down views where you want consistent object sizes regardless of distance.
Camera jitter usually happens when you update camera position in Update instead of LateUpdate. Use LateUpdate to ensure the camera moves after all player movement calculations are complete.
Attach the camera to a player GameObject, use Input.GetAxis for mouse input, rotate the player body horizontally and camera vertically, and clamp vertical rotation between -90 and 90 degrees to prevent flipping.
Direct transform movement gives instant, snappy camera updates ideal for arcade games. Vector3.Lerp creates smooth interpolation between positions, perfect for cinematic or follow cameras that need fluid motion.
Use culling masks to ensure each camera only renders what it needs. Set your main camera to exclude UI layers and your UI camera to only render UI elements using LayerMask.NameToLayer.
FOV controls the camera's viewing angle in degrees. Lower values create zoom-in effects, higher values zoom out. Modify cam.fieldOfView at runtime to create dynamic zoom effects or convey speed changes.
Use Input.GetAxis for WASD movement in the XZ plane, Input.GetAxis("Mouse ScrollWheel") for zooming, and adjust either fieldOfView for perspective cameras or orthographicSize for orthographic cameras.
Calling Camera.main multiple times per frame searches through all GameObjects to find the MainCamera tag, which is inefficient. Cache the reference once in Start and reuse it for better performance.
Implement collision detection by casting rays from the target to the camera position, and move the camera closer when obstacles are detected. Alternatively, use Unity's built-in Cinemachine package for advanced collision handling.
Use a smooth follow camera that tracks the player on X and Y axes while keeping the Z position fixed. Implement dead zones where the camera doesn't move until the player reaches the edge of the frame for more stable movement.