The Complete Guide to Creating Stunning Environments in Unreal Engine 5: From Concept to Code
Discover the art and science of world-building in UE5, from foundational concepts like Nanite and Lumen to a step-by-step walkthrough for creating your first interactive landscape.
Here's the thing - when I first started working with environments in game development, I thought it was just about dropping some trees and rocks into a scene and calling it done. Boy, was I wrong. After years of building everything from mobile game backgrounds at KIXEYE to teaching environment creation at Carnegie Mellon, I've learned that environment creation is actually one of the most complex and rewarding aspects of game development. It's where art meets technology, where your creativity directly impacts how players feel when they step into your world.
Today, I'm going to walk you through everything I wish someone had explained to me when I was starting out with Unreal Engine 5 environment creation. We'll cover the fundamentals, dive into the technical implementation, and I'll share the exact processes I use in my own projects.
Table of Contents
- What Environment Creation Really Means in Game Development
- The Foundation: Understanding UE5's Core Environment Systems
- Your Digital Toolkit: Essential Terms Every Environment Artist Needs
- Nanite vs Traditional Meshes: When I Use Each Approach
- Lighting Your World: My Lumen Implementation Strategy
- Building Terrain That Tells a Story
- Real Games, Real Solutions: How Industry Leaders Handle Environment Creation
- Your First Environment: A Complete Walkthrough
- The Performance Balance: What I've Learned About Optimization
What Environment Creation Really Means in Game Development
Let me start with something that took me months to figure out when I was getting into environment art. Creating an environment in Unreal Engine 5 isn't just about making pretty pictures - it's about world-building. You're crafting the digital space where your game's story unfolds, solving the fundamental problem of needing a believable, immersive, and interactive stage for gameplay.
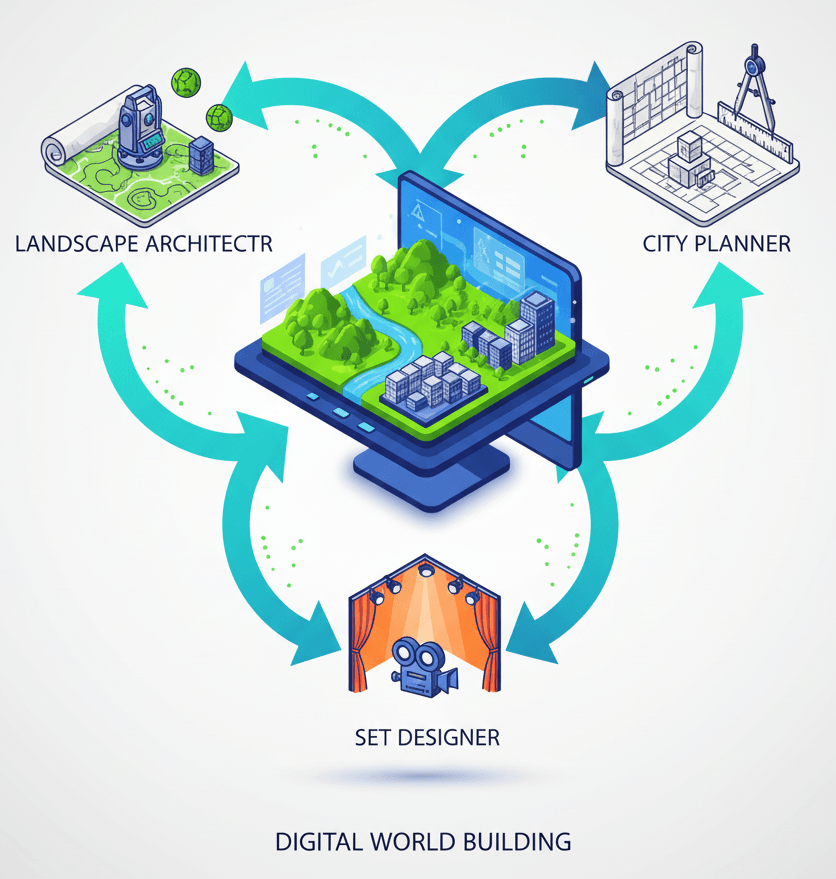
Think of it this way: you're being a combination of a landscape architect, a city planner, and a set designer for a movie, but for a digital world. You're not just placing objects randomly; you're sculpting terrain, painting textures, controlling light, and setting a mood to evoke specific feelings and guide the player's experience.
From my experience working on various game projects, I can tell you that the environment is often what makes or breaks player immersion. A well-crafted environment draws players in and makes the game world feel real and engaging. It guides players naturally through levels using lighting, composition, and pathways. Most importantly, it sets the mood and tone - establishing whether you're building a dark, scary horror game or a bright, cheerful adventure.
The environment itself can become a core part of the gameplay, with features like climbable ledges, destructible objects, and interactive elements that directly impact how players experience your game.
The Foundation: Understanding UE5's Core Environment Systems
After working with multiple versions of Unreal Engine, I can confidently say that UE5 represents a massive leap forward in environment creation capabilities. Here's what you need to understand about the core systems:
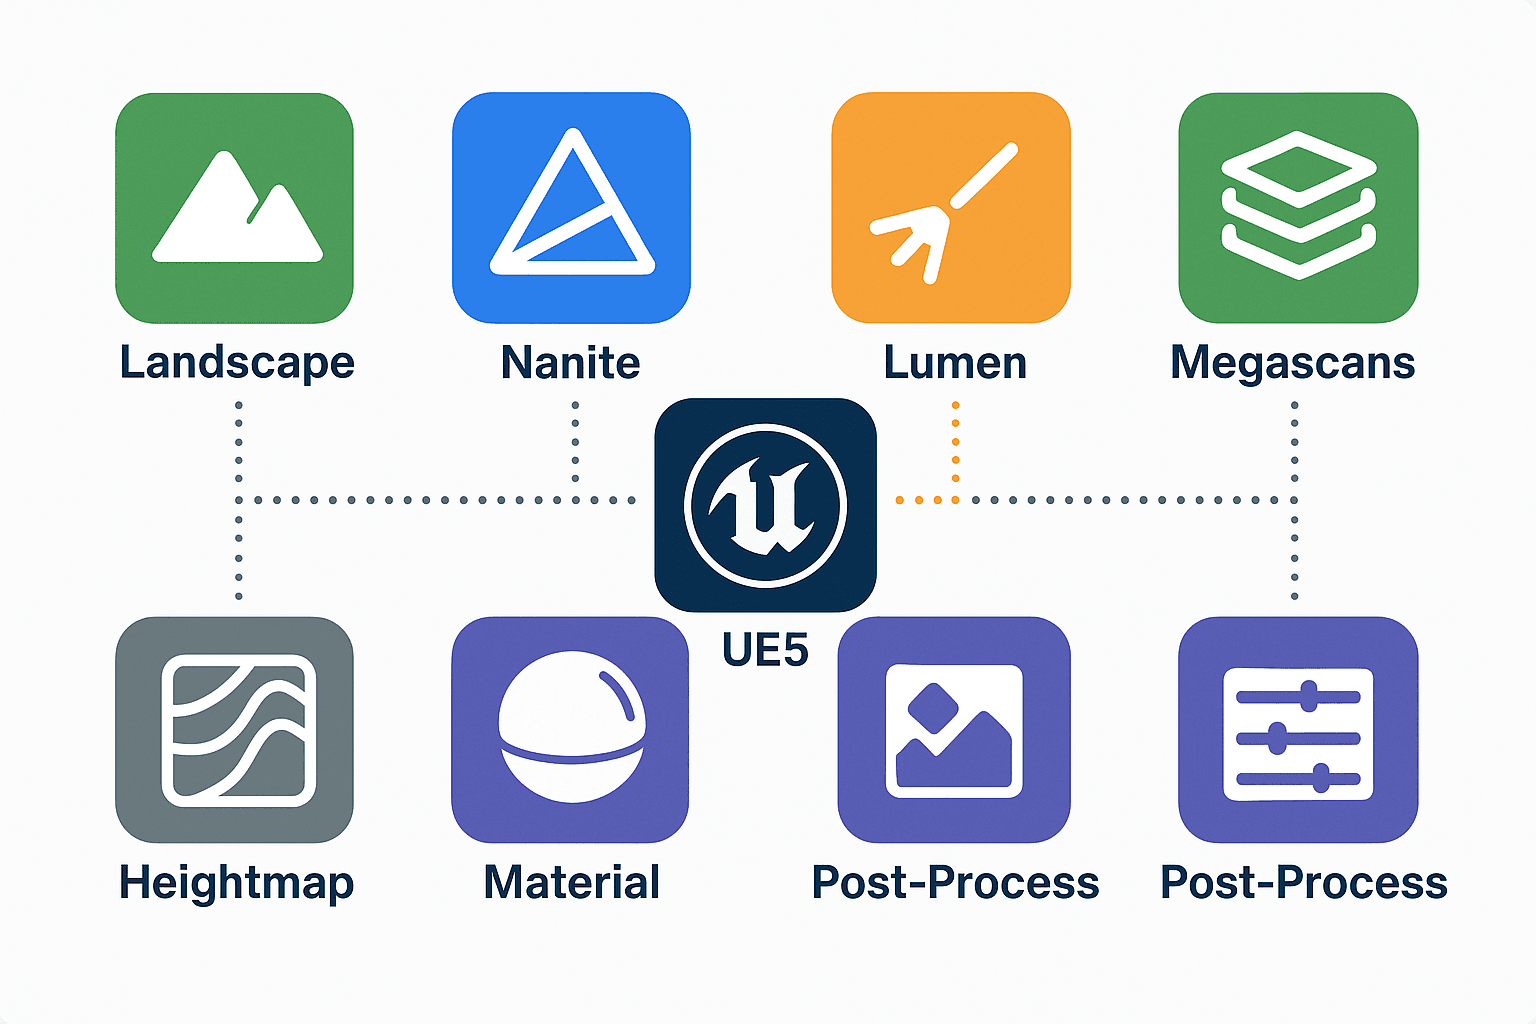
Landscape is the foundational terrain system in Unreal Engine that you can sculpt and paint to create hills, valleys, mountains, and other large-scale ground features for your world. I use this as the starting point for almost every environment I create.
Nanite is a virtualized geometry system that allows for the use of incredibly high-polygon models without the traditional performance cost, enabling cinematic-quality assets to be rendered in real-time. This was a game-changer when it was introduced - suddenly we could use movie-quality assets in real-time games.
Lumen is Unreal Engine's fully dynamic global illumination and reflections system that provides realistic lighting that adapts to changes in the scene, eliminating the need for pre-baked lighting. Trust me, once you start using Lumen, you'll never want to go back to traditional lighting workflows.
Your Digital Toolkit: Essential Terms Every Environment Artist Needs
When I first started, the terminology was overwhelming. Here are the key terms you absolutely need to know, explained the way I wish someone had explained them to me:
Quixel Megascans - A massive library of high-quality, photorealistic 3D assets, surfaces, and vegetation that can be used to populate and detail your environments quickly. I use Megascans in almost every project because the quality is incredible and it saves hours of modeling time.
Post-Process Volume - A tool that allows for grading and adjustments to the entire scene's visual output, controlling effects like color, exposure, and bloom to set the final mood. Think of this as Instagram filters for your entire game world.
Heightmap - A grayscale image used to generate terrain, where white represents the highest points and black represents the lowest, allowing for the import of pre-made landscape data. This is incredibly useful when you want to create realistic terrain based on real-world topography.
Material - An asset that defines the appearance of a surface, controlling its color, texture, roughness, and other physical properties, which is then applied to objects and landscapes. Materials are what make your surfaces look like wood, metal, fabric, or any other real-world material.
Nanite vs Traditional Meshes: When I Use Each Approach
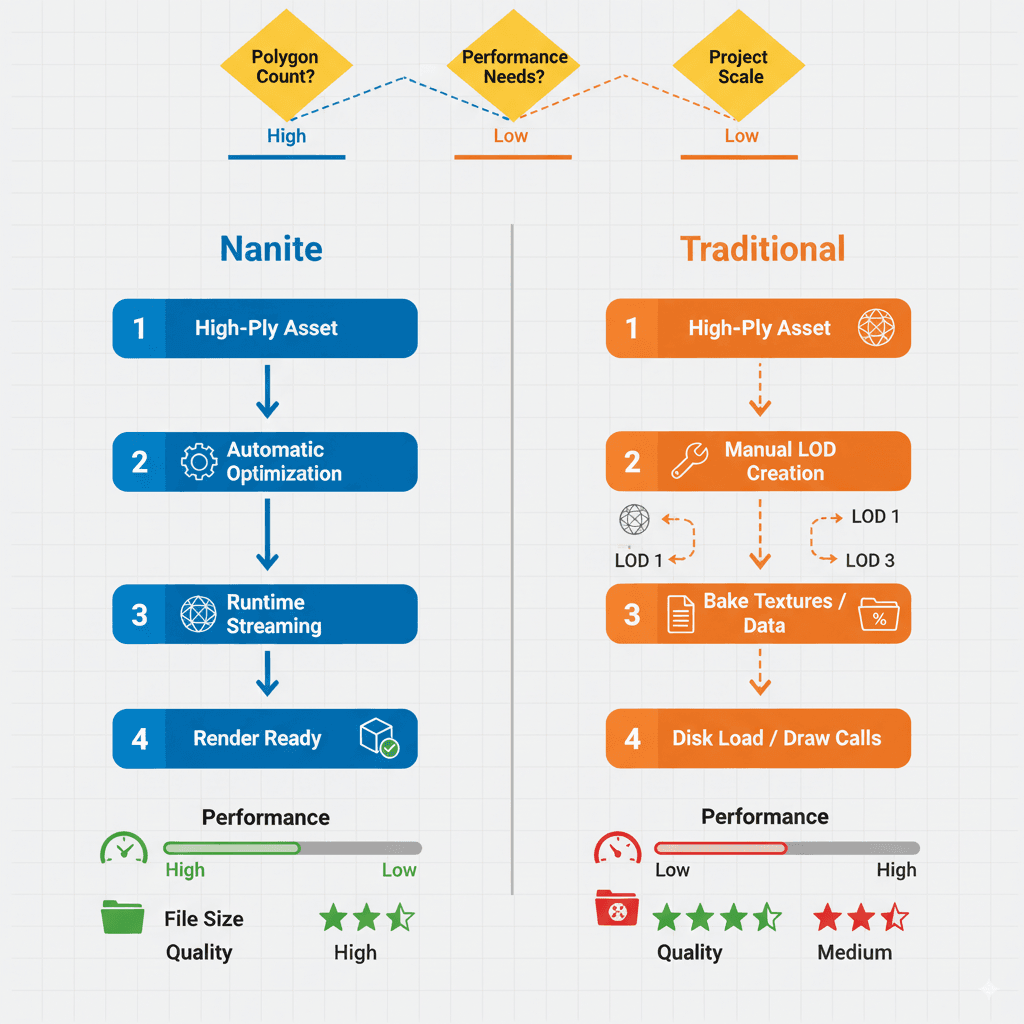
Here's something I learned the hard way during my early UE5 projects - not every situation calls for Nanite, even though it's tempting to use it everywhere. Let me break down when I use each approach:
| Criteria | Approach A: Manual Sculpting | Approach B: Using Heightmaps |
|---|---|---|
| Best For | Highly artistic and specific terrain features, smaller landscapes, or when you need precise control over the shape. | Creating large, realistic landscapes based on real-world data or generated from external tools like World Machine or Gaea. |
| Performance | Performance is dependent on the complexity and resolution of the landscape you create. | Can be more performant for very large worlds if the heightmap is well-optimized. |
| Complexity | Requires artistic skill and can be time-consuming to create large, detailed landscapes. | Requires knowledge of external software to create the heightmap, but can be faster for generating large terrains. |
| Code Example | // N/A - This is a manual process in the editor. |
// N/A - This is a file import process in the editor. |
For Manual Sculpting, I typically use this approach when I'm working on smaller, more artistic environments where I need complete creative control. It's perfect for stylized games or when you need very specific terrain features that can't be easily generated.
For Heightmap-based approaches, I lean toward this when creating large, realistic open worlds. The key is having good source data - either from real-world elevation maps or tools like World Machine.
Lighting Your World: My Lumen Implementation Strategy
One of the biggest advantages of UE5 is Lumen's dynamic lighting system. Based on my experience implementing Lumen in multiple projects, here's how I approach it:
Lumen provides realistic lighting out-of-the-box. You can enable it in your project settings and then add lights like a Directional Light (for the sun) and a Skylight to illuminate your scene. The beauty of Lumen is that it adapts to changes in real-time, so you can move objects around and the lighting automatically adjusts.
Here's what I've found works best: start with basic lighting setup using a Directional Light for your primary light source, add a Skylight for ambient lighting, and then use Lumen's settings to fine-tune the quality versus performance balance for your specific project needs.
Building Terrain That Tells a Story
Creating a landscape is where the magic really happens. The first step in many environments is generating the terrain through the Landscape tool, which can create a new landscape from scratch or import a heightmap. I always recommend starting with basic shapes and then refining them as you develop your vision.
Once a landscape is created, you use brushes to modify its shape and apply materials. This is a highly artistic process to create natural-looking environments. The key thing I've learned is that good terrain tells a story - it shows how water flows, where people might walk, and what natural forces have shaped the land over time.
For sculpting and painting terrain, the process is all about layering. Start with broad strokes to establish the major forms, then gradually add detail. Use reference images constantly - I can't stress this enough. Real-world reference will make your environments feel authentic in ways that purely imaginative work often can't achieve.
Real Games, Real Solutions: How Industry Leaders Handle Environment Creation
Let me share some examples that have really influenced my approach to environment creation. I've studied dozens of games over the years, and these implementations stand out:
The Witcher 3: Wild Hunt showcases vast, sprawling open worlds with varied landscapes, from dense forests to snowy mountains. What I find fascinating about this approach is how they likely use a combination of heightmap generation for the large-scale terrain and manual sculpting for specific areas and points of interest. The player feels like they are exploring a massive, living world with a rich history and diverse ecosystems.
The Last of Us Part II demonstrates highly detailed and realistic post-apocalyptic environments with dense foliage and detailed interiors. From a developer's perspective, what makes this brilliant is their extensive use of high-quality assets (similar to Megascans) and detailed lighting to create a believable and oppressive atmosphere. The environment enhances the feeling of desperation and survival, making the world feel dangerous and lived-in.
Cyberpunk 2077 presents a dense, vertical, and highly detailed futuristic city with complex architecture and lighting. After analyzing this game's approach, what stands out is their heavy reliance on modular assets to construct the massive city, combined with advanced lighting and reflection techniques to create the neon-drenched look. The player is immersed in a bustling, overwhelming, and visually stunning cyberpunk world.
Your First Environment: A Complete Walkthrough
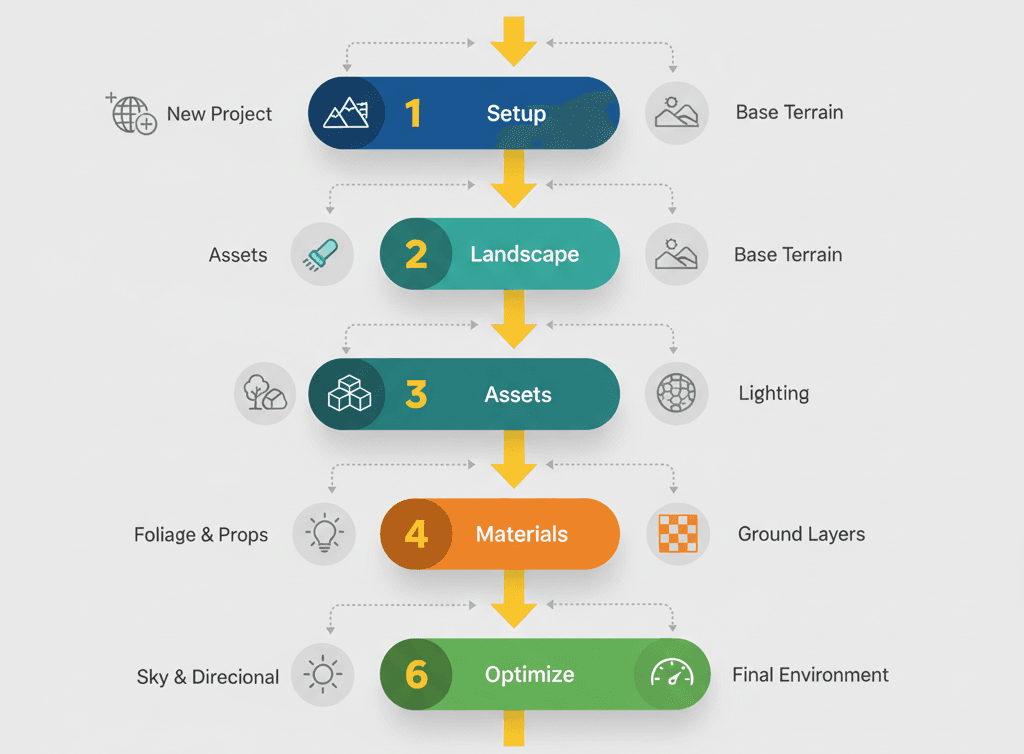
Let me show you how I approach creating a basic environment from start to finish. I've used this exact method in dozens of projects, and it's the same process I teach to new developers:
Creating Your Foundation Landscape
Here's the exact method I use when starting any new environment project. In the Select Mode dropdown, choose Landscape. In the Landscape panel, keep the default settings and click Create. This gives you a basic flat terrain to work with.
Switch to the Sculpt tool. Left-click and drag on the landscape to create a hill. Hold Shift and left-click to lower the terrain. I always start with broad shapes - don't worry about details yet.
Create a new Material asset. Open it and create a simple material with a Vector3 node connected to Base Color to give your landscape a color. In the Landscape panel, switch to the Paint tool and assign your new material to the landscape.
Bringing in High-Quality Assets
This is where Quixel Megascans becomes invaluable. Open the Quixel Bridge from the Window menu. Browse to a rock asset you like and download it. Once downloaded, click Add to import it into your project.
The asset will appear in your Content Browser. Drag and drop it into your scene to place it. Notice that the asset has Nanite enabled by default, allowing for high detail without performance loss. This is exactly the workflow I use in professional projects.
Adding Dynamic Lighting
For basic lighting setup, I always start with these components. Create a new Blueprint Actor called DayNightCycle. In the Event Graph, add a reference to your Directional Light.
On the Event Tick node, add an Add Actor Local Rotation node. Connect the Directional Light reference to the Target. Set the Delta Rotation to a small value on the Pitch axis (e.g., 0.1). This will rotate the sun over time.
Place the DayNightCycle Blueprint in your scene. Make sure your Sky Light is set to Movable to update with the changing light.
Here's the C++ equivalent if you prefer coding:
// C++ equivalent for rotating the sun in a DayNightCycle actor's Tick function
#include "GameFramework/Actor.h"
#include "Engine/DirectionalLight.h"
#include "DayNightCycle.generated.h"

UCLASS()
class MYPROJECT_API ADayNightCycle : public AActor
{
    GENERATED_BODY()

public:
    ADayNightCycle();

protected:
    virtual void BeginPlay() override;

public:
    virtual void Tick(float DeltaTime) override;

UPROPERTY(EditAnywhere, Category = "Day/Night")
    ADirectionalLight* SunLight;

UPROPERTY(EditAnywhere, Category = "Day/Night")
    float RotationSpeed = 10.0f;
};

ADayNightCycle::ADayNightCycle()
{
    PrimaryActorTick.bCanEverTick = true;
}

void ADayNightCycle::BeginPlay()
{
    Super::BeginPlay();
}

void ADayNightCycle::Tick(float DeltaTime)
{
    Super::Tick(DeltaTime);

    if (SunLight)
    {
        SunLight->AddActorLocalRotation(FRotator(RotationSpeed * DeltaTime, 0.0f, 0.0f));
    }
}
This code creates a simple day/night cycle by continuously rotating your directional light (sun) over time.
The Performance Balance: What I've Learned About Optimization
After working on multiple shipped games, I've learned that optimization isn't something you do at the end - it's something you think about from the beginning. Here are the key practices I always follow:
Always use reference images to guide the artistic direction of your environment. I maintain a reference board for every project, and I refer to it constantly throughout development.
Blockout your scene first before adding details. I learned this lesson the hard way - it's much easier to establish composition and scale with simple geometric shapes than to try to fix these issues later when you have detailed assets everywhere.
Use modular assets wherever possible. Create and use modular assets (like wall sections, pipes, and railings) that can be snapped together to build complex structures efficiently. This approach saves enormous amounts of time and keeps your project organized.
For landscape materials, optimize early and often. Use material functions and layer blending to create complex and optimized landscape materials that are performant. The Epic Games documentation on creating landscape materials has been incredibly helpful for understanding the technical aspects of this process.
Ready to Start Building Your First Game?
Now that you understand how to create stunning environments in Unreal Engine 5, you're ready to put this knowledge into practice. But here's what I've learned after years of teaching game development - knowing the theory is just the first step.
The real learning happens when you start building actual games and solving real problems. That's exactly what we focus on in our comprehensive game development course. You'll go from understanding these concepts to actually implementing them in complete, playable games.
Whether you're looking to break into the game industry or just want to bring your creative ideas to life, our step-by-step course will take you from beginner to building professional-quality game experiences.
Key Takeaways
- Environment creation in Unreal Engine 5 is about world-building, combining landscape architecture, city planning, and set design for digital worlds
- Nanite enables cinematic-quality, high-polygon models in real-time without traditional performance costs
- Lumen provides fully dynamic global illumination that eliminates the need for pre-baked lighting
- Landscape tools allow you to sculpt and paint terrain to create realistic ground features and natural environments
- Quixel Megascans provides photorealistic 3D assets that can dramatically speed up your environment creation workflow
- Manual sculpting works best for artistic, specific terrain features, while heightmaps are ideal for large, realistic landscapes
- Reference images and blockouts are essential for establishing strong composition and artistic direction
- Modular assets and optimized materials are crucial for both efficiency and performance in environment creation
Common Questions
What is Nanite and why should I use it?
Nanite is UE5's virtualized geometry system that allows you to use incredibly high-polygon models without the traditional performance cost. You should use it when you want cinematic-quality assets rendered in real-time without worrying about creating multiple Levels of Detail (LODs).
How do I create a landscape in Unreal Engine 5?
Use the Landscape tool from the Select Mode dropdown. You can either create a new landscape from scratch with default settings or import a heightmap for more complex terrain based on real-world or generated data.
What is Lumen and how does it improve lighting?
Lumen is UE5's fully dynamic global illumination and reflections system. It provides realistic lighting that automatically adapts to scene changes, eliminating the need for time-consuming pre-baked lighting workflows.
When should I use manual sculpting versus heightmaps for terrain creation?
Use manual sculpting for highly artistic and specific terrain features, smaller landscapes, or when you need precise creative control. Use heightmaps for creating large, realistic landscapes based on real-world data or when working with external terrain generation tools.
What are Quixel Megascans and how do they help with environment creation?
Quixel Megascans is a massive library of high-quality, photorealistic 3D assets, surfaces, and vegetation. They help by providing ready-to-use, professional-quality assets that can dramatically speed up your environment creation workflow.
How do I optimize landscape materials for better performance?
Use material functions and layer blending to create complex but performant landscape materials. Focus on reducing texture samples and using efficient blending techniques as outlined in Epic's landscape materials documentation.
What is a Post-Process Volume and when should I use it?
A Post-Process Volume allows you to adjust your scene's visual output, controlling effects like color, exposure, and bloom. Use it to set the final mood and visual style of your environment, essentially like applying filters to your entire game world.
How do I implement a day/night cycle in my environment?
Create a Blueprint Actor that rotates your Directional Light (sun) over time using the Add Actor Local Rotation node. Set your Sky Light to Movable so it updates with the changing light direction.