What is GameLoop and How It Powers Every Unity Game You've Ever Played
Discover the invisible engine that breathes life into every game you've ever played and learn how to master Unity's event functions for professional results.

Here's the thing - I remember staring at my first Unity project at Carnegie Mellon, watching a cube just sit there doing absolutely nothing. I'd written what I thought was movement code, but the cube remained frozen like it was mocking me. The problem wasn't my code logic; it was that I had no clue how Unity actually runs that code behind the scenes.
That's when I discovered the game loop - the invisible engine that breathes life into every game you've ever played. Whether it's Mario jumping with perfect consistency or your character responding instantly to keyboard input, it's all thanks to understanding what is gameloop and how Unity manages it for you. Once you grasp this concept, everything else in game development starts making sense.
Table of Contents
- Why Your Game Feels Broken Without Understanding This
- The Secret Behind Every Smooth Game Experience
- Here's What Actually Happens Every Single Frame
- The One Comparison That Changed How I Write Code
- When I Finally Understood Why This Matters So Much
- The Mistakes I Made So You Don't Have To
- How I Learned to Make Characters Move Like Professionals
- Three Projects That Will Make Everything Click
Why Your Game Feels Broken Without Understanding This
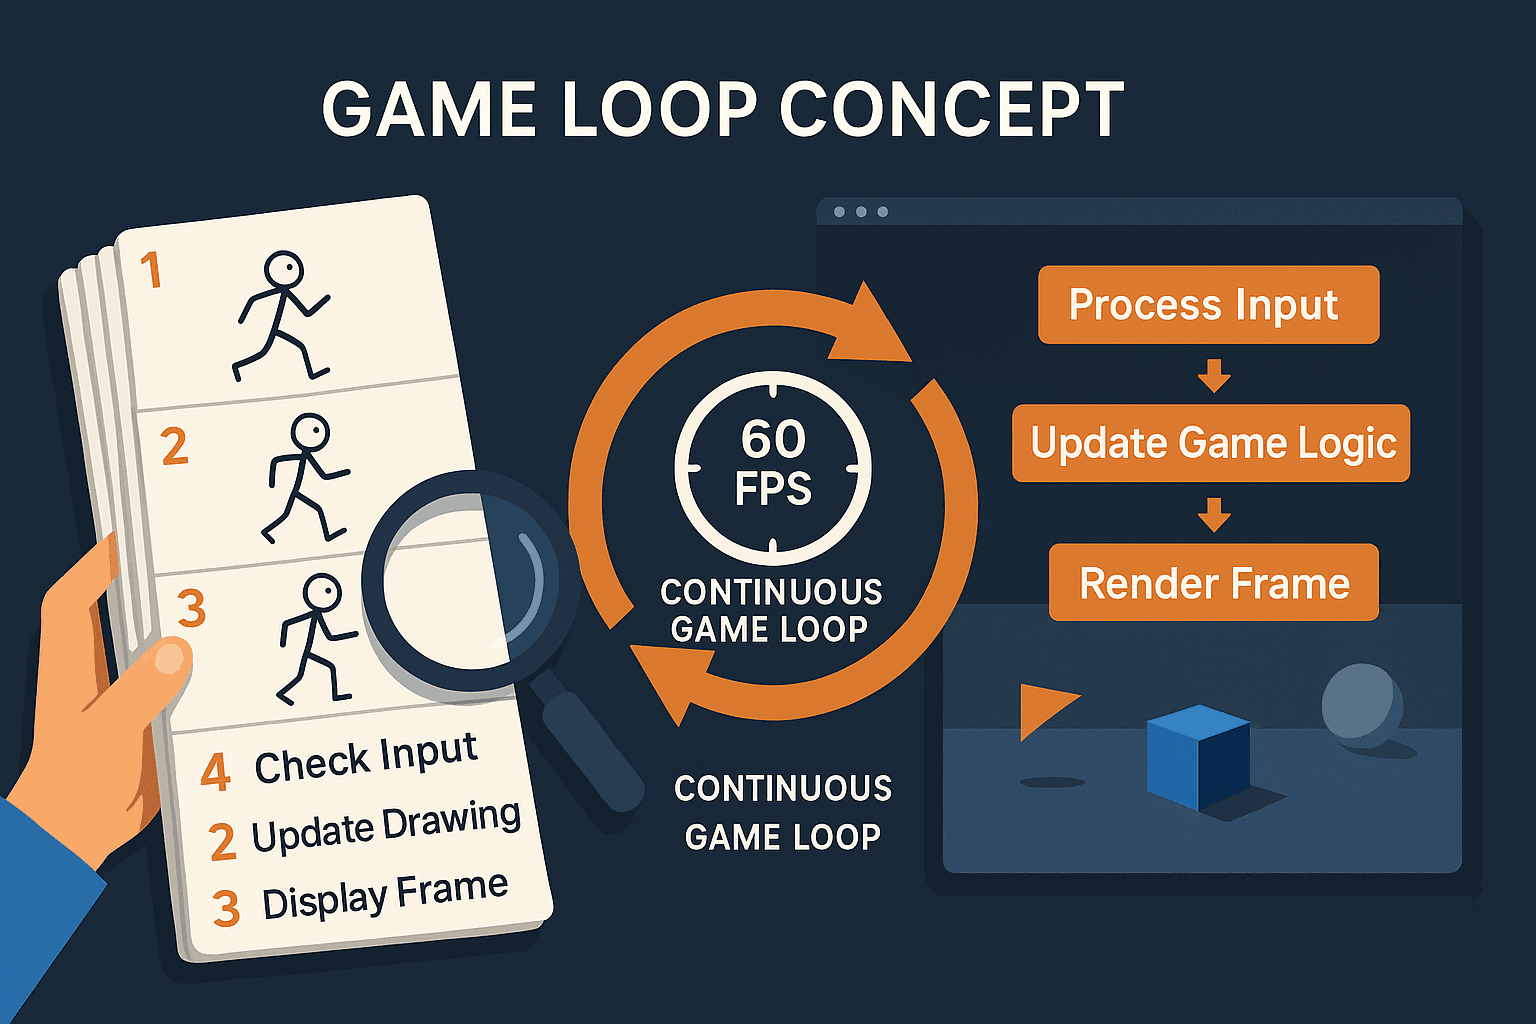
Let me tell you what the game loop actually is, because when I started at CMU, nobody explained it in terms that made sense. Think of it like a flipbook - you know, those little books where you flip pages really fast and a stick figure appears to run? Each page is a "frame" where you check if someone turned the page (that's input), update the drawing slightly (that's game logic), and then show it (that's rendering). When you flip through all the pages rapidly, you get smooth motion.
The game loop is exactly that process, but happening automatically in your Unity game. It's the invisible engine at the heart of every Unity game, running continuously from the moment a scene loads until it closes. It solves the fundamental problem of creating motion and interactivity in a program that would otherwise be static. The gameloop in unity allows you to create dynamic worlds by repeatedly processing player input, updating game logic and physics, and rendering everything to the screen frame by frame.
Without understanding this, you'll write code that feels laggy on some computers, physics that behave differently depending on frame rate, and characters that move in jerky, unpredictable ways. Been there, trust me.
The Secret Behind Every Smooth Game Experience
Here's where Unity becomes brilliant - it takes the raw complexity of managing a game loop and gives you simple "event functions" that you can hook into. Understanding the order and purpose of these events is the key to writing effective Unity code.
Let me break down the terminology that confused me for months:
- Game Loop: The core cycle that every game runs on. In each cycle, it processes events, updates the game state, and renders a frame. Unity manages this loop for you.
- MonoBehaviour: The base class from which every Unity script derives. To use Unity's event functions like
Start()orUpdate(), your script must inherit from MonoBehaviour. - Event Functions: Special methods that Unity automatically calls at specific points during the game loop. You don't call these functions yourself; you simply define them in your script to "hook into" the loop.
The main event functions you need to master are:
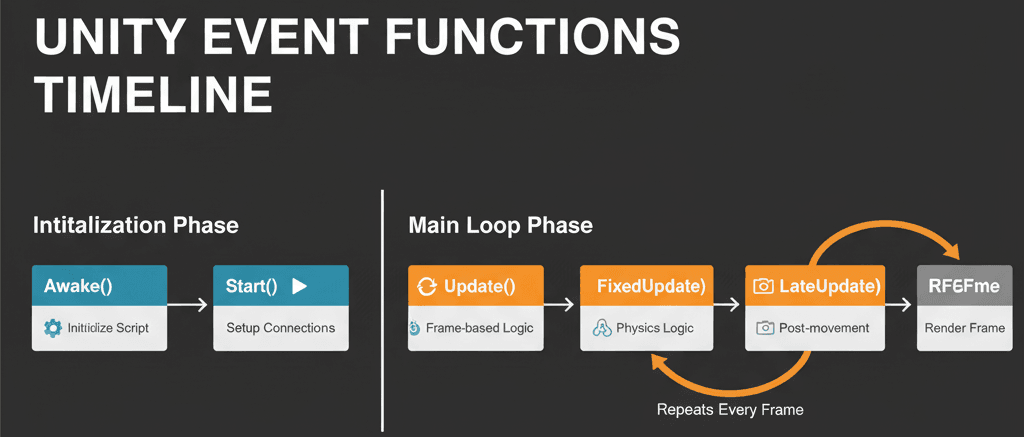
Awake(): This function is called only once in the lifetime of a script instance, right after the object is loaded into the scene. It is used for initializing the script itself before any other objects are guaranteed to be ready.Start(): This function is called once in the lifetime of a script instance, but afterAwake()and before the firstUpdate(). It is ideal for creating connections and references between different scripts and GameObjects.Update(): This function is called once every frame. The time between calls can vary depending on the frame rate, so it is best for handling input, simple timers, and non-physics-based movement.FixedUpdate(): This function is called at a consistent, fixed time interval, completely independent of the frame rate. It is the only place you should handle physics-based logic, such as applying forces to a Rigidbody, to ensure consistent and predictable results.LateUpdate(): This function is called once every frame, but after allUpdate()functions have been completed. It is most commonly used for camera controllers, ensuring the camera tracks an object that has already finished moving for the frame.
Here's What Actually Happens Every Single Frame
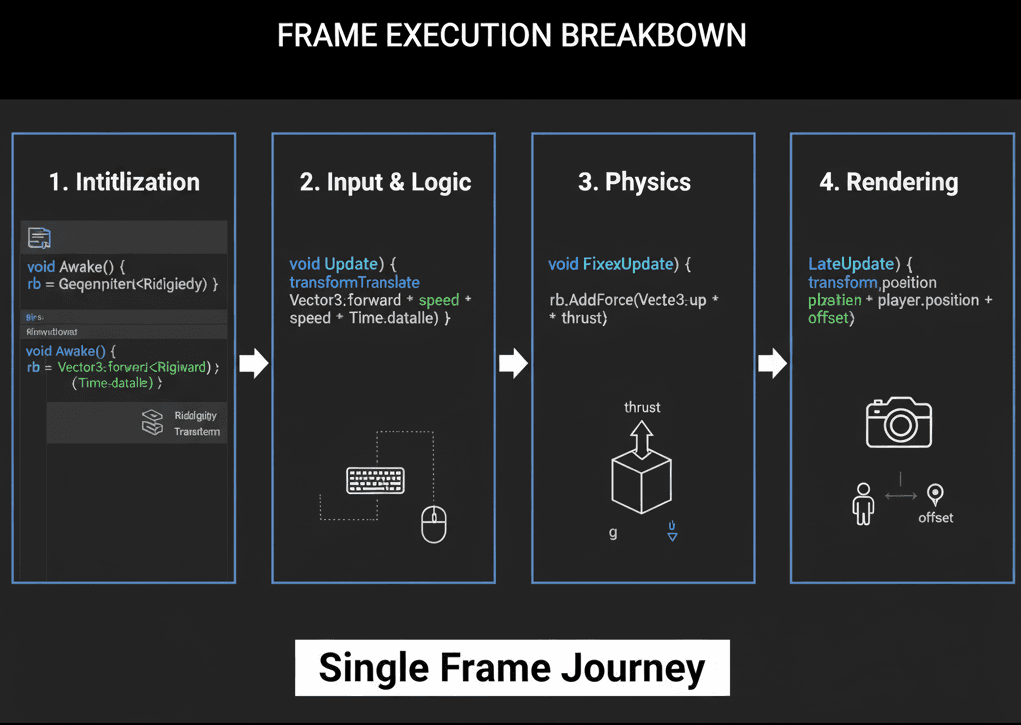
When I finally understood the actual sequence of events, everything clicked. Let me walk you through what Unity does behind the scenes:
The Initialization Phase (Awake and Start)
Unity begins by initializing your objects. Awake is called first, making it perfect for setting up internal references within a script.
// Use Awake() to get a reference to a component on the same GameObject.
private Rigidbody rb;

void Awake()
{
    rb = GetComponent<Rigidbody>();
}
The Main Update Phase (Update)
This is where most of your game logic will go. Since it's tied to the frame rate, you should always use Time.deltaTime to make movement and other actions smooth and frame-rate independent.
// Move an object forward smoothly, regardless of the frame rate.
public float speed = 10.0f;

void Update()
{
    transform.Translate(Vector3.forward * speed * Time.deltaTime);
}
The Physics Phase (FixedUpdate)
Unity's physics engine runs on its own fixed timetable. All interactions with Rigidbodies should happen here to ensure stability.
// Apply a constant upward force to a Rigidbody in FixedUpdate.
public float thrust = 20.0f;
private Rigidbody rb;

void Start()
{
    rb = GetComponent<Rigidbody>();
}

void FixedUpdate()
{
    rb.AddForce(Vector3.up * thrust);
}
The Post-Update Phase (LateUpdate)
This is your last chance to modify things before the frame is rendered. It's perfect for logic that needs to happen *after* everything else has moved.
According to Unity's official documentation on Order of Execution for Event Functions, this sequence is guaranteed and critical for proper game behavior.
// A simple camera follow script using LateUpdate to avoid jitter.
public Transform player;
private Vector3 offset;

void Start()
{
    offset = transform.position - player.position;
}

void LateUpdate()
{
    transform.position = player.position + offset;
}
The One Comparison That Changed How I Write Code
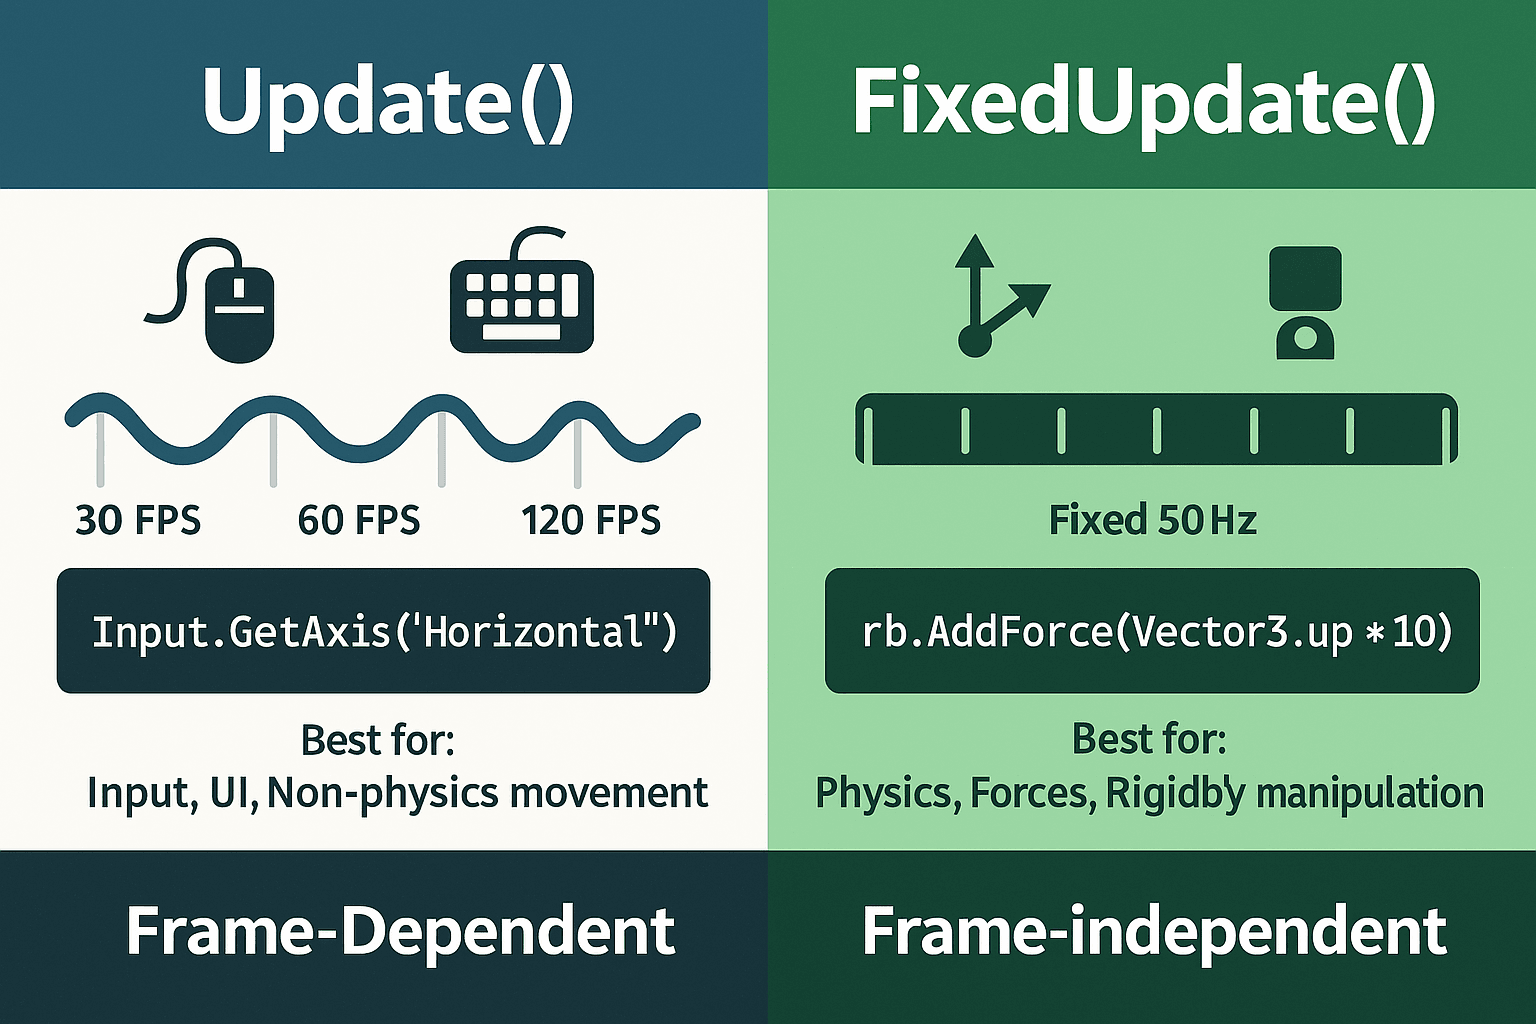
At KIXEYE, I spent weeks debugging why my character movement felt different on different devices. Turns out, I was using the wrong update function. Here's the comparison that would have saved me those sleepless nights:
| Criteria | Approach A: Update() |
Approach B: FixedUpdate() |
|---|---|---|
| Best For | Reading player input, handling timers, and managing game logic that is not physics-dependent. | Applying forces, setting velocities, or any manipulation of a Rigidbody component. |
| Performance | Called once per frame. Can be called many times on high-end machines or fewer times on low-end ones. | Called on a fixed timer (default is 50 times per second). Unaffected by visual frame rate. |
| Complexity | Simple to use, but requires Time.deltaTime for frame-rate independent movement. |
The only correct choice for physics, but should not be used for input as it can miss key presses. |
| Code Example | transform.position += new Vector3(1, 0, 0) * Time.deltaTime; |
rigidbody.AddForce(new Vector3(1, 0, 0)); |
When I Finally Understood Why This Matters So Much
Understanding when to create gameloop in unity events properly gives you these crucial benefits:
- Predictable Physics: Using
FixedUpdatefor physics guarantees that your game will behave consistently across all different types of hardware, which is critical for fairness and stability. - Smooth Visuals: Understanding the difference between
UpdateandLateUpdateallows you to create smooth camera movement and other visual effects that are free from jitter. - Organized Code: Following the conventions of the game loop (e.g., initialization in
Awake/Start, logic inUpdate) leads to cleaner, more maintainable, and less buggy code. - Performance Optimization: Knowing the cost of each event function helps you write more efficient code by placing logic in the most appropriate place and avoiding expensive calculations in frequently called methods like
Update.
The Mistakes I Made So You Don't Have To
Here are the practices I learned the hard way during my transition from finance to games:
Always Read Input in Update
Always check for player input in Update, as FixedUpdate can miss inputs if its fixed step is not aligned with the frame rate.
// Good: Capture input every frame so it feels responsive.
private bool jumpRequested = false;
void Update()
{
    if (Input.GetButtonDown("Jump"))
    {
        jumpRequested = true;
    }
}

void FixedUpdate()
{
    if (jumpRequested)
    {
        GetComponent<Rigidbody>().AddForce(Vector3.up * 10, ForceMode.Impulse);
        jumpRequested = false; // Reset the flag
    }
}
Cache Component References
Use Awake() or Start() to get and store references to components you will need later. Calling GetComponent() repeatedly in Update() is slow.
// Bad: GetComponent() is called every frame.
void Update() { GetComponent<Rigidbody>().velocity = Vector3.zero; }

// Good: The reference is cached once in Awake().
private Rigidbody rb;
void Awake() { rb = GetComponent<Rigidbody>(); }
void Update() { rb.velocity = Vector3.zero; }
Use OnEnable and OnDisable for Setup/Cleanup
These functions are perfect for logic that needs to run every time a GameObject is activated or deactivated, such as subscribing to events. According to Unity's MonoBehaviour.OnEnable documentation, this is the recommended approach.
How I Learned to Make Characters Move Like Professionals
Let me share how I've seen these concepts brilliantly implemented in games you probably know:
What I Find Fascinating About Super Mario Odyssey
The Mechanic: In Super Mario Odyssey, Mario's jump height is always the same, regardless of whether the game is running at 30 or 60 FPS.
The Implementation: The jump force is applied to Mario's Rigidbody within FixedUpdate. This ensures the physics calculation is consistent and not dependent on a fluctuating frame rate.
The Player Experience: The player enjoys a reliable and predictable platforming experience, where the controls feel fair and consistent at all times.
Why Valorant Feels So Responsive
The Mechanic: In a first-person shooter like Valorant, player input for shooting is checked every single frame to ensure maximum responsiveness.
The Implementation: The code checks Input.GetMouseButtonDown(0) inside the Update() function. This guarantees that the moment the player clicks, the input is registered on that exact frame.
The Player Experience: This results in a feeling of immediate, lag-free control, which is absolutely essential for competitive, fast-paced games.
Three Projects That Will Make Everything Click
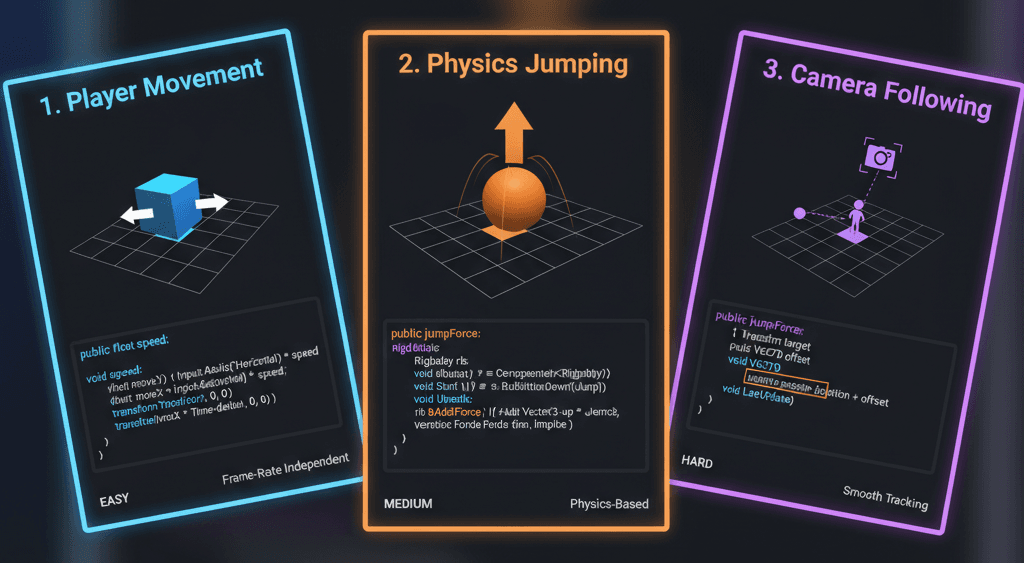
Let me walk you through three complete implementations that cover the most important gameloop in unity concepts. I use these exact examples when teaching students at Outscal.
Project 1: Frame-Rate Independent Player Movement
Scenario Goal: To move a player character left and right using keyboard input in a way that is smooth and consistent regardless of the game's frame rate.
Unity Editor Setup:
- Create a 3D Cube GameObject and name it "Player".
- Create a new C# script named
PlayerMovementand attach it to the "Player" GameObject.
Step-by-Step Code Implementation:
Define Speed and Read Input: In the Update function, we read the horizontal axis input, which returns a value between -1 and 1.
// File: PlayerMovement.cs
using UnityEngine;

public class PlayerMovement : MonoBehaviour
{
    public float speed = 5.0f;

    void Update()
    {
        // Get the horizontal input (A/D keys or left/right arrows)
        float horizontalInput = Input.GetAxis("Horizontal");

        // Calculate the movement amount for this frame
        Vector3 movement = new Vector3(horizontalInput, 0, 0) * speed * Time.deltaTime;

        // Apply the movement to the player's transform
        transform.Translate(movement);
    }
}
This approach uses Time.deltaTime to ensure smooth movement across different frame rates.
Project 2: Reliable Physics-Based Jumping
Scenario Goal: To make a character jump using physics in a way that is predictable and not affected by the frame rate.
Unity Editor Setup:
- Create a 3D Sphere GameObject named "Player".
- Add a
Rigidbodycomponent to the "Player". - Create a C# script named
PlayerJumpand attach it to the "Player".
Step-by-Step Code Implementation:
Get Input in Update: We check for the jump button press in Update for responsiveness. Apply Force in FixedUpdate: We apply the physics force in FixedUpdate for stability.
// File: PlayerJump.cs
using UnityEngine;

public class PlayerJump : MonoBehaviour
{
    public float jumpForce = 10.0f;
    private Rigidbody rb;
    private bool canJump = true;

    void Awake()
    {
        rb = GetComponent<Rigidbody>();
    }

    void Update()
    {
        // Only check for input in Update
        if (Input.GetKeyDown(KeyCode.Space) && canJump)
        {
            // Use FixedUpdate to apply the physics force
            rb.AddForce(Vector3.up * jumpForce, ForceMode.Impulse);
            canJump = false; // Prevent double-jumping in the air
        }
    }

    // Check for ground collision to reset the jump
    void OnCollisionEnter(Collision collision)
    {
        if (collision.gameObject.CompareTag("Ground"))
        {
            canJump = true;
        }
    }
}
This implementation follows Unity's Rigidbody.AddForce best practices.
Project 3: A Smooth Third-Person Follow Camera
Scenario Goal: To create a camera that smoothly follows the player without any jittering or lag.
Unity Editor Setup:
- Create a "Player" GameObject (e.g., a Cube or Sphere).
- Position the Main Camera behind and slightly above the player.
- Create a C# script named
FollowCameraand attach it to the Main Camera.
Step-by-Step Code Implementation:
Store the Offset: In Start, we calculate and store the initial distance and angle between the camera and the player. Follow in LateUpdate: In LateUpdate, we update the camera's position to match the player's new position plus the stored offset. Using LateUpdate ensures the player has finished all its movement for the frame.
// File: FollowCamera.cs
using UnityEngine;

public class FollowCamera : MonoBehaviour
{
    public Transform playerTransform;
    private Vector3 offset;

    void Start()
    {
        if (playerTransform == null) return;
        // Calculate the initial offset from the player
        offset = transform.position - playerTransform.position;
    }

    void LateUpdate()
    {
        if (playerTransform == null) return;
        // Apply the offset to the player's current position
        // This happens after the player has moved in Update()
        transform.position = playerTransform.position + offset;
    }
}
Ready to Start Building Your First Game?
Now that you understand what is gameloop and how to work with Unity's event system, you're ready to start building actual games. But here's the thing - knowing these concepts is just the beginning. The real magic happens when you start combining movement, physics, animations, and player feedback into a complete gaming experience.
That's exactly what we teach in our hands-on course Mr. Blocks. You'll go from these basic concepts to building a complete block-breaking game that feels professional and polished. We cover everything from smooth paddle movement using the techniques you just learned, to particle effects, sound integration, and proper game architecture.
The best part? You'll have a finished game for your portfolio by the end, plus the confidence to tackle more complex projects on your own.
Key Takeaways
- The game loop is Unity's invisible engine that processes input, updates logic, and renders frames continuously to create motion and interactivity in your games.
- Use
Awake()for internal script initialization,Start()for cross-object references,Update()for input and frame-dependent logic,FixedUpdate()for all physics operations, andLateUpdate()for post-movement operations like camera following. - Always multiply movement by
Time.deltaTimeinUpdate()to ensure consistent motion regardless of frame rate, but never useTime.deltaTimeinFixedUpdate()since it runs at fixed intervals. - Read player input in
Update()for maximum responsiveness, but apply physics forces inFixedUpdate()to guarantee consistent behavior across different hardware. - Cache component references in
Awake()orStart()instead of callingGetComponent()repeatedly in update functions to avoid performance issues. - Use
LateUpdate()for camera controllers and any logic that needs to execute after all other objects have finished their frame updates. - Professional games like Super Mario Odyssey and Valorant demonstrate the importance of proper gameloop implementation - consistent physics timing and responsive input handling are what separate amateur projects from polished experiences.
- Following Unity's event function conventions leads to cleaner, more maintainable code that other developers can easily understand and modify.
Common Questions
What is the difference between Awake and Start in Unity's game loop?
Awake() is called immediately when an object is loaded, before any other objects are guaranteed to be ready. Use it for internal script setup. Start() is called after all Awake() functions have completed, making it perfect for establishing connections between different GameObjects and scripts.
Why should I use Time.deltaTime in Update but not in FixedUpdate?
Time.deltaTime represents the time between frames, which varies based on frame rate. In Update(), this ensures smooth, consistent movement regardless of whether your game runs at 30 or 120 FPS. FixedUpdate() already runs at fixed intervals, so using Time.deltaTime would actually break the consistency you're trying to achieve.
When should I use FixedUpdate instead of Update for my game logic?
Use FixedUpdate() only for physics-related operations like applying forces to Rigidbodies, setting velocities, or checking physics collisions. Use Update() for everything else including input handling, UI updates, animations, and non-physics movement.
How do I prevent my player input from being missed in FixedUpdate?
Always capture input in Update() and store it in a variable, then consume that input in FixedUpdate(). This pattern ensures responsive input while maintaining consistent physics behavior across different frame rates.
What happens if I put GetComponent calls inside Update?
Calling GetComponent() in Update() creates performance problems because it searches for the component every single frame. Instead, cache the reference once in Awake() or Start() and reuse that cached reference throughout your script's lifetime.
Why does my camera movement look jittery when following a player?
This usually happens when you update the camera position in Update() at the same time the player is moving. Use LateUpdate() for camera controllers to ensure the camera moves after the player has completed all movement for that frame.
How can I make sure my game behaves the same on all devices?
The key is understanding when to use each update function. Use FixedUpdate() for physics to ensure consistent behavior regardless of device performance, and always multiply non-physics movement by Time.deltaTime in Update() to maintain frame-rate independence.
What's the correct order of execution for Unity's event functions?
Unity calls functions in this order each frame: Awake() (once), Start() (once), Update(), FixedUpdate() (multiple times if needed), LateUpdate(). Understanding this sequence helps you organize your code logic properly.
Can I call these event functions manually from my own code?
While you technically can call them manually, you shouldn't. Unity's game loop automatically calls these functions at the appropriate times. Calling them manually can lead to unpredictable behavior and breaks the intended flow of the game loop.
How do I debug issues with the game loop and event function timing?
Use Debug.Log() statements in different event functions to see their execution order and timing. You can also use Unity's Profiler to visualize when different functions are being called and how much processing time they're consuming each frame.